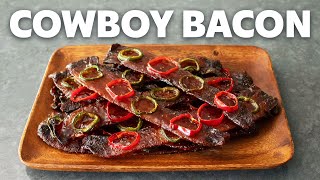

The Real History of Cowboy Bacon
53sViewers will be surprised to learn cowboy bacon has historical roots in Israel and was originally just thick-cut bacon, not candied.
▶ Play Clip"Delivers exactly what the title promises — a detailed, step-by-step recipe for spicy candied cowboy bacon."
This video from Food Wishes presents a detailed recipe for spicy candied cowboy bacon, including a historical note that cowboy bacon originally referred to thick-cut bacon. The host demonstrates how to prepare, glaze, and bake the bacon with brown sugar, barbecue sauce, and chili rings, resulting in a sweet, spicy, and fully rendered texture.
The video introduces cowboy bacon as a spicy candied meat treat. Historically, cowboy bacon was not candied and was cut extra thick because meat slicers weren't available. The host also mentions a cowboy belt buckle used for presentation.
Cover a pan with heavy-duty foil, place a baking rack on top. If no rack, use crinkled foil to allow rendered fat to drain.
Use thick-cut bacon. Lay strips on the rack, touching or slightly overlapping is fine as bacon shrinks. One pound fits on the rack.
Bake at 375°F for 10 minutes, then flip and bake another 10 minutes. This par-cooks the bacon before glazing.
Mix 1/4 cup packed brown sugar with barbecue sauce, rice vinegar, freshly ground black pepper, and garlic powder. No cayenne because chili rings will add heat.
If bacon curls, snip with scissors to relieve tension and keep it flat.
Brush glaze generously on one side. Bake for 7 minutes, flip, brush the other side, and bake another 7 minutes.
After flipping and glazing, bake for 10 minutes to caramelize. Optionally rearrange pieces for even cooking.
Brush final glaze layer, then place seeded jalapeno and Fresno chili rings on top. Bake for 10 minutes, then apply last glaze and bake until peppers are tender and bacon is browned.
Transfer bacon to parchment paper to cool to room temperature. Cut in half for manageable bites. The texture is between crispy and chewy, described as 'fantastic'.
Cut bacon strips can be placed vertically in a glass with a cowboy belt buckle for a thematic presentation.
This spicy candied cowboy bacon recipe delivers a perfectly balanced sweet and heat flavor with a unique texture. It's a guaranteed crowd-pleaser for parties and snacks, and the historical context adds an interesting touch.
What oven temperature is recommended for baking cowboy bacon?
375°F.
01:20
What are the key ingredients in the glaze?
Packed brown sugar, barbecue sauce, rice vinegar, black pepper, and garlic powder.
01:49
Why is the bacon baked for 10 minutes before applying glaze?
To par-cook the bacon, resulting in a better texture than glazing immediately.
01:34
What trick is used to keep curling bacon flat?
Snip the bacon with scissors at the curled spots to relieve tension.
02:56
How many times is the glaze applied during the baking process?
Multiple times: first on one side, then the other, then again with chili rings, and a final brush.
03:09
What types of chili peppers are used for the rings?
Jalapeno and Fresno chilis (seeded).
05:13
Why is the bacon transferred to parchment paper after baking?
To prevent sticking and tearing when removing from the rack.
06:22
How is the final texture of the bacon described?
Somewhere between crispy and chewy, fully rendered, and fantastic.
07:13
Historical Origin of Cowboy Bacon
Reveals that cowboy bacon historically was simply thick-cut bacon, not a candied snack, adding cultural context.
00:02Bacon Curling Fix
Simple scissor snipping trick saves bacon from uneven cooking and ensures flat surface for glazing.
02:56Texture Description
Describes the unique texture between crispy and chewy, which is a key selling point for the recipe.
07:13Creative Presentation
Suggests serving bacon vertically in a glass with a cowboy belt buckle, enhancing the thematic appeal.
07:53[00:02] foodwishes.com with cowboy bacon. That's right. I'm going to show you my take on this spicy candied meat treat, which I thought was invented by food bloggers. But historically speaking,
[00:17] cowboy bacon was in Israel. It just wasn't candied and covered in pepper rings. And besides the bacon, I'm also going to show you the greatest cowboy belt buckle ever. But first things first and to get started, we'll go ahead and
[00:31] prep our pan, which means completely covering it with some heavy duty foil, or I guess a couple strips of regular foil. And once that's been accomplished, we'll place over our baking rack, which is going to give our rendered fat a
[00:43] place to go. But if you don't have a rack, you can just use some crinkled up foil, which will sort of serve the same purpose. But anyway, once that's prepped, we'll start laying down our bacon strips, which should definitely be
[00:55] of the thick cut variety. In fact, one of the original meanings of cowboy bacon was bacon cut extra thick, which makes sense since they didn't have meat slicers. And they were probably slicing it up with honey knives. And if you do
[01:08] use something with a similar thickness, we'll be able to fit exactly one pound on this rack. And by the way, it's totally fine if a couple pieces are touching or slightly overlapping since, as you know, bacon shrinks when it
[01:20] cooks. And eventually, everything will be beautifully spaced. And that's it. Once our bacon's been laid out, we will transfer that into the upper center of a transfer that into the upper center of a 375 degree oven for 10 minutes, at which
[01:34] point we'll pull it out and we will flip that bacon over. And then we'll pop it back in for another 10 minutes since one of the keys to a perfectly candied bacon is to cook it about halfway before we start brushing on our glaze. Right. That
[01:49] rendered out. And I really do think we end up with a much better texture than if we just started brushing on the glaze immediately. So once that bacon's in for another 10 minutes. And while we're waiting, we can go ahead and mix
[02:03] up our glaze, which could not be any easier. And now we'll start with a packed 1/4 cup of brown sugar. And yes, I mean very well packed. All right. If measuring cup, you didn't pack it hard enough. And then to that, we will add a
[02:18] little bit of barbecue sauce. All right. dealer's choice as well as some rice dealer's choice as well as some rice vinegar or any vinegar, but rice is nice since it's fairly neutral. And then we'll finish up with some freshly ground
[02:31] black pepper as well as a little bit of garlic powder. And that's it. We'll take a whisk and give this a good mix. And no, I didn't forget the cayenne. Right, as you'll see, we're going to cover our bacon with spicy pepper rings. So, I
[02:44] decided not to cayenne this time, but if you want it extra spicy, feel free. I mean, you are after all the posit cowboy bacon's heat. But either way, our
[02:56] glaze is ready to brush on. But before we do, let me show you a little trick. Okay, if your bacon's curling up in spots, especially near the ends, we'll simply take some scissors and snip here and there to relieve the tension. And
[03:09] since my bacon was very well behaved, I only had to do that in a couple spots. flat, we'll go ahead and take our glaze and brush it on very generously just on this one side. Making sure we're
[03:22] covering the entire surface. And once that's been accomplished, we will pop that back in the oven for 7 minutes. At which point, we will pull it out and very carefully flip it over. And then we'll repeat that exact same glazing
[03:37] process on the second side. Oh, and I know I said to brush generously, but be a little bit careful not to lay it down too too thick. All right, we're going to be glazing this multiple times, so we don't want to use it all up too early.
[03:51] brushed, we'll pop that back in for another 7 minutes. At which point, we'll pull it out and flip it again. Except this time, after we flip, we won't brush again. We will simply pop this back in the oven for about 10 minutes this time
[04:06] the bacon a chance to start to caramelize. And after about 10 more minutes in the oven, our bacon should look something like this. And we will give it yet another flip. And by the way, the pieces on the outside are
[04:20] always going to cook a little faster than the ones in the center. So, if we want, we can take some of those more well done pieces on the outside and switch them with some of the ones from the inside that might not be cooking
[04:32] quite as fast. And yes, that's a totally optional step. But if you do that, there's a chance you're going to get a more uniform cook. And since I've always been a big fan of uniform cooks, I went ahead and did that. But whether you
[04:45] rearrange or not, we'll go ahead and give this another brushing before we pop it back in the oven for another 10 minutes or so. And no, I certainly don't many times we baked this and flipped it and brushed it. All right, all those
[04:59] steps are going to be in the written recipe, but basically our game plan here is to keep glazing and flipping and baking until our bacon's close to being done. And at this point, I thought I was getting close. And when we do get to
[05:13] this point, we'll give our bacon one more brush. And then using that as a sort of glue, we'll place down our sliced chili rings. And I'm using both jalapeno and Fresno chili. And as far as placement goes, you can go green, red,
[05:28] green, red, or if you prefer, red, green, red, green. And yes, as you can see, we definitely want to seed the peppers. Oh, and as you're placing these down, if you happen to grab a smaller ring that looks like it'll fit better on
[05:42] bacon, you can always switch it out for the bigger one that's there. And then move that to a spot on a strip that's a little bit wider. And once we're happy with how every strip's been pepper ringed, we will pop those back in the
[05:55] oven for about 10 minutes or so before pulling them out and giving them the final glaze. And if everything's gone according to plan, we should be pretty much out of the glaze by the time this step's done. At which point, we'll
[06:08] simply put them back in the oven until they look perfect. Meaning those chili peppers have become tender and our bacon's fully rendered and beautifully browned. And for me, about 7 minutes later, my bacon looked like this. And I
[06:22] decided it was perfect. And once it is, we simply need to let this cool to room temp before we serve it. But what I like to do is take it off the rack and transfer it onto a piece of parchment paper since sometimes if you let it cool
[06:35] on the rack, it will stick and the bacon will break or tear as you try to get it off. So, I like to play it safe and transfer it. And we'll go ahead and let that cool completely. And yes, the ends are going to get a little bit charred.
[06:47] If you cook it this far, which I really think you want to to achieve the perfect candy bacon texture, and trust me, it's not going to taste burnt. It's going to taste amazing, which I will verify in a few seconds after I transfer this onto a
[07:01] serving platter. Oh, and it's probably not a bad idea to cut these in half before you serve them, just to make for a little more manageable bite. And it's probably best to do that when they're on the parchment paper, so you're not
[07:13] dislodging the rings underneath like I am. But anyway, that my friends was a perfect perfect piece of candy bacon. And I'm not going to say this is crispy because it's really not going to be when you do a sweet, sticky glaze like this.
[07:27] But it is completely and fully rendered, which gives us a texture somewhere between crispy and chewy, which we don't really have a word for, so I will just call it fantastic. And as I mentioned, I thought cowboy
[07:40] bacon was sort of a madeup thing. But as it turned out, bacon pretty much kept the cowboys alive since they could cure it and smoke it and preserve it for a long time. Oh, and speaking of cowboys, for an alternative delivery system,
[07:53] after these are cut, you can actually place them vertically in a glass. And then if you have one of these authentic cowboy scorpion belt buckle belts, you can use that for your presentation, which I really think ties everything
[08:05] together nicely. And I would love to tell you the story about how I acquired this belt, but I can't for a few more years at least. But no matter how you serve it, this spicy candied bacon will be the most popular, most talked about
[08:20] snack at your party, which is why I really do hope you give it a try soon. So, please follow the links below for the ingredient amounts, a printable written recipe, and much more info as usual.
[08:33] And as always enjoy. Boy.
⚡ Saved you 0h 08m reading this? Transcribe any YouTube video for free — no signup needed.