
Secure WordPress API with App Passwords
45sViewers struggle with WordPress API security; this clear, step-by-step tutorial on app passwords is highly practical and shareable.
▶ Play Clip"Delivers exactly what the title promises — a full automation tutorial, though with some filler and a sponsor segment."
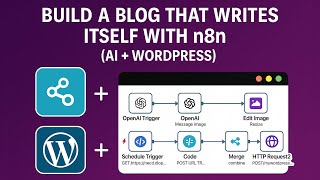
This video provides a step-by-step tutorial on building a fully automated WordPress blog post creation workflow using n8n, ChatGPT (OpenAI), and the newsdata.io API. The workflow fetches news articles, generates unique blog posts with AI, creates matching images, and publishes them to WordPress on a daily schedule.
Use application passwords for secure API access to WordPress. Generate a strong app-specific password in the WordPress admin panel and use it in n8n.
Application passwords can be revoked anytime, providing better security than sharing the main admin password. New passwords are needed for each workflow or instance.
Add a schedule trigger node to run the workflow daily at 9:00 AM. Adjust the time based on audience activity.
Use an HTTP request node to connect to newsdata.io API. The free tier allows 200 requests per day, enabling up to 200 blog posts daily. Configure parameters like category, language, country, and size.
Use OpenAI's 'Send Message to Model' node with GPT-4o for high-quality content. Provide a system message and user prompt to create original, plagiarism-free blog posts with specific formatting.
Add a function node with JavaScript to parse the JSON response and extract only the title and content fields, resulting in cleaner data for the blog post.
Use OpenAI's image generation node with DALL·E 3 to create a professional illustration based on the blog title and content. Customize size and quality as needed.
Add an image editing node to resize images to optimal dimensions for WordPress templates (e.g., 1340x638). This ensures proper display.
Use an HTTP request node to upload the image to the WordPress media library via the REST API. The response includes the image ID, which is crucial for the next step.
Use a merge node to combine the blog content and image ID into a single data item, preventing duplicate posts or posts without images.
Use an HTTP request node to create a new post via the WordPress REST API, including title, content, status, and featured media (image ID).
After testing, activate the workflow by toggling the switch. It will run automatically on schedule, keeping the blog updated with minimal effort.
This tutorial demonstrates a complete, automated content pipeline that fetches news, generates unique blog posts with AI, creates and uploads images, and publishes to WordPress daily. The workflow can be customized with different sources, categories, or additional steps like social media posting or email notifications.
What is the recommended method for accessing the WordPress API in n8n?
Using application passwords.
00:24
How many requests per day does the free tier of newsdata.io allow?
200 requests per day.
03:22
What model is recommended for high-quality content generation in the video?
GPT-4o.
05:22
What is the purpose of the function node in the workflow?
To parse the JSON response from OpenAI and extract only the title and content fields.
07:02
What image dimensions are recommended for the WordPress template in the video?
1340 pixels wide and 638 pixels high.
09:46
Why is the image ID important in the workflow?
It is used to set the featured image for the WordPress post.
11:10
What is the purpose of the merge node?
To combine the blog content and image ID into a single data item to avoid duplicate posts or posts without images.
11:39
What HTTP method is used to create a new WordPress post?
POST.
12:48
Application passwords for secure API access
Highlights a security best practice for WordPress API integration.
00:24newsdata.io free tier allows 200 requests/day
Provides a concrete number for scaling content generation.
03:22GPT-4o for high-quality content
Recommends a specific model for better output quality.
05:22Cleaning OpenAI response with JavaScript
Shows a practical solution for handling complex AI outputs.
07:02Merging data to prevent duplicate posts
Addresses a common pitfall in automation workflows.
11:39[00:00] Ok, so let's start by creating or setting up WordPress credentials properly, since this
[00:15] is a crucial step that many people struggle with. When working with WordPress in N8n, you need secure access to your WordPress site's API. Let me show you exactly how to set this up with application passwords, which is a recommended
[00:28] method for API access. Let's add WordPress node to our workflow. Let's select create a post for example. When you have this node you'll see drop down at the top for credential. Click on it then
[00:43] click on create new credential and here the pop-up window will appear asking for your password login information. But before we figure this out we need to generate a secure application password in WordPress. So go to your WordPress admin dashboard. This is the one for me. Let's refresh it.
[01:04] First thing to do is to grab your email right here and paste it here as the username. Then go back and scroll down and you'll see application passwords. Here you need to fill a name for your
[01:17] new application. Let's call it an Nathan test and let's add application password. So WordPress here will generate a secure password specifically for this application.
[01:30] So copy it somewhere safe because WordPress will only show it to you once. So let's copy it. Let's go back here and let's paste it in password. And then you have Windows URL, which will be your complete WordPress site URL.
[01:44] For example, for me, it's this one. Let's paste it here and click on save. And there you go. Connection tested successfully. The beauty of using application passwords is that you can revoke access at any time by going here and click on revoke.
[02:02] This gives you much better security control than sharing your main admin password. If you ever need to set up another workflow or if you are moving your workflow to a different NATN instance, you'll need to generate a new application password and go through this process again.
[02:17] Also, if you have an insecure website, you can check this option. It's for websites that use only HTTP. Ok, so now we need a trigger to start our workflow. Let's search for schedule trigger.
[02:29] This will be the first node in our workflow. Let's configure this trigger to run daily, so let's keep it at days here. You can select weekly or monthly, depending on your needs.
[02:42] Let's keep it every day, and let's select the hour as 9 am, which is a good time to publish fresh content. can adjust this time based on when your audience is most active. Once you've set this up, we
[02:55] have our trigger ready to go. This will automatically start our workflow at 9am every day, making sure your blog stays consistently updated without any manual intervention. Ok, let's test it. Great. Now we need to add a source from our content. Let's create our second
[03:13] node here. Let's search for HTTP request and we're going to configure this to connect the newsdata.io. So newsdata is my go-to news API for this workflow because it offers excellent coverage across
[03:28] multiple categories and languages. The free tier gives you 200 requests per day which means you could technically generate up to 200 different blog posts daily if you wanted to scale this workflow. So let's go back here. Let's keep the method as get since we're retrieving data. For
[03:44] the urls let's copy this one, let's paste this one. This is the base endpoint. Now we need to add our query parameters Toggle the send query parameters and let add several parameters First API key which is my API So let copy it and paste it here in value Let scroll down and add a new parameter This one is category which will be technology for me
[04:15] Let's add language and I'll set it to EN for English and let's add country. Let's set it for US or whatever region you want to focus on. Finally, I'll add size and set it to one.
[04:31] We're just processing one article per run for now. Okay, let's test this by clicking on test step and see what comes back. Great, we got a Z-Zone response with news articles. Take a look at the
[04:47] structure. Each article contains the title, description, content, link, keywords and many details. This is exactly what we need to generate our blog posts. Great! Let's move on to the next
[04:59] node. Let's generate a blog post from our news item using AI. Let's click on the plus sign here and let's search for OpenAI. Let's scroll down and click on message a model. Great! So first make
[05:14] sure your OpenAI credentials are set up. For resource select text and for operation choose message a model. Ok. For the model let's select GPT-4O. It's the best for quality content,
[05:29] though you could use 3.5 turbo if you prefer. Now for the prompt. This is crucial for getting good results. In the message section, add a system message with this text. So select the role
[05:41] system and add this message to excel at transforming news into interesting articles without plagiarism. Great! Now let's add the user message. Write a completely original
[05:56] blog post about this news. So, title. Let's select the title here. There we have description. Let's add our description here. And then let's add our requirements. Here we go. So create
[06:12] a unique and engaging title, write exactly 5 separate paragraphs, each in its own p tag, include your own analysis and perspective, do not copy phrases from the original source,
[06:25] and end with a thoughtful conclusion. Next, for the parsing, format the response as clean JSON without backticks. And let's add this. So we want a response with title and content.
[06:39] Great. This detailed prompt ensures we get consistently formatted high quality content. Let's test this note by clicking on Test Step.
[06:51] And here we go. We got a complete blog post with a creative title and five well-structured paragraphs. So looking at our output, we have a problem. OpenAI returns the content in a complex format that we need to clean up.
[07:07] So let's add a function note by clicking here. function, code, ok. In this node we'll add some simple JavaScript to parse the response. Let's paste it here. So this code takes the content string from the OpenAI response, parses
[07:24] the JSON inside it, and returns just the title and content fields in a clean format. Let's test this node by clicking test step, and you shall see how much cleaner the output
[07:38] with just the title and content we need for our blog post. Great! Now a good blog post needs an eye-catching image. So let's generate one using Shadgivity.
[07:50] So let's click plus after our function node and add another opening eye. Trigger Let search for image and generate an image So let configure this node for image generation Set the resource to image operation generate an image and for the model select daily3 for the best quality Now for the
[08:15] prompt you want to create an image that matches our blog post. So let's use this expression. let's open two brackets and let's say create a professional illustration
[08:28] showing let's add the title here and then plus close that and let's concatenate so the image should reflect key themes from this content let's add a
[08:48] a plus sign here and let's add our content and let's add dot substring 0 200 and here we go so this creates a dynamic font using our blog post title and the first part of the content
[09:05] and the result will be a unique image that perfectly matches each post and you can adjust the size and quality settings based on your needs so let's test this node let's click on test step
[09:18] And after a moment you should see a generated image that matches your blog post content. And here we go, let's view it. And great. So before we upload this image to WordPress, let's make sure it's the right size.
[09:33] WordPress works best with specific image dimensions, so let's add an edit image node. So here let's add a node. Edit image. And resize image.
[09:46] In this node set the operation to resize and enter dimensions that work well for your WordPress template. For me it's 1340 as width and 638 for height.
[09:59] Ok let's test this. And here we go the image is properly resized. As you can see the file size went from 187 to 152.
[10:12] Ok, now let's upload the image to the WordPress Media Library. Let's click on plus and add a cdp request. So let's configure this as follows. Method, post, url, gonna select your website url, paste it here and add this.
[10:32] So wp-dzone slash wp slash v2 slash media. media for authentication select predefined presentation type and search for wordpress
[10:44] and here we go then enable send headers add content disposition and for value add this attachment file name equals image.png then enable send body for the body content select
[11:00] n8n binary file and input data field name equals put data so let's test this note it should upload your image to WordPress and return information about
[11:15] the uploaded media including its ID and here we go so this ID is crucial for the next step now before we create our WordPress post we need to combine our
[11:29] blog content and image information into a single data item. This is a crucial step to avoid creating duplicate posts or posts without images. So we will add a node
[11:41] and let's search for Merge. Okay, let's put the mode as Combine. Let's select Combine by Position and let's keep the number of inputs as 2. This node takes data
[11:54] from both our content generation branch and our image upload branch and merges them into a single item that contains everything we need Okay so let put it here So make sure to connect the output from your code node to one input and the output from your HTTP request node with
[12:15] the image ID to the other input. Okay, so let's open it and let's click on test self. And you should now see a single item that contains both your blog's
[12:27] content fields and your WordPress image ID. This combined data is exactly what we need to create a complete WordPress post. Finally let's create our WordPress post
[12:40] with the blog content and featured image. Let's put this here and let's add an HTTP request. Let's put the message as post. Let's copy our WordPress link and let's
[12:54] at this wp-json slash wp slash v2 slash post ok let's use the WordPress API for
[13:06] credential and let's enable send body ok so select json using field below ok let's start by the title let's select the title here we go let's put it here
[13:23] and let's add another parameter for content and let's add a content here and then the status let's put it as publish and then the featured medium here we go and let's select the id
[13:40] of the image and here we go now let's try to run this workflow from the beginning and see the complete automation in action. Gonna save, reload, and let's test our workflow.
[13:57] When we click on Test Workflow, the system will fetch a fresh technology news article, transform it into a unique blog post with GPT for all, generates a custom image that
[14:11] matches the content, resize it for optimal display, upload that image to our WordPress the media library and finally publish a complete post with both elements properly integrated
[14:25] great so the workflow executed perfectly let's head over to our post let's reload and you can see we have a new post here let's go here and reload and this is our new post now your blog
[14:40] will be consistently updated with fresh relevant content even when you're busy with other tasks If you want to customize this workflow further, you could change the new source or category, modify the AI prompts to match your specific writing styles, add social media sharing notes maybe to promote new posts, and finally maybe implement email notifications when posts are published.
[15:05] Now it's time to activate your workflow. Click on the toggle on the top right corner to turn it on, and from now on, it will run automatically according to your schedule. keeping your WordPress blog fresh with minimal effort on your part.
[15:22] Now this wraps up our WordPress blog post's automation workflow. What we've built today is a powerful, fully automated content system that keeps your blog fresh with quality articles, all without your daily intervention.
[15:35] If you found this walkthrough helpful for your own content strategy, please hit that like button and subscribe for more automation workflows. I hope we ran something special for you. Click on the link below to get an exclusive discount on NAPEN VPS hosting through Hostinger.
[15:51] Just choose your plan, choose a period of 12 months, and enter the coupon code to receive a discount on the 12-month subscription period. Thanks for watching, and I'll see you in the next tutorial where we'll explore more advanced features of NAPEN.
⚡ Saved you 0h 16m reading this? Transcribe any YouTube video for free — no signup needed.