
How to Make Seamless Carousels in Canva
44sQuick, actionable tutorial hook that promises a simple solution for a common social media need.
▶ Play Clip"Delivers exactly what the title promises — a clear, step-by-step tutorial with no fluff."
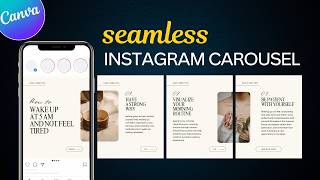
This tutorial demonstrates how to create seamless Instagram carousel posts using Canva. It covers calculating the total canvas width, designing on a single long canvas with guides, splitting the design into individual images using a free app, and preparing the images for upload.
The video explains how to create seamless Instagram carousel posts using Canva, emphasizing it's quick, easy, and suitable for sharing tips, stories, or promotions.
Click the plus icon and choose Instagram. Two sizes are available: 1080x1350 pixels (portrait) and 1080x1080 pixels (square). Both have the same width of 1080 pixels.
Use a calculator to multiply the width (1080 pixels) by the number of posts desired. For example, four posts require a total width of 4320 pixels.
In Canva, create a custom design using the calculated total width. This creates a long horizontal canvas for designing all posts in one place, which will be cropped later.
Go to File > Settings > Guides to add grids. Set the number of columns to the number of posts and set the gap to zero to avoid spacing between guides, making alignment and overlapping elements easier.
Design the content across the columns, allowing elements to overlap columns for a seamless feel when users swipe through the posts.
Go to Apps, search for 'split', and install the free app. Export the design as PNG with maximum size, then use the app to split the image into the desired number of columns (set rows to 1).
Add the split images to an Instagram post size in Canva. Use 'Set background' or manually resize to fill the canvas. Create a new page for each image and repeat the process.
Disable guides, click Share > Download, exclude the first page, and download the final images. The carousel is then ready to upload to Instagram.
By following these steps, you can create a seamless Instagram carousel that looks professional and engaging. The key is to design on a single canvas and use the split app to divide it into individual posts.
What are the two Instagram post sizes mentioned in Canva?
1080x1350 pixels (portrait) and 1080x1080 pixels (square).
00:17
How do you calculate the total width for a carousel design?
Multiply 1080 (the width) by the number of posts you want in the carousel.
00:32
What gap value should you set for the guides to avoid spacing?
Zero.
01:29
What file type and size should you select when exporting the design for splitting?
PNG and maximum size.
02:11
What should you set the rows option to in the Split app?
One.
02:38
What should you do if the 'Set background' option doesn't work?
Click 'Add to design' and increase the image size to fill the canvas.
03:03
Width Calculation Method
Provides a simple formula to ensure all carousel posts align perfectly.
00:32Using Guides for Alignment
Shows how to set up visual columns for precise design and overlapping elements.
01:12Free Split App
Introduces a free tool to automatically crop the design into individual images.
01:56Excluding First Page
Highlights a crucial step to avoid duplicate images in the final download.
03:18[00:02] you how to create seamless Instagram carousel posts using Canva. It's quick, easy, and perfect for sharing tips, stories, or promotions. Let's get started. All right, let's start by selecting the Instagram post size.
[00:17] First, click on the plus icon and choose Instagram. Here, you'll see two different post sizes. 1,080x 1,350 pixels, which is a portrait 1,080x 1,350 pixels, which is a portrait size, and 1,080x 10,080 pixels, which is
[00:32] the standard square post size. Both sizes have the same width of 1,080 pixels. Next, open a calculator and multiply this width by the number of posts you want in your carousel. For example, if you want four posts, so I'll
[00:46] type four here. This gives us the total width we need for our design. Now, let's go back to Canva. We'll create a custom design using the total width we calculated. In my case, the number is already entered because I tried it
[00:59] before recording, but you need to add the size here. Then click on create new design. This will give you a long horizontal canvas that we'll use to design all the posts in a single canvas so we can crop them later. To make
[01:12] designing easier, click on file, open settings, and choose guides. This will add these helpful grids to your design. Now click on custom and add the number of columns you decided on earlier. Set the gap value to zero to avoid spacing
[01:29] between the guides. Then click add guide. Now we have clear visual columns making it super easy to align and even overlap elements across different slides. Let me quickly design something to show you how
[01:42] it looks. All right, I have designed this to just show you. As you can see, the other column. This gives the carousel a seamless feel when users swipe through the posts. Once you're done with your design, the next step is
[01:56] to crop the canvas into individual images. To do this, go to apps and search split and install this free split and install this free app. Once installed, export your
[02:11] design. In the settings, choose PNG as the file type and make sure to select the maximum size. Then click export and it will start exporting your design. Once it's done, you'll see a preview of
[02:24] your design. As you can see, our design is perfectly divided into four columns as we want. If you have more than four columns, you can increase the number of columns from here. This app also has an option for rows, but we don't need that.
[02:38] So, set it to one. Once you're ready, click on split image, and the app will crop your design into separate images for your carousel. Now let's add these images to an Instagram post size in Canva so we can download them for
[02:51] posting. Click on this arrow, choose social media, then search for Instagram and select your size. Now add the first image here. Click on set
[03:03] background. Sometimes the set background option might not work, but don't worry. Just click add to design and increase its size to fill the canvas. Add a new page for each image and repeat the same steps for all your carousel images. Once
[03:18] all your images are placed, disable the guides since we no longer need them. Now you're ready to download your carousel. Click on share, then download. Exclude the first
[03:32] page, click done, and download your final images. And that's it. You're ready to upload your beautifully designed Instagram carousel post. If you found this tutorial helpful, don't forget to like, share, and subscribe for
[03:46] more Canva and Instagram tips. And if you want to create a viral Instagram reel that gets lots of engagement, make sure to watch this next video. I'll see sure to watch this next video. I'll see you there.
⚡ Saved you 0h 03m reading this? Transcribe any YouTube video for free — no signup needed.