Why Holley Retrobrights Don't Work on 80s Toyotas
51sThe surprising reason (switched ground vs. positive) that makes these LED headlights incompatible with Japanese cars is a unique and educational twist.
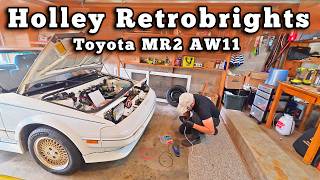
▶ Play ClipThis tutorial covers the installation of Holley RetroBright LED headlights into a first-generation Toyota MR2 (AW11). It explains why the installation is not plug-and-play due to the car's switchable ground system and provides step-by-step guidance on fabricating and routing a custom wiring harness.
"Title accurately describes the tutorial content."
Reason for wiring harness
Explains why a standard Holley RetroBright kit doesn't work on an 80s Toyota (switchable ground vs. positive) and requires a special harness.
00:39Accessing the wiring route
Details the difficult decision to cut the 40-year-old grommet to route wires, a necessary step for the AW11's limited space.
02:49Grounding mistake & weather concern
Highlights a critical mistake: using an unsealed ground inside the headlight bucket risks short circuits in rain, requiring a redesign.
04:38Bullet connectors for error-proofing
Recommends bullet connectors over soldering to allow easy correction of wiring mistakes, offering a practical solution for home mechanics.
08:56Removing washer reservoir for access
Shows removing the oversized washer fluid reservoir to gain working space on the driver's side, a clever trick for tight engine bays.
10:23[00:00] This is how to put holly retrobrites into a Toyota MR2 AW11. If you already bought these and just the headlights, and you went to put them in and plug them in,
[00:14] you may have noticed that they don't work. You're like, what the hell? Nothing about this installation is normal. Unlike a classic American car that you can, these are holly retrobrides, you can put them right in, they work.
[00:27] But not on an 80s Toyota. The reason it doesn't work is because holly made these things mostly to work with classic American cars that have switchable positive to turn their headlights on and off.
[00:39] But Toyota didn't do that in the 1980s, they use switchable ground. And because these headlights are LEDs, they only like electricity going one way. They won't go both ways.
[00:51] So you need a separate wiring harness which holly will gladly sell you to make them work. They have their own relays,
[01:03] they have their own connectors. But you have an MR2, which means everything's weird. We're gonna go through how to put this in and you're gonna have to get extra wire and you're gonna be slice and stuff.
[01:15] But don't worry, we're not gonna cut into the existing wiring harness. The first thing you're gonna need is out of circuits. These are controversial, some people don't like them, but for the sake of making this simplistic, that's what we're gonna do. Doesn't matter what they are, just buy them on Amazon.
[01:29] ATC fuse out of circuit. Inside the front of an AW11, there's gonna be all kinds of body panels, your spare tire. All of that comes out, we need room to work. This is your front fuse panel,
[01:42] and this is where we're gonna get 12 volts. These two fuses right here, the blue 15s, those are your fuses for both headlights. Take two 15 amp fuses. And if you don't have extra 15 amp fuses
[01:54] that really cheap again, buy them on Amazon and take your ATC fuse, and put it into one of the headlight fuse sockets. On the end to your ATC fuse, is you're gonna find a butt connector.
[02:07] Into that end of the butt connector, you're gonna take another piece of wire and put the female end of a bullet connector on. The reason you're gonna do this is because we have to get all this wiring all the way under here and through this grommet.
[02:23] You notice that inside your housings for your headlights, the headlight bucket is completely filled. There is no direct root from inside the headlight bucket
[02:37] into the front, so you got two choices. Either you can drill baby drill and go right through, which we don't wanna do that, or we can go through this wiring harness, gigantic grommet right here. So that's what we're gonna do.
[02:49] You have a choice. You can either try to get this 40-year-old heap tape out or we have to cut the grommet because we have to push more wires through it.
[03:03] So that's what we're gonna do. As much as I hate to do it, we're gonna cut this grommet because it's all taped up. Toyota wanted to make absolutely sure that nothing got through, no weather, no anything,
[03:16] would get through this. So we are going to, once we have this separated to make sure it's sealed back up again. I am using a window scraper, a razor,
[03:28] and gently coaxing it open. I'm not slicing in because the last thing we wanna do is to slice into the wiring harness itself. You know what? I think that's enough. I think we've been big in the hole enough.
[03:40] All of this has to fit through there. Oh, get through. My goal here is to not have to crimp and not have to cut this stuff.
[03:54] I am hoping that I have enough length in this wire to make it all the way around into the headlight bucket.
[04:07] So let's see how much I'm working with. Oh, my arm is deep. Oh, it's getting cut up by the headlight bucket.
[04:19] Okay, we got, how much, oh. Oh, that is all the way back there. And that's all the distance I have to work with. That wire has to get all the way up here.
[04:38] Now, I just remembered something, using a ground inside the headlight bucket or inside the headlight enclosure, which is this entire area right here, is a bad idea and the reason it's a bad idea
[04:52] is because this is not weather sealed. So having current, if you were driving in the rain, having current goes through a ground that was exposed to water is not ideal.
[05:04] So I had to start all over and pull this out. But in order to have this reach, this thing is not gonna be long enough. So we're gonna have to cut this with some black wire and make more wire. There is our butt connector and bullet connector
[05:20] to extend our ground, which, I see some other grounds going right there, so that's probably good. That's where all ground, our ground will go. At least for the passenger side headlight. I think we're gonna make it.
[05:33] The orange plug is for the headlight itself and the headlight itself. They give you an extra pig tail. So we may have enough room here. The black plug uses the existing headlight
[05:47] and I have plenty of wire to, I have plenty of length to work with there. One headlight is in and I hope I have enough clearance
[05:59] that the wire isn't going to bind rather the connector as I put the headlight down. There's enough room with it up, but when it goes down, the headlight is actually moving farther away.
[06:12] Oh, here we go. All right. All right.
[06:27] All right, I didn't see, one more time. All right. Okay, that one's good. Our passenger side headlight is working.
[06:40] There was enough room. Our real ladies are just gonna sit here. All right, guys, I'm gonna like this, but it shoved into the grommet and these things, and I'm going on, we may have to sacrifice our stock jack location.
[06:56] Unless I make a much better, get a wiring room and have these wires go over here, we picked our ground position here next to our fuse box and this should all be covered up.
[07:09] By the panels. Now we need to do the driver side, which means this John has to go all the way out and around.
[07:21] This has to go all the way across the car, and that is not gonna make it, is it? So we're gonna have to cut all these wires right here and extend them. The wiring harness for the driver side is gonna have to leave the realaise,
[07:35] go underneath, the sound deadening and carpet deadening. Pop out here, go through the grommet,
[07:49] go around the quarter panel back in and up there. So this is gonna need about one, two, three more feet of wiring.
[08:03] This is gonna have to be three feet longer. What's going on here is now I'm crimping the new wiring harness together. So it's always a little bit, yeah, when you have to cut a supplied wiring harness,
[08:16] that's all beautiful and nice, but because this is an AW11 and nothing is normal, we need to fit it around the quarter panel and get it in there. So cutting it and then I'm using bullet connectors to connect it.
[08:32] I really should be soldering and heat shrinking, but I'm not gonna do that. I am gonna heat shrink, but I'm not gonna solder because I'm always worried that in my head,
[08:44] I'm connecting everything correctly, but in reality I'm not because sometimes I see things, and my mind says they're correct, but my hands did them wrong.
[08:56] So I like bullet connectors in the same way I like to use mechanical pencils because they have a racer's on them. And bullet connectors, you can always go, oops, wrong one, I'm gonna reconnect the right one.
[09:09] And then my buddy Lance shows up. Here's my extended wiring harness. That's gonna have to go through the car and thank you Lance. And I chose this bolt here as my ground.
[09:25] So round goes here. Now we're gonna test, see if this is copacetic on this end.
[09:41] We don't have to have a switchable triplug, triplug, whatever it is because one triggers both of them. Okay, you better work, and you don't, okay, I did something wrong.
[09:58] Okay, I did something wrong. So all I did was hook up my own wiring harness wrong. So I had to color code it up and figure it out. So we've got both of them working, awesome. Wamp, sorry Lance.
[10:11] And now I get to fish all of that through the grommet and inside. Three wires in through this grommet around and into the bucket.
[10:23] But unlike the passenger side, the driver's side has the gigantic hawk and washer fluid reservoir in the way. To me, for me, it works. So I wonder if I should just save myself the trouble
[10:36] and just unhook this just to get a little bit more work in space. I wonder why Toyota felt the need, like why are we gonna need this much washer fluid
[10:48] for a windshield this tiny? And it's not like this washer fluid reservoir, like they took it off of a T100 or a pickup. This was made for this.
[11:00] We're gonna be like, yeah, let's just fill all of this with fluid. We want to make sure they have enough washer fluid to wash this window for five years. Yeah, that thing has to come out. It comes out with two bolts, one has a bracket on it
[11:14] and then there's a gigantic, not a bung, but just a piece of rubber down there. It keeps it from like rattling around making noise. Yeah, you're right. And that just sits in there, unhook the electrical connector
[11:28] to the washer motor, which is connected to the washer reservoir. So this is just gonna chill right there while I have some working room. All right, we're good on the passenger side. Here's my extended wiring harness.
[11:40] I'll put a loom on this just so it looks nice. And we're gonna use the ground right here. I have no idea what this bolt is supposed to be, but that's gonna be our ground for the driver side.
[11:52] Do I say passenger side? I'm in driver side. It's been so much time in JDM stuff. I got my driver and passenger sides mixed.
[12:04] So one thing we discovered is that down inside since the driver side doesn't need this anymore, the sock one, this thing is just flopping around in there
[12:19] and making noise. So I need a zip tie to something. Yeah, that's gonna get nowhere near a bracket or anything. See what I want to zip tie it to, but now that I put this in,
[12:33] I don't have the hands to get in there. Let me see if I can do it by feel. I'm not the point in my life where I don't throw away zip ties like a previous me, or like I can't even be bothered for this one. Just throw it on the ground. They should make zip tie flavored gum.
[12:47] I don't have to go around because I don't have to fight for inches because I made my wiring. I made my harness nice and long. I don't have to go through the support, pull it back through and go underneath. Oh, I gotta do this without seeing.
[13:01] Oh, this is gonna be like plugging in a USB charger on and out, let's behind your bed at night. If you ever have to do one of these things, or you need to plug something in, you can't see,
[13:13] close your eyes. You're not using them anyway. All right, if that thing's hanglin' and this thing's danglin', let's see if it makes that noise again.
[13:41] What I'm doing is I'm keeping the lights on as I reassemble the interior of the front. In case something goes wrong and they stop working, I figure I realize exactly that it's going wrong
[13:53] because I found one of my crimps was bad here on the main power lead. I'm like, why the fuck are they not gonna turn it on? So I'm just gonna keep it on here. Just for a little bit, thank you, Lance. As I put the strut tower brace on here.
[14:07] You know, people with MR2s, they like to put aftermarket strut tower braces on them. Like, Toyota just gave you one, but I can't remember if these, the washers go above or below the brace.
[14:20] I mean, logic dictates they go above it, right? I wonder why they decided to have one here, not completely go around the bolt, like that one. I don't know what the torque rating is.
[14:32] Don't know at all. Tight. Let me put the strut tower bolts to typically not that, and crazy. Oh, dead parts.
[14:46] I think the wheels for this car, they're only torque to 70 foot pounds or something like that. It's a spare tire cover. Hell yeah, you can just put it down. Yeah, okay. Should I get two to put on camera? Yeah, put it on camera.
[14:59] Okay. Yo, what's up? Okay, I'll bring somebody to you and we'll operate it. We'll bring it. Oh shit, this is gonna be fun. We're recording and putting the holly retro bikes
[15:11] in as they are, too. Hey, hey, Muzzy. Yeah, yeah, we're here hanging out. We were just finishing up. We just put the helmets in, the wired things back there.
[15:23] Oh, my farts. They never stop. You know, I guess maybe head up here through the winding out here right now. This guy is flopping around a little bit.
[15:35] I do have a wire tie, some cable management. I could probably put and just zip tie it like right here. Do you have any final words to the camera? Ha, ha, ha. No, we said it already is alive.
[15:49] No, no, we're just rolling on GoPro. This is gonna be a video for later. No power or working. Actually, wait, I do have something. Bring it on for some reason. I've seen like multiple Jaguar XJSs.
[16:02] Like, it might be a good day if I see one, but like I see like two or three on the regular now and I'm loving it. This is it, we're done. The only evidence that this thing
[16:15] has the extra wiring harness in. The jack covers up the relays, which are down there. I don't like that they're just hanging in the open, but there's so many wires
[16:27] and I think with the top and the bottom they'll stay put. You see a little bit of my loom there on the passenger side. And if you look by the washer, there's a little bit of wiring in there. But apart from that, she looks like she's like,
[16:40] nothing's been done. I'm gonna leave the headlight shrouds off because I have to wait till night. There's our left and right adjustment and down below. There's a screw in there for up and down. But when you put the shroud on,
[16:52] you can't get left and right adjustment. Although I think left and right is probably gonna be fine because it's a blade that goes right across. Unless we get out there and we see one as like cocked to the left or to the right. Because these things were aligned fine for incandescent,
[17:09] but I'm not sure where the blade is going. Well, thank you. That's it done. Retro Bryce saw on an AW11.
⚡ Saved you 0h 17m reading this? Transcribe any YouTube video for free — no signup needed.