WD-40 Secrets Mechanics Hide
45sThe claim that mechanics gatekeep tricks saving thousands sparks curiosity and challenge, driving clicks and shares.
▶ Play Clip
[00:00] Almost every car owner has a can of WD-40 sitting in the garage, but around 90% of them never use it to anywhere near its full potential. And here's the shocker. Mechanics quietly gatekeep the tricks that could save you thousands in repairs.
[00:18] Today, we're revealing 18 WD-40 tricks that put serious money back in your pocket. Don't skip ahead because number three alone can literally save you $3,000.
[00:32] Let's start with trick 18. Trick 18. Clean a gunked up gas cap. Your gas cap is filthy and probably hasn't been cleaned in years. The fix is simple. Spray WD-40 generously around the threads,
[00:49] the underside of the cap and the ceiling ring. Then let it sit for a minute to cut through the buildup before wiping it down with a clean microfiber cloth. The formula dissolves hardened grime,
[01:01] lubricates the threads and restores a clean seal that snaps tight every time. Add a light follow-up coat before you screw it back on and the cap will turn smoothly,
[01:13] seal properly and stay clean for months. Do this every few months and you'll likely never see a fuel-related check engine code again. Most people burn hundreds of dollars chasing that
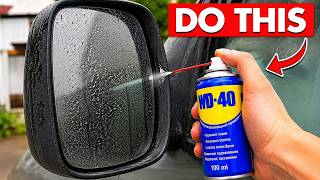
[01:26] light through diagnostics when the fix was sitting in the garage the whole time. It's a two-minute job that keeps a check engine light from ruining your morning. Trick 17. Remove water spots from
[01:40] your side mirrors. Those cloudy white spots clean to the glass like they've been baked on because mineral deposits from rain and tap water bond to the surface and leave a haze that distorts your reflection.
[01:54] Here's what actually works. Missed a little WD-40 directly onto the mirror glass, let it sit about 30 seconds, then buff gently in circular motions with a clean microfiber cloth.
[02:08] The deposits lift right off, leaving glass that's clear, streak-free and glare-resistant, and the thin water-repelling layer it leaves behind makes rain beads straight off. Make it a habit after every wash and your mirrors stay clear far longer than you'd expect.
[02:25] A clear side mirror isn't only about looks, it's about spotting the car in the next lane before it's too late. Trick 16. Clean leather and vinyl seats. Dirt grinds into leather until that rich surface looks dull,
[02:41] cracked and tired, and most people reach for expensive conditioners or harsh cleaners that strip the finish even further. Here's what the pros do instead. Spray a small amount of WD-40 onto a
[02:54] microfiber cloth, never directly onto the seat, and wipe along the natural grain. The formula lifts and bedded grime and dissolves surface oils without soaking through, and you'll see the dirt transfer
[03:07] onto the cloth almost instantly. Follow with a dry wipe and the seat looks darker, cleaner, and more supple. Run it along your door inserts and console trim too since they collect the same oils.
[03:20] Badly cracked leather is nearly impossible to fully restore, so keeping its supple now save you from an expensive re-apholstery job later. Trick 15. Clean and restore your tires. Your tires wear that dull
[03:36] brownish film no amount of water seems to remove, because brake dust, road tar, and rubber oxidation leave the sidewall looking flat and neglected. Here's the move. Spray dude 40 onto the sidewall and
[03:48] work it in with an old cloth or detailing brush. It cuts through the oxidation and tar in seconds, lifting the brown layer to reveal the deep black rubber underneath. Wipe off the excess and the difference is instant, with tires that look darker, cleaner, and freshly
[04:05] detailed plus a barrier that slows the browning between washes. A quick pass before a car show or a road trip makes the whole car look like it just rolled off the lot. Clean black tires make the entire
[04:19] vehicle look a thousand dollar sharper. Trick 14. Clear up a hazy windshield. Your windshield carries a smeared oily haze that turns every oncoming headlight into a blinding starburst, which isn't
[04:33] just annoying at night, it's genuinely dangerous. That film is road exhaust, silicone vapor off your dashboard, and residue water alone never removes. Spray a light coat of WD-40 on the glass. Spread it
[04:48] evenly with a microfiber cloth. Give it 30 seconds, then wipe it completely off with a clean, dry cloth. What lifts off will surprise you, and the surface underneath comes out clear, smooth,
[05:01] and slick enough that rain sheets straight off instead of smearing. Wipe down your blades while you're at it, and your visibility in the next storm will feel like a different car. Trick 13. Restore your
[05:17] exhaust tips. Your exhaust tips are black, carbon-caped, and dragging down the back end of an otherwise good-looking car, and that hardened suit makes on an extreme heat where regular soap won't touch it.
[05:31] Reach for the WD-40. Spray it generously inside and around the tip, let it soak into the carbon for a minute or two, then work it with a cloth or soft brush. The build-up starts releasing almost
[05:44] immediately, lifting off the metal in long, dark wipes, buff it dry, and the tip shines like it just left the showroom floor. If you have dual tips, do both at once so the finish matches,
[05:56] and looks intentional rather than half done. Trick 12. Refresh rubber floor mats. Your rubber mats look cracked, faded, and permanently dirty even right after a wash, because mud, salt, and grime
[06:10] have ground and so deep a rinse barely helps. After hosing them down, spray a light coat of WD-40 over the surface and spread it evenly. It seeps into the rubber, restoring flexibility and pushing out
[06:23] the deep grime water can't reach. Wipe off the excess, let them dry, and when you lay them back in, they look dark, refreshed, and solid black again, the way they did when the car was new.
[06:35] With a layer that repels moisture and makes the next cleanup far easier. The same works on trunk liners and cargo mats, so don't stop at the floor. Trick 11. Restore faded tail lights. Your tail lights have gone milky and yellowed,
[06:52] making the car look older than it is, and worse, the haze scatters your light output and makes you harder to see from behind, which is a safety issue, not just a cosmetic one. Spray WD-40 onto the lens and wipe in smooth circular motions with a microfiber cloth.
[07:11] Almost immediately the fog lifts and the lens looks clearer, brighter, and sharper, as the formula fills microscopic scratches and leaves a thin layer that slows future fading.
[07:24] Keep a can in the trunk and hit the lenses every couple of months. In some states, badly faded tail lights can actually get you pulled over, so keeping them clear is about more than
[07:36] appearances. Before we get to the WD-40 hacks that will really blow your mind, do me a favor and hit that like button and subscribe. It helps us keep bringing you the secrets mechanics don't want
[07:49] you to know. Trick 10. Clean Dusty Interior Services. Your dashboard and door panels carry a thick gray film that ordinary wipe downs never fully clear. Spray a little WD-40 onto a microfiber cloth,
[08:07] never straight at the surface, and wipe along the dash, door panels, console, and trim. It traps and lifts dust instead of spreading it, and leaves a conditioning layer that helps plastic
[08:19] and vinyl shrug off future buildup, so your interior looks cleaner and stays cleaner longer. Pay extra attention to the air vents, because the dust packed into those fins is exactly what gets
[08:31] blown back through the cabin every time you run the act, which means a few minutes here actually makes the air you breathe noticeably fresher. Trick 9. Add a quick protective coat to your paint. Your paint
[08:45] is under attack every day from bird droppings, tree sap, road tar, and bug guts. Any of which can etch into the clear coat if left to bake in the sun. After a wash and dry, missed a little WD-40
[08:59] onto one panel at a time, and buff it evenly with a clean microfiber cloth. The surface takes on a deep wet looking shine, and the film left behind makes contaminants slide off on contact. It's not
[09:13] a replacement for wax or ceramic coating, but as a quick layer of protection between full details, it's one of the most underrated moves in a detailer's kit. Focus on the hood and front bumper
[09:26] since they take the worst of the road debris and bug impacts at highway speed. A basic respray on a single panel can run anywhere from $300 to over $1,000. Trick 8. Free up a stiff seat belt.
[09:42] Your belt is sticking mid pull, snapping back unevenly, or fighting you every time you draw it across, and a belt that doesn't retract properly may not hold tension in a crash, so it's not something to
[09:54] ignore. Pull the belt out to full extension and run a clean cloth dampened with a light mist of WD-40 along the webbing. Then let it retract slowly several times. It loosens built up grime,
[10:09] frees the internal spring mechanism, and restores that smooth, consistent pull and retract. Do every belt in the car while you're at it since if the driver's side is stiff the others usually aren't far behind. A seat belt replacement at a dealership can run anywhere from $200 to $500.
[10:28] Trick 7. Fix a sluggish ignition switch. You slide the key in and instead of a clean, snappy turn you get stiffness, grinding resistance, or a key that barely wants to go in,
[10:40] and most people assume the cylinder is failing and brace for a big bill. Nine times out of 10, it's just dust and dried out lubricant in the tumbler. With the key out, give the keyhole a short controlled burst of WD-40.
[10:57] Then insert the key and turn it slowly back and forth several times to work it through. What felt like a C's cylinder starts turning smoothly with every pass. Treat your spare keys lock the same way so it doesn't seize from neglect the one time you need it.
[11:14] Ignition's cylinder replacements run anywhere from $150 to $400 at a shop, and most of the time it's just a dried out lock. Trick 6. Quiet a squealing serpentine belt. Your belt screams every time you start the car,
[11:33] and that squeal usually means dust, humidity, or surface glazing is letting it slip across the pulleys instead of gripping. Before you replace it with the engine off, give the belt and pulleys a
[11:45] light controlled mist. Then start the car and the squeal drops away almost immediately as the glazing and residue dissolve, and the belt finds traction again. It's not a permanent fix if the belt is
[11:59] genuinely worn, but it's the fastest way to learn whether you need a new belt or just a clean one. While you're under the hood, check the belt for cracking or fraying, because if the rubber is breaking down. No spray will substitute for a proper replacement. A new serpentine belt can cost $100 to $250
[12:19] in labor alone, so knowing the difference before you walk into a shop keeps a service rider from upselling you. Trick 5. Free up stiff window tracks. Your window grinds, squeaks or hesitates
[12:34] every time you roll it down, and it gets worse in the cold, because the rubber lying channels collect dust, grime, and moisture until the glass is practically dragging through mud. Lower the window
[12:46] halfway, spray WD-40 into the exposed track on both sides, then run it up and down slowly several times to work the formula through the whole channel. What was grinding now glides almost silently.
[13:01] With the debris cleared and the rubber kept pliable in any weather, don't skip the rear windows since those tracks get neglected even longer. In winter especially, a frozen track can crack the glass
[13:13] if you force it, and one quick spray keeps everything moving. A window regulator replacement can run $150 to $300 at a shop, and lubricated tracks are the easiest way to make sure you never need one.
[13:30] Trick 4. Free a stuck side mirror. Your power mirror has stopped adjusting, the motor strains every time you hit the button, and you're changing lanes with a blind spot. The motor usually isn't a culprit.
[13:44] It's the pivot joints, gummed up with grime, and corroded by moisture sitting in the housing. Spray WD-40 carefully into the joint and around the adjustment housing, give it a minute to penetrate,
[13:57] then try the controls again, and you'll often feel the mirror loosen right away and track smoothly through its full range. On manual mirrors, the same spray restores easy movement and keeps the
[14:09] joint from locking up after rain or cold. A pre-winter spray on both mirrors takes two minutes and can spare you a frozen mirror on the coldest morning of the year. Power mirror motor replacements cost
[14:22] $100 to $250 in parts and labor, and most of the time the motor was never the problem. Trick 3. Unstick a seized parking brake cable. You release the parking brake and the car won't move,
[14:40] because the cable has frozen or corroded inside its housing, gripping the rear brakes no amount of lever pumping will release. Before you call a tow truck, find the cable running along the chassis underneath the vehicle. Spray WD-40 generously along its length and into any exposed housing openings,
[14:59] and let it soak for several minutes. Then cycle the brake on and off while gently rocking the car, and the lubricant breaks the corrosion bond, restores movement, and releases the lock tension.
[15:13] Once it frees up, give the whole run one more coat so moisture can't creep back in and refresh it, which matters most if you live somewhere with heavy winter road salt. Parking brake
[15:26] cable replacements run $100 to $300 depending on the vehicle, and regular lubrication with a cheap can would have prevented the whole thing. Trick 2. Clean your mass airflow sensor. Your engine runs rough,
[15:43] the throttle feels hesitant, and your fuel economy has quietly tanked. Before you pay for a full diagnostic, check the mass airflow sensor, because when it gets coated with oily film and dust,
[15:56] it feeds wrong data to the computer, and the result is weak performance, wasted fuel, and a check engine light. Remove the mass sensor from the intake housing, usually two screws in a connector clip, missed it lightly across the wires, and sensing elements.
[16:14] Let it sit about 60 seconds, then wipe gently with a clean dry cloth, and let it air dry completely before reinstalling. Make sure it's bone dry before you reconnect it, since a wet sensor can throw
[16:28] off your readings and trip the very light you were trying to clear. A brand new mass sensor runs anywhere from $80 to over $300. So a 60-second clean before replacing it is always worth a shot.
[16:43] Trick 1. Restore your front grille. Your grille is the face of the car, and right now it looks like a bug graveyard, with road debris, brake dust, and baked on insects turning a once bold finish into
[16:55] a dull pitted mess. Spray WD-40 generously across the grille, working it into the slats and mesh where residue has baked in. Let it sit a minute, then go through it with a soft detailing brush.
[17:10] Wipe it down with a microfiber cloth and stand back, because the grime lifts cleanly, the finished darkens and sharpens, and the thin layer left behind makes future bugs and debris far easier to wipe away. Hit it again every few weeks during road trip season when insect build-up is at
[17:28] its worst. And the grille never reaches that baked on stage again. The front grille is the first thing anyone sees when you pull up, and a clean one says immediately that this is a car someone takes pride in.
[17:43] If you learned something new today, hit that like button and comment below which trick surprised you the most. Want more car secrets that can save you hundreds in repair bills? Click the next video on
[17:55] Genius Car Tips, and your bank account will thank you.
⚡ Saved you 0h 17m reading this? Transcribe any YouTube video for free — no signup needed.