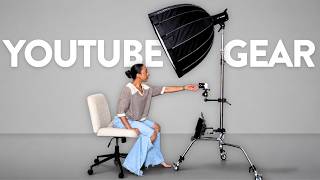

The shocking $1 trash bag lighting hack for YouTube
50sAudiences love a pro-looking setup that uses a humble trash bag, making it a surprising and shareable money-saving tip.
▶ Play Clip"The title promises an exact setup walkthrough and delivers a detailed gear tour with practical advice, only slightly padded by a sponsor segment and like requests."
In this video, content creator Modern Millie walks through her complete YouTube studio setup, accumulated over six years of making videos. She covers lighting, camera, lenses, audio, teleprompter, storage, and editing software, offering practical recommendations for creators at every stage.
Millie has six years of experience with YouTube gear and is showing her final setup, which she uses for every video, while filming on her phone to display the equipment.
She uses two primary lights: a Godox softbox (largest size with diffuser) and a GVM RGB LED, which together create a bright, even coverage on her face.
Clamshell lighting pairs a key light from above with a secondary light from below to fill in under-eye shadows, giving a glam look preferred by makeup artists and YouTubers.
Instead of multiple tripods, she uses two C-stands with wheels and clamps, simplifying her studio into a mobile, organized rig that's easy to move.
Her main camera is the Sony ZVE10, chosen for its flip screen, touchscreen, skin blur effect, and interchangeable lens capability. It also supports long recording sessions without overheating.
She uses the Tamron 11-22mm f/2.8 lens for vlogs, short-form videos, and B-roll, swapping between it and the kit lens depending on the shooting need.
About 90% of her B-roll now comes from Storyblocks, an all-in-one library with footage, music, and graphics, saving her time from hunting across multiple sites.
She uses the Rode Wireless Go mic exclusively, clipping it under her clothes with double-sided tape, offering reliable audio for long-form, short-form, and vlogging.
Her teleprompter is the Padcaster Parrot, which attaches to the camera lens via rings. She uses the Parrot app with a Bluetooth remote to scroll through scripts, projecting them onto the glass.
She recommends at least 128GB SD cards with fast read speeds for 4K filming, and currently uses a 1TB SanDisk card. She keeps smaller cards in a case for rotation.
Active projects are stored on a SanDisk 4TB portable SSD for fast editing, then moved to a SanDisk Creator desk drive as an archive. She also keeps redundant copies after past hard drive failures.
She started with CapCut, which was user-friendly, but now edits everything in Adobe Premiere Pro, including short-form, long-form, and course content, using Storyblocks for assets.
Millie emphasizes that she didn't start with this expensive setup; she began editing on her phone. She cites Ryan Trahan, who films with just an iPhone, tripod, and mic, as proof that beginners shouldn't wait for perfect gear.
Millie's setup shows that a professional YouTube studio comes together over time through deliberate purchases and workflow tweaks. The core message: start with what you have, then upgrade strategically as you learn and grow.
Godox softbox with diffuser
tool
GVM RGB LED light
tool
Sony ZVE10 camera
tool
Tamron 11-22mm f/2.8 lens
tool
Rode Wireless Go microphone
tool
Padcaster Parrot Teleprompter
tool
Parrot teleprompter app
tool
SanDisk Creator 4TB portable SSD
tool
SanDisk Creator desk drive
tool
Western Digital hard drive
tool
CapCut
tool
Adobe Premiere Pro
tool
Storyblocks
service
Ryan Trahan
person
YouTube workbook
book
Amazon storefront
link
What type of lighting setup does she use to reduce under-eye shadows?
Clamshell lighting with a key light above and a fill light below.
01:20
What is the main camera she uses for her YouTube videos?
The Sony ZVE10.
03:42
What lens does she switch to for short-form videos and vlogs?
The Tamron 11-22mm f/2.8 lens.
05:31
Which service provides 90% of her B-roll footage?
Storyblocks.
06:16
What microphone does she use for all her YouTube videos?
The Rode Wireless Go.
08:26
How does her Padcaster teleprompter work?
It attaches to the camera lens with rings, uses the Parrot app for scripts, and a Bluetooth remote to scroll.
09:33
What is the minimum SD card size she recommends for 4K filming?
128GB.
11:43
What is her two-phase backup strategy?
Active projects are stored on a portable SSD; finished videos are archived to a desk drive.
12:10
Clamshell lighting technique
Explains how pairing top and bottom lights reduces under-eye shadows for a flattering, professional look.
01:20Camera choice for creators
Shows why a flip screen and skin blur effect are essential for solo YouTubers to get the shot right from the start.
03:42Teleprompter workflow
Demonstrates how a teleprompter allows script reading while maintaining direct eye contact with the camera.
09:33Redundant backup strategy
Stresses the importance of multiple storage copies after personal hard drive failures, a viral lesson for creators.
12:10Start with what you have
Encourages beginners to start with simple gear, citing Ryan Trahan's success with just an iPhone, tripod, and mic.
15:55[00:02] experience with gear would be an understatement. So, after 6 years of that I've landed on and that's responsible for every single video that I'm talking about all of my YouTube gear, I'm actually not filming with any
[00:19] of the gear. I'm filming on my phone today so that I can show you the gear. As always, timestamps are below. Use them if you need them. Let's jump in. First, let's talk about my lighting setup. I have like three main lights
[00:31] that I use for every single one of my videos. This is like our power duo right here. Attached, we have the newer octagonal softbox. I think this is just like the biggest size with the diffuser attached.
[00:49] See? And then I also have another Godox here When I first started making videos, we didn't have the biggest softbox. We Ours apartment was smaller and we needed something compact that we could like
[01:03] store away easily. This just stays up and this is bigger, more surface area, just provides like more coverage evenly across my face. Now, I pair this key light with This one is the GVM RGB LED
[01:20] The pairing of these two together when they face me, it's called clamshell lighting. That's when like I have my key light coming top to bottom and then I have a secondary light going bottom to top to kind of fill in the under
[01:34] shadows. This is specifically because of these under eye bags and my own self-conscious thoughts. So, over time we've found that this clamshell light setup is my personal preference. It's a little bit brighter, airy. It's like the
[01:49] glam look that like a lot of maybe makeup artists or makeup YouTubers use. So, we actually put a white trash bag over this one as our
[02:01] So, this setup is what's in front of me. As you can see, I like face the camera and I face this direction. And then as my back light or behind me, I just add this one shining behind me. If I'm filming here, I'm just going to
[02:16] If I'm filming here, I'm just going to have this face me. And then
[02:36] right there. And then I would just be sitting here. Originally, all of these were on their own tripod. Like this was on its own C-stand. This was on a tripod. This was on a tripod. And it was just too many things going on. So, John
[02:49] actually created this handy-dandy rolling setup for me. So, now my setup rolling setup for me. So, now my setup just uses two C-stands. And we have clamps that we bought separately like the accessories for the clamps to
[03:03] connect the camera to the C-stand. And then a clamp here to connect this light to the C-stand. And the wheels were also an additional purchase. So, we just added the wheels to the bottom of the C-stand. Now, as a reminder, this is my
[03:16] setup that I've collected over the past 6 years. This is not where I started, okay? So, if you want more like starter gear recommendations, I do have my YouTube workbook that I'll link down below. It talks about everything you
[03:30] need to get started as a YouTuber in general. So, like starting your channel, gear starter kit, all the things. So, it's completely free. I'll be sure to leave it linked down below. Okay, now let's talk about my camera setup. that I
[03:42] use is the Sony ZVE10. This is my baby. This is like my YouTuber purchase. I remember I hit a milestone, I think like once I hit 1,000 subscribers on YouTube or something, I was like, "I'm going to buy myself a real YouTuber camera." And
[03:57] this was the camera that I bought. So, I have had this baby for like 5 or 6 years, and I love it. One of the biggest reasons I wanted to purchase it was that I could see myself when I was filming. It's also touchscreen, and
[04:11] there's like a skin blur effect. You could do like a soft, medium, or lowest, softest setting. So, it makes that clamshell lighting just look even more magical. I also liked that the camera offered interchangeable lenses so
[04:25] on the type of video that I was going to film. Something else that I was looking for when looking for a new camera was a camera that could film for long periods of time because my camera before, I think it was a Canon, it would just like
[04:38] stop filming. Just like randomly stop. The battery was fine, but it would just stop filming. And sometimes I would like yap and yap and yap, and then I didn't know when it cut me off, and it just caused a lot of issues. And this camera
[04:51] keeps up with my yap sessions. Like when I filmed my 3-hour masterclass, this just stayed recording the whole time. When I record my course videos, it stays on. I have a battery that also like plugs into the camera and plugs into the
[05:03] wall. So, I don't have to worry about like the battery dying when I'm doing longer videos. And it could just handle long film sessions. So, that was like a huge deal for me, too. Now, as a reminder, all the gear that I'm talking
[05:15] description below. I have an organized Amazon storefront with all of my YouTube creator gear. Now, in terms of vlogging content or filming extra b-roll or when I film my short-form videos, I actually switch lenses for short form, and I use
[05:31] this lens. So, this is the Tamron 11 to 22 mm f/2.8. This is just what I've always used for casual content like my vlogs or even my short-form videos. And a lot of times when I would film my own b-roll for
[05:47] content or for YouTube videos, when I would film my own B-roll, this fixed crop wasn't always the best and I wanted more of variety of options, so I would swap between these two often when I was filming my own B-roll. B-roll is just
[06:02] the clips that you see edited on top of my talking head content. So, while I'm close-up clips of a lot of the gear that I'm talking about. That's B-roll. It helps with the visual storytelling of your content. Now, I used to film all of
[06:16] my B-roll for my videos, but now 90% of the time my B-roll I just get directly from Storyblocks. Honestly, I think I started subscribing to Storyblocks in 2021 and I have loved them and used them ever
[06:30] Storyblocks, they are an all-in-one stock media library with footage, music, and graphics to help creators tell better stories through video. I used to spend so much time bouncing between different websites trying to find music,
[06:44] sound effects, B-roll, or graphics when I was editing. Sometimes when I was in the middle of editing a video, I'd realize that I didn't get B-roll for a specific shot and then I'd have to have a whole other film day filming more
[06:56] B-roll. And it just took up so much time. So, one day I was actually watching one of my favorite YouTubers one of their videos and it was sponsored by Storyblocks and they were talking about Storyblocks and I immediately
[07:08] signed up and I've been using them for all of my editing asset needs since. What I really appreciate is that everything in the Storyblocks library is made by actual filmmakers. They actually don't allow generative AI stock content
[07:22] in their library, which I know is so important to a lot of creators right now. Plus, you also get access to music and sound effects, which makes editing as a YouTuber feel super seamless just having everything you need in one place.
[07:35] And if you edit in Premiere Pro or After Effects, which we'll talk about editing they also have templates and workflow tools that make your videos look more graphic from scratch. And the best part
[07:48] licensing, which matters a lot when creating monetized content since everything is royalty-free and cleared for YouTube videos, commercial work, client projects, and all of that. So, if you want to start telling better stories
[08:02] with the same tools that I use, go to storyblocks.com/modernmille. They're also offering a limited-time discount for my audience only available through my link. Huge thank you to Storyblocks for sponsoring this video,
[08:14] and now let's get back to the setup. Now, let's talk about microphones. The only mic that I use for my YouTube videos and have always used is the Rode Wireless Go mics. They have different serieses
[08:26] of the Rode Wireless Go, so I think this is like the original, but they have Rode Wireless Go Twos or Threes, and I just love this because one, it's wireless, so
[08:38] it's attached to me. Now, it comes with a clip-on, so you could clip it on like this, but I usually wear it, so I'll just put it in my pocket, and then I have double-sided sticky tape, and I just tape it right under my clothes so
[08:50] videos. And it just works for everything, for my long-form content, for short-form content, for vlogs, because the quality is there. You don't have to be close to the camera. You could be walking throughout the room,
[09:03] quality. So, that is always my go-to mic for YouTube. Now, the most common teleprompter though. And before I tell you about my teleprompter, if you give this video a thumbs-up since it's going to tell YouTube that other
[09:19] video valuable. And if you learned two new things by the end of this video, to support me, my channel, and it allows me to continue to create free content like this for you every single week. My teleprompter, this is the Padcaster
[09:33] teleprompter. This is one of their like oldest versions. So, if you look at Padcaster gear, you might not see this exact one, but you see different Padcaster Parrot Teleprompter. And how it works is it comes with different
[09:46] rings that attach directly to your camera lens, depending on your camera lens size. So, it has a bunch of these rings. My camera is 58 mm, so I'm going to just screw it on, and then I attach the teleprompter.
[10:01] Then you download the Parrot teleprompter app, and you put your script in the app. So, we usually just script on Google Docs, and I'll just copy paste everything over. Once your script is imported, you just flip it.
[10:19] Put your phone on do not disturb, and then you use the Bluetooth remote to swipe through your teleprompter, or just swipe through your script. So, I'll just sit with my remote, and I'll press play, and the script rolls. The script is
[10:33] projecting right on this screen here, so it looks like I'm looking directly into the camera, but really I am reading my script. I read a script in almost all of check them out. Maybe not this one, but check it out. I read a script in every
[10:46] single one of my videos, and this is the setup that I use. You could pause the fast forward it. Any teleprompter has been a huge lifesaver. So, that was the main setup. We have lights, camera, gear, but that is not all the gear that
[11:01] is involved with being a YouTuber. There's equipment that supports the actual filming and post-production, so let's talk about that. Let's talk about storage and post-production gear. First thing that you'll probably be using when
[11:14] you're filming is an SD card. I currently use much of an investment it was for me. But, oh my gosh, am I obsessed with
[11:31] this? I think before the 1 terabyte one, I was doing a 128 gigabyte. If you're shooting 4K, it's just so important to have fast read speeds. So, I typically
[11:43] don't recommend anything under 128 gigabytes for SD card sizes. If you do have smaller SD cards, which I did in the beginning, I had a few small ones that I would just kind of like rotate between when filming. I also had an SD
[11:58] card holder, like a little case, and that would hold all of my SD cards. When I am done filming, I back up my footage in two phases. Phase one is active
[12:10] projects that I'm currently working on or I need to edit. They haven't been posted yet. I'm not done with them. Any active projects, I'm going to first move everything I film over here. This is a portable SSD. This one is also the
[12:26] SanDisk Creator series. It's 4 terabytes. And a portable SSD is great terabytes. And a portable SSD is great to save your computer or laptop, especially if you're editing directly off your computer or laptop and you find
[12:39] editing takes forever and you're like your computer is lagging, it's because your computer or laptop for it to handle. And so, once I got a portable handle. And so, once I got a portable SSD, I edited off of this. So, I had it
[12:52] of my editing with this plugged in and it made everything go so much faster. So, any active projects that I'm working on and editing, they go here. Once I'm done, my video is posted, it is live, I don't have to touch it again, I'm going
[13:06] to move everything here over to my archive. This is the SanDisk Creator desk drive and I have been using it as like an archive for all of my content.
[13:19] So, this stores everything that I'm not using, raw footage, edited videos, projects, edited projects in like Adobe Premiere, course content materials, and just stores my archive. Basically, it's just freeing up space from my SD cards,
[13:35] it's freeing up space in my SSD so that my SSD only has to worry about the pressure of active projects, then I'll offload those over here. Now, you don't have to do this right away, but we actually have archives of our archives
[13:49] of our archives. So, this is like the main archive, like if it's Modern Millie needs to quickly grab anything, it's right here. But, this archive, once the at the end of the year, we back up this archive to another archive that is
[14:03] like a shared archive with me and my husband, and we just have doubles of everything because we have had hard drives fail on us before. Never SanDisk, I will say. No, this is not sponsored by SanDisk, but we've never had a SanDisk
[14:18] drive or anything fail on us. I think, oh, what was the other brand that failed on us? It was Western Digital, I believe. We've had two Western Digital hard drives fail us, and we've lost everything. And so, now we don't do that
[14:31] anymore. I think now we use SanDisk and Seagate might be the other one. I'll heavy. I'm not going to get them out right now. I'll do it when I film And then, of course, I feel like editing software might count as gear, so I do
[14:44] want to touch on what I started using versus what I use. Starting off, I used CapCut. I felt like it was great for both mobile and desktop. It's really easy to use, and I was scared to use anything Adobe. I don't know what it
[14:57] was, but mentally I was intimidated by any Adobe product. Now, I actually prefer editing in Adobe Premiere Pro. My video editors use Adobe Premiere Pro. I use Adobe Premiere Pro for now short-form and long-form and my
[15:12] course content. For a long time, I was like just in CapCut for short-form, and now I just I prefer sitting at my desk and editing there, so most everything I use is in Adobe Premiere Pro. Then of course when I'm editing any sort of
[15:26] effects or things that I need for like music, b-roll footage, sound effects, assets, graphics, all of those things, I use Storyblocks. So that is my entire setup, like a walk-through through my whole setup. If you have any questions,
[15:41] I'll be sure to link everything also in the video description. And I want to remind you, this is the setup that has taken me 6 years to get to. I didn't start here. I started on my phone editing YouTube videos on my phone. So
[15:55] don't think you need perfect equipment to get started. I think Ryan Trahan is a perfect example of just use what you have because he is like one of the biggest YouTubers and a majority of his videos you can see when you watch them
[16:08] back, he is filming on just an iPhone, a simple tripod, and a mic like this. will see you in the next one. Follow your joy. Bye.
⚡ Saved you 0h 16m reading this? Transcribe any YouTube video for free — no signup needed.