Enter Mina's Grave for Secret Beastium
32sThe creepy grave location and danger make this a thrilling secret to uncover.
▶ Play ClipThis guide details how to activate beast mode in *Mina the Hollower* by collecting all six Beastium trinkets. It covers each trinket's location, the required items or conditions, and the steps to equip them simultaneously for the transformation. The video also explains the combat mechanics and limitations of beast mode.
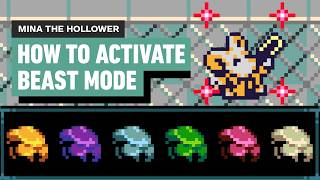
Warning, starving, volatile, draining, burning, reckless.
Found in Oex's Radiant Manor courtyard. Use Iron Steed and Carry the Wisp to cross a gap.
Located in Night's Rest, Miner's Mile. Requires a door opened with three sparks. Lay in Mina's grave to enter a warped area, then return to the crypt.
Purchased from Vitus on the train platform between Bone Beach and Knox's Bayou during a specific route. Cost: 750 bones.
Bought from the shop inside the Kindlewood after defeating the Mad House boss. Cost: 2,000 bones.
Found in Cold Train Peak. Burrow under a hole to the east, then complete a platforming challenge with ice and spikes. Equip Steady Souls, Carry the Wisp, and Spike Spurs for easier navigation.
Obtained by helping Dr. Knot in Astral Ory Mirror's End. Retrieve his hidden brain (break wall north, cross wide gap) and throw it at him.
To equip all six, you need six trinket slots. Upgrades can be purchased from Emporium in Oex, obtained by defeating Maxi, or found in Astral Ory Mirror's End (requires mirror unlock).
Equip all six in an underlab, they flash. Drink a vial to transform. Melee attack with three-hit combo: quick follow-up sends a wave, delayed follow-up performs an AoE spin. Sidearm becomes a fireball (dash attack midair). Cannot heal with vials; individual trinket effects don't apply.
"Title accurately describes the guide content; the video delivers exactly what it promises."
What are the names of the six Beastium trinkets?
Warning, starving, volatile, draining, burning, reckless.
Where is the warning beastium located, and what items are needed to reach it?
Oex, the courtyard of Radiant Manor. Use Iron Steed and Carry the Wisp to cross a gap.
0:27
Where is the starving beastium found, and what is required to access it?
Night's Rest, a section of Miner's Mile, inside a door requiring three sparks.
1:14
How is the volatile beastium obtained?
Purchased from Vitus on the train platform between Bone Beach and Knox's Bayou, while riding the train during a specific route.
1:53
How much does the draining beastium cost?
2,000 bones.
2:36
Do you need to equip all six Beastium trinkets at once to activate beast mode?
Yes, equipping them all and drinking a vial activates beast mode.
4:11
What changes occur in Mina's melee attack combo during beast mode?
The third attack changes depending on timing. A quick follow-up creates a small wave; waiting slightly longer creates a powerful AoE spin.
5:09
What are two key limitations of beast mode?
You cannot use vials to heal (they revert Mina to normal), and the individual trinket effects do not apply.
5:35
Beast Mode Attack Combo Variations
Explains how the third attack changes based on timing, providing strategic depth for combat.
5:09Beast Mode Limitations
Clarifies that healing is disabled and trinket effects don't stack, which is critical for gameplay planning.
5:35Requirement of Six Trinket Slots
Highlights the need to upgrade trinket bag to equip all six, linking transformation to progression.
4:09Six Special Trinkets Trigger Beast Mode
Establishes the core mechanic: collecting all six Beastium trinkets unlocks a powerful transformation.
[00:00] There are six special trinkets in Mina
[00:02] the Hollower, the different beastiums.
[00:04] And if you wield all six at once, you
[00:06] might just have something special
[00:08] happen. Want to know how to do it for
[00:10] yourself? Here's a guide for how to
[00:11] activate Mina's beast mode with all six
[00:14] Beastium trinkets.
[00:17] First things first, though, this is
[00:19] typically something you'll only be able
[00:20] to get after getting pretty far into the
[00:22] game. So, this is your courtesy spoiler
[00:25] warning.
[00:27] The warning BCM can be found in Oex, the
[00:30] courtyard of Radiant Manor. Head to the
[00:32] right and there's a large gap to cross.
[00:34] There are a few ways to go about this,
[00:36] but your best bet is to use the iron ste
[00:39] sidearm and carry the wisp trinket. The
[00:42] iron ste can be picked up inex just next
[00:45] to the blacksmith.
[00:51] Carry the wisp can be purchased from
[00:53] puppet's hidden shop in the southern
[00:54] outskirts.
[01:01] Line up the Iron Steed with the gap.
[01:03] Leap at the edge, then tap and hold jump
[01:05] to float with Carry the Wisp. And the
[01:08] warning beastium is just on the other
[01:09] side.
[01:14] The starving beastium can be found in
[01:16] Night's Rest, a section of Mner's Mile.
[01:19] There's a door here requiring three
[01:21] sparks to open. We'll include a link to
[01:23] our spark locations guide in the
[01:24] description below. Once you have three
[01:27] sparks, open the door to Mina's grave
[01:29] and lay inside. You're taken to a warped
[01:32] version of the surrounding area that's
[01:34] filled with danger. Carefully make your
[01:36] way around. We'd recommend having the
[01:38] protospark trinket equipped in case you
[01:40] get hit.
[01:42] Follow the path back to the same crypt
[01:44] where you started and your reward is the
[01:46] starving beastium.
[01:53] The volatile beastium can be purchased
[01:55] while riding the train, but only during
[01:58] a very specific route. Board the train
[02:00] from Bone Beach and ride to Knox's
[02:03] Bayou. This means you'll not only have
[02:05] to unlock the train, which is an
[02:07] expensive requirement to reach Cold
[02:09] Train Peak, but also have access to the
[02:11] train stations in both Bone Beach and
[02:13] Nox's Bayou. The beastium can be
[02:15] purchased from Vitus on the platform
[02:18] between sections of the train. The
[02:19] volatile beastium will be yours for 750
[02:23] bones.
[02:28] The draining beastium can be purchased
[02:30] in the Kindlewood. When you first enter
[02:32] the region, you'll have to battle
[02:33] against the mad house. Winning the
[02:36] battle opens up a shop inside, and the
[02:38] draining beastium can be purchased for
[02:40] 2,000 bones.
[02:48] The Burning Beastium can be found in
[02:50] Cold Train Peak. Early in the dungeon, a
[02:53] couple of screens past the first
[02:55] underlab, you'll find a hole you can
[02:57] burrow under to the east.
[03:00] Within it is a platforming challenge
[03:02] with ice and spikes. We recommend
[03:04] equipping the steady souls trinket to
[03:06] make this section easier, as it negates
[03:08] the ice physics. Carry the wisp may also
[03:11] be helpful.
[03:13] as well as the spike spurs to reduce
[03:14] spike damage.
[03:17] At the end of the platforming challenge
[03:19] is the burning beastium.
[03:23] The reckless beastium is found in the
[03:25] astral ory mirror's end. Regardless of
[03:28] which mirror you enter to reach the
[03:30] central hub, head to the east and you'll
[03:32] find Dr. Knot, an NPC who is apparently
[03:35] missing his brain. There are a few
[03:37] brains lying around for some reason, but
[03:40] his brain is hidden away. Break the wall
[03:43] just north, and at the end of the
[03:45] section is the real brain you're looking
[03:46] for. The gap is a bit wide, so you'll
[03:49] need something extra to get you over
[03:50] there, such as carry the wisp so you can
[03:52] float across, but anything that can
[03:55] expand your movement options should work
[03:56] here. Bring it back to Dr. KN and throw
[03:59] the brain at him to slot it back into
[04:01] his head. Your reward will be the
[04:03] reckless beastium and a hint about using
[04:06] all of them together. H
[04:09] Once you have all six Beastium trinkets,
[04:11] there's actually one more step,
[04:13] equipping all six at once. That means
[04:16] you need six trinket slots. Here's a
[04:18] quick rundown of where to find all five
[04:20] upgrades. Three of them can be purchased
[04:22] from the Emporium in Oex, with each one
[04:25] more expensive than the previous. One is
[04:28] obtained in the Eastern Heath just
[04:30] outside of AX. After clearing your first
[04:32] dungeon and spark generator, Maxi will
[04:34] be waiting for Mina here. Defeat Maxi
[04:37] and your reward is a trinket bag. The
[04:40] last trinket bag is found in Astroi
[04:42] Mirror's End to the west. You'll have to
[04:44] have unlocked the mirror in at least
[04:46] September to get here, and you'll need
[04:48] to spend a year to access the upgrade.
[04:50] Once you have all of these, you'll be
[04:52] able to equip six trinkets at once. Once
[04:55] you head to an underlab and equip all
[04:57] six beastium trinkets at the same time,
[04:59] they'll flash. Drink a vial and Mina
[05:02] will activate beast mode. Here, your
[05:04] weapon and sidearm are replaced by a
[05:06] melee attack. If you attack three times,
[05:09] your third attack will change depending
[05:10] on how long you wait to use it,
[05:12] indicated by the weapon icon in the
[05:14] lower left. If you attack immediately,
[05:16] Mina will unleash a small wave ahead of
[05:18] her to deal a lot of damage. If you wait
[05:20] for a short moment, you'll see the icon
[05:22] change to a small tornado. Finish your
[05:25] attack combo during this time to instead
[05:27] perform a powerful AoE spin. Your
[05:30] sidearm is a fireball, and if you
[05:32] activate it in midair, it's a dash
[05:33] attack. There are two things to note
[05:35] about beast mode. One is that you cannot
[05:38] use vials to heal, as they'll simply
[05:40] return Mina back to normal. And the
[05:42] second is that all of the individual
[05:44] beastium trinket effects do not apply
[05:46] when used together in beast mode.
[05:50] And that's how you find all six beastium
[05:53] trinkets to activate beast mode. This
[05:55] form is very powerful. Will you be using
[05:58] it in your playthrough? Make sure to let
[06:00] us know down in the comments. And for
[06:02] more on Mina the Hollower, make sure to
[06:04] check out our other guide videos and
[06:06] everexpanding wiki pages. For everything
[06:08] else gaming, keep it locked right here
[06:10] at IGN.
⚡ Saved you 0h 06m reading this? Transcribe any YouTube video for free — no signup needed.