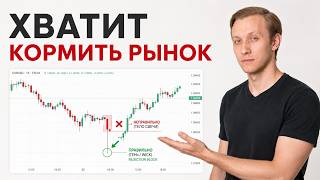

5 Rules to Identify a Rejection Block
50sProvides actionable, rule-based identification that viewers can immediately apply, increasing engagement and saves.
▶ Play Clip"Title promises the best order block for trading, and the video delivers a detailed explanation with rules and examples."
This video explains the concept of a Rejection Block in trading, a more precise zone than a standard Order Block, which helps reduce drawdown and improve entry accuracy. The presenter, Kirill, outlines five rules for identifying Rejection Blocks and demonstrates how to combine them with Order Blocks across timeframes for better trade execution.
A Rejection Block is a more precise zone than an Order Block, formed only on swing highs or swing lows where the candle shadow is larger than the body. It is marked along the shadow, not the body.
Order blocks are marked along the candle body, while rejection blocks are marked along the shadow. The shadow shows the extreme point where price rejected, making it a more accurate entry zone.
Rejection blocks often form when price breaks a high or low to collect liquidity, then sharply reverses. They provide a logical zone for stop-loss and take-profit placement.
A rejection block must form on a swing high or swing low. If it appears in the middle of a move, it is not valid.
The shadow must be visibly larger than the body. If the shadow is not noticeable, the candle is not a rejection block.
For a bearish rejection block, the shadow is on top. For a bullish rejection block, the shadow is below.
When multiple candles form a swing point, select the candle with the highest shadow (regardless of bullish or bearish) as the rejection block zone.
Mark only the entire shadow area, not including the body or the opposite side of the shadow.
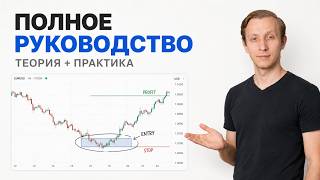
Timeframes are fractal. On a higher timeframe, a rejection block candle contains multiple candles on a lower timeframe. The rejection block provides the zone, and the order block inside that zone on a lower timeframe provides the entry point.
The presenter shows several chart examples where rejection blocks are identified by a small body and large shadow at swing points. These zones help set logical stop-loss and take-profit levels.
The rejection block is a powerful tool for identifying precise entry zones with less drawdown. By combining it with order blocks on lower timeframes, traders can improve accuracy and manage risk effectively.
What is a rejection block?
A rejection block is a form of order block formed on a swing high or swing low where the candle shadow is larger than the body, marked along the shadow.
01:43
How does a rejection block differ from an order block?
An order block is marked along the body of the candle, while a rejection block is marked along the shadow.
02:31
What is the first rule for identifying a rejection block?
It must form only on a swing high or swing low, not in the middle of a move.
03:12
What is the second rule for identifying a rejection block?
The shadow must be larger than the body.
03:26
What is the third rule regarding shadow position?
For a bearish rejection block, the shadow is on top; for a bullish rejection block, the shadow is below.
03:40
What is the fourth rule for choosing the candle?
Choose the highest candle at the swing point, regardless of whether it is bullish or bearish.
03:55
What is the fifth rule for marking the rejection block?
Mark only the shadow area, not including the body or the opposite side of the shadow.
04:10
How does fractality apply to rejection blocks?
On a higher timeframe, a rejection block candle contains multiple candles on a lower timeframe. The rejection block provides the zone, and the order block inside that zone on the lower timeframe provides the entry point.
04:27
Why do rejection blocks often form?
They often form when price breaks a high or low to collect liquidity, then sharply reverses.
02:58
Rejection Block Precision
Introduces the core concept that rejection blocks are more precise than order blocks, reducing drawdown.
00:34Key Difference: Shadow vs Body
Clearly distinguishes rejection blocks from order blocks by marking zone along shadow instead of body.
02:31Five Rules for Identification
Provides a systematic framework to identify valid rejection blocks, essential for consistent application.
03:12Fractality Principle
Explains how to combine rejection blocks (higher TF) with order blocks (lower TF) for precise entries.
04:27Chart Examples
Demonstrates real chart examples showing how to apply the rules and set stop-loss/take-profit levels.
06:03[00:02] gone where it should? How much money have you lost on inaccurate entries? Well, one of the reasons you mark the body of the candle is when you need to place the shadows. [music] Understand, the rejection block solves this, and today we're going to talk about it. By the way,
[00:16] in my Telegram channel [music] and free trading community. I recommend subscribing, link in the description. Now let's get down to business.
[00:34] is a more precise zone than order block. This gives less drawdown and makes your entry more accurate. Today's video structure. First, we'll talk about what a rejection block is and how it differs from an order block. Then I will tell you about the
[00:49] five rules of identification. When this will be a rejection block and when it will not. After this, we will touch on the principle of fractality or how to find an order block within the shadow. After watching this video to the end, you will have less drawdown in
[01:03] why the price reverses in a lose profit where you could have earned it. If you don't know me, here's a little about me. My name is Kirill. 4 years in trading. I've been living in
[01:16] Dubai for the same amount of time. I trade using SmartMoney and IC. The markets I work with are Forex, gold and crypto. I have also attached my latest trades. Everything is transparent and honest. So that you see that trading is not a money button. Yes,
[01:30] you can make good money here, but there will also be losses. But in order to be in the black over the long term, you need to understand what you're doing and have the right approach. Accordingly, what we're going to talk about today is that rejection
[01:43] block helps in [music] trading. Let's move on. What is a rejection block and how is it different from an order block? A rejection block is a form of order block that is formed only on a swing or swingow. A mandatory criterion for
[01:58] us to be able to define a rejection block is that [music] the candle shadow must be larger than the candle body. Accordingly, as we see in this illustration, we have a candle on our local pig high or pig low, where the shadow will be
[02:14] larger than the body. Accordingly, this will be our block cutting zone. We celebrate this from the very beginning to the very end. The main difference between a rejection block and an order block is that an order block is the
[02:31] zone that is marked along the body of the candle, while a rejection block is the zone that is marked along the shadow of the candle. Why does this work? Rejection block shows otkastny and move on. Accordingly, here we see that our
[02:44] shadow is the extreme point to which the price reaches and after that it goes into rejection. Swinhigh is a refusal to go higher, and swinglow is a refusal to go lower. A Rejection Block, in its simplest sense, is a more precise zone than a regular orthoblock.
[02:58] Accordingly, this gives less drawdown and makes your entry more accurate. This is usually done to collect liquidity. The price breaks the high or low, collects stops and sharply reverses. [music] I'm sure this sounds familiar to you.
[03:12] Let's move on. Five [music] rules for identifying when it will be played as a block, and when it will not. Rule number one, it's mandatory to have only [music] on swinghali swing low. If this
[03:26] happens in the middle of a movement, we can safely forget about it. This will not be safely forget about it. This will not be our rejection block. Rule number two. our rejection block. Rule number two. The shadow will always be larger than the body. If the shadow is not
[03:40] noticeable, we do not take it into account. The shadow will obviously be larger if we look at it on the graph. Great. Let's move on to rule three. Position of shadows. If we are talking about a bearish rezhek block, then the shadow will be on top. If we are talking
[03:55] about a bullish cutting block, then the shadow will be below. Rule number four. Which candle should I choose to understand that this is the rejection block zone? We choose the highest one. Whether it is a bearish candle or a bullish one, it doesn't
[04:10] matter to us. We just look at the highest candle. As we can see, here we have taken the highest one, where the shadow is larger than the body, and we move on to the rule of five. When
[04:27] very end, we do not include the body or the opposite side of the shadow in our markings. Take into account only the shadow, the whole [music] area. Let's move on to the principle of fractality. As we know, in trading
[04:41] all timeframes are fractal. And now we'll talk about how to find an order block inside the shadow. Accordingly, if we take a higher timeframe of 4 hours, take a higher timeframe of 4 hours, we will have one candle. We realized that this is a
[04:54] rejection block according to all our rules. We have one candle, the shadow is larger than the body. This is the highest. If we switch to the hourly timeframe, to a lower one,
[05:07] this zone will consist of four candles. And in this zone we will find our order block. How to understand and apply this mechanics in your trading and analysis? The rejection block will
[05:21] provide a zone on a higher timeframe. Further, the order block inside this zone on a lower timeframe will provide an entry point. Actually, this is the mechanic that we use [music] Rejection Block and Order Block for. I also want to remind you
[05:36] that I have a Telegram channel where I publish more information on trading. community where I share my trading [music] ideas, conduct live trading, and talk more about trading approaches
[05:49] based on SmartManyoney and ICT. Also, if you are a member of the trading community and have any questions, you can feel free to write to me. I am in touch with everyone and always respond promptly. Accordingly, let's now
[06:03] move on to the chart and look at this in more detail using examples so that you can use it yourself. I have already noted several options so that it would be clear and understandable for you and easier to determine in the
[06:17] future. [music] Actually, here we see several examples of block cuts. As we discussed earlier, we have five rules for determining block notches. Let's take a look. That is, we have a local low. There is also a local high in this example
[06:32] local low. There is also a local high in this example . And we determine this by the fact that we have a small candle body and a large shadow. This is the lowest, the highest close. And this zone here will be a
[06:48] rejection block. In this case, it is quite obvious that this is a large shadow, this is a body. And [music] here we have had a strong
[07:00] manipulation, as we can see. In the future, when making a trade, we will understand that this or that zone will be a logical zone for either stop-loss or take-profit. Here. Let's move
[07:16] on. Here I also noted two more options. That is, here we shadow. Here. And this is also the lowest close. Here after this we
[07:31] lowest close. Here after this we form equalс. Good enough. form equalс. Good enough. This is also [music] we highlight the This is also [music] we highlight the rejection block zone. In the case of
[07:45] achieving a local change, here in this zone, here we also have a smaller body, and the shadow itself is larger. We define this as our cutting block. When switching to a lower timeframe, be it 1 hour or 15 minutes,
[08:00] we will be able to see the order block in more detail and use it to enter a trade or determine it as a more precise
[08:12] stop-loss or take-profit. [music] And one more example that will be quite interesting and clear to you . So, I have highlighted another rather illustrative example. Let's break it down. That is, here we see that a
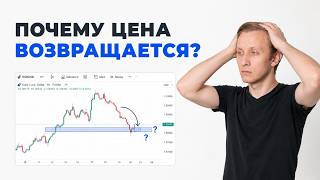
[08:25] [snorts] is quite small, the shadow is large. That is, this zone will be our rejection block. Here. And then we
[08:38] see that the price returns to this zone. Accordingly, we, accordingly, we can also understand that by understanding a more precise zone, using this, and not the precise zone, using this, and not the body, we can minimize our
[08:53] losses. or maximize our profit. Even if we set a stop-loss in this zone, you could easily knock us out. If we focus on a zone, and the block's rejection, then we understand that it is logically better to place a
[09:09] understand that it is logically better to place a stop-loss beyond this zone. And in this way our deal could have been saved. So, today how to use it in conjunction with an order block, how to use it to make
[09:23] our trades more accurate, how [music] to maximize profits, and how to minimize losses. Here. I hope this video was more helpful. I also want to ask you [music] to subscribe to the channel, like it, and leave a
[09:36] comment. Also, let me know what you would like me to cover in the next video. I also recommend watching this video. It is also quite good and useful. Well, that's all for now, see you in the next video.
⚡ Saved you 0h 09m reading this? Transcribe any YouTube video for free — no signup needed.