Stop Burning Your Chicken! Try This
45sDirectly addresses a common grilling frustration with a promise of a simple solution.
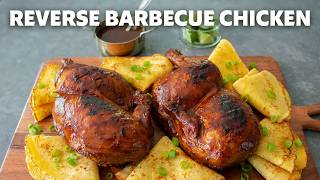
▶ Play ClipChef John from FoodWishes.com presents a method for making perfectly cooked barbecue chicken using a reverse sear technique. By baking the chicken first, letting it rest, and then finishing it on the grill, this approach ensures moist, tender meat with a beautiful char, eliminating the common problem of burnt skin and raw insides.
Chef John introduces the concept, inspired by reverse sear steak, to solve the problem of black-on-the-outside, raw-in-the-middle chicken.
Cut a whole chicken in half by removing the backbone with scissors, bending it open, slicing the breastbone, and flattening. Trim excess fat and optional wing flats.
Mix salt, brown sugar, garlic powder, black pepper, smoked paprika, cayenne, and barbecue sauce. Coat the chicken halves thoroughly.
Place chicken skin-side up in a baking dish, cover with foil, and bake at 325°F for exactly 45 minutes.
After baking, let the chicken rest for 1 hour. For best flavor, brush with pan juices, wrap, and refrigerate overnight.
Scrape off excess marinade, let chicken warm for 30 minutes. Boil pan juices to make a sauce for mopping.
Use 14 briquettes spaced apart for even heat. Grill skin-side down for 3 minutes, then flip skin-side up. Mop sauce and flip repeatedly for 30-35 minutes until heated through and charred.
Method works for bone-in thighs or boneless breasts (adjust baking time). Serve with extra sauce, lime wedges, and cornbread crepes.
The reverse barbecue chicken method ensures perfectly cooked, moist, and tender meat by baking first and finishing on the grill. This technique removes variables and delivers consistent, delicious results.
"The title perfectly matches the content: the video delivers a complete, detailed tutorial on reverse barbecue chicken, exactly as promised."
What is the oven temperature and baking time for the chicken?
325°F for exactly 45 minutes.
02:36
How many briquettes are used for grilling and how are they arranged?
14 briquettes, spaced a few inches apart for even heat.
04:06
What is the purpose of the overnight method?
To let the chicken absorb flavors overnight for a better final result.
03:07
How long should the chicken rest after baking before grilling?
1 hour (60 minutes).
02:52
What is the approximate grilling time for the overnight method?
30-35 minutes.
05:51
What is the key difference between the reverse sear for steak and this chicken method?
For steak, it's finished in a pan over high heat; for chicken, it's finished on the grill.
02:36
What is the recommended way to cut the chicken in half?
Remove the backbone with scissors, bend open, slice the breastbone, and flatten.
00:29
What ingredients are in the wet rub?
Salt, brown sugar, garlic powder, black pepper, smoked paprika, cayenne, and barbecue sauce.
01:22
What is the purpose of scraping off the marinade before grilling?
To remove any excess that could burn on the grill.
03:34
What is the optional step for the wing flats?
Cut them off for better presentation and add to broth for a chef snack.
01:09
Reverse Sear Technique for Chicken
Introduces a novel method that eliminates common grilling problems.
Baking Before Grilling
Key step that ensures chicken is perfectly cooked before finishing on the grill.
02:36Overnight Flavor Absorption
Optional step that significantly enhances flavor and moisture.
03:07Even Heat Grilling with Few Coals
Using only 14 briquettes spaced apart prevents hotspots and ensures gentle browning.
04:06Versatility of the Method
Method works for various chicken cuts, making it widely applicable.
06:07[00:00] Hello, this is Chef John from FoodWishers.com with Reverse Barbecue Chicken! That's right, Gorgeous perfectly cooked barbecue chicken is not the easiest thing to do,
[00:14] which is why inspired by the reverse sear steak technique, I think I've come up with a very simple method, and hopefully your days of black on the outside run the middle chicken are over. Oh, and I'm also going to tease a very exciting possibly upcoming video.
[00:29] Well first things first, and you get started, we're going to cut a chicken in half, since for me that is by far the best thing to use for barbecue chicken, and what we'll do is turn that chicken breast side down, and we'll simply use our scissors to make two cuts, right
[00:41] against the backbone on both sides, which of course we will save to make some broth later. Oh yeah, when you use a whole chicken, you get free broth. But anyway once that's been removed, we'll bend the chicken open, and we'll find the breast
[00:55] bone, which is covered by a little piece of cartilage in the center, and we will slice in about a quarter inch deep right there, and then flatten out the chicken until the breast bone reveals itself. At which point it's going to be very simple to finish cutting this in half, and yet you
[01:09] might have to give it a whack or two with your hand to get through, but it's really not that hard, and that's it besides trimming out any excess fat, the only other optional thing I like to do is cut the flat sections of the wings off, since I think it makes for
[01:22] much nicer presentation, and also we can add those to our broth, and then pull about later and have a little chef snack, and once our chicken's prepped, we'll go ahead and make our wet rub, which includes some salt, some brown sugar, some garlic powder, some
[01:38] freshly ground black pepper, some smoked paprika, and of course a few shakes of cayenne to stay in shape, and then we'll finish up with some prepared barbecue sauce, or a dealer's choice
[01:50] use whatever you like, whether it's from the store, or possibly homemade using our famous all-American barbecue sauce recipe, and what we'll do once we have that all mixed up is transfer in our chicken, and we'll give it a toss until it's thoroughly coated, which is probably
[02:05] easier to do with your hands, but I used tongs because I was filming, and I didn't feel like washing my hands, but anyway once coated, we'll transfer that into a baking dish, or shallow roasting pan like this, with the skin side up, and then we'll use a spoon or a brush
[02:21] to transfer any and all that wet rub on top, applying that as evenly as we can, and once that's been accomplished, we're going to cover this in foil and pop it in the oven, okay if you're familiar with the reverse sear technique for steak, the meat is cooked gently in
[02:36] the oven first, and then finished in a pan over high heat to get some nice brown color, well we're basically doing the same thing here, only we're going to finish on the grill, so once that's wrapped we'll pop it into a 325 degree oven, for exactly 45 minutes,
[02:52] at which point we'll pull it out and do absolutely nothing, for one hour that is, okay we want to let this sit in rest for 60 minutes, during which time it's going to cool down while that cooking process finishes, and once that happens we'll unwrap it, and if we want
[03:07] to move on to the grilling and finishing step, but not me, I'm doing the overnight method, which involves brushing the pan juices and wet rub over the top, and once we have that thoughtfully applied, and this is cooled down enough to put in the fridge, we'll wrap it
[03:22] back up and do just that, and we'll let it sit absorbing all those beautiful flavors overnight, which I really think gives us a better final result, but as I said it is optional so you decide,
[03:34] I mean you have to all do pit master of whether to go faster, but either way to prep this for the grill, we'll take a spatula or a stiff finger, and we will scrape off any wood actually became a marinade off the surface, and we'll do that to both halves, at which point we'll
[03:50] let that chicken warm up for about 30 minutes, before we hit the grill, and while we're waiting we'll transfer everything that was in the pan, into a small saucepan, and we'll place that over medium heat and bring it to a boil, and we'll give it a stir, and reduce it for a few minutes
[04:06] until it starts to thicken up a little bit, and as you might suspect, that's going to make an amazing sauce to mop over our chicken once it goes over the coals. Speaking of which, we're not going to use that many coals, okay, I'm only using 14 brickettes, which I like to space out a few inches
[04:23] apart so that we get some very even heat, and we won't have to worry about any hotspots, and we'll do is place that chicken skin side down, and we will give that side about three minutes or so,
[04:35] just to start the browning process, and then we'll go ahead and flip it back over skin side up, since we're going to do the majority of the reheating with this side up, or I think to the pelvis and the ribcage and the breastbone, the other side has a lot more insulation, and we're
[04:50] really not that concerned if that side chars a little bit, and as usual anytime we're grilling, it's not a bad idea to give things a turn, just to hedge our bets with that whole even heat thing, and at this point we can start mopping our sauce over the top, since eventually we're going
[05:06] to turn this back over to get a little more browning, and as you'll see we'll apply a bunch of sauce to the other side as well, and it was pretty windy out, so I did cover this occasionally between turns, and yes I'm still rocking the $30 expert grill, which just refuses to fall apart so I can get a
[05:23] new nice one, but anyway we'll flip that over, and like I said we'll apply some sauce to the other side, and again we're just going to give that skin side a few minutes facing the coals, since we want a fairly gentle browning and light charring, so after a few minutes we'll flip it back
[05:39] over, and we'll basically just repeat those steps two or three more times, until our chicken's nice and hot and safely heated through, and we've achieved an absolutely gorgeous finish, and of course
[05:51] this is going to take longer if you do the overnight method, right? This step roughly took like 30-35 minutes, whereas if you toss this on the grill right after you bake it, it's going to go a lot faster, since you're basically just browning the skin, and making sure the chicken's fully cooked.
[06:07] Oh and I should have mentioned, if you don't want to go with the chicken halves, I'm pretty sure this method's going to work no matter which you use, whether that's some bone-in thighs, or even some boneless, skinless chicken breasts, okay you obviously have to change the pre-baked times,
[06:21] but the idea of cooking the chicken perfect first, and then finishing on the grill, should translate, but in any event, once we're happy and we decide it's done, we'll pull it off the heat, and we will bring it inside and transfer it onto a cutting board, being careful not to tear this
[06:36] skin, whoops I just tore this skin, but that's okay, that's what extra barbecue sauce is for. And once I covered up that little situation, I went ahead and transferred over some folded up cornbread
[06:48] crepes, which are basically tortillas made with cornbread batter instead of masa, and once I perfect the recipe, which is hopefully very soon, I'd love to show you how to make those, and that's it,
[07:00] I finished up with some freshly sliced green onions, before I grabbed a fork and knife and went in for the official taste, and that my friends was pretty much a perfect barbecue chicken. All right, by baking it first, and then letting it sit overnight and all that goodness,
[07:14] once it is finished on the grill as shown, not only do we achieve a perfect appearance, but the meat is going to be very moist and tender, and it would be fantastic no matter how you served it, but what I'm going to do next is cut a few slices, and I'm going to grab a little extra sauce
[07:31] and some fresh lime wedges, and I'm going to tear one of these cornbread crepes in half, and I'm going to top it with the chicken, and one slice is probably enough, which is why I did three,
[07:43] and I'm going to drizzle on a little bit of sauce, and if you drop some lime juice, and I'm going to roll that up, and I cannot think of a better way to eat barbecue chicken than this, and if you know of one, please tell me, so I can check it out, but anyway, that's it,
[07:59] what I'm calling reverse barbecue chicken, which as I explained is loosely based on the reverse sear steak technique, and by using this method, we take a lot of variables out of play, and as long as your chicken is cooked almost, if not perfectly before we grill it,
[08:15] I think you're going to have some amazing results, and no matter what barbecue sauce you use, or how you decide to spice it out, I loved everything about this, and I really do hope you give it a try soon,
[08:28] so please follow the links below for the ingredient amounts, a printable written recipe, and much more info as usual, and as always, enjoy!
⚡ Saved you 0h 08m reading this? Transcribe any YouTube video for free — no signup needed.