4 Ingredients for Perfect Sourdough
45sHigh educational value showing simple ingredients, debunking intimidation, and promising a crispy, fluffy result.
▶ Play Clip[00:00] So you want to make your first loaf of sourdough bread, good choice, with just four simple ingredients, flour, water, salt, and sourdough starter. You can make a loaf of sourdough bread that's crispy and crunchy on the outside, soft and fluffy on the inside, and it doesn't have to be that intimidating
[00:14] of a process. Here's what to do. Start by feeding your starter. In the evening, take 25 grams of left over sourdough starter out of the fridge. I just keep mine in the fridge and it waits for me until whenever I want to bake bread. Put your starter on a digital scale and then add 50 grams of water
[00:31] to the sourdough starter jar and mix the water and starter together to dissolve. Then get out your bread flour. I'm using the same bread flour that I'm going to be using in my bread recipe. It's this blue bag of king Arthur flour. Then add 50 grams of bread flour to the jar and stir it
[00:48] thoroughly until the sourdough starter mixture has the consistency of a loose pancake batter. Cover the top of the jar loosely with a lid. I'm using these lids that allow air to release, so I'm just going to close the lid all the way and then mark the top of the starter with a rubber band
[01:02] or some kind of mark so you can see how much the starter rises overnight. Place the jar on your kitchen counter and let the starter rise at room temperature overnight for about six to eight hours or until it roughly doubles in size. The next morning your starter should look something like this.
[01:18] Now that your starter has doubled in size, place a large mixing bowl on top of your digital scale. Add 300 grams of water to the mixing bowl. If you accidentally overshoot on the water, you can take out a few grams at a time with a spoon and get back to 300 grams of water.
[01:33] Then add 100 grams of your active and risen sourdough starter. Take the leftover starter that's left in the jar and place it back into the fridge to save it for the next time that you want to bake. Stir the starter and the water together to thoroughly dissolve the starter. Then add 450 grams of
[01:50] bread flour and of course take out any excess flour with the spoon if you accidentally overshoot. Then add 10 grams of salt directly on top of the flour. I used to add my salt into the water as I was mixing my dough and you can totally still do that but a few people told me that when they mix
[02:06] salt and water, it makes their dough get clumpy. So if you want to avoid this problem even if it's never happened you before, just add your 10 grams of salt into your flour and then stir it into the flour with a spoon as you're mixing your dough. So stir the salt into the flour to incorporate it and then
[02:21] mix all of the ingredients together with a spoon to form a shaggy dough without any visible dry clumps of flour. Should take about 30 seconds to a minute of mixing. Once your dough looks something like this, you can move on to the next step. Cover your dough up with a kitchen towel and let it rest on your
[02:37] counter for 30 minutes. Now it's time for the stretch and fold process. Stretch and folds are a way to build up gluten in the dough and it's a gentler alternative to kneading by hand. For this recipe, you're going to be doing three sets of stretch and folds with a 30 minute rest in between each set.
[02:53] So after that first 30 minute rest, uncover the mixing bowl and grab the corner of the dough that's furthest away from you. Let's call this the north end of the dough. Stretch the dough up into the air and then fold it back on top of the dough and stick the dough into itself. Give the mixing bowl a quarter
[03:09] turn then stretch the west end of the dough up into the air and fold it back on top of the dough and stick it down into the dough again. Give the mixing bowl another quarter turn, stretch the south end of the dough up into the air, fold it over the top of the dough. Then give the mixing bowl one last
[03:25] quarter turn and stretch the east end of dough up into the air, fold it back on top of the dough and press it down. That's the first set of stretch and folds. You stretched each corner of the dough and that's that. Cover the mixing bowl with a kitchen towel and let the dough rest for 30 minutes.
[03:41] 30 minutes later as the sun begins to rise, perform the second set of stretch and folds. For this, you're going to do exactly what you did for the first set of stretch and folds, except now you should notice that the dough is stronger and stretchier than it was the first time.
[03:54] After stretching and folding all four ends of the dough, north, west, south and east, cover the dough again with a kitchen towel and let the dough rest for 30 minutes on your counter.
[04:06] 30 minutes later give the dough its third and final set of stretch and folds. The dough should feel much stronger now that the gluten has been developed through the stretching and folding process. Stretch all four corners of the dough one last time and then you
[04:19] can move on to the next step. The first rise aka bulk fermentation. For the first rise, you can let your dough rise in the same mixing bowl that you mixed it in, but I prefer to move my dough to a seven cup glass bowl with a lid. The glass bowl allows me to see through the sides and see
[04:35] how much the dough is rising. To start off the bulk fermentation, move your dough into the glass bowl that has been greased with a little bit of olive oil and in the bowl, position the dough so that the smooth side is facing up and the seam side is facing down. Cover the dough with an airtight lid
[04:50] or a sheet of plastic wrap if your bowl doesn't have a lid and then let the dough sit in the glass bowl to rise for five to eight hours at room temperature. In my kitchen that's roughly around 70 degrees Fahrenheit, it took the dough exactly five hours to double in size. Once your dough has
[05:06] roughly doubled in size, you can move on to the pre-shape step. Eventually, I'll be shaping my dough into an oval or a batard shaped loaf, but for the pre-shape, I'm going to shape it into a ball.
[05:18] So gently take your dough out of the glass bowl and place it on an unfloured surface of your kitchen counter. Keep the smooth side facing up and the seam side facing down onto the counter. Then cup and pull the dough with your hands, moving the dough in a circular motion against the counter to
[05:33] form a tight ball of dough. This round shaping technique will build strength and structure in the dough, and after a short rest period, it will actually be easier to shape the dough into an oval during the next step. By the way, if your dough feels a little bit too sticky during this stage of the process,
[05:47] it's okay to add a little bit of flour to the top of the dough and then continue shaping. That'll take the edge off of the stickiness. Once your round ball of dough is formed, let your dough rest uncovered at room temperature for 30 minutes. This is sometimes called the bench rest.
[06:03] 30 minutes later, your ball of dough should be relaxed and you'll be ready to give the dough its final shape as an oval. Start by preparing a 10-inch oval banneton basket by dusting the bottom
[06:15] and the sides of the basket thoroughly with bread flour or rice flour if you have that. This dusting a flour will help the dough release from the sides of the basket later after the final proof. To shape this round dough into an oval, dust the top of the dough ball with a small amount of bread flour.
[06:32] This will create an additional non-stick surface on top of the dough. Then flip the dough over so that the flowered side is against the counter and the sticky side is facing up. Pull the corners of the dough out so that the dough forms a square shape and then fold the left third of the dough over the middle
[06:50] third and then fold the right third of the dough over the middle third as well so they meet in the middle. Then take the end of dough that's furthest away from you and roll the dough into itself until the dough
[07:03] forms a log or an oval shape. You should end up with a tight log of dough with a smooth side on top and then a seam side underneath. The great thing about the shaping technique is that the tension is
[07:15] running right and left like this on the top of the dough and when you score the dough in one long slash, it will burst open along that score mark when it bakes in the oven. It's pretty cool. The last thing you'll want to do is smooth out the ends of the dough. I just grab the flap on one end and
[07:30] fold it under the dough. Then I flip the dough over to the other side, grab the other flap, tuck it under and then just smooth out the sides of the dough with my hands so those flaps kind of disappear underneath the dough and there you have an oval shaped dough that's ready for the bannets and basket. Pick up the dough
[07:46] and flip the dough over so the seam side is facing up and the smooth side is facing down. Then gently place the dough upside down into the bannets and basket. Now cover up the dough gently with a kitchen towel
[07:58] and your dough is ready for the second rise or the final proof. Here's my recommendation for the final proof. Let your dough proof at room temperature for one hour. During that one hour your dough will get a head start on the fermentation process and will even visibly rise a little bit in the bannet and
[08:15] basket. After that hour, move your dough to the fridge, still covered up by that kitchen towel and let it sit and cold proof in the fridge overnight for about eight hours to whenever you want to bake it the next day. That's the great thing about the cold proof. You can take it out whenever you want the next
[08:30] day and bake it. The next day you're ready to bake so it's time to score and then bake the dough. A half hour before you're ready to bake, preheat your oven to 450 degrees Fahrenheit. Make sure you have a Dutch oven inside your oven. You're actually going to bake the bread inside of that Dutch oven.
[08:46] So I put that on the middle rack of my oven and I like to put some kind of sheet pan or something metal underneath that on the rack below. That's going to keep the bottom of the bread from burning. So preheat your oven for about a half hour. Now it's time to score or cut the dough before you bake it.
[09:01] So take your dough out of the fridge. You can do this cold. You don't have to let your dough warm up to room temperature. That actually takes a lot longer than people think. So take your dough freshly out of the fridge. You won't really see much rise in the fridge because the temperature keeps it so cold
[09:16] that the dough doesn't really rise, but a lot of fermentation went on inside the dough. That's going to create a lot of flavor. Cut out a sheet of parchment paper so that it is slightly bigger than your dough and then casually help the dough release from the sides of the bannetin basket with your fingertips.
[09:32] Then place the piece of parchment paper on top of the dough and gently flip the dough over so that it falls out on top of the piece of parchment paper. The dough is now right side up. Dust off any excess
[09:44] flour from the dough with your hand and then holding your bread lump or your razor blade at a 45 degree angle roughly. Score the dough with one long slash from the farthest end to the nearest end.
[09:59] Sometimes I go over the ends one more time just to make sure I scored through all the way. This scoring pattern will cause your dough to burst open along the score mark during the first half of the baking time. Now that your oven has preheated for about 30 minutes, it's time to bake. Pick up
[10:14] the dough with the parchment paper and all and then place it into the bottom of your hot Dutch oven. Be careful not to burn your arms on the Dutch oven as you drop in the bread. Close the Dutch oven lid to trap the steam and then bake the sourdough bread for 20 minutes with the lid on. After the
[10:31] initial 20 minutes have passed, remove the Dutch oven lid to release the steam. If everything is gone right, your dough should have puffed up and burst open along that score mark revealing a beautiful sourdough ear or the little edge that curls up on top of the bread. With the lid of the Dutch oven
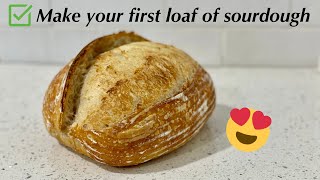
[10:46] off, continue baking for another 15 minutes or 20 more minutes if you want your loaf to be darker. 15 minutes later, your loaf of sourdough bread should be golden brown and ready to cool. Move your dough over to a wire rack or a cooling rack and let it cool for at least one hour before
[11:03] slicing. After an hour of cooling, your bread should be cool with a touch and ready to slice and if you placed a baking sheet underneath your Dutch oven, the bottom should be golden brown and not too dark. The bread is nice and crusty on the outside as homemade sourdough bread should be,
[11:18] but with a good serrated bread knife, you can cut right through it, revealing everyone's favorite part, the interior of the bread or the crumb. Even though this bread has a crusty exterior, the inside is soft and fluffy. Thick slices of this bread are great for making sandwiches. The sourdough
[11:32] bread has a mild sourdough flavor, it's not too sour. One of my favorite ways to enjoy this bread is just with a slather of butter and some kind of jam or apple butter, but enjoy your bread however
[11:44] you want to. You're going to love it. If you're watching this video on YouTube, I have a link to the written recipe down below in the video description. If you make the recipe, let me know in the comments how you like it and I will see you in the next video.
⚡ Saved you 0h 12m reading this? Transcribe any YouTube video for free — no signup needed.