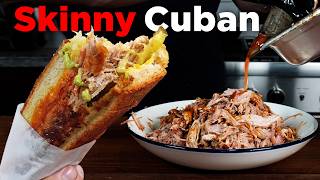
The Best Cuban Sandwich Hack
40sThe unique lengthwise cut and comparison to a Big Mac and hot dog is a surprising twist that sparks curiosity and debate.
▶ Play Clip
[00:00] The day that I first had this sandwich,
[00:02] I immediately stopped looking for a
[00:04] better one. It's the best sandwich I
[00:06] ever had. Eight trips to Miami, dozens
[00:09] of Kubano sandwiches, and this hidden
[00:11] gem, La Solas Cafe, was the only one
[00:15] that truly spoke to me. And it wasn't
[00:17] just the perfect shredded moho roast
[00:20] pork or the salsa verde that they served
[00:22] it with, but it was how they served the
[00:24] sandwich. They don't cut it in half on
[00:26] the bias like a normal Kubano sandwich.
[00:28] They cut it lengthwise, long and skinny
[00:31] down the middle, and then take those cut
[00:33] halves and sear them on the griddle. The
[00:36] result is something that eats more like
[00:37] a hot dog. And strangely to me, reminds
[00:40] me of like a Big Mac.
[00:43] >> It's like a hot dog and a Big Mac.
[00:44] >> The sandwich is a revelation. And today,
[00:46] we're inducting it into Steviey's food
[00:48] hall of fame and making it from scratch.
[00:51] Real roast moho pork, homemade Cuban
[00:54] bread. This is the lass solas kubano.
[00:57] The best Cuban sandwich I've ever had.
[01:00] Now, a Cuban sandwich consists of six
[01:02] ingredients. Cuban bread, moho roast
[01:06] pork, ham, mustard, pickle, and Swiss
[01:10] cheese. A lot of those things, they're
[01:12] taking care of for us. Two things need
[01:14] our attention. The roast moho and the
[01:17] Cuban bread. And those require being
[01:19] prepped in advance. So, let me take you
[01:21] back to yesterday. So now to make a
[01:23] Cuban bread, like many breads or pizzas,
[01:26] we need a starter. And a starter is
[01:28] pretty simple. It's basically one part
[01:31] water to one part flour, and a little
[01:33] bit of yeast. So I have 120 g of water
[01:35] here, 120 g of bread flour, and I'm
[01:38] going to combine the two into a tall
[01:41] container. Now, I've got some instant
[01:43] yeast. To make the starter, I'd go with
[01:45] about like half a packet of yeast in
[01:47] there, which you can do. However, I
[01:49] happen to have some starter in the
[01:51] fridge already, some leftover. Fed it a
[01:53] little bit of flour and water just to
[01:54] keep it alive. There's probably like 100
[01:56] grams in here. And so, since we have
[01:58] like this active culture already in
[02:00] here, we're just going to contribute
[02:02] that into our new starter. You can even
[02:05] take this residue, add flour and water
[02:08] to it. 30 g of flour, 30 g of water, and
[02:11] you can make new starter with just that
[02:12] residue on the side of the container.
[02:15] And then we're just going to mix that up
[02:16] together. Going to make sure you get all
[02:18] the dry flour at the bottom. It's just
[02:20] well combined. What you should be
[02:22] looking for is just like a very wet
[02:24] dough. We're going to pop a lid on this
[02:26] guy. Place it in the fridge at least
[02:28] overnight, but you would keep this
[02:30] going. Ideally, you just feed it a
[02:32] little flour and water every day or when
[02:34] it starts to collapse and you could keep
[02:37] this going forever essentially. Now, a
[02:39] starter isn't the only thing we need to
[02:41] get done ahead of time. We need to make
[02:43] a beautiful aspect of this recipe which
[02:46] is the Moho roast pork or at least the
[02:48] marinade for it and get that pork
[02:51] marinating early. Overnight is best 2
[02:53] days that works great as well too. So
[02:56] the first aspect of the moho is
[02:58] generally would be sour orange but we
[03:00] don't have that. So we're basically
[03:02] going to replicate that by using 2/3 a
[03:04] cup of orange juice and then 1/3 a cup
[03:07] of lime juice. That with all the spices
[03:09] and garlic, some of the best pork you'll
[03:12] ever have. Now, based in my experience,
[03:14] 2/3 of a cup is going to roughly be
[03:18] three oranges. Just going to take my
[03:20] fork, poke it, sort of breaking up the
[03:22] fibers, allowing me to juice it a little
[03:25] bit more thoroughly and easier. Sort of
[03:28] rotating it, making sure I just get a
[03:30] good yield out of each half. You can
[03:32] also
[03:34] funny story, the I had to get an MRI on
[03:36] my arm the other day. kind of panicking.
[03:38] I kind of slightly claustrophobic. Turns
[03:41] out the MRI tech was a follower. Great
[03:43] guy, Joe. Shout out, Joe. Thank you.
[03:46] Made me feel at ease. Was able to get
[03:49] the the MRI. No problem. I'm going to
[03:51] start taking care of it. All right. So,
[03:53] we've got our orange. Then we can do
[03:55] this with the limes. Three limes. Three
[03:57] oranges works. So, now I've got like
[03:59] this little hotel pan. This is what
[04:00] we're going to roast the pork in, but
[04:02] we're going to marinate it in plastic
[04:04] and just kind of hold it in there. So
[04:06] going to go in with the orange juice and
[04:08] lime to that a/2 cup of olive oil
[04:12] roughly. We got our spices. We got some
[04:14] oregano, Mexican oregano if you've got,
[04:16] but regular is fine. Tablespoon of onion
[04:18] powder. Can eyeball it. Tablespoon of
[04:20] garlic powder. Teaspoon of coriander.
[04:23] Teaspoon of cumin. Some fresh cracked
[04:25] black pepper. Bay leaf. Now we got a
[04:28] whole shebang of garlic here. Right.
[04:29] Going to take a bunch of whole garlic.
[04:32] Going to add them in. I'm going to hold
[04:34] back some of the larger pieces and then
[04:37] I'm going to grate them. Grating in
[04:38] about like six cloves. Throwing in
[04:41] another six whole. So now we've got our
[04:43] marinade. We can just sort of juzj up.
[04:45] Here we have a boneless, skinless 4 lb
[04:49] pork butt here. This should be enough
[04:51] for about four sandwiches. You notice we
[04:53] didn't salt the marinade. It's cuz we
[04:55] can't control it that way. I like to
[04:57] salt the meat itself because salt is not
[05:00] a spice. It's an essential thing, right?
[05:02] that needs to be dialed in. So, I don't
[05:04] really add salt to my marinades, we're
[05:06] going to go straight onto the pork. You
[05:08] want to be generous.
[05:13] So, the way that I kind of go is just
[05:15] once it's kind of completely dusted all
[05:17] over the place, almost like a frosted
[05:19] doughut, that's when I know it's ready.
[05:22] So, now we're going to take the pork and
[05:24] add it to the bag of marinade. Close it
[05:26] up 2/3 of the way and then start to suck
[05:29] some of that air out and just rub it
[05:31] around.
[05:35] lay it down. Then we're going to put it
[05:36] in the fridge. And every few hours, I'm
[05:39] just going to flip it. Make sure it gets
[05:40] nice and uh evenly marinated on all
[05:43] sides. Now, all we have to do tomorrow
[05:45] is throw some ingredients in the mixer.
[05:48] Get a little dough going. Empty this bag
[05:51] of plastic into this bin and toss it
[05:53] into an oven. You're halfway there. So,
[05:55] I'll see you back here tomorrow. All
[05:57] right. So, it's the next day. Our pork
[05:59] has been just bathing in all of that
[06:02] amazing moho. Just going to
[06:06] slide that all in. Such a amazing smell.
[06:09] Then simply all we've got to do take a
[06:12] little parchment and I'm just going to
[06:13] cover the top. It's very acidic. Acidity
[06:16] and meats in general sometimes just
[06:18] don't react well when it touches
[06:20] aluminum foil. The parchment's also
[06:22] going to steam it, cook it really
[06:24] nicely, and protect it from the foil on
[06:26] top. You could also do this in like a
[06:28] Dutch oven. So now I've got my oven
[06:30] preheated 300°. We're going to cook it
[06:33] nice and slow for about 4 hours. At
[06:35] around 3 hours, we're going to remove
[06:37] the top. We're going to put the heat up
[06:39] a little bit higher. That's going to
[06:41] both brown the meat and prep the oven
[06:44] temp for when we ultimately are going to
[06:46] bake the Cuban breading, which is what
[06:48] we're going to start on now. Now, the
[06:51] flour for this recipe, it's going to be
[06:53] bread flour. So, I got me some of that
[06:55] organic stuff. I actually got a flour
[06:57] mill. We're going to start milling our
[06:59] own flour eventually. Now, outside of
[07:02] the starter we made yesterday, that
[07:04] flour and water is going to be factored
[07:06] into the equation today, but we need 450
[07:10] g of this bread flour measured out. Now,
[07:13] to that, we've got our starter from
[07:15] yesterday. I mean, look at that. She's
[07:17] beautiful. Now, we don't need all of
[07:18] this. I only need uh 250 g of it. That's
[07:21] going to leave us with some leftover cuz
[07:23] I made extra yesterday. I have a pizza
[07:25] recipe in mind. So, I'm just going to
[07:27] keep that leftover and we're going to
[07:29] feed it and just keep it going. And
[07:31] that's what you should be doing with
[07:32] this type of thing. 45 g of lard. Lard
[07:36] is what makes Cuban bread Cuban bread.
[07:38] Gives it that crisp outer shell that
[07:41] doesn't sort of shatter, but kind of has
[07:43] stability and that fluffy pillowy
[07:45] inside. Allows it to get smooshed down
[07:47] and gives it that iconic texture. Then
[07:50] we got 15 g of salt, 15 g of sugar. Salt
[07:54] going to be the last thing that gets
[07:55] added. And then we got the rest of that
[07:56] half pack of yeast that we used to make
[07:59] the starter. We've got our bowl. To the
[08:01] bowl, we have 225
[08:03] g extra of warm water. We're going to
[08:06] add that straight to our mixing bowl.
[08:09] Now, we're going to get all set up here.
[08:11] We're going to get the dough hook in.
[08:13] Going to add the sugar, the yeast. I'm
[08:16] going to start mixing in the flour, but
[08:18] I'm going to add it a little bit at a
[08:20] time. This allows that flour to slowly
[08:23] get introduced into the water. Make sure
[08:25] it gets nice and hydrated.
[08:28] Add a little bit more. Get that dry
[08:30] flour from the sides worked in.
[08:35] A little bit more.
[08:38] Now, I'm just going to take some of our
[08:39] starter and measure it out cuz I don't
[08:43] need all of this. Just 250 g. Get that
[08:46] worked in. And then the rest of the
[08:48] flour. Now we can add in our lard. Room
[08:51] temperature of course. Once it's all
[08:53] come together, I'm just going to raise
[08:54] the speed. And we want to just allow
[08:57] this to knead for a good 10 minutes, 15
[09:00] minutes or until you can kind of stretch
[09:02] it into what they call a window pane or
[09:05] just basically means stretching a thin
[09:07] layer of it without it tearing
[09:09] immediately. So, what we're going to do
[09:11] is just let it go about 10 minutes or so
[09:13] and then begin testing it. You're going
[09:15] to see the dough smooth out and kind of
[09:18] pull away from the walls and turn into a
[09:20] nice soft dough. Forgot one thing. Now,
[09:23] we got to add the salt. Salt always goes
[09:25] last.
[09:28] Over time, as you could see, all that
[09:29] stuck on bits around the bowl sort of
[09:32] gets sucked into the dough and the the
[09:34] bowl almost cleans itself. And that
[09:36] shows the dough is getting less sticky.
[09:39] It's getting some structure built. It's
[09:40] a good sign. Now, let's check for the
[09:42] window pane. You see how it stretches
[09:44] and it kind of pulls thin, but just at a
[09:47] certain point, it breaks in several
[09:49] places. That's telling me we're on our
[09:51] way and almost there, but not quite
[09:54] there. So, we're going to go a little
[09:56] longer.
[09:58] Now, after about 13 minutes, I'm going
[10:00] to stop it. I'm going to give it like 2
[10:02] minutes to just relax. Sometimes the
[10:04] dough needs a minute to relax, to really
[10:06] assess it. After a couple minutes, I can
[10:08] feel it's definitely relaxed a bit more.
[10:10] Let's give it a test. You see how much
[10:13] more extensible it is? It's got enough
[10:16] extensibility and elasticity to hold a
[10:19] little bit of a window pane before it
[10:20] eventually tears. I just got a bowl. I'm
[10:23] going to hit it with some spray oil. I'm
[10:25] just going to knead it into a smooth
[10:27] ball.
[10:30] We're going to cover it and we're going
[10:31] to allow it to rise until it about
[10:34] doubles in size. Probably going to take
[10:36] about an hour. Put this back here by the
[10:39] warm stove. That leads us back to our
[10:42] residual starter. Right, we've got, I
[10:44] don't know, 50 g in here left. So, this
[10:46] is how you would feed a starter. Keep it
[10:48] alive and keep it going. Here I have 50
[10:51] g of bread flour, 50 g of water. I'm
[10:54] going to get that old starter, the new
[10:56] water, and the new flour all mixed in.
[10:59] So, now we got new starter in here. We
[11:01] can just cover it up, and then this can
[11:03] just live in our fridge. It will
[11:05] eventually double in size. And if you
[11:07] ever see it then deflate back or get
[11:11] watery or sort of break. The yeast has
[11:13] just eaten through everything. And
[11:16] that's what feeding it is. You're just
[11:17] adding more flour, more things for the
[11:20] yeast to eat through, fart a little bit,
[11:22] create the bubbles, and then that's the
[11:25] thing that makes bread and pizza dough
[11:27] great. It's been 3 hours of cooking for
[11:29] the pork, so we're going to take it out.
[11:31] See where we're at. It's actually still
[11:33] a little bit tougher than I would like.
[11:35] So, we're just going to cover it again.
[11:37] We're going to let that go for basically
[11:39] it's stuck around 170 175, which is kind
[11:42] of, if you know anything about pulled
[11:44] pork or barbecue, where the stall hits,
[11:47] which is basically when evaporative
[11:49] cooling is taking place. It's like the
[11:51] meat sweating, like you when you run and
[11:53] sweat, that's meant to cool you down.
[11:55] Same thing's happening with the pork,
[11:58] which is preventing it from pushing past
[12:01] that point into the tender zone.
[12:03] Depending on the size of meat, that
[12:04] might happen at different points. And
[12:06] it's again why I'm not going to tell you
[12:07] exactly the amount of time to cook it.
[12:09] I'm going to teach you how to know when
[12:10] it's done. So, in the meantime, we're
[12:13] going to work on something that I don't
[12:14] know is like super traditional to this,
[12:17] but La Solas Cafe does this, so that's
[12:20] what I'm doing. It's actually nice to
[12:21] serve this sandwich with a condiment,
[12:23] split down the middle, easy to dip. So,
[12:26] we're making a raw salsa verde that
[12:28] involves, you know, eight tamatillos.
[12:32] Now, when you want to shop for
[12:33] tamatillos, you want to look for
[12:34] tomatillos with like really fresh husks,
[12:38] not dried out, not torn or brown, nice
[12:41] and green. These are all examples of a
[12:44] nice fresh tomatillo. When you open it
[12:46] up, you get a nice green tamatillo. It's
[12:50] perfect. It's not blemished. It's not
[12:52] rotting anywhere. Once you've got the
[12:54] husks off, there's a little sticky film
[12:57] on them. We're just going to rinse it
[12:58] off. So, I've got my little bullet here.
[13:01] We're going to go in with like a third
[13:03] of a white onion. Whenever you're making
[13:05] like a a salsa verde or something like
[13:07] that with a red or for that matter like
[13:09] Mexican recipes in general, you always
[13:11] use a white onion. White onion is just a
[13:13] little bit more palatable, especially
[13:15] for raw application. To that, we have
[13:17] two garlic cloves. Just going to smash
[13:20] those. Now, since it's raw, I'm going to
[13:22] get those harsh things in there. Then,
[13:23] I'm going to hit it with the lime juice
[13:25] and use that lime juice sort of mellow
[13:27] those flavors out. Also, salt to them
[13:30] helps as well. Now, while those simmer,
[13:32] I can kind of shave a little bit of a
[13:34] serrano or jalapeno in there. Just the
[13:36] cheeks. If you don't want it too spicy,
[13:38] sort of limit the amount of seeds you
[13:40] get in there. Some fresh cilantro.
[13:43] One avocado. When you're picking out
[13:45] avocados, you always want to press down
[13:47] here. You want it to be soft. And if you
[13:49] want it to stay super green, you want to
[13:51] make sure you see that the stem is in
[13:54] there, not fleck off. Kind of like that.
[13:57] That allows air to get in there. That's
[13:59] what helps it oxidize and turn brown
[14:01] when you open it. So, I'm guessing this
[14:04] is going to look pretty nice and green
[14:05] inside. There you go. If it's ripe, the
[14:08] seed should pop right out. Dice it up
[14:10] inside of its shell. Scoop it into the
[14:13] blender. Going to add another lime to
[14:16] neutralize any oxidation that might
[14:18] occur on the avocado. Now we can cut the
[14:22] tomatillos.
[14:28] A little more salt for the ingredients
[14:30] we just added. Little olive oil. We're
[14:32] just going to close it up.
[14:38] Now, I must say this is completely
[14:40] optional, not necessary or traditional,
[14:42] but it's how I like it. And I think it
[14:44] actually goes well. So, if you're Cuban,
[14:46] don't come at me. Now, it looks like our
[14:48] bread's doubled inside. Nice and jiggly.
[14:51] Let's degass it. Get it onto the board.
[14:54] Got a nice large sheet tray here. Just
[14:56] going to get it spread out like that.
[14:58] Cut it in half.
[15:00] Then, we're just going to take one side
[15:02] and spread it out into a rectangle.
[15:04] Flatten it out. use your thumb and fold
[15:07] over.
[15:09] So, you're pushing almost a third into
[15:12] the dough and you're kind of folding and
[15:14] pushing your palm into it. Right? Then,
[15:17] we're going to rotate the dough and
[15:18] repeat the same motion.
[15:25] Now, you've got this long strip of
[15:27] dough. We're going to measure it out
[15:29] till it's about the length of the sheet
[15:31] tray. And then, I'm just going to
[15:32] lightly flatten it. And we're going to
[15:34] transfer that onto the sheet tray. And
[15:36] then we're just going to repeat with the
[15:37] other one.
[15:45] I think it looks pretty good. Let it
[15:47] rise another time. I like to take one
[15:50] side at a time and wrap it and almost
[15:52] use the cling wrap to sort of help keep
[15:55] its shape. As it rises, it'll sort of
[15:58] create some tension and hopefully allow
[16:00] it to raise up rather than out. We're
[16:02] just going to let that rise. So, I let
[16:05] it go for the four hours.
[16:07] Way more tender. Now, just want to set
[16:10] this on the meat side up. We're going to
[16:12] base this sucker. We're going to now
[16:14] jack the heat up to 400°, which is the
[16:17] temperature the bread is eventually
[16:18] going to bake at. And while that comes
[16:20] up to temperature, we're going to brown
[16:22] this meat. Just give it a check every
[16:23] few minutes. Rotate it around until it's
[16:26] beautifully browned and caramelized.
[16:28] with that marinade that gets caramelized
[16:30] on top of the beef. It's such a yummy
[16:32] flavor. You just eat it plain, forget
[16:35] the sandwich, throw it on some rice, you
[16:37] got a meal.
[16:39] And you see how they doubled in size.
[16:41] Beautiful. All we've got to do, take a
[16:43] very sharp knife. We're just going to
[16:45] use the tip of it. We need to score the
[16:47] the bread so it has a place to expand.
[16:50] So, we're just going to take the knife
[16:52] and very quickly cut down the middle.
[16:54] Now, our oven has hit our preheated
[16:56] 400°. So, while that meat's in there, we
[17:00] can throw these in. All I want to do,
[17:02] little bit of spritz of water on top.
[17:05] We're going to pop it in. That's going
[17:06] to cook for about 25 30 minutes. We're
[17:10] going to rotate it halfway through. And
[17:12] we're really just looking for like a
[17:13] little light golden brown. We don't want
[17:15] to go too dark. We're going to be
[17:17] cooking this in lard on the griddle.
[17:22] I mean, I'm turning you into a Cuban and
[17:24] a baker. We can't do anything to these
[17:26] until they cool down. And now our pork
[17:30] is done. It took longer than even I
[17:32] anticipated even for any pork that I've
[17:34] cooked. So again, the recipe is less
[17:37] important than knowing when it's done.
[17:39] And one easy way for us to check it goes
[17:42] in and out easily. That's one way to
[17:45] check. That's the most definitive way to
[17:48] check. Also, the temperature. We can see
[17:50] it's hovering around 208 209 at the
[17:54] center. It's at 203. Now, of course, you
[17:57] can use it, but best practice, you want
[18:00] to wrap this up nice and tight and allow
[18:02] this to cool down and relax. It's good
[18:05] now, but if you give it time to chill
[18:08] down, calm down, just chill out, it's
[18:10] going to be 5 to 10 times better. Now,
[18:13] since everything's pretty much ready to
[18:15] go, I got my griddle over here, and I
[18:17] got a nice heavy big cast iron pan. I'm
[18:20] just going to lightly gently start
[18:21] warming them up so they're ready when
[18:23] I'm ready to make the sandwiches to get
[18:25] fired up and cook. Now the pork is
[18:28] cooled. And if you know anything about a
[18:29] pork butt, it's consists of various
[18:32] muscles connected by fat. So what I want
[18:35] to do here is take this guy, put it in a
[18:37] bowl, and what I want to start to do is
[18:39] sort of just remove muscles and
[18:42] eliminate any unwanted fat. So you're
[18:44] almost just like pulling it apart.
[18:46] That's all fat right there. It's not the
[18:48] good type of fat. That's all fat right
[18:50] there. Gristle and all sorts of stuff
[18:52] like that. I mean, it's beautiful.
[18:55] Squeeze it all together. Mix all the
[18:57] muscles together. Combine them.
[19:01] And we can take some of that juice, get
[19:03] that worked in. All that flavor gets
[19:07] reabsorbed by the pork. So, now we're
[19:10] ready to make sandwiches. Now, one of
[19:12] these loaves will make two sandwiches.
[19:14] You just take the butts off.
[19:17] Cut it in half. Not bad, huh? I'm going
[19:19] to cut it nice and evenly right down the
[19:21] middle.
[19:25] Got to make my door man one, too. First
[19:28] up, we go mustard on each side. Yellow
[19:31] mustard. The only time I really kind of
[19:33] use it. Spread it on nice and even.
[19:39] And we're going to go with a slice of
[19:41] Swiss cheese on the bottom and the top.
[19:44] Then I've just got my ham. Some nice
[19:47] deli ham. I'm going to fold it just like
[19:49] that. Then we go with pickles on the
[19:52] bottom. Then on top of that, the pork.
[19:54] Nice even layer.
[19:58] Then another piece of cheese in between
[20:01] the ham and the pork. And then right on
[20:03] top. Then we're going to take some
[20:06] softened lard. And then we just paint
[20:08] the top with it. Then we're going to
[20:10] place those sandwiches right onto that
[20:11] hot griddle. Place that heavy pan right
[20:13] on top and weigh it down any way you
[20:16] can. I'm using a wooden spoon. We're
[20:18] looking to flatten that sandwich and
[20:20] toast and crisp up the outside of that
[20:22] bread all while melting the cheese
[20:24] inside. Just like a grilled cheese,
[20:26] we're going to flip and rotate it every
[20:29] 30 seconds to a minute until that cheese
[20:31] is melted. But we want to be careful to
[20:33] manage the heat cuz we don't want it to
[20:35] darken too much. We want a nice golden
[20:37] brown on the bread. When it's crisp and
[20:40] the cheese is melted, get it off the
[20:41] griddle. Now for the trick. Normally a
[20:44] cubano is cut like that on a steep angle
[20:48] so you get like sharp points to eat it.
[20:50] The better way, maybe all sandwiches are
[20:53] better this way. Down the middle, we cut
[20:55] it lengthwise. Nice sawing motion.
[21:03] Now, that's about as perfect of a
[21:05] sandwich that I've ever seen and is
[21:07] perfectly fine to serve as is. But there
[21:09] is one missing step that Los Olas does,
[21:12] which is after they cut it lengthwise,
[21:14] they place that sandwich back on the
[21:15] griddle, cut side down, and this is
[21:17] where you get sort of that Big Mac
[21:19] In-N-Out flavor coming out. It's the mix
[21:22] of that mustard frying with the meat
[21:24] that mimics that mustard fried In-N-Out
[21:27] burger flavor. This is a top level
[21:29] technique, and it's why I love this
[21:31] place so much. Now we're ready to serve.
[21:33] A little bit of salsa verde and you're
[21:36] in heaven. It's the best sandwich I ever
[21:38] had. Nothing beats the way this eats.
[21:41] The bread is perfect. The pork is
[21:43] perfect. The assembly is perfect.
[21:45] Everything's perfect. You want the
[21:46] recipe? It's going to be down in the
[21:47] description. No traveling to Miami.
[21:50] Anyway, that's all that I have today.
[21:52] I'll see you next time. Until then, take
[21:53] care of yourself and go feed yourself.
⚡ Saved you time reading this? Transcribe any YouTube video for free — no signup needed.