
How PHPUnit Tests Work in Drupal
45sExplains the core concept of PHPUnit testing in Drupal with a practical example, appealing to developers learning testing.
▶ Play Clip"The title accurately describes the content: a detailed example of PHPUnit testing in Drupal using Quick Node Clone."
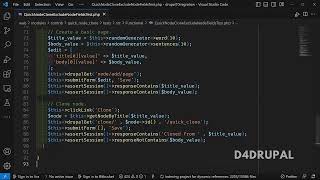
This video explains how PHPUnit test reports are generated in Drupal, using the Quick Node Clone module as an example. The presenter walks through the test code and the corresponding HTML test report to demonstrate how functional tests work.
The video explains how PHPUnit test reports are generated and how tests run, using the Quick Node Clone module.
The module allows cloning a node with a prepended title and excluding specific fields like the body field.
The test is a functional test using the standard profile, depending on the Quick Node Clone module. Tests are placed under module/tests/src/Functional.
The setup function creates an admin user with necessary permissions and edits the configuration to exclude the body field for basic page content type.
The test function logs in as admin, changes configuration (title prepend text to 'cloned from', enables basic page bundle, selects body field), and submits the form.
A node is created with random title and body values. The test verifies the node page contains both title and body.
The test clicks the Clone tab, submits the clone form without changes, and verifies the new node has 'cloned from' prepended to the title and no body field.
The presenter shows the HTML report step by step, confirming login, configuration changes, node creation, and clone verification.
The PHPUnit functional test for Quick Node Clone successfully verifies that the module clones a node with a prepended title and excludes the body field as configured.
What are the four types of testing in Drupal?
The video mentions functional testing but does not list all four types.
03:02
Where should functional tests be placed in a Drupal module?
Under module/tests/src/Functional.
03:29
What does the setup function do in this test?
Creates an admin user with permissions and edits the configuration to exclude the body field for basic page content type.
03:38
How does the test verify the clone operation?
It asserts that the new node's title is prepended with 'cloned from' and the body field is absent.
08:00
Test file location
Clarifies the standard directory for functional tests in Drupal modules.
02:51Setup function pattern
Demonstrates common setup tasks: user creation and configuration editing.
03:38Clone verification assertions
Shows how to assert expected behavior after cloning: title prepended, body excluded.
08:00[00:00] hello everyone welcome to D for Drupal
[00:03] Channel today we are going to understand
[00:04] how the PHP unit test reports are
[00:07] generated and how the PHP unit test is
[00:10] running all those we are going to uh see
[00:12] now and that's why I'm going to explain
[00:14] how the test report they have written in
[00:16] the code so I will be explaining all so
[00:19] in previous video you have seen how to
[00:21] set up and run the test report
[00:24] and in that video I have explained how
[00:27] the test reporter is working with the
[00:28] contrary model called quick node clone
[00:31] so I'm going to use the same module now
[00:33] so that you can understand it better
[00:36] so uh
[00:38] before that you have to understand how
[00:40] the module works so this module
[00:42] basically provides a cloning option of a
[00:45] node so by using this module you can
[00:47] clone your complete node so you no need
[00:50] to provide value again for new node if
[00:53] you are going to duplicate the same node
[00:55] and if you are going to alter something
[00:57] very few so in that case you can go with
[00:59] this module
[01:01] so here you can see I have created some
[01:04] notes here so when you click on the
[01:06] operation you will be able to see a
[01:08] option called clone
[01:10] so then you click on it
[01:14] so it will take you to the Clone page
[01:16] where you can see the complete node is
[01:19] cloned so let me explain it
[01:24] so this is the node so let me give some
[01:26] body value
[01:27] so that I can explain it well
[01:38] so now I created a node
[01:45] and I have a body value as body value
[01:47] and when I click on clone
[01:51] so you can see here the title is
[01:54] prepared with the text of clone of and
[01:57] the body value is empty so all these are
[01:59] happening because of the configuration
[02:00] what we are having from the crypto clone
[02:02] module so this is the configuration what
[02:05] we have so I am going to explain only
[02:07] the node part not the paragraph part so
[02:10] here uh text to prepare to the title so
[02:14] that is clone of you can see the text is
[02:16] prepended and then next uh what they are
[02:19] doing they are excluding some fields
[02:21] from cloning so in the basic con basic
[02:25] page content that they are excluding the
[02:27] body field value so the body filled
[02:30] value is not cloned here and you can
[02:32] save the
[02:35] node
[02:39] now the node is saved you can see now
[02:41] the complete node is saved and you don't
[02:44] have body field in the new as as we
[02:47] configured here so uh this is what we
[02:49] are going to understand now
[02:51] in test report so this is the file which
[02:54] I ran in the previous video
[02:57] so first how uh here they have written
[02:59] test in the functional so uh there are
[03:02] four types of testing I will create a
[03:05] separate video on proper example in
[03:07] future so now in this functional testing
[03:12] so here uh what they are doing they are
[03:14] using the standard profile and this test
[03:17] is depend on a module called quick node
[03:19] clone so all those should be enabled so
[03:21] that this will work properly and they
[03:24] are creating one admin user so whenever
[03:27] you are creating any test that will be
[03:29] under the module test SRC functional
[03:32] folder
[03:34] and then here the first function called
[03:38] setup will get called for the first time
[03:40] so in this function you can have all the
[03:44] required statements so which means so
[03:48] here I am going to use the testing with
[03:51] the admin user so I am creating a user
[03:54] with all this
[03:55] access conditions so the user will be
[03:59] created with this permission once the
[04:02] user is created next you can see here
[04:04] they are editing the configuration so
[04:06] config Supply will be helping us to edit
[04:10] the configuration whatever we are having
[04:12] in the Drupal so this is the
[04:14] configuration quick clone settings this
[04:16] is a configuration for the
[04:23] so you can go to your development
[04:26] configuration export
[04:35] so simple quick note one so you can see
[04:38] quick note rule settings this is the yml
[04:41] file which hold the complete
[04:43] configuration whatever you are saving
[04:45] here so we are editing that oml file and
[04:49] we are keeping excluding node page so
[04:53] which means we are excluding the basic
[04:55] page
[04:56] content type body fill so the same
[04:59] configuration whatever I'm having here
[05:00] so for the node for the basic page they
[05:04] are excluding the body field and they
[05:06] are just saving the configuration so
[05:09] here all these values are
[05:12] as like in the yml effect so when you
[05:15] see the yml file so exclude
[05:18] node
[05:21] and then page so exclude dot note Dot
[05:24] Page and the value is body
[05:26] okay so they are just saving the
[05:28] configuration once that is done so the
[05:31] next function what we'll get call is
[05:32] that whatever function you are starting
[05:35] with the test
[05:37] the word so the function will be started
[05:39] executing so in the next function what
[05:42] they are doing they are just logging in
[05:44] by using the function called Drupal
[05:45] login and they are logging in with the
[05:48] user admin user which we created on the
[05:50] setup function okay this user will be
[05:53] logged in
[05:54] once the user is logged in they are just
[05:57] giving the value for all the
[05:59] configurations form so here
[06:02] text to print title so when I default
[06:05] the value was
[06:07] flown off they are just changing the two
[06:09] cloned from and then uh in the bundle
[06:12] they are enabling basic page so Pages
[06:15] page they are enabling which means here
[06:19] so in the bundle they are enabling the
[06:21] basic page and then in the page they are
[06:24] enabling only for this particular body
[06:26] field
[06:27] so in the field list they are enabling
[06:30] only the body field so once this is
[06:32] created they are once they just uh
[06:36] assign the value in Array they are just
[06:39] going to the path of this bracket so
[06:42] admin configure flow and they are using
[06:46] all this value edit value and they are
[06:49] just submitting the form
[06:50] so once this is done the configuration
[06:52] form will be submitted here
[06:55] and then next here we excluding the
[06:58] basic page right so now we have to
[07:00] create a node so that we can test
[07:02] whether the field excluding
[07:04] functionality is working or not
[07:07] so they are generating randomly uh 10
[07:10] words for uh title and sentence 10
[07:14] length
[07:15] for body value and then they are just
[07:18] recreating one new array so as like here
[07:21] for the body field
[07:23] and then title field and they are just
[07:26] getting the node at page of node add
[07:28] page and they are passing the tradit
[07:30] value and they are just saving so which
[07:33] means here they completely saved the
[07:36] node the new node which they created so
[07:39] once they say
[07:40] in the asset session in the response
[07:43] when you see the node slash node ID page
[07:46] it can be node slash one or two or three
[07:48] whatever
[07:49] the response should contain title value
[07:52] and the body value
[07:54] which you passed and which you've saved
[07:56] by sure that will be there
[07:58] once that is done
[08:00] they are just clicking on the Clone tab
[08:03] what we have in the node view page
[08:06] so they are just loading the node so
[08:08] whatever by using this node title
[08:11] by using the value of the node title
[08:14] they are loading the same node and they
[08:16] are just going to flown slash node ID
[08:20] slash quick clone
[08:23] so this is the page
[08:26] and you click on clone
[08:33] clone slash node ID slash Quick Loan so
[08:37] clone slash node ID slash quick clone
[08:39] and they are just submitting the form
[08:41] without passing any value so the value
[08:44] is getting submitted without passing any
[08:47] new value so by default when you clone
[08:50] it what will happen the title value will
[08:53] be pre-populated with the text of flown
[08:55] from and then body value will not be
[08:58] there because we excluded that body body
[09:01] field value here
[09:03] right so that's what they are doing here
[09:06] here
[09:07] when they click on clone slash no ready
[09:09] slash node they are just saying they are
[09:11] not altering anything so when you see
[09:14] the response of the node which we create
[09:17] a newly the response should contain
[09:19] cloned from
[09:21] because we saved the configuration
[09:25] text has cloned from so that will be
[09:28] cloned from the title value of the or
[09:32] default node and then the response the
[09:35] body value should not be there in the
[09:37] node slash no ready page of the Clone
[09:39] download because we excluded that body
[09:42] field in the configuration
[09:45] okay so this is how this should work
[09:48] that so they have written all the uh
[09:51] test report here and we have run it so
[09:55] uh here we have all the test report as a
[09:57] HTML file okay so now when you go here
[10:01] so I already opened all the HTML file
[10:05] line by line here so that I can explain
[10:07] you explain you to you efficiently so
[10:10] when you see here here first they are
[10:12] clicking on login page because they are
[10:15] doing admin login first right
[10:18] scroll up
[10:20] and here you can see admin user is
[10:22] logged in first so they are going to
[10:24] login page you can see the file is
[10:27] coming from site simple test browse row
[10:29] so the login page is getting hit and
[10:33] they are just posting the value for the
[10:35] login page once that is done so they are
[10:38] getting the request once that is done
[10:41] the user slash one is logged in
[10:43] successfully now the login process is
[10:46] Success so which means this single line
[10:48] is completed next what they are doing
[10:51] they are going here and giving these
[10:53] values and they are just sharing it that
[10:56] will be the next
[10:58] so when you scroll up they are hitting
[11:00] get request they are hitting admin slash
[11:03] config slash quick note clone
[11:06] so here you can see this is these are
[11:08] default value clone from all those so
[11:11] they will be giving all this value here
[11:13] and they will be posting the form again
[11:16] so here again the form is posted once it
[11:19] is posted when you scroll down
[11:22] now it is guess get again so when you
[11:24] have scroll down you can see the text is
[11:27] cloned from the value what we have given
[11:29] and then basically it's selected and the
[11:32] body field is selected
[11:34] and then click now clone setting has
[11:37] been saved successfully
[11:38] so once until this done now we are going
[11:41] to create a Content node that's what
[11:44] here right so this is the node add page
[11:48] get request
[11:50] so this is the fields
[11:52] in the next they will be posting it the
[11:55] value
[11:56] will be posted is the random text to
[11:58] whatever generated here okay so that
[12:01] will be posted now it will be node slash
[12:03] node one or something
[12:05] it will be node one you have node one so
[12:07] now the node is created we are in node
[12:09] one page
[12:10] here you can see the randomness
[12:13] generated text title and the body fields
[12:16] are there
[12:17] so this response also contain title and
[12:20] the body
[12:21] and the next one they are going to click
[12:24] on clone slash node ID slash Quick Loan
[12:28] so
[12:29] next they are going to click on clone
[12:32] slash node ID slash quick clone so in
[12:35] this page
[12:36] here you can see the prep and text is
[12:40] added as per our configuration and also
[12:42] the body value is empty because we
[12:45] disabled it from cloning
[12:48] and this is done now and next now the
[12:52] value is posted because we are not going
[12:53] to alter anything so they are just
[12:55] saving it so here they are just saving
[12:59] it
[13:00] and and the final one
[13:02] so now the node 2 is created in the node
[13:05] to
[13:07] type in title we will have cloned from
[13:11] so clone to from with the title value
[13:13] responsible content is it is has and
[13:17] then response not containing body values
[13:19] so here you can see the body value is
[13:21] not there only the title we have as per
[13:24] our
[13:25] test what we have written and this is
[13:28] how the PHP unit test will work with the
[13:32] explanation and the example whatever we
[13:35] are having here and if you have any
[13:37] queries please post it in the chat
[13:39] and that's it about today's video if you
[13:41] like the video please share like And
[13:43] subscribe to my channel thank you bye
⚡ Saved you 0h 13m reading this? Transcribe any YouTube video for free — no signup needed.