
Pouring Paint on a Table?!
60sThe unexpected action of pouring paint on a table creates curiosity and shock, making viewers want to see the outcome.
▶ Play Clip"Delivers exactly what the title promises: a clear demonstration of using a yard rake to refurbish a table."
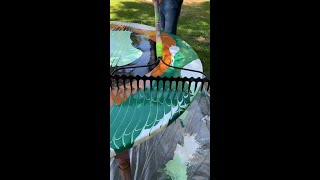
This video demonstrates a creative DIY technique for refurbishing an old table using acrylic paint and a garden rake to create a unique, marbled design. The process involves layering paint colors on the table surface and then dragging a rake through the paint to produce intricate patterns.
Start with a base color (green) applied heavily on the table surface.
Apply white paint on the outside edges, allowing it to drip off the sides.
Fill any small holes or gaps with white paint to ensure an even surface.
The design is open to interpretation; the table's slant gives a unique, unreproducible look.
Add dark green and a touch of black paint to specific sections for depth.
Position the rake and pull it through the paint without pressure to create patterns.
Drag the rake in different directions to create intersecting lines and blend colors.
Tilt the table to let excess paint drip off, revealing the final design.
The result is a colorful, marbled table suitable for a kitchen nook or dining area.
With just paint and a garden rake, you can transform an old table into a vibrant, one-of-a-kind piece of furniture.
What tool is used to create the pattern on the table?
A garden rake.
03:35
What should you avoid when pulling the rake through the paint?
Applying pressure; let the rake do the work.
04:02
Why does the table's slant contribute to the design?
It gives a unique look that cannot be reproduced.
02:40
What is the purpose of tilting the table at the end?
To let excess paint drip off and reveal the final design.
05:53
Unique Design Principle
Emphasizes that the table's slant ensures a one-of-a-kind result, encouraging creativity.
02:40Rake Technique
Demonstrates a simple tool (garden rake) used in an unconventional way to create art.
03:35Final Reveal
Shows the dramatic transformation from messy paint to a beautiful marbled pattern.
05:53[00:47] Right. That's going to look great.
[01:23] we've used the least amount of right now which is green. We go right now which is green. We go heavy right here.
[01:41] let's do white on the outside. White is the outside color. We want that and that should drip off the sides.
[01:59] how we have the green going to the side here. We can put that white right on the inside and go out to the outside. Mm hmm. this blends in a second. We're also going to fill in our
[02:12] also going to fill in our little holes with white. Okay looking good. Mm hmm. So guys, something we're going to do. are going to add just the light green right here. So, check
[02:25] this out. Right here, watch. Very carefully. Yeah. So small. Just to fill in that hole right there. Yup. Perfect. Great.
[02:40] The nice thing about this is all of this is free to your interpretation of what you want it to be and you can do this in any backyard because the slant of the table will actually give
[02:52] it a unique look that will never be reproduced. Right never be reproduced. Right there. Perfect. And then, just there. Perfect. And then, just a little bit more
[03:08] look. Okay, and maybe some dark green right here in this section. It actually got just a little bit of black to go in. don't want to mix too much because we're going to mix with
[03:20] because we're going to mix with our garden rig. Right. her. And we can put some black in there. right there. Okay, for this? Yeah and all these little pieces throughout don't
[03:35] because. We're about to change it. Yeah, it's about to all it. Yeah, it's about to all change with this. Okay. Just a simple garden rake. Okay. So, you want to position yourself
[03:47] this okay? Is the lighting okay? Yeah. I can see. We got some good, nice shadows here of the leaves on the table. It Alright, you ready? Watch right here. See this? One sec. Let
[04:02] here. Right here. Yeah. I'm going to pull the rake through. Yeah. I'm not going to put down any pressure. I'm just going to let the rake do the work. Here it goes. Okay. This is when
[04:14] everything changes. Alright. Pull. Whoa. Look Wow, that's already looking really cool. Beautiful. Same
[04:28] really cool. Beautiful. Same thing here. Yep. Great. And you're going to just do those sides. Yeah. Easy.
[04:40] Great. Okay. And over here on this side. Now, wait until you see the lines. How's it looking? Intersect. Okay. See that? Yup. Look at how amazing that looks right now
[04:55] ready? Yeah. So, now you have to do it one other way. Like this. Okay. Cuz otherwise, we end up with colors staying exactly where they are. Look at that amazing design. It's
[05:09] really cool. This is. This is amazing. Really cool looking. do a little tilt. No, you're going to see the end with this peacock feathers or something. Like feathers. That's very cool
[05:24] really close up on this one. Watch it. Yeah.
[05:37] here and look at the paint dripping off right here. Just you can see again. And look at all these colors on the floor blending. Get right here. Yeah. Wow. Very cool. Okay, you ready
[05:53] Wow. Very cool. Okay, you ready for the final move? Okay, final move. Coming up. Okay up to a place where I can see really good right here. Great. You gotta careful
[06:08] table at the at Goodwill to refurbish it basically. Yeah, this is looking really good. Watch it move. Look. Look at it
[06:20] all moving. You don't want to go too far. No, not too far. Watch me go the other direction. Look at that. And so all the extra just kind of drips off. and makes this
[06:35] really cool design on the table here and then you're left with great. So now, we've got all the all of the sides of the reach over to the other side. I want you to just get the camera
[06:48] just lift up a little bit towards me. I'm going to hold table. So, we can get there's some little spots down here. even more. Even more. even more. Even more. Ready? Keep a
[07:03] more. Even more. Ready? Keep a little bit more. There it goes. see that it's solidifying into its new shape a little bit its new shape a little bit more. Almost. Great. That looks
[07:15] great. Wow. Okay, this is pretty amazing looking. Now, we pretty amazing looking. Now, we put this.
[07:27] little bit of extra there on the side. Look at this. This is gorgeous. Look at that. Now, you have your new dining room table. That's really fun for like a little kitchen nook or
[07:41] like a little kitchen nook or look at that. It's very cool. It's gorgeous. Look at all those beautiful designs up close. Look at all the all those colors mixed together
[07:54] those colors mixed together Gorgeous.
⚡ Saved you 0h 08m reading this? Transcribe any YouTube video for free — no signup needed.