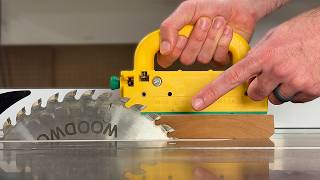

Deadly Table Saw Kickback Warning
42sShows dramatic safety tip about kickback risk, highly engaging and educational for woodworkers.
▶ Play Clip"Delivers years of woodworking knowledge across three projects, but the Patreon pitch and some repetition keep it from being exceptional."
This comprehensive woodworking tutorial guides beginners through progressively complex projects, starting with essential shop safety and techniques, then building a cutting board, a keepsake box, and finally a full-size dresser. The video emphasizes practical tips, mistake recovery, and design principles to accelerate skill development.
Always mark one side of the board as scrap and run the blade through that side to account for the material removed by the blade.
For precise cuts, cut deliberately oversized then take thin slivers off by pushing the board slightly into the blade to deflect it.
For repeatable cuts, use a stop block (clamped block of wood) instead of measuring each time.
When crosscutting, keep the fence out of the way to prevent the offcut from wedging and causing kickback.
Use a scrap wood backer board behind the workpiece to support wood fibers and avoid tear-out.
Use tapered countersink bits that drill pilot hole and countersink in one go to prevent splitting wood.
Instead of measuring, mark parts directly from the project piece to ensure perfect fit without knowing exact numbers.
Start with 100 grit for rough surfaces, 120 for moderate, 150 for smooth; finish at 180 for film finishes, 220 for oil finishes.
When progressing through sanding grits, never skip more than one grit (e.g., 120→150→180, or 100→150→220).
Many oil finishes generate heat while curing; lay used rags flat on concrete to dry before disposal to prevent fire.
Use hardwoods like maple, cherry, walnut; avoid softwoods like pine, cedar, cypress, fur.
Use Titebond II or other water-resistant glue; apply evenly with a roller or brush.
Use blue painter's tape instead of clamps to hold mitered box joints together—tape acts as the clamp.
Apply concentrated dye (e.g., in denatured alcohol) to figured wood; it penetrates deeper than stain and makes curl pop after sanding and oiling.
Save offcuts from the project; glue them into gaps, plane/sand flush to repair errors invisibly.
Test fit all joinery before applying glue to avoid misalignments and rushed fixes.
Clamp two workpiece halves together and cut dados simultaneously to ensure perfect alignment for shelves.
Epoxy provides longer working time than wood glue, essential for complex assemblies with many parts.
Use playing cards as spacers to center drawer fronts and achieve even reveals around all edges.
Use figure-8 washers or similar when attaching a tabletop to allow seasonal expansion and contraction without cracking.
By breaking complex projects into simple steps and learning from mistakes, anyone can progress from basic cuts to building fine furniture. The key is to keep practicing and try new techniques on small, low-stakes projects.
What is the rule of thumb for sanding grit progression?
Don't skip more than one grit in the progression.
06:11
What glue is recommended for cutting boards?
Titebond II (water-resistant glue).
11:42
How do you prevent kickback when crosscutting on a table saw?
Keep the fence out of the way so the offcut has room to move without wedging.
02:11
What is the purpose of water popping?
To pre-raise the grain before final sanding, preventing future roughness when wood gets wet.
18:11
What is the difference between dye and stain?
Dye penetrates deep into the wood grain, while stain sits on the surface.
31:53
How do you fix a misalignment after gluing?
Glue a scrap piece into the gap and plane/sand flush.
39:41
What tool allows wood movement when attaching a tabletop?
Figure-8 washers (Izzy skirt washers).
01:09:50
How do you ensure dados for shelves are perfectly aligned?
Clamp the opposing pieces together and cut both dados simultaneously.
50:57
What is relative dimensioning?
Using the project piece itself to determine part size instead of taking measurements.
03:57
Why use epoxy for large glue-ups instead of wood glue?
Epoxy provides longer working time before setting, essential for complex assemblies.
52:11
Spontaneous Combustion Risk
Highlights a serious safety hazard many beginners overlook—proper disposal of oily rags can prevent workshop fires.
07:03Dye to Accentuate Figure
Demonstrates a professional technique to make figured wood pop, transforming a piece from plain to spectacular.
31:53Always Dry Assemble
Emphasizes a fundamental rule that prevents costly mistakes and rushed corrections during glue-ups.
49:29Break Complex Problems into Steps
Applicable beyond woodworking—this mindset helps tackle any intimidating project by focusing on incremental progress.
01:10:02Allow Wood Movement
Crucial for furniture longevity; ignoring wood expansion causes splitting—figure-8 washers are a simple solution.
01:09:50[00:00] woodworking can be a really fun and rewarding hobby and it's something that I've enjoyed now for many years. But I can remember what it's like when you're first starting out and how overwhelming it can be when you don't have all the tools and you're still trying to learn all these different
[00:14] building techniques and there's just a lot that you're trying to pick up all at once. So in today's video I'm going to be giving you years worth of woodworking knowledge by guiding you step-by-step through multiple projects. Starting with some simple beginner-friendly builds and then progressively
[00:29] going into more difficult and more complex projects as your skills and your knowledge start to grow. Before we dive into our first project let's go over some woodworking basics and some helpful tips that every woodworker needs to know. Now regardless of what material you're using there's some important
[00:44] things to know when you're in the shop. First off don't forget to account for the blade curve whenever you're making your cut. If you try to put your blade right on the line your part's going to be a little bit shorter due to the amount of material that the blade is going to remove. I always mark one side of my
[00:58] boards as the scrap piece so I know that I can run my blade through that without ruining the part. Now we've all heard the saying measure twice cut once however I need to make a really precise cut I'm not going to try and nail that in just one go and said I will cut it deliberately a little bit too
[01:15] big and then slowly sneak up on it until I get the perfect size that I need. Now the easiest way to take little tiny slivers off of your board is to actually push the board into the blade just slightly
[01:28] and then make your cut. This is going to deflect the blade just a little bit and you'll get a very very slim cut. Now if you need to make multiple pieces that are all the same size make sure you're using a stop block so that you get precise repeatable cuts. So it'll be a lot faster and a lot easier
[01:44] than trying to take measurements every time and cut to the same spot. Now there's a lot of options out there for buying premium stop blocks to fit on your tools and equipment. However you can always use a clamp on a block of wood to make a quick and simple stop block that is going to work just fine.
[01:59] All right this next one is very important. Anytime your cross cutting material the long grain is running towards the fence whether you're using a miter gauge or even a sled you should never have
[02:11] your material riding against the fence when you're going through the blade. It's a very good chance that this cut off is going to get wedged in between the blade and the fence and when it does it's going to kick back at you at about mock three and take you out before you even know what happened. So if you're
[02:28] going to be making cross cuts make sure the fence is out of the way so this piece has plenty of room to sit out here without getting wedged and kick back towards you. Now if you do want to use the fence so that you can have repeatable cuts when you're doing your cross cut get yourself a clamp and a
[02:42] block of wood and put it on the back of the fence here. Make sure it's far enough back so that when you clear that block there's nothing in between your off cut and the fence so you don't have a kick back. When you drill a hole through a board there's a pretty good chance that you're going to get
[02:58] a really nasty blow out on the back side and no one wants a nasty blow out on the back side. To prevent this make sure you use a scrap piece of wood as a backer board. That's going to support the wood fibers so that you don't get that nasty blow out and you get a nice clean cut instead. When you're using
[03:13] screws always make sure you pre drill and countersink the hole before you drive the screw otherwise you're very likely to split the wood. Instead of guessing it would drill bit size you need I recommend picking up some of these tapered countersink bits. These are specially made for drilling the pilot hole
[03:28] and doing the countersink all in one go. And they're already the exact size you need for the screws that you're using. Now if you don't mind spending a little bit extra money I highly recommend this
[03:41] amount a bit. This has a non-marring depth stop on it so that you get the exact same depth in your countersink every time for repeatable results. When you're building your projects you want to start using relative dimensioning as soon as possible. I don't worry this isn't anything as complex as
[03:57] Einstein's theory of relativity. This simply means you use your project to determine the size of your parts instead of relying on the numbers in your plans or taking actual measurements. In this case I need a board to span this distance but I don't know this exact measurement and it doesn't matter.
[04:13] All I have to do is put my board in place where I want it and mark it directly from the work piece. I still don't know what this measurement is and I don't care because the board fits exactly because I used relative dimensioning. Now when it comes to finishing your project it doesn't matter which
[04:29] finish you use. If you want a flawless finish you have to start with proper sanding. First off I always make sure I have on hand all the sanding grits from 120, 150, 180 and 220. Now you shouldn't need all
[04:43] of these for every project but let me show you the thought process that I go through when it comes to choosing a grid. All right let's take for example this piece of oak. If my project look like this side of the oak it's very rough, has a lot of scratches and deep marks in it that I need to remove so
[04:57] that's a lot of material I need to take off for this piece. If my project look like this I'm going to start with 100 grit. Now if I turn this around I have another side here, I have some glue marks, I have some marks from the machinery so but this is a lot smoother than the first side so I have less
[05:14] material that needs to be removed. I do have a few defects that I want to get out. In this case I was start with 120. And finally on this side of the oak this is very very smooth, there's almost no defects, no deep scratches. This is a pretty flat piece of the board. So in this case since I have very
[05:32] little material to remove I would start with 150. Now that you know what grid to start with how high up do you need to sand? Well I typically only sand either 180 or 220 depending on the finish that I'm using.
[05:45] If I'm going to be using a film building finish like paint, polyurethane, lacquer, anything like that I'm going to stand up to 180, there's just no reason to go any higher. Now if I'm going to be using
[05:58] an oil finish like a teak oil, Danish oil, even some of the hard wax oils I will take that up to 220 so that the wood has a smoother feel since it's not going to have a film over the top of it.
[06:11] Now you know what grid to start sanding with and what grid to finish sanding with but what do you do in between? Well there's a really simple rule of thumb and that is don't skip more than one grit in the progression. Alright so let's say with your project you want to start with 120 and you want to
[06:25] sand up to 180. You would go 120 and you can skip 150 and then sand with 180 grit and then you can start your finishing process. Now let's say on another project you're going to start at 100 and you want to go
[06:39] up to 220. You go 150 and then 220 but if you wanted to go from 180 you start with 100 you can skip
[06:51] 120 but then you have to do 150 and then you can do 180 because we can't skip more than one grit. Now if you only learn one thing from me today let it be this right here. This is the most important
[07:03] thing that I have to share with you. What do all of these products have in common? All of these products contain oils or chemicals that when they start to cure will generate heat and can spontaneously
[07:16] combust. This means if you finish with some of these and you wipe them up and throw them in the trash you can very easily start a fire in your house. I'm not saying that to scare you away from using any of these. I use all of these products. I like every single one of them. You just need to recognize the risk
[07:33] and make sure that you properly dispose of your rags after you're done. The safest way to handle the rags whenever you're done is to lay them out flat on some concrete and let them dry overnight. Once they've dried they're completely safe you can then wipe them up and throw them in the trash.
[07:48] Now anytime you're trying out a new finish or a new stain test the material out on some offcuts from your project before putting it on the project yourself. That way if you don't like the results you have it ruined your project and you can go back with something else. Now that we've got some of the basics
[08:03] to build off of let's start building our first project. Now one of the first things that many woodworkers learned to build is a basic cutting board. However I've seen a lot of beginners make the same mistakes over and over again. So here's how I build cutting boards and I'm going to show you
[08:20] some tips to make batches of them. It's going to save you a lot of time and money. I'm going to be using maple cherry and walnut for these cutting boards. I would avoid any softwoods such as pine, cedar, cypress, fur. These woods are just too soft to be used in cutting boards and they can also
[08:36] leave a nasty flavor behind. I'll leave a list below of the woods that I like to use in my cutting boards. Now join her in a planer or pretty essential tools to have in a wood shop to be able to flatten and square roughs on lumber. However if you don't have these tools yet you can still build these
[08:50] cutting boards by asking your hardwood dealer for pre-surface lumber. Now this is just lumber that's been flattened and surfaced on at least two sides and one edge. It's typically referred to as either S4S which means surfaced four sides or S3S for surfaced three sides. Now getting your materials
[09:08] pre-surface like this is going to be a little bit more expensive but if you don't have the tools that you need to mill rough lumber then this is really your best option. Now there's one more thing to think about when it comes to materials that's how wide of a board do you want to get. Now I want my cutting
[09:23] boards to be about 12 inches wide. However if I buy my lumber 12 inches wide I'm going to pay a premium on that board. That can be as much as one and a half to two times as much as a narrower board.
[09:37] I'm sticking with stock that is about six to seven inches wide and I'm going to glue them together to get the wider panel that I need. Doing this is going to create an additional glue join in the board. However it's going to save you a lot more money in the longer run. So first I need to cut each of
[09:52] these boards down. I'm making them three foot long by six inches wide. Then I'll take one each of the walnut maple and cherry over to the table saw to cut some thin decorative strips. I prefer to cut
[10:05] thin strips on the opposite side of the blade from the fence. This is because thin strips can vibrate between the blade and the fence and cause burning and saw marks on the wood. Now here I'm using a thin strip jig from Rockler to get the exact same size thin strip every time. Now while this jig
[10:22] is certainly nice to have in the shop it's not the only method that you can use to cut thin strips. In fact let me show you another method that doesn't require any additional tools or jigs at all.
[10:34] Now with this method we're still cutting on the opposite side of the blade from the fence. Just take a previously cut thin strip and set it up against the blade. Now take your work piece and just the fence over until those pieces are flush with each other. Then lock down your fence.
[10:50] Now you can move the other thin strip out of the way, turn on the saw and make your cut. Now this method can be just as accurate but it does take a little bit longer to set up than it is using the jig. Now after cutting all the thin strips I also ripped an inch and a half piece off of
[11:12] each of the boards. This is where we will sandwich in these thin strips. With all of our pieces cut now it's time to prepare for our glue up. First we want to make sure that we get some of each type of wood with each board. So our cherry is going to get some strips of maple and walnut. Our walnut
[11:30] board is going to get some strips of cherry and maple and of course our maple board is going to get some cherry and walnut strips. Now when it comes to glue for these cutting boards you want to make sure
[11:42] you're using a water resistant glue. I like to use tight bond too. There are a few other options that you can choose out there but this is the one that I've been using for many years and I've always had great results. To ensure we have a strong glue joint you want to have an even layer of glue
[11:58] don't leave any dry spots. You can use a brush or a roller or just your finger to spread the glue evenly over the entire glue joint. Now for me I prefer to use this rubber ink roller. I've just
[12:11] haven't found anything that works as quickly or as efficiently as this. Now you want to start with tightening the clamps slowly and evenly. Do a little at a time on each clamp.
[12:26] I also like to use a piece of scrap to hold the boards down tight against the clamp rails. This helps to ensure everything stays in a line and the boards don't slip and slide past each other.
[12:38] Now you don't have to go all gorilla mode on these clamps. Just tighten them enough to close up the joint. Too much pressure can squeeze out the glue and that's going to cause a weak joint.
[12:51] There are a couple of options for dealing with the glue squeeze out. I like to wait 30 to 40 minutes for the glue to start to set up and get a little film over the top. I can then use a paint scraper to remove the majority of the glue without leaving behind a big mess.
[13:05] Now you want the boards to set in the clamps for at least a couple of hours. It certainly doesn't hurt to go longer. I think I actually went about three days before I finally got around to come
[13:18] back to these. Now that we've got our boards out of the clamps, it's time to do a little bit of cleanup. Even though we wiped off the majority of the glue, we've still got some squeeze out we got to deal with. Also no matter how careful you were with your glue up and making sure everything was
[13:34] properly aligned, there's still going to be a little bit of inconsistencies between your glue joints where one board is going to be higher than the other. So before we cut these down in individual boards, we need to do some rough cleanup and we've got a couple of options for that. First,
[13:48] if you do have a planer, this is the perfect time that you want to use it. It'll just take a couple of real quick passes on each side to clean these up and then we're ready to move on to the next step. However, if you don't have that planer, our second option is sanding. So hopefully you have a random
[14:03] orbit sander. I recommend going with 80 grit and just sticking with 80 grit until you've cleaned up all of the glue squeeze out and these boards are perfectly smooth. We're not looking for a finish ready surface. We just want to clean up the glue squeeze out and any inconsistacies in the glue up.
[14:18] So a couple of quick tips on sanding with a random orbit sander. One, don't tilt the sander over on its edge to try to knock down high spots. This is going to leave gouges in the wood and it can also overstress the motor on your sander and cause it to wear out faster.
[14:35] The same applies for putting too much pressure on the sander to try to get it to sand faster. This is going to overstress the motor and could cause your sander to fail early. You just want light pressure on top of the sander just enough to keep it moving where you want it to go.
[14:52] You don't really need anything more than the weight of your hand and the weight of the sander. Just let the sander and the sandpaper do its job. Now it's time to cut these panels down into individual cutting boards and to do that,
[15:06] I'm going to use my ridiculously oversized crosscut sled. Seriously, you don't need anything near this big. You could just use your table saw's miter gauge or if you have a miter saw, you can use it
[15:18] to cut these down. Whatever you use, you just want to make sure that you're getting good square cuts. Each of my cutting boards are going to be 9 inches by 12 inches.
[15:31] From the original six foot long boards, I'm getting 12 cutting boards with very little waist.
[15:47] We have all of our boards cut out so now it's time to do something about the sharp edges because no one wants to cut themselves on their cutting board. So I recommend either going with a chamfer or a small roundover on the edges. Now in these small boards, I prefer a roundover and you don't want to go too large with a roundover,
[16:03] a half inch or even a quarter inch roundover. It's probably not going to look real good on a board this size. So I'm actually going to go with a one eighth inch roundover. And depending on what tools you have, there's a couple of different options for doing your edge profile. The fastest and the easiest
[16:18] is probably going to be using a router table. Just a quick setup and you can run through all of these boards in a matter of minutes. Another option would be to use a handheld trim router and the bit of
[16:30] your choice. Trim routers are great for adding edge profiles, especially if you're using smaller router bits. You just need to make sure that you keep the router flat so you don't gouge into your work. And finally if you don't have a router table or even a palm router, you can just use a sanding block
[16:54] or even a block of wood with just sandpaper wrapped around it to create chamfers or roundovers. So we've got the edge profiles I can care of, but these boards are still pretty rough,
[17:06] so we need to go through our sanding process. Now my strategy for this is I'm going to take my pencil and scribble all over each side of the boards and work my way through my sanding grit. So we'll start with 120 grit, go through that one, then we'll work up to 150, 180, and then finally
[17:24] 220 grit. Marking the boards each time with the pencil in between so I know when I'm done with that grit and I can move on to the next one. And just like before, we're going to use light even pressure while we're sanding. Don't tip the sander over on its edge, that's going to leave gouges.
[17:40] Just try to be patient and let the sander and the sandpaper do its work. Now with all of our sanding done, these boards feel really nice and smooth. However, they won't stay that way if we stop here. You see the first time someone goes to rinse the board off, the wood is going to absorb some of that
[17:54] moisture and it's going to cause all the little broken fibers of wood to stand on in and it's going to make the board very rough and kind of fuzzy feeling. So to prevent this, we're going to use a technique called water popping. Now this is really simple. All we do is take a spray bottle of water and
[18:11] spray over our cutting boards. You let them dry and this will cause the grain to pre-raise. After the boards have dried, we come back with our 220 grit sandpaper and give them a light sanding.
[18:23] Now this will prevent the grain from rising again in the future. Alright, so now it's time to start finishing these boards and really this is the fun part for me because this is where we see the wood really come to life once that oil hits the wood. Now I've got
[18:39] a tub here with some mineral oil in it. Notice I said mineral oil, not mineral spirit. Those are two very different things. Now I'm not going to soak the boards in this mineral oil. I'm just going to dip and move them over to a drying rack and let them dry. With these long grain boards, there's really no
[18:55] reason to soak them for a long time. They're not going to absorb that much of the oil. So just a quick dip and we'll let them dry out. Alright, so the last thing we need to do to these boards is add a cutting board conditioner to give these a little bit of moisture protection in the kitchen.
[19:11] Now I'm using a board butter that I make myself. This is really just a mixture of mineral oil and beeswax. Now one of the most important things to learn in woodworking is how to build a simple box
[19:24] after all, almost everything that we build is some derivative of a box. From cabinets to dressers, bookcases to humidors, they are all basically boxes when you boil it down to it and
[19:36] sometimes there's often boxes within the boxes. We have kind of a boxception thing going on. However, we're going to start really simple with a basic box design, but we're going to incorporate some more
[19:48] advanced techniques to continue to build up your skill level. So when it comes to materials for our box, since we're working on such a small scale, this is an excellent time to use either some exotics or some highly figured wood. For one, because this is such a small box, we don't need a lot of
[20:03] material. So instead of going out and spending hundreds of dollars on a bunch of material, a couple of small pieces enough to build our box. But because this is such a small project and a relatively simple design, we want to use the materials to speak volumes here and really bring the
[20:19] attention and the wow factor. And that's why I decided to go with a figured maple for this keepsake box. And I don't need a lot of material for this. In fact, this board is more than enough for the box that I'm going to do today. So I'm probably going to save some of this for a smaller box down the road.
[20:33] And the figure on this board is absolutely amazing. I can't wait to see what this is going to look with the finish on it, but we'll get to that much later. For now, this board is pretty thin. It's about a half inch, but it's still too thick for the box that we want to make. It's very
[20:49] important that we keep things into proper proportions. In a very small box like this, half inch is just too thick. So I'm going to mill this down and get it down to about three-eighths, which should be about
[21:01] perfect for the size of the box we're building. Now we need to establish the dimensions of our box. This is going to be very important because throughout
[21:16] this build, I'm going to be taking advantage of something called the golden ratio, which is derived from the Fibonacci sequence. Now don't get worried about this. You don't need to know anything about the equations or the mathematics or how any of this is derived. I've already done all the figures
[21:33] for you, and I'm going to list all the dimensions. They'll be in the plans that you can get at my website. Just for now, I'm going to establish the sides of the box, which the long side is going to be eight inches, and that means that the short side following the sequence is going to be right around
[21:50] five inches. So we'll cut this board down to get our sides of our box. Now it's extremely important that we make sure that our cuts are perfectly square and the exact same size for the sides of our box. So for that, I'm going to be using my crosscut sled and a good stop block to cut all the parts out.
[22:26] All right, now we've got our sides cut to length. We need to establish how tall our box is going to be. This is where using the golden ratio or Fibonacci sequence is going to help us establish the perfect proportions that are going to look best to the eye. So if our long sides are eight inches and our
[22:44] short sides are five inches, if we follow the sequence, the next number for the height is going to be just over three inches tall. Now I'm going to add an extra eighth of an inch on top of that,
[22:56] which is the width of my blade curve, and you'll see why in a few minutes. All right, so now we need to make some miters on the end of our boards. Now to do this,
[23:20] I'm going to set my blade to 45 degrees and I'm going to use my miter gauge and a stop block to cut the miters. Now I want to take off as little material as possible to preserve as much length of our boards as we can. So you want to cut right up to the edge and not take any more if it
[23:36] all possible. All right, so now I'm bringing the parts over here to our shooting board where I'm going to clean up the miters. Now on a large piece of furniture, it really doesn't matter that much. You'll have to go through this extra step because any small inconsistency with your miters, even tiny gaps,
[23:50] just aren't going to be that noticeable. But on something this small and intricate, even tiny gaps are really going to stand out. So using the shooting board, really clean up and true up these miters joints so that we don't have any gaps or any flaws with them. And it's just going to make
[24:06] everything look nice and clean and tight. Try to make sure that you're taking about the same number of passes on each joint and that's going to make sure that you're taking the same amount of material off so that you don't get your sides inconsistent and have different sizes. All right,
[24:21] so now that we got our miters cleaned up, the next thing we need to do is cut the grooves for our top and bottom panels and we'll take care of that over at the table saw. To cut the grooves, first I need to change out my table saw blade. Now I'm putting in a blade with a flat ground tooth so that I
[24:34] get a nice, flat bottom when I cut the grooves. Then I'm going to use some setup blocks to establish the blade height and the distance from the fence. Now of course, if you want to have a set of setup blocks, you can just measure using a ruler. But having something like this makes it a lot faster
[24:49] and easier to set up your tools. We'll head and cut your grooves into all four pieces on the top and the bottom. Once you've got all of the grooves cut, bump the fence over a little bit,
[25:03] make the cut again widening out the groove. Now check the size of the groove with the panel that you're going to be using. Keep adjusting the fence until you get a nice snug fit. Once you've got that
[25:15] perfect fit finished cutting the rest of the grooves. I'm going to be making the top and bottom panels of my box out of wingy. And as I said before, a small box like this is an excellent opportunity to play
[25:31] with some more exotic materials. But there's a very specific reason why I chose this material for this box. You see in this design, I'm playing very heavily with contrasting materials and it's pretty obvious that this dark chocolate brown almost black wingy is a very stark contrast to the very light colored
[25:50] figured maple. But did you notice the other contrast here? Let's take another look. You see, I specifically chose the straightest grain I could find in this wingy. Now this is another very stark contrast
[26:02] to the wavy patterns and the curl in this maple. Now this is something I'd like you to start considering in your own designs and your own projects. Make sure you're not just considering the color of the materials that you're working with, but also consider the grain patterns and how they're going to
[26:17] flow from one part of the project to the next and how it's going to look in the overall design. And even though it sounds kind of cliché I guess, whenever you start incorporating these types of elements into your projects, it's going to set your projects up to the next level. It's really going
[26:31] to help accelerate your growth as a woodworker and a designer. When you're cutting out the panels, make sure you cut them slightly under size to allow for just a little bit of wood movement. About a sixteenth of an inch should be planning. Then make sure to do a dry assembly just to make
[26:44] sure everything's fitting up properly. Before we do the actual glue up we want to go ahead and sand the inside of all of our components while they're easy to get to because once it's glued together
[27:00] it's going to be really hard to properly sand the inside of the box. Now this wingy has a couple of these little holes in it. I want to take care of those real quick so they go all the way through. So a little bit of painter's tape on the backside.
[27:18] I'm going to use this star bond medium thick and bright part brown and still those holes so they're not as noticeable. A little dab of do you?
[27:38] All right so now it's actually time to glue up our box and I'm using some blue tape instead of clamps. I mean this really is the simplest and easiest way that I've come across to glue up a small box like this because you don't have to fiddle around with a bunch of clamps and try to get them into
[27:53] the right positions and over tightening anything because the tape here itself acts as the clamp and keeps everything in line and holds it together long enough for the glue to dry. You just line up your parts and stretch some tape across each of the joints then flip the whole thing over, add your glue to
[28:09] the miters and fold it all together to form your box. And doing this we don't need to add any glue to the inside to hold the panels in place just let them float.
[28:24] All right at this point everything should be nice and square but it doesn't hurt to just go ahead and just double check to make sure you don't need to make any final adjustments and if everything's looking good just give it some time and let the glue dry so I'm going to go grab some lunch and
[28:41] come back finish this in a bit. All right so after grabbing some grub we've got box although it's kind of tough to get into right now. What are you doing? All right so hear me out I've been
[28:53] watching this guy bourbon moth and learned a really neat trick to get in a box. Okay what do you say? You just hang on there Gallagher there's a very simple way to open this box and make a lid at the
[29:05] same time over at the table saw I'll set my blade height just shy of cutting all the way through the sides of the box then I'll set my distance between the fence and the blade so that I don't cut into my panel and I keep it encapsulated in the lid. Now I'll use a hand saw to carefully remove the lid
[29:30] from the box by cutting through the remaining material. There we go and now we have a box with an actual lid that can come on and off. Now we'll just need to clean up this little bit of material
[29:47] it's left and we'll be ready for the next step. All right so once I have the bulk of this excess material removed with my block plane I want to get a sheet of sandpaper and just set the box on the
[30:00] sandpaper and kind of move it around and get the rest of it all even and smooth all the way around this lid. And now we have a box with a removable lid without having to resort to more
[30:18] deconstructive methods. All right so the next thing this box needs is a liner on the inside. That's going to do a couple of things for us. For one it's going to finish out the inside of this box so that we've got all winging inside the box here make it look nice and finished. Two it's going to give this
[30:35] lid something to register on so that it doesn't just slide around and slide off the box. We've got some more winging and let's make a liner.
[31:10] All right so next I'm going to show you how we can get an absolutely killer finish on this heavily figured maple. But first we got to do some finish prep and that means we got to do some sanding.
[31:26] So I'm going to sand everything up to about 220 to make sure that this box is just baby butt smooth and make sure we round all the corners so there's no sharp edges anywhere and then we'll get into
[31:39] some of the tricks that I'll show you to get the perfect finish. All right let's make some magic happen with this finish. So I want to really accentuate the figure in this maple to do that. I'm going to use a concentrated dye solution. Now dye works very differently than stain.
[31:53] Where stain will just sit on the surface and color the wood. A dye is going to penetrate deep into the wood grain and into the figure itself. So we're going to use that to our advantage and really
[32:05] highlight the curl that's in this maple. To make this solution I need a little bit of denatured alcohol and about 8 to 10 drops of our dye.
[32:22] Just apply the dye to the box with the foam brush and don't worry about getting it on the wing gate. The wing gate is already pretty dark it's not really going to show up so it's not going to matter if you get any on it. Just make sure that you cover all of the maple evenly. Now again
[32:35] this isn't really a stain so we're not really coloring the box brown or anything. This is just going to soak into the wood grain and it'll be a much lighter once it dries from what it is right now
[32:47] when it's going on. You can already see it's starting to bring out some of that figure. Alright with the dye applied to the box and the lid we're just going to let this dye dry for a while
[33:05] give it about an hour or two and make sure it's completely dry before we go to the next step. Alright so now the dye has had a couple of hours to dry we can move on to the next step and as you can see it's kind of a brown mess at the moment but don't worry don't panic this is just kind of a
[33:22] ugly duckling phase of the process that we have to go through to get where we want to be with this finish. Yep that looks like it. So what we need to do now is just remove the dye that's dried on the surface and left this kind of muddy mess that we see and that's going to reveal what has happened
[33:36] beneath. All that really means is we're just going to do a bit more sanding until it looks like all the dye has gone. Alright so we got our box sanded down and all the dye removed from the surface so
[33:56] we're looking much better now. I'm sure some of you are asking why did we do all that to begin with. You put the dye on and then you sanded it all away. Well we sanded away what was on the surface but that dye really soaked down into this wood grain and the figure in this maple and when we put
[34:12] the finish on it's really going to pop because that dye is really going to stand out when we put the oil finish on. Now for the finish I'm going to be using Osmo which is a hard wax oil out of all
[34:24] the different ones that I've tried. Osmo looks the best on maple it doesn't add that amber yellow tone that you get with a lot of oil finishes. Alright now I've been promising some magic with this finish so here we go. Look at how that grain that figure comes alive with that Osmo.
[34:49] That looks amazing. Really happy with that that's looking. Now when I'm applying this kind of finish I like to use these white brillo pads
[35:07] just enough scrub where you can really get the finish down into the grain but it's not going to cause any scratches or anything in the wood. Make sure you're getting this down into all the little
[35:19] corners and then all this grain. You want to go pretty light. You don't need a heavy coat. A little bit of this stuff will go a long ways and see how much it darkens up that wingy without finish
[35:32] with the finish. Alright once we've got all the finish on and let it sit for just a minute you want to come back and wipe away all the excess. You don't want any standing finish on the box. This is not going to
[35:46] dry properly so you want to wipe it away until it feels like it's completely dry. Alright so a couple of coats of Osmo later and our keepsake box is done and this thing looks absolutely gorgeous.
[35:59] I just love the way this figure came out and that dye really helped bring that to life. Now that you've got a few projects under your belt you're probably starting to build up quite a few scraps. However don't throw these out. Instead let me show you one way that you can turn scraps into
[36:15] not only another project but also show you how it's a great way to learn new skills and techniques. First I have to address the large crack that runs almost all the way down this board so I'm using you guessed it epoxy. Since this maple has so much figure to it I don't want to draw even more
[36:31] attention to such a small piece by using a bright colored epoxy. So by using a more muted color in the epoxy I'm allowing the figure of the wood to stand out and be the center of attention. It is wonderful to be the center of attention.
[36:45] And once that epoxy is cured I'll run it through the drum sander to get everything smooth. Now with the board stabilized and I know it's not going to fall apart on me I can start working on the next part of this challenge which is installing some bowtie inlays. Over at the table saw I take
[36:58] some scraps of walnut and cut it down into some small pieces. I'm going to use these pieces to create some bowties to install a long crack. I've never used bowties before. I've always been a double Windsor or even a Bolo Man myself so I figured this is a great opportunity to try out
[37:14] something new. Sometimes these are also called butterfly keys. I'm not sure if either one is the right answer but I've heard both used so let me know in the comments which one do you use is it bowties or butterflies. I don't have one of those acrylic templates that you can use to create
[37:31] bowties using your router so I'm making mine at the bandsaw. To do this I'm using a dovetail jig that I made using a scrap of plywood with a dowel in it. The dowel serves as a stop. I cut to the halfway point on one side and then flip the piece over and cut to the halfway point again. Do
[37:47] this on both sides to get that uniform bowtie shape. The bandsaw is going to leave a fairly rough finish on these keys so once I'm done cutting them out I'll take them over to my work bench where I'll
[37:59] use my chisels and make very light pairing cuts. This removes all of the rough cuts from the bandsaw and leaves a smooth flat surface on the bowties. I'm using some blue tape and some super glue to hold
[38:12] these bowties in place so I can cut around them with my marking knife. And now unlike the hair on my head these keys aren't going anywhere. I'll trace around each of the keys with my marking knife being
[38:26] careful to cut through both layers of tapes that I cut into the wood below. Then I can remove the tape and use my palm router to remove the majority of the waste. The goal here is to get as close to
[38:38] the line as possible without touching it or especially going over. This will make the next step much easier. Now I can move on to my chisels and start removing the rest of the waste. If you did a good job with
[38:54] the router you should be able to put your chisel directly into the cut made by your marking knife and then a few taps of the mallet will leave a clean mortise for your inlays.
[39:09] One of the great things about trying out new techniques on these type of challenges is if you completely screw up and have to scrap the project at least it wasn't on a $12,000 table for a client. This takes away some of the stress about making a mistake trying out a new technique. While the
[39:25] aspect of the challenge has you more invested than you would be if you were just practicing on some scraps that were just going to go in the trash. And since we're talking about mistakes the installation of these bowtie inlays didn't go perfectly I ended up with a few gaps I'm going to have to address.
[39:41] Something I learned very early on in woodworking all woodworkers make mistakes however the really good ones know how to fix their mistakes so that's something I'm always trying to get better at is how to repair the mistakes that I make. I saved some of the cutoffs from when I was making the
[39:55] bowties with a little bit of glue I can put these in place and fill in the gaps. After a bit of sanding you can't even see that there was a gap there. Now I can take my maple board over to the
[40:14] table saw and cut off the rough edges and make sure everything is nice and square. I also need to cut off a small one-inch block from the bottom of the board. Then I'll cut a couple of strips from
[40:26] the piece of walnut so that I can use in my glue up. Now this glue up is a little tricky since I have this one-inch piece of maple that I'll have to
[40:39] get in the proper position so I'll start with the larger piece, apply glue to both sides and then sandwich it between the two pieces of walnut. Then I can glue the smaller block into place make sure that the spacing is correct and then I'll use my square to make sure that everything is
[40:55] properly aligned. While the glue is drying I'll cut down another piece of maple and another piece of walnut. I need to add a small rabbit to this piece of maple so I'll do that at the table saw as well.
[41:13] Now I can glue these parts together. I'll apply the glue to the maple and I'm going to use the rabbit to hold this in the proper position. Once I've got it in place I'll apply a couple of clamps
[41:25] to hold it until the glue dries. Once the glue is dried I'll take all my parts over to the table saw and trim all the ends flush. To keep this piece from looking so blocky I'm going to add some large
[41:44] bevels to the sides and the best place to do this is over the table saw. It can be tricky and somewhat dangerous trying to make this type of cut using just your table saw fence. So I'm going to use my miter spline jig that rides along the fence to secure the workpiece. And once it's clamped in
[42:01] place it's perfectly secured so I don't have to worry about it tipping while I'm making the cut. This also allows my hands to be behind the jig and fall from the blade while I'm making the cut.
[42:14] Now even if you have no intention of getting into hand tools I recommend every wood worker have at
[42:26] least a block plane. This little plane is one of the most used tools in my shop. Here I'm using it to remove all of the sharp edges and leave a small chamfer on the edge of the workpiece.
[42:45] Once all the edges are taken care of I do a quick sanding up to 180 grit. For the finish I'm going to use what has to be the smallest bottle of Rubio in existence. I mean
[42:58] look at this thing absolutely tiny. That's what she said. This is the first time I've used Rubio before which is why I have this little tiny sample bottle. However this bottle was actually enough I still have two-thirds of the bottle remaining after finishing
[43:15] this project so this stuff really does go a long ways. Simple challenges like this are great ways to improve your woodworking skills. It has you step outside of your comfort zone and try something
[43:27] different whether it's a new design or a new technique or even just working with new material that you've never used before. So I try to incorporate these challenges from time to time to make sure that I'm constantly learning new techniques and improving my skills because the only sure way to
[43:41] get better is to actually get out in the shop and build something. Now that you know how to build some amazing boxes and you've started learning some really awesome woodworking techniques it's time to up the ante and start building some full-size furniture. Now I know this step can be really
[43:57] intimidating but don't worry I've got tons of tips and tricks to help you out along the way. All right so let's jump right into this. The first thing I need for this project are a set of legs and everything is going to be built out from these legs. When milling legs you want to make sure
[44:13] that you mill them oversized and the longer the legs are going to be the more extra material that you want to make sure that you leave. This is because once you cut the legs out of a larger piece of stock they're very likely to move on you leaving you with a table with a ganty leg. So make sure and leave
[44:29] your legs stock a little oversized let it sit overnight so it can do any movement that it's going to and then the next day you can mill up to actual size and you'll end up with perfectly straight legs. You also need to pay attention to the grain direction in your legs. Flat song boards will leave you
[44:44] with a cathedral grain pattern. Instead look for quarter song or rift song grain which is going to be running diagonal through the end of the leg. This will give you the straightest grain pattern of the legs which looks much better. Now reference marks are extremely important especially for large
[45:00] complex projects. You're going to see me use reference marks throughout this entire project. Be sure that you label your parts and use reference marks often to avoid mistakes. Because seriously the last thing you want to do right now is to cut a nice clean mortise into the wrong side of your legs.
[45:17] To keep from having just straight square blocks for legs I like to add a taper to the bottom inside faces. This really lightens the look of your project and has a really nice subtle detail. Just mark a slight taper on the bottom of the leg and cut it off at the bandsaw.
[45:32] Now make sure to grab that off cut because we're going to need it. Tape this back in place so that you still have your mark so that you can cut the other face at the bandsaw.
[45:45] Anything coming off the bandsaw is going to be rough and jagged so we need to get this cleaned up. Now you could use a sanding block but I really recommend getting a hand plane. Now if you've never used a hand plane before you are really missing out. A good sharp hand plane is
[46:00] just so satisfying to use. I mean seriously try to find a local woodworkers guild or a rockler that's offering some hand plane classes and go try it out. You'll be hooked. And the surface that you get
[46:13] fresh off the plane is so much smoother than anything you can get with sandpaper. Have you ever moved a heavy piece of furniture across the floor and have a piece chip out of the bottom of the leg? Well this can happen if you don't have a heavy shamp for on the bottom of the legs.
[46:27] A few swipes with one of my favorite tools. A small block plane is all it takes. Now I use this little guy on every project. It is so handy to have one in the shop. Now another small detail that has a huge impact on your projects is including long flowing curves.
[46:44] This makes a piece much more interesting to the eye and it is so easy to add this detail. And all you need to do this is something long and a little floppy. That's what she said. That's what she said. All you need to do is clamp some scraps to each
[46:57] into the board that you want the curve on. Then push your floppy member against the blocks, put some pressure in the middle and create your curve. For my project I'm doing that on all of the lower rails to add a nice lighter look to the piece.
[47:13] Now once again we need to address the rough cut from the bandsaw. However a regular plane won't do
[47:31] here. This is a job for a spoke shave. Now these are great for smoothing out curves but if you don't have a spoke shave you can make a flexible sanding block that will do the job as well. You just need a piece of hardboard with a couple of wooden handles glued to each end
[47:46] and then glue on some sandpaper. This makes quick work out of smoothing out curves because the hardboard is going to flex and fit the profile and sand out all of the high spots leaving you with a silky smooth curve.
[48:06] Full sheets of plywood can be very difficult to move around and dangerous to try to lift onto a table saw. Now I prefer to lay down pieces of styrofoam and cut the sheets down to manageable size on the floor instead of trying to wrestle the plywood up onto a table. You can use a
[48:21] track saw to get very accurate cuts or you can make your own homemade version for a circular saw like a video that I did a while back. Now I'm using a lot of dominoes in this build but don't let
[48:33] that stop you and make you feel like you can't build something like this. Anything that you see me doing with the domino you can do with dowels, biscuits or even pocket holes.
[48:45] Whenever possible you should always sand your parts before gluing them together into assemblies. It is so much easier to sand everything when all of the parts are flat and you have full access to all the sides. To reduce the stress and frantic running around trying to grab hammers and clamps
[49:03] during glue-ups try to work with subassemblies if your design allows. For this dresser I can glue up the side panels and the legs as well as the back panel all separately. Then after the glue dries I can
[49:16] put together the subassemblies greatly reducing the number of glue joints that I have to worry about. All right now this is a bit embarrassing to admit but you're about to witness me break my number one
[49:29] rule in woodworking. You should always and I mean always do a dry assembly before applying the glue. Once the glue is on it's a race against time to get everything assembled and aligned before
[49:41] the glue starts to set up. You don't want to have to try to find more clamps or realize the too late that your joinery is just a little bit off when that glue is starting to seize those parts together. Now in my rush to get these subassemblies glued up I completely forgot to do a dry
[49:59] assembly and ensure everything fit properly and unfortunately for me a couple of my dominoes were off which caused a misalignment between the solid wood rail and the plywood back panel and to make things even worse I panicked and I overtighten the clamps which caused the plywood veneer to chip out.
[50:16] This turned a small problem into an even worse issue. This is exactly why it's a good idea to keep all of your scraps until the end of the project. I was able to find a piece that matched the rail
[50:28] and glue that in place. Once the glue dries I used my hand plan to get it down to the perfect size. With a bit of glue and some general sanding the cracked veneer almost completely disappears
[50:40] and since this is the back panel it will be against the wall but because I know it's there I wanted to do my best to repair it. When you're making dados for shelves or dividers it's very important to ensure your dados are in perfect alignment russer shelves will not be square when installed.
[50:57] So here's a trick that I like to use to ensure they are perfect every time. Clamp the opposing pieces together and then cut your dado into both of them at the same time. This ensures that the dados are perfectly aligned so your shelves will be nice and square.
[51:12] This also gives the router more support if you're trying to balance it on small parts. You can get pretty close with the router but then come back and clean up the edges with a nice sharp chisel. After I learned my lesson from the last time it's time I'm doing a complete dry assembly
[51:43] before gluing up the subassemblies for the dresser. I'm checking to make sure that all the joinery is tight and lines up and that I have all of the clamps ready to go to pull everything together tight.
[51:55] This is when I realized that my clamps aren't long enough. However I do have a simple trick for this. If you take two parallel clamps and you clamp the heads together you can make an extra long monster clamp.
[52:11] Since this is such a large and complex glue up it's going to take me a while to get everything aligned and clamped up. I'm going to be using epoxy instead of wood glue. This is going to give me the extra time that I need before the joint starts seizing up.
[52:26] Even with the extra time this is still a very stressful glue up since this is the most critical part of the entire build. If for some reason I can't get a joint seated or the case is out of square the
[52:38] whole build could be ruined. I really have to start rushing once I get to the front of the dresser because the cup of epoxy starts heating up in my hand meaning I only have a few minutes left before it sets up. Finally I get all the clamps in place and everything comes together as it should without
[53:05] any major problems. I can take a breath of relief and relax while the epoxy finishes setting up. You should always take your measurements wherever your parts are fully supported. This way any
[53:17] bow doesn't throw off your measurements otherwise you could lock in that bow instead of getting everything perfectly straight. When cutting dividers this is another time that you want to cut things slightly
[53:30] oversized and sneak up on the perfect fit to fit within your dado. Once the size is perfect then you can cut the tenons to fit the dados. For this you want to make
[53:42] sure you're using a flat grand blade to get a nice square shoulder on the tenon.
[54:04] The bottom rail on this dresser is rigid so I'm using that as a starting point and I'm working from the bottom up to the top installing these dividers.
[54:18] Using a straight edge as you go ensures that you aren't creating any bow when the rails. Any bow will cause issues with drawer alignment and uneven gaps later. Instead of using clamps which you could also cause a bow I'm just adding a little bit of weight
[54:32] to the top to keep everything in good contact until the glue dries. Before you can install drawers on a case like this you need to have some internal support for the drawer slide.
[55:04] These back rails are really easy these can be just screwed directly into the back panel. Just make sure that you measure carefully to get the exact same measurements as the front rails. For the rest of the internal structure I'm going to use pocket holes. Now I'm not a big fan of
[55:19] pocket holes in most cases the visual screw pockets just look terrible if not well hidden but for internal support structure and things like face frames it's really hard to beat the simple pocket hole joints. Since this is all on the inside of the case you'll never see it. Just make sure that when
[55:36] you're screwing these together you really clamp these pieces well. The boards have intended to see to move a little bit as you drive in the screws so I use several clamps to hold the boards exactly where I want them until the screws are fully seated.
[55:56] For the drawer boxes themselves I'm doing something just a little bit different. I'm using ambrosia maple to add just a little bit of extra jazz to the interior of the case. You could use pine or popular for drawer boxes and that would be just fine.
[56:10] But if you really want to kick things up a bit use something with a little bit more figure and visual
[56:46] and once all of the drawer carts are milled to pick right size it's time to build the drawer boxes. This is another place that you could use pocket holes or rabbits to build the boxes but if you're going all out on the wood that you're using for the drawers and consider stepping up your joinery as well
[57:01] with dovetails to give the piece a much higher quality and finished look. Now you could spend days doing hand cut dovetails if you wanted. However I want to get this done quickly so I'm using my dovetail
[57:13] jig so I can cut all of the joints for these boxes in just over an hour. And by the way if you're interested in the dovetail jig that I'm using this is the lead D4R Pro.
[57:25] I'll have a full video review and demo on this jig. I'll link the link in the description so you can go check it out.
[57:43] Once all of the dovetails are cut it's a good idea to double check to ensure all the boxes fit together properly. Now take a moment to admire those great looking boxes.
[57:58] Well enough of that time to take them back apart so we can make the drawer bottoms. You could make the grooves for the bottom panels at the router table but I prefer to do this at the table saw where I have a lot more control over the exact size of the groove.
[58:15] Now it is extremely important here that you label your parts. You really don't want to make a groove on the outside of your doors.
[58:39] I get a lot of questions about why I cut my plowwood on the floor and this is why I can barely manage
[58:55] to get this quarter sheet up onto the saw, turn on the saw and then safely make the cut. There's no way I'm doing this with a full three quarter and sheet of plowwood. Once I get this down to a manageable size it's really no problem and I can knock out all of my drawer bottoms.
[59:13] I give the drawer parts a quick sanding before assembly but I'll save you from having to watch that and hoping not to put everyone to sleep here. The drawer boxes go together very quickly. Just a dab of glue and the dovetails is really all you need and you don't need any glue on the bottom
[59:28] panel. I just let that float. Thanks to the dovetail jig all the joints go together very easily with just hand pressure. Now I do add a few clamps and just use light pressure just to ensure that all the
[59:42] joints get closed up good and tight. With so much effort going into making a really nice piece of fine literature this is not the time that you want to cheap out on a hardware. Using really good hardware can make a huge difference in the final project. I'm using bloom under mount soft
[59:59] closed door slides for the stressor. These slides will be hidden out of sight beneath the drawers. Now you do have to remove a small notch on the bottom of the drawer boxes to provide clearance for these slides.
[1:00:28] Now this little jig is sold separately from the drawer slides but it is absolutely worth it. It's used to get the perfect placement and the depth for the guide pin hole in the back of the drawers.
[1:00:40] It's also used to get the perfect mounting location for the clips on the front of the drawers. Now you can do all of this without the jig but this just makes it so fast and easy. It's
[1:00:55] well worth spending the extra money and just get the jig. So I did have one of these pins break off on my drawers. Probably just didn't have enough glue on this one but it's going to be a quick and
[1:01:07] easy fix. Just a little bit of Fixie glue and a little bit of quick set activator.
[1:01:23] Now because I added the internal supports earlier the drawer slide installation is incredibly easy.
[1:01:43] All I have to do is set the slide back enough for the drawer front and screw them in place. Now the drawers will snap in place with a very satisfying click.
[1:02:09] You want to be careful when you're selecting material for your drawer fronts. The drawers are going to be front and center making them the most visible part of the entire project so you want to make a good first impression. And whatever possible you want to get your drawer
[1:02:23] fronts from a single board. Now I like to mark mine with chalk so that I know where each drawer front belongs. When done correctly this creates a wood grain that flows from one drawer into the next.
[1:02:35] Once again it's this kind of detail that's really going to set your projects apart for all the right reasons. Once I have the drawer fronts cut to rough size I use my favorite trick to get the perfect reveal around the drawer. For this trick you just need a deck of plane cords. Now stack of three or
[1:02:52] four cords on all sides is what I prefer. If you can fit the same number of cords on all sides around the drawer front it's going to be centered and have a perfectly even reveal. And once it's really close
[1:03:05] you can use a hand plane to make very minor adjustments until you get it perfect. When it comes to installing the drawer fronts we need to make sure we don't undo all of the hard work
[1:03:19] we did trying to get everything perfectly centered. To do this I marked the exact position for the drawer pulls and drill a small pilot hole. Then using the card trick again I'll get the drawer fronts
[1:03:38] perfectly positioned. Now I can drill a screw through the pilot hole and into the drawer box.
[1:03:52] This screw is going to hold the drawer front on while I countersink and drill some screws in the back side that are going to permanently mount the drawer front.
[1:04:12] Now I can remove the screw from the front and then re-drill the hole all the way through the drawer box for the hardware. Now during the build I decided I didn't like how these side panels
[1:04:30] looked it was just too plain and needed a bit more detail to jazz it up a bit. So I trimmed down some scraps from the legs and softened the edges a bit. I really don't have the room to get clamps in place
[1:04:43] to hold this decorative strip while the glue dries. So instead I'm going to use this CA glue trick. First I add the wood glue and then a few drops of CA glue.
[1:04:58] When I spray some quick set activator on the panel the CA glue is going to get an instant bond and this will hold the piece in place while the wood glue dries. And with this last piece in place the main case is done and we can start building the top.
[1:05:17] Now I'm sure you've heard by now that you should alternate the grain direction when building solid wood panels to prevent them from warping. Well I'm here to tell you it doesn't matter. Focus on getting the best looking panel and don't worry about alternating smiley and frowny
[1:05:32] ingrained patterns. However this in and out method on the joiner really can help ensure you get tight glue joints on your panels. Just keep the boards in order and alternate the pattern as shown. This eliminates any error in your joiner or the boards if anything isn't exactly 90 degrees.
[1:05:50] There are a lot of methods you can use to keep panels flat while you glue them up but I like using these panel clamps. They pull the boards together while at the same time applying pressure across the panel to keep the boards flat and in line. I'm a buddy Lee over at Busted Nuckle Woodworks likes to
[1:06:07] use super strut to make a DIY version of these clamps. Be sure to go check out his video down in the description. Now another method I like to use is with wooden calls. A little box tape prevents the
[1:06:20] wood from binding them to the panel. The only problem here with this method is it takes a lot more clamps than the specialty panel clamps. After the glue is dried we need to square up the end of
[1:06:41] our top panel. Now if you did use any dowels or dominoes in the panel be very careful not to cut into them when you're trimming the top to size. And since the top is too wide from a table saw sled I'm going to use my track saw to trim the end. You could also do this with a circular saw and a
[1:06:57] guide rail. To prevent the top from being too blocky I'll add a chamfer to the bottom. Now you could also use a roundover if you prefer but unless you're trying to recreate some antique piece avoid the Roman OG and that's OG not the other award that the Romans are known for. As I start sanding the dresser
[1:07:15] and getting it ready to apply the finish I want to thank the people who regularly watch like and comment on my videos. I really enjoy making this content for you and sharing my passion for woodworking and teaching. Now if you're interested in further supporting this channel I invite you to
[1:07:28] become a patron. There you'll unlock access to some really cool perks such as early access to videos before they hit YouTube. There's also priority communication with me so you can get answers to your woodworking questions. Special behind the scenes and shop updates that you won't find anywhere else
[1:07:45] and much more. Your donations will allow me to continue making high quality content right here on YouTube. Purchase tools and materials for more build projects and invest in things like the cameras, lights and editing tools needed to make these videos. If you enjoy my videos and want to be a part of
[1:08:01] this growing community then click on the link in the description below and check out my Patreon page. Now there's certainly no obligation and if that's not something you can do right now no problem. You can still continue to support by watching the videos liking and commenting so thank you and
[1:08:16] let's get back to the build. For the finish I'm using Rubio Monaco which is a two-part hard wax oil. The ratio isn't critical but the best way I found to do this without making a huge mess is to use
[1:08:28] these large syringes. Rubio does seem expensive but it goes a long ways. This little cup is enough to do the entire dresser. These white floor buffing pads make the perfect applicators for this finish.
[1:08:44] You can cut out a section and attach it to your rammed-dum orbital sander or to a buffer and quickly cover large areas. They're a lot cheaper than purchasing the actual buffer pads that go on a lot of
[1:08:56] these tools. Now I used to hate applying finished projects but I later realized it wasn't because I hate applying the finish it was because I was confused over so many different options of methods
[1:09:08] of finishing and I just never knew if I was doing it right. But since I switched to hard wax oils I actually really enjoyed finishing process. I mean just look at the cherry come to life when the
[1:09:20] oil is applied and this finish couldn't be any easier. You just wipe it on and rub it into the wood. After a couple of minutes you wipe away any excess on the surface until it feels completely dry.
[1:09:33] Now we're in the home stretch but we're not finished yet. Now I need to attach the top to the case and a major mistake people make here is not allowing for wood movement. See wood expands and contracts as the seasons change and if you don't allow for this movement the top can split and crack.
[1:09:50] Now I like to use these Izzy skirt washers. These allow for the seasonal movement while still holding the top securely to the case. Now this next piece of advice is the most important thing that I have to
[1:10:02] share with you. It's something that has really helped me to learn new skills and techniques and has encouraged me to take on more and more difficult projects. And that's no matter how complex or difficult something seems if you analyze it carefully any complex problem can be broken down into a
[1:10:20] series of simple steps. Instead of looking at a problem as a whole just try to figure out what is the first step then what is the second step then the third. If you get to a step that seems too
[1:10:34] difficult break it down into smaller simpler steps. Now this is a technique that is used often in science and engineering and it can certainly be applied to woodworking or any other difficult task to make them easier to accomplish.
[1:11:15] All right here's where it really gets fun. Now that you've mastered the base six and you're building some awesome furniture it's time to push the boundaries and really flex your woodworking chops to build
[1:11:30] something truly amazing.
⚡ Saved you 1h 31m reading this? Transcribe any YouTube video for free — no signup needed.