The #1 Wheel Cleaning Mistake
45sOpens with a common mistake that hooks viewers who want to avoid damaging expensive wheels.
▶ Play Clip[00:00] One of the biggest detailing mistakes I see people make is treating wheels as though you just spray a bit of wheel cleaner on there, scrub at them with brushes and that's it, job done. But if you don't want to wreck expensive wheels or dull down the finish and you want your protection to actually last, well, there's a process to it.
[00:17] I'm going to share with you some tips and tricks and show you the proper process on how to clean your wheels, how never to miss a spot and I'm going to throw some tips and tricks in there that I've learnt over the years that help me get a better finish faster.
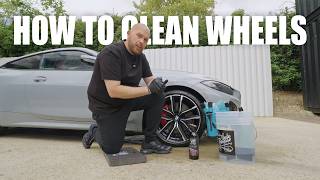
[00:29] So, let's grab our equipment and get stuck into it. So, one really important thing before we get started on our wheels is to make sure everything's cooled down.
[00:41] Now, I know it's tempting to pull back up at home, wheels are still hot and you start spraying cleaner on them, but trust me, that is the worst thing you can do. Now, this car has actually been driven quite a long way into work, but we've left it a couple of hours.
[00:54] It's all cooled down before we've pulled it into the wash bay. Now when I feel the wheels, the brakes, everything is nice and cool and that means I can spray my wheel cleaner on there, it's not going to get fainted, it's not going to do any damage and this is the perfect time to start cleaning.
[01:09] Now you might ask why wheels first? I know it's tempting to get your snow foam lance out, make a big mess all over the car, take some pictures for Instagram and post them but that is not the way to do it.
[01:21] wheels are generally the grubbiest part of the car and as with anything when we're detailing we start at the worst part and work our way around from there the reason we do wheels first is because if we do body work we've then got to do our wheels and then we're going to get the dirt from the
[01:34] wheels back onto body work it just makes no sense so always start on your wheels some people do have a different view to this and that's fine but i've been doing this about 20 years i've always done it this way and it serves me pretty well so if you follow this you won't get into any trouble the
[01:50] First thing I'm going to do is talk to you about the differences in wheel cleaners. What I've got here is an acid reactive wheel cleaner. The reason I'm picking this for these wheels is because these are pretty grubby. If you look at them, they are absolutely tight.
[02:04] This car probably does 200 to 500 miles a week. It gets a lot of use, so the wheels get pretty grubby. If these were show wheels or something not quite as dirty, you would use an alkaline cleaner. they're just a little gentler especially on lug nuts, calipers, brake belt housings but to get the job done
[02:22] on this one it's going to be reactive. So to turn the nozzle on first job I'm going to do is get a good coating on the entire wheel starting by getting all in that barrel all behind the spoke and all the way around Now I going to work my way onto the face and make sure I get into all the detail all the lug nuts all the gaps all the edges At this point I not going to go grabbing my
[02:46] brushes and start scrubbing that all in because all I'm going to do is drag all that dirt around the finish and that's going to dull it down and make my wheels look more tired before their time. So I'm going to leave this to dwell for as long as possible without drying out.
[02:59] similar to a pre wash on the exterior of the car that's what I'm going to do with it I'm going to let it do its thing for a bit any little bits that you think could do with a bit more there don't be afraid just load it up make sure you cover everything and remember
[03:12] the underneath of your spokes as well because otherwise when you move the car you still have a dirty bit and it doesn't look good
[03:29] Now we've left that to do its thing for two or three minutes and I feel that it's ready to be jet washed off. Just got my jet wash on a cold setting we do run a hot pressure washer I know a lot of people have asked in previous versions and videos that we've done but this time it's just on cold
[03:44] I can assure you we're not seeing any steam from this and what we're going to do is just start on the face and jet the whole thing off. This is going to ensure we remove around about 80 to 90% extent of all of the dirt and road grime that's on there as well as the brake dust before we come into contact with it.
[04:00] so here we are then and we're now ready after the pre-wash to settle in for some proper
[04:29] deep cleaning of our wheels. I've got my equipment here set up with me, I've got my bucket of water, I've got a little flop of Revolution Wheel Soak in there as well, not for its cleaning power, just to keep everything nicely lubricated like my brushes and my mitts, and then I've got my
[04:43] reactive wheel cleaner again which I'm going to apply back to the wheel. This time I won't need as much as on the pre-wash and then I'm going to attack the wheel and show you a couple of tips so you never miss a spot. First things first, take your wheel cleaner like I said, spray it up onto
[04:56] Don't forget to include your brake caliper at this point as well. And with the barrel done I just going to come around and apply it to the face as well Now whilst that quickly doing its thing what I got is Verso at 3 to 1 and I just going to load up my tyre walls By cleaning the tyre wall I going to get all of that road grime and gunk that stuck to the old tyre dressings off of the tyre wall
[05:18] and this will make my life easier and give me a better finish later on. When I come to dress those tyres it means I'm going to be putting the dressing on a nicely cleaned pressed surface. I'm going to get a better finish and I'm going to get more durability from the product.
[05:31] First things first is I'm gonna start on the barrel. Take a barrel brush, get it wet, start at 12 o'clock and work round in a clockwise manner. This means every single wheel I'm doing the same thing
[05:44] and I know that I've been all the way round. Some of these modern wheel designs have got this bit behind here. I try and get the brush in there at the same time so I don't have to mash my fingers round there later on. Cross this way, across that way, back and forward across the barrel itself.
[05:57] These are flare tip brushes so they're nice and safe. even a black wheel is fine to use. And they squish down nice to get behind that caliper. At the same time as I'm doing the barrel here, I'm actually putting some pressure this way as well,
[06:09] just to get on the outer edge of that caliper. Because you don't want nice clean wheels and then a horrible, grubby, great caliper sitting behind it. That doesn't look good. I can go and grab a mini barrel brush if I want, just go down that caliper a little bit more,
[06:22] get in the gaps, get all around it, get down the edges. Calipers can be a tricky one if they're really close to the spoke. when I move it, I can always get that as a bit of quick detail and stuff, but I'm gonna try and get as much of it as I can. So with the barrel done,
[06:35] starting to get a little bit of drying out here, so all I'm gonna do is just a quick little mist over to keep everything moving, keep everything lively, and then I'm gonna take my wheel mitt. Same process again. I'm gonna get in them edges, I'm gonna get down them spokes in that detail.
[06:47] I'm actually pressing just one finger through that mitt to get into this design. So I wanna get everything I can. These are actually a tricky wheel to clean. Again, working around in a clockwise manner, just getting into everything I possibly can.
[07:02] I do like these wheel mitts for this because I can make it any shape that I want it. I think this is actually my favorite tool, wheels. I'll get it down the back of the spokes as well. Just gonna work back around. Didn't follow my own rule there,
[07:14] didn't start at 12 o'clock, I started here, but I have remembered where I started. And that has got probably about 80% of it now, I've actually got. Last thing for this is to take your detailing brush, get in those lugs, get in this detail
[07:27] where the wash wouldn't go, you wouldn't be able to really get it in there fully. So you make sure we're getting all that detail there, all those recesses, just scrub them out, clean them up, go round the valve as well.
[07:45] Last thing is the caliper Probably need a smaller brush for that Down there all the gaps One last thing that we started earlier, spray that tyre wall back up, narrow out it's dwelling, take your rubber scrubber and hit them flat with the scrubber over here.
[08:00] Trust me, doing this will make a massive difference at the end. So with all that done, all that's left to do now is rinse that wheel off.
[08:15] So that is the wheel cleaning process complete. We've done the barrel, we've done the face and I'm fairly confident that has not missed a spot. Now I would go ahead and dry these wheels but before that I've got to do the bodywork.
[08:27] So that would be an absolute waste of time. But to finish them off, after you've washed the car, actually you dry your wheels. I have got one more top tip for you. If you want to keep them looking like that for longer and make them easier to clean next time,
[08:41] take yourself a ceramic rinse aid like Aquacote, a little mist over the face, hit the barrel as well. You can even hit the caliper with it.
[08:55] One final rinse. and that is now a clean and protected wheel. I hope this video was helpful and if you've got
[09:12] any questions please feel free to drop me in the comments below I'll go through and try and answer all of them myself. Also if you've enjoyed this video I would really appreciate a thumbs up and subscribe for more detailing guides just like this. See you in the next one.
[09:33] Thank you.
[10:03] Thank you.
⚡ Saved you 0h 10m reading this? Transcribe any YouTube video for free — no signup needed.