Fix Your Ugly WoW UI Fast
45sStarts with a relatable complaint about the default UI, hooking players who want a cleaner setup.
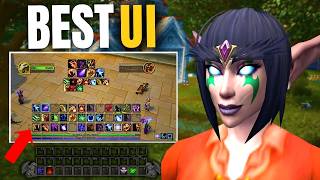
▶ Play ClipThis tutorial guides new World of Warcraft players through customizing their UI for a streamlined, efficient gameplay experience. The host demonstrates the game's built-in Edit Mode to reposition elements like action bars, portraits, and the minimap, and also highlights useful features like the cooldown manager, damage meter, and Assistered Highlights.
The video aims to help new players transform the default WoW UI into a cleaner, more functional layout.
Press Escape or click the question mark to open the game menu, then select 'Edit Mode' to start customizing.
In Edit Mode, click the artwork to access the option 'Hide Bar Art' – this removes the griffin decorations at the bottom of the screen.
Use the options menu (Escape -> Options -> Action Bars) to enable bars 3, 4, and 5 for more ability slots.
Move the Talking Head (quest pop‑up) to a less intrusive spot near your feet; place the Cast Bar just above the main action bars.
Change side bars from vertical to horizontal, reduce rows to 2, and scale them to 70% to keep consumables and Hearthstone compact and out of the way.
For bars 4 and 5, set visibility to 'Out of Combat' so they disappear during fights, reducing screen clutter.
Bring portraits closer to the center of the screen to keep an eye on buffs/debuffs without shifting focus away from combat puddles.
Increase the size of debuffs (so they're hard to miss) and make the minimap bigger for better situational awareness.
Enable the built‑in Cooldown Manager in Options (requires level 10). It tracks abilities, buffs, and utility cooldowns; can be made larger for clarity.
Open Options and search 'Damage Meter' to enable a built‑in damage/healing meter. Position it above the chat; multiple windows can be created for interrupts or healing.
In Options -> Gameplay Enhancements, enable 'Assistered Highlights' – it suggests the best ability to press based on your class/spec, helping new players maximize DPS.
The optional add‑on 'Sexy Maps' replaces the default minimap with customizable skins. Access it via Options -> Add‑ons -> Sexy Maps.
The host demonstrates the final layout on a target dummy, noting that most elements can be toggled to show only during combat for minimal screen clutter.
By leveraging WoW's built‑in Edit Mode and a few key options like the Cooldown Manager and Assistered Highlights, players can create a sleek, functional UI that reduces clutter and improves combat performance. The video provides an import string in the description for those who want to replicate the exact layout.
"The title accurately reflects the tutorial content – it delivers a step‑by‑step guide to creating a 'best' WoW UI using the game's own tools and a couple of mentions of add‑ons."
What are the two ways to open Edit Mode in World of Warcraft?
Press Escape or click the question mark icon to open the game menu, then select Edit Mode.
0:36
How do you hide the griffin artwork at the bottom of the screen?
Click on the artwork in Edit Mode and select 'Hide Bar Art'.
1:41
Which action bars does the host activate and why?
Bars 3, 4, and 5 are activated because five bars are typically enough for their characters.
2:15
How do you prevent a bar from snapping to other elements?
Untick 'snap to elements' in Edit Mode.
5:00
What visibility setting does the host apply to side bars 4 and 5?
Set to 'Out of Combat' so they disappear during fights.
5:19
How do you enable the built‑in Cooldown Manager, and what level requirement exists?
Open Options, search 'cooldown manager', and enable it. It only activates once you reach level 10.
11:08
What is the purpose of the Damage Meter and how do you enable it?
It tracks damage/healing/interrupts. Enable it in Options by searching 'damage meter'.
13:42
How do you create multiple windows in the built‑in Damage Meter?
Click the cog icon above the damage window, then select 'Create new window' and choose whether to record healing or interrupts.
14:18
What does 'Assistered Highlights' do in combat?
It highlights the best ability to press based on your class and spec, helping new players maximize DPS.
17:36
Which add‑on is recommended for customizing the minimap's appearance?
Sexy Maps.
18:22
Activating Additional Action Bars
Directly increases ability accessibility for new players who may not know how to unlock more bars.
2:06Hiding Bars Out of Combat
Clever use of conditional visibility reduces on‑screen clutter during fights.
5:19Enabling the Built‑in Cooldown Manager
Reveals a powerful vanilla feature that competes with popular add‑ons, saving resources.
11:08Assistered Highlights for Rotation
Demonstrates an official tool that guides new players to optimal spell use, boosting performance.
17:36Sexy Maps Add‑on
Shows a simple way to personalize the interface without sacrificing functionality.
18:22[00:00] What's up, gaming heroes, and welcome
[00:02] back to another awesome World of
[00:03] Warcraft video. Today, we are going to
[00:06] be looking at the UI in World of
[00:08] Warcraft. You've just created your
[00:10] character, you've got into the game,
[00:12] finally pay that subscription, and now
[00:14] you're greeted by this absolute
[00:17] travesty, which is a UI, and you want to
[00:20] make it look cool. Well, today I'm going
[00:22] to show you exactly how you can do that.
[00:24] And if you're looking to make it that
[00:26] much faster for yourself, I'm even going
[00:28] to put the import export string in the
[00:31] description below if you want to check
[00:33] that out. So, let's dive in. Make sure
[00:36] to help this video, you click that
[00:38] subscribe button. It really, really
[00:39] helps. To open up the edit mode for the
[00:42] UI changes, you'll need to go ahead and
[00:44] press escape or go down to the question
[00:46] mark here and open up the game menu.
[00:49] Then you can click on edit mode. From
[00:51] here you get the option basically to
[00:53] have the basic version like so or you
[00:55] can press the advanced version like
[00:57] that. I'm going to press advanced. Uh I
[01:00] think actually I'm going to leave it
[01:01] like that for now and then we'll do the
[01:03] advanced version afterwards. Uh now you
[01:06] get kind of like the option of modern
[01:08] preset which is kind of the modern
[01:09] version of World of Warcraft and you get
[01:11] the classic which puts the portraits
[01:13] above and everything like that. It
[01:15] doesn't really matter what you choose
[01:17] but I prefer you know modern. And then
[01:19] what I like to do is press new layout.
[01:21] We give this a name. Subscribe to my UI
[01:25] video. Okay. And you get to select here
[01:29] whether this is character specific
[01:31] layout or if this is a general layout
[01:34] you want to use across your whole
[01:35] account. In this instance, I'm just
[01:37] going to use it as a general layout
[01:39] across the whole account. At this point,
[01:41] we kind of get to decide, do we want to
[01:44] have the things like this fancy artwork
[01:47] that Blizzard has or not. So, we can
[01:49] click on this to edit it. And you get
[01:51] the option here straight away, hide bar
[01:53] art. And that's how you can hide these
[01:55] kind of like griffins here at the bottom
[01:58] if you choose to. In that, in this
[02:00] instance, I am actually going to hide
[02:01] them because they are just going to get
[02:02] in the way for what we're trying to
[02:04] achieve. Okay. So, at this point, uh, we
[02:06] can just quickly press save and then
[02:08] activate additional action bars. This is
[02:11] going to make it a lot easier for just
[02:13] figuring everything out. So, I'm going
[02:15] to go ahead and click on that X, then
[02:18] press the options here, and then I'm
[02:21] going to go down to where it says action
[02:23] bars right there. I'm going to activate
[02:26] three, four, five, because I typically
[02:28] find that having five action bars is
[02:32] usually the amount I need for my
[02:34] characters. Then we go back to the edit
[02:36] mode. And here we find we've got
[02:39] additional action bars now that we can
[02:41] organize and figure out how everything
[02:44] works. I'm just going to go ahead and
[02:45] move this over to the side here. Uh,
[02:48] just so it's out the way and we can
[02:49] really focus on what we're dealing with.
[02:52] Now, the talking head. This is when you
[02:54] get like a quest and it starts telling
[02:56] you about the quest. That's basically
[02:58] the talking head. And sometimes, you
[03:00] know, you can have it up here. You can
[03:02] have it wherever you want. You just
[03:03] don't want it to conflict too much with
[03:05] other buttons that you've got. So,
[03:07] typically I like to have this towards my
[03:09] feet section or above up here just there
[03:14] because I kind of find it it quite
[03:15] useful it being out the way. You want to
[03:18] make sure it's out of the middle of the
[03:19] screen because this is this is typically
[03:20] where you're clicking on characters and
[03:22] you aren't often going to see the
[03:24] talking head bar. So, you don't need to
[03:26] worry about that. Your cast bar is quite
[03:29] an important one and I think this should
[03:32] typically go towards lower than your
[03:34] feet, just above your bars. So, I would
[03:37] just typically move everything out the
[03:39] way and just get the bars to exactly
[03:42] what it is you want. So, if do you want
[03:44] three bars? Do you want four bars? How
[03:46] many do you want? I would put it
[03:47] something like that and put the cast bar
[03:50] on top like so. It just makes it nice
[03:52] and uniform, makes it look good,
[03:54] everything like that. Now, I'm going to
[03:56] focus on working on these sidebars here
[03:58] because these sidebars are typically
[04:00] where I will keep like the half stone.
[04:02] We'll keep consumables, things like
[04:04] that. We don't want this giant vertical
[04:07] bar. Instead, we'd much prefer it to be
[04:10] a bit more consolidated. So, I'm going
[04:12] to change it from vertical to horizontal
[04:14] first of all. Then I'm going to change
[04:16] the amount of rows to two rows. And then
[04:19] because this is one of those things I
[04:21] want to basically not be in the way too
[04:24] much, I'm going to make it quite a bit
[04:26] smaller. So I'm going to go ahead and
[04:28] make it about 70%
[04:30] of the typical size. And that's just
[04:33] because I'm not using it for spells and
[04:34] abilities. It's just to hold things
[04:36] like, you know, my Hearthston or random
[04:38] consumables I'm not going to use in
[04:40] combat. I'm going to do the exact same
[04:41] thing for the other one as well. So
[04:42] change it from vertical to horizontal.
[04:44] Give it two rows instead of one. Drag it
[04:48] down. And then we're going to go ahead
[04:49] and make it 70%. So it's the same
[04:52] typical size. Then we'll put these two
[04:54] together so that they look really nice
[04:56] and they kind of like don't stand out
[04:58] too much. If you want to move it and you
[05:00] don't want it to snap like it is doing,
[05:02] you can go ahead and untick snap to
[05:05] elements and that will prevent that
[05:07] happening in the future. So now we can,
[05:09] you know, we can press that control
[05:11] button whilst we're doing this and it
[05:13] will allow us just to move it exactly
[05:15] where we want it. We can press that
[05:17] again and that won't snap back now
[05:19] because we've already moved it which is
[05:21] brilliant. Now what I typically like to
[05:23] do for these action bars four and five
[05:25] because they're on the side, they've got
[05:27] all the consumables, half stones, and
[05:28] everything like that. I like to make it
[05:30] so they disappear when I'm in combat and
[05:33] reappear when I'm out of combat. So I
[05:35] always click this and I press out of
[05:36] combat. So, this bar will only become
[05:39] visible when I'm out of combat. I'd like
[05:41] to do the same for this one here. And
[05:43] that way, when I'm in combat, I can
[05:45] really just focus on what I'm actually
[05:47] seeing and not the plethora of different
[05:50] action bars that you can possibly have
[05:52] in World of Warcraft. It quickly gets
[05:54] too much to deal with. Great. So, that
[05:57] is actually done for both of those
[05:58] there. Now, what I would like to do is
[06:01] bring these portraits a bit closer to
[06:04] the middle of the screen because when
[06:05] I'm doing combat, I want to be able to
[06:08] look towards my feet so that I'm not
[06:10] standing in any puddles that might get
[06:12] me slain. So, I will always move my
[06:16] portraits a bit closer towards the
[06:19] center of the screen. I find this will
[06:20] really, really help you for the most
[06:22] part. Now, don't have them too low
[06:24] because then you're going to not be able
[06:26] to see the actual buffs or debuffs on
[06:28] either yourself or the or anything
[06:31] you're targeting. Okay, there we go.
[06:34] We've got a nice setup there for the
[06:36] portrait. It looks really cool. We've
[06:38] got the encounter bar here as well. This
[06:40] typically isn't going to be used a lot,
[06:43] so you can really put that wherever it
[06:45] is you so choose. It's entirely up to
[06:47] you. It's not going to appear very
[06:49] often. It'll be quite a rare time you'll
[06:51] actually see that. So, I'm going
[06:52] actually going to put that encounter
[06:54] over here as it's just one of those
[06:56] things I'm not going to see too often.
[06:59] Extra abilities. These extra abilities
[07:02] are things like when you're in a raid
[07:05] and you've got to press an extra action
[07:07] ability. This is what you will typically
[07:09] press. I like to keep that here as it's
[07:11] just something you don't typically see.
[07:13] Sometimes some people like to keep it
[07:15] here instead and that is entirely fine
[07:17] as well. Well, I don't particularly like
[07:19] it being there because I like to have
[07:21] the focus frame there. So, I actually
[07:24] prefer it right here. Then, I'll move
[07:26] this focus frame across and I'll pull it
[07:28] just next to this portrait here and I
[07:31] find that will really really help. Some
[07:33] people move this pet frames to the side
[07:35] like so, but I prefer it underneath. H
[07:38] it just works better for me personally.
[07:40] Then the vehicle exit button. I
[07:42] typically have that just below where the
[07:45] we'll move that possess bar there. And
[07:47] then the vehicle e exit button I'll
[07:49] typically just have somewhere around
[07:50] here so it's really clear, really
[07:52] obvious where it it actually is sitting.
[07:54] I think in this instance I'm just going
[07:56] to pop it around about here as this is
[07:59] kind of like an area I don't typically
[08:01] often use in World of Warcraft.
[08:03] Typically when I'm playing I never
[08:05] really play with a stance bar. It's one
[08:07] of those bars that's just kind of not
[08:09] needed if you don't want to use it. And
[08:12] it's entirely up to you if you do use
[08:14] it. It's just one of those things I
[08:16] don't typically use. Remember, when
[08:18] you're doing this, sometimes it's a good
[08:19] idea to exit out of edit mode and just
[08:22] see how it's all looking for yourself.
[08:25] So, let's try that right now. Okay, so
[08:27] let's just select someone. That's how it
[08:29] it feels. That's how it looks. It's
[08:31] looking really simple, really easy. So
[08:34] far, I quite like this. I do feel that
[08:37] these could be lower and that would
[08:39] definitely feel a lot nicer, though. I
[08:41] could just zoom out a little bit more
[08:42] and that would actually be perfect.
[08:44] That's about usually where I play the
[08:46] game. So, that's actually not too bad.
[08:48] Let's jump back into edit mode. This is
[08:50] where I like to basically make sure that
[08:52] my debuffs are quite big. They're quite
[08:55] important debuffs are. You really do
[08:57] want to be able to see when you've got a
[08:59] debuff and you want it to be quite
[09:00] obvious. So, I typically like to make
[09:03] this quite big just so that it really
[09:06] screams at me, oh, hey, you have a
[09:08] debuff. You need to be careful. Then on
[09:11] top of that, I like to make this map
[09:12] bigger because I mean, it's just useful
[09:15] having a bigger map, isn't it? Let's be
[09:17] honest. This boss frames on the side
[09:19] here is only used typically in raid or
[09:21] sometimes PvP, things like that. You
[09:24] don't really need to worry about it too
[09:25] much. It's quite perfect to have it
[09:27] there. I like to move these arena frame.
[09:29] I like to move these arena frames right
[09:31] here. It works quite nicely. The tool
[09:34] tips, HUD tool tips. Typically, people
[09:36] just leave that down there because
[09:38] that's just when you it pops up with
[09:39] some useful information. Then your
[09:41] equipment durability. This is a good one
[09:43] just to pop over here. You aren't really
[09:46] going to worry about, you know, your
[09:47] arena frames covering it or anything
[09:49] like that because more than likely you
[09:52] aren't going to have damaged equipment
[09:53] whilst you're in in an arena. You can
[09:56] just put it like that and it will pop up
[09:58] really obviously when you are damaged.
[10:00] It is a good idea to make the spit
[10:02] bigger as well, just so you really don't
[10:03] miss it. So, we can go ahead and make
[10:04] that 150% and it should be really,
[10:07] really, really obvious. I'm actually
[10:09] going to move the boss frames on there
[10:11] as well. So, let's just move these arena
[10:13] frames out the way. Put the durability
[10:16] right here cuz this is where my quests
[10:17] are going to go. So, I don't want that
[10:19] space filled for any particular reason.
[10:21] You're never going to have the arena
[10:23] frames and the boss frames active at the
[10:25] same time. So, you don't really need to
[10:27] worry about those two conflicting. They
[10:29] can be in the same location happily.
[10:31] Let's go ahead and save that. Now, I
[10:33] feel like we're at the point now where
[10:36] we might need to start activating that
[10:37] advanced option. One more thing for me
[10:40] to change is the chat frame. I quite
[10:42] like having a bigger chat than typically
[10:44] other people might like just so I can
[10:46] see more messages a bit easier, but some
[10:49] people like having a really small chat
[10:51] right out the way. It's entirely up to
[10:53] you what you prefer. I really like a
[10:55] chat box a bit like that. Pressing this
[10:57] button at the bottom right of the chat
[10:59] frame allows you just to edit it without
[11:02] you needing to mess about with the width
[11:03] or height or anything like that. It's
[11:04] entirely up to you how you choose to do
[11:06] it. So now we're going to press the
[11:08] advanced options mode and you'll see
[11:10] there are some additional things here
[11:12] which will really really help you such
[11:14] as the cooldown manager. I'm going to go
[11:16] ahead and show you exactly how that
[11:18] works. So we're going to press save.
[11:21] We're going to press exit. And then
[11:23] we're going to go to our menu and press
[11:25] options. In the options, we're just
[11:27] going to type in cooldown
[11:30] manager. And this will allow you to
[11:32] basically enable it. If you don't enable
[11:35] it here, you won't see it when it's
[11:37] actually in game. So, I'm going to go
[11:39] ahead and enable that right now. So, it
[11:42] will only enable once you hit level 10.
[11:44] So, do just keep that in mind. For the
[11:47] purpose of this video, I'm going to swap
[11:48] to one of my higher level characters so
[11:49] you can see what it does. Okay, here I
[11:51] am in my secret banking location and I'm
[11:55] going to go ahead and press that edit
[11:56] mode. Switch to the subscribe to my UI
[11:59] video
[12:00] mode. And now we're going to edit it
[12:02] from here. Again, cool down manager
[12:05] isn't activated. So, we do need to go
[12:07] ahead and activate that right now. So,
[12:10] I'll go ahead and just type in cooldown
[12:13] manager. Press activate. And now you can
[12:15] see you've actually got like a weak or a
[12:18] builtin game without any add-ons needed.
[12:21] This is really cool. So here you can now
[12:24] see this is no longer grayed out. You
[12:26] press cool down manager and you can drag
[12:28] that up to actually see what it is
[12:30] you've got. You got tracked de you got
[12:32] tracked buffs. Then you've got your
[12:34] utility cooldowns. These are really
[12:35] useful just to see and it's a good idea
[12:37] to make these bigger. There you go.
[12:40] They're nice and big now so that when
[12:41] we're in combat, we can actually see
[12:44] what is happening without too much work
[12:46] or hassle at all. This is going to be
[12:49] useful just to enable you to do more
[12:51] damage in general. Your personal re
[12:54] resource display. This is something I
[12:56] don't typically worry about because I
[12:59] can see that for myself on my party
[13:02] frames and my player frames really
[13:04] easily. So, I personally don't use
[13:06] personal resource display very often.
[13:09] Boss warnings, however, is a very, very
[13:12] useful thing to have in game. This will
[13:15] prevent you from dying in game quite a
[13:18] lot. So, always make sure you have that
[13:21] enabled, especially if you plan to do
[13:22] raiding. This uh boss timeline on the
[13:25] side here will tell you when important
[13:27] abilities are coming. And this will give
[13:29] you a pre-warning to move out the way or
[13:32] to do something that your character
[13:34] needs to do to react to that mechanics
[13:36] to survive or help dis like defeat the
[13:39] boss. So, make sure that is activated.
[13:42] Brilliant. Now, we're going to go ahead
[13:44] and activate the damage meter. Again,
[13:46] open up options and type in damage
[13:49] meter. There we go. This will now show
[13:51] you the default damage done. So, we can
[13:54] go to edit mode again and we can move
[13:56] that down to where it is. where we might
[13:59] want it. For me personally, I actually
[14:01] want it right above the chat so I could
[14:04] easily see it and it's never in the way
[14:06] of the party frames. The party frames
[14:08] are pretty much always going to be up on
[14:10] the left side of the screen. So, I want
[14:12] to make sure that they are always there.
[14:15] Brilliant. That's actually completely
[14:17] done. Now, now if you want to make
[14:19] multiple windows so that you can record,
[14:22] for example, the damage done and then
[14:24] you want to record the healing done, you
[14:27] can just press that cog button above the
[14:30] damage done and it will allow you to
[14:32] press create new window. You create new
[14:35] window and then you can select whether
[14:37] you want it to record healing or if you
[14:40] want it to record any other things like
[14:42] interrupts. Having this in Mythic Plus
[14:44] is really useful. having like a dungeon,
[14:47] uh, having a damage done, a healing
[14:49] done, and an interrupts is really,
[14:51] really useful. So, now we're going to
[14:52] press edit mode, and we can edit these
[14:55] pretty easily. For the frame width, I
[14:58] like to kind of go for the lowest frame
[15:00] width possible. And then for the height,
[15:02] I like to go for the minimum, but make
[15:04] sure it has at least five people in
[15:06] there. For padding, you don't really
[15:08] need a lot of padding, to be honest. It
[15:10] gives you a lot more padding than you
[15:11] actually need for it. So, it's entirely
[15:13] up to you what you go for, but I
[15:15] typically like to go for like the
[15:16] minimum on that. It doesn't look as
[15:18] good, unfortunately. So, I'm going to
[15:20] probably go for more of a bore there on
[15:22] that one. Now, if you don't like the way
[15:24] it looks, you can just mess about with
[15:26] the default. You can have it default
[15:28] like that. You can have it bordered. You
[15:29] can have it thin like so. It's entirely
[15:32] up to you what you go for. So, we can
[15:34] press save there. And then we can move
[15:36] these in. Now, we can press escape and
[15:38] get out of the edit mode. And we can
[15:40] actually edit this healing bar to be
[15:42] pretty similar to that one. Like so. And
[15:45] then that way it's nice and simple. So
[15:47] that's typically how you could play the
[15:50] game with your both healing and damage
[15:53] done and everything like that. I'm going
[15:55] to go ahead and remove these just
[15:56] because I don't need them on this
[15:58] particular character, but if you did,
[16:00] it's pretty easy to edit them and to
[16:03] change them off this import if you do
[16:05] choose to import this. So let's press
[16:07] edit mode. And then we can just untick
[16:10] the damage meter. Boom. That's unticked.
[16:15] So now if I go to options and I press
[16:18] damage meter, we get rid of the damage
[16:21] meter. It's gone. It's disappeared. We
[16:22] don't need to look at that. I think in
[16:24] in this instance, I'm actually going to
[16:26] move the stance bar to the left of the
[16:29] top bar and then actually move the pet
[16:31] bar down more and then the cast bar even
[16:34] further down. I think this will just
[16:35] make it look better in general. I might
[16:37] move these up slightly just so that
[16:39] they're not interfering with each other.
[16:41] And then that should actually look
[16:43] better. I'm going to have to turn off
[16:44] the snap to elements just so that I can
[16:47] move it exactly where I want it to go.
[16:49] And then we can move the cast bar up
[16:51] like so. That's brilliant. We can press
[16:53] save. And then look at that. That's
[16:55] perfect, isn't it? I can see this is
[16:57] slightly off. So, I'm just going to
[16:59] press edit and then move this across
[17:02] slightly just because I can really tell
[17:04] this is going to have to be uh turned
[17:06] off on the snap again and try it again
[17:08] to make this look really good. Perfect.
[17:11] We can press save and that should look
[17:13] pretty good. Now, we're going to put
[17:14] snap to element again as make sure this
[17:16] cast bar is kind of centralized. There
[17:18] you go. Lovely jobly. Press save and
[17:21] press escape. Look at that. That's
[17:23] excellent. So, that's if we're close.
[17:24] That's if we're further away. And let's
[17:27] just select someone. so we can actually
[17:29] see what it looks like. There you go.
[17:31] So, that's exactly what you'll be
[17:32] operating with. And this is really,
[17:34] really useful. Now, here's one final
[17:36] little tip. It's not really a UI tip,
[17:38] but it kind of is. It's going to help
[17:39] you a lot in combat to do even more
[17:42] damage. Press the options again and just
[17:44] type in highlight. Go down to gameplay
[17:47] enhancements and click on assisted
[17:49] highlights. This is going to really help
[17:51] you if you're newer to your character
[17:53] and you don't quite know your character
[17:55] yet. This is going to help you know
[17:57] which button is probably best to click
[17:59] on to do the most amount of damage based
[18:02] off your class and your spec. This is
[18:04] going to basically give you a general
[18:06] highlight uh on your bars when you're
[18:08] just playing the game. And that's going
[18:10] to be really quite useful just in
[18:12] general. I used it a raid last night and
[18:14] out of 20 people I was the top DPS using
[18:18] just the button highlights. It was very
[18:20] very very useful indeed. If you are
[18:22] looking to expand your UI and make it
[18:25] look even cooler, I can recommend one
[18:27] add-on which I really like. It's a
[18:29] pretty cool add-on. It is called sexy
[18:31] maps. Now, to edit sexy maps, you just
[18:34] have to press escape, click options, go
[18:36] to add-ons at the top, and then go down
[18:38] to sexy maps like so. And this will have
[18:41] a bunch of default presets that you can
[18:43] choose from, which you might like. Look
[18:45] at that. It's changing the map each
[18:47] time. Let's just make it bigger so you
[18:48] can actually see what's going on here.
[18:50] There's loads of really cool different
[18:52] ones that you might like. For this one
[18:53] in particular, I don't really want the
[18:55] outside to be rotating or anything like
[18:57] that. I'm going to go ahead and actually
[18:59] delete that one and only keep the inner
[19:01] one as I really really like how that
[19:03] looks just in general. Then I'm actually
[19:05] going to go ahead and just make it
[19:06] bigger as a whole. So, let's just make
[19:09] it a little bit bigger and then move it
[19:10] across to exactly where it is you want
[19:12] it. Look at that. That's all done. We
[19:14] can lock that in now. And that's
[19:16] perfect. Look, that's Isn't that a
[19:18] really nice setup? we've got right
[19:20] there. I'm really happy with that. Let's
[19:22] try it on one of my other characters as
[19:24] well and just see what it looks like.
[19:25] Okay, I'm on one of my other characters.
[19:27] It's going to switch to the new UI. And
[19:30] we've got too many action bars. So,
[19:31] we've got to turn one of those action
[19:32] bars off. There we go. And that's the
[19:35] the kind of new UI right there. As you
[19:37] can see, this whole stance bar, I don't
[19:39] typically use it. What I could do on
[19:41] this character is just pull it right at
[19:43] the bottom like so. It's just out of the
[19:45] way. Or I could even pop it under here,
[19:47] which might even be a better place to
[19:49] keep it in general. So, let's just press
[19:50] save. And oh, that's much nicer, isn't
[19:52] it? It's much cleaner, much simpler.
[19:54] Then, if we go to combat. So, let's just
[19:57] find a target dummy. And then we can go
[19:59] ahead and we can show you it in action.
[20:02] Now, I do just want to turn on the
[20:04] cooldown manager. And then also, I want
[20:07] to turn on assisted cooldowns. Now, if
[20:10] there's any particular version of this
[20:11] that you don't like to see, for example,
[20:13] you don't like the top bit, but you do
[20:15] like the bottom bit, you can just go
[20:17] ahead and press edit mode. You can click
[20:18] on what you don't like, and you can just
[20:20] press hidden, and it will always hide
[20:22] it. You'll never see it again. It's
[20:24] quite cool like that. So, uh, say we go
[20:26] into combat. Uh, we are now using the
[20:28] assisted. So, we just go here and just
[20:31] charge in. We use just the buttons it
[20:33] tells us to use. Nice and easy. And
[20:36] look, we're doing the damage. It's
[20:38] perfect. is exactly how you need to be
[20:40] playing it. And it's s super simple,
[20:42] super easy, and it's pretty fun to do
[20:44] like this as well, I think. Anyway,
[20:46] super easy. Look at that. There's no
[20:48] messing about at all. And we're just
[20:50] pressing exactly what it tells us. It's
[20:52] also got quite nice little like
[20:54] highlights of here of exactly what
[20:56] buttons and things we need to see. If we
[20:58] want to press edit mode again and make
[21:00] this show, uh we can have it only show
[21:03] when we're in we're in combat as well,
[21:05] which is quite useful. So, if we press
[21:06] save here, uh, this should all disappear
[21:09] now and only reappear when we get into
[21:11] combat. So, if we charge back in, you
[21:13] should see it activate. Boom. There you
[21:16] go. You can only see everything now. And
[21:18] it is going to tell you when you got
[21:20] really important, you know, abilities
[21:21] you need to be pressing and things like
[21:23] that. That's going to be really useful
[21:25] for you to, you know, keep track of
[21:26] things and do the most damage or most
[21:28] healing possible. I really hope this
[21:30] video helped you. If it did, please hit
[21:32] that subscribe button. Please hit that
[21:34] like button. help other people get their
[21:37] UI sorted today. If you want to import
[21:39] mine, check it out in the description.
[21:41] And if you want to help support this
[21:44] channel in the best way possible, check
[21:47] out gaminghero.io.
[21:49] It's a website that helps you play World
[21:51] of Warcraft at a higher level. Thanks
[21:53] for watching. This is Arosium from
[21:54] Gaming Hero
⚡ Saved you time reading this? Transcribe any YouTube video for free — no signup needed.