
My Cat Chose Which Mini House to Build
53sThe cat's decision creates conflict and surprise, making viewers curious about the outcome.
▶ Play Clip"Delivers exactly what the title promises: two DIY miniature houses built from start to finish."
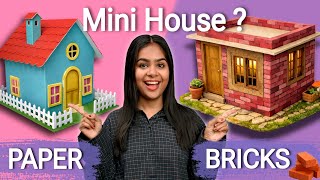
In this DIY video, the creator unboxes and assembles two miniature house kits: one made of real bricks and cement, and another made of paper. The video provides a step-by-step guide on constructing both, highlighting the materials, techniques, and final results.
The creator has two mini house kits and chooses one based on her cat's preference.
The brick kit includes bricks, small bricks, windows, doors, two bases, MDF pieces, a pet knife, and cement mix.
Apply cement on bricks and attach them to the base, building a layer on all four sides for walls.
Cement mix is used to install the door and various sized windows on the front, sides, and back walls.
Instead of applying cement on each brick individually, apply cement on the entire wall first, then place bricks. Ensure cement on sides for strength.
Attach the roof using cement, then build a boundary on top with remaining bricks.
The second kit contains paper pieces, glue, a base, and decorative elements for a quick and easy assembly.
Glue paper parts together, attach to the base, install the roof with layered paper pieces, and add 3D window frames and a fence.
Both miniature house kits offer satisfying DIY experiences: the brick kit simulates real construction with higher detail, while the paper kit is quick and easy for instant results.
What materials are included in the brick miniature house kit?
Bricks, small bricks, windows, doors, bases, MDF pieces, a pet knife, and cement mix.
00:17
What is the efficiency tip for applying cement to bricks?
Apply cement to the entire wall at once, then place bricks, ensuring cement on the sides for strength.
02:30
How many windows are installed in the brick house, and where are they placed?
Four windows: largest on the front wall, two small on the sides, and the smallest on the back wall.
02:04
What is the main difference between the brick kit and the paper kit?
The brick kit uses real bricks and cement for a more realistic construction experience, while the paper kit is easier and quicker to assemble.
05:12
What is used to create a 3D effect around windows in the paper house?
Double-sided tape and small paper pieces are glued around the windows to create a 3D effect.
06:34
Efficiency in Brick Laying
Provides a practical tip to speed up construction by applying cement to the entire wall before placing bricks.
02:30First House Completion
Showcases the satisfying final look of the brick miniature house, demonstrating the kit's potential.
04:33Paper House 3D Effect
Illustrates a simple method to enhance the paper house's appearance with 3D window frames.
06:47[00:03] what is this? I ordered these two mini house kits. But now I don't know which one to house kits. But now I don't know which one to make. Mannu, which one do you like? This one. This one? Ok. So we will not make this one at all. We will make this one.
[00:17] So right now I don't even know what's inside this kit. So let's unbox it and see. So to build a house, first of all it has these bricks. There are also some small bricks and along with them are these windows and doors. It comes with two bases
[00:31] and look how cute its windows and doors are. Looks exactly like the real one. Along with this are some MDF pieces and this pet knife with which we will apply the cement. And the most important thing we have got is this cement mix. I mean, you see,
[00:44] whatever material is required for construction is available in it. And I am very excited to use it because I have never used anything like this before. And look at these little bricks, I feel like playing with them.
[00:56] And you can see how to make it in this. It is exactly like real construction material and the process of making it is also the same. So let's get to work and get started. So look, we've got two bases.
[01:11] We have to take a base and start construction work on it. So simply take a brick. You have to apply cement on it and attach it and just keep doing it like this. So first of all we have to put a layer of bricks on all four sides and on
[01:25] top of this we will build our walls. Now we have to install this rope. First of all, look at this door, how real it looks. Now we will use our cement mix for installing the door also. I installed this door by applying cement mix. And now it's time to
[01:38] use the smaller bricks. Now, you all must have seen construction going on at a construction site and to tell you the truth, whenever you see cement being mixed, walls being built, bricks being added, do you not feel like just watching? Dude, I really wanted to watch it
[01:50] and literally I watched it for hours. In fact, I also felt like going and making it. So for now I have made three lines with bricks on the front wall. And now after completing this much, we have to install these cute
[02:04] windows. So, we have got different sized windows. And I am placing the biggest window on the front. Front means on the front wall. Dude, it's really giving off a construction vibe. I
[02:16] feel like my childhood dream has come true. Well, along with the front wall, we have to build the back walls as well. And you know, after making so much, the light in my mind lit up. That means I was applying cement to each brick again and again and
[02:30] sticking them together. But I realized why I was working hard again and again? I can simply apply cement on the entire wall in one go and then keep placing bricks. Just keep one thing in mind that you have to apply cement on the sides of the bricks because it is necessary to have cement on all sides.
[02:43] Otherwise your house will not be strong and if there is an earthquake or something, your house may collapse. Therefore, strength will have to be taken care of. Dude, it is really satisfying to see construction going on at a real construction site. But being able to have a similar
[02:55] experience at home is also quite satisfying. And if you also want to have this experience at home, then definitely try this kit. So I got this kit from It's Witsy. Rather, you can order any art craft or stationery item
[03:10] come in very good quality. Also, if you use my coupon code Mansi05, you will get an extra discount of 5%. And the rest of the details are given in the description. And the rest of the details are given in the description. So check it.
[03:30] biggest one which I have installed on the front. There are two small ones which I have placed on the sides and the smallest one is the one which I have placed on the back wall. Now we have to put the roof on. But before placing the roof, we found these MDF pieces which we had to attach. But
[03:43] I did not feel good keeping it. I thought I make it like this. So directly placing the roof. So in this way we attached the roof with the help of cement. But what if someone falls from the roof? So for that we will have to make a boundary. So
[03:57] some bricks are still left. So we will make its boundary from that. So just like we attached the bricks at the bottom, we will do the same at the top and in the same way we will make two lines of bricks. I am very excited to see its final look. So let's see.
[04:11] to see its final look. So let's see.
[04:33] tell me how do you feel? I just don't understand whether I should leave it like this or paint it like it is done on a real house. But wait a second, this kit is still lying here. Friend, Mannu liked this kit.
[04:47] I threw it away at that time but now I feel like making this one too. To tell you the truth, if Mannu says anything, I do n't feel like doing that work at all. But I enjoyed using the first kit so much that now I feel like
[04:59] trying this kit too. So let's unbox it and look at all the stuff we've got in it. And after seeing this you must have understood that we have to make this kit from paper. So look, both the kits are quite different from each other and
[05:12] using both is a different experience in itself. In the first kit, you have to make a house with bricks and in this kit, you have to make a house with paper. Both kits are quite good. If you want a more satisfying experience,
[05:24] try the brick kit. And if you want a house that can be built quickly and easily, then you can try this paper house. And glue is also mixed in it. The end process is very easy. So first of all,
[05:39] both the parts and stick them together. is ready. Now we will need the base. So we have got the base.
[05:52] We just have to stick it on top of it. And this house is already very colorful. So we wo n't even have to get it painted. If I have to get it done then I am talking as if I am building a real house. Well, we have laid the base. Now we will also install its roof
[06:06] for which we already had this paper. But it wo n't look good like this, empty. So for this, we get these small pieces which we have to apply glue and stick one on top of the other one by one. And only after installing this will the roof get its
[06:21] real look. Now this is another little piece. And wherever we have to fold , marks are already given there. So folding becomes very easy. And I am having a lot of fun making these little pieces. Now with this we have got
[06:34] these double sided tips. What would you have got this for ? Think think. What is thinking? I will tell you myself. We have got small pieces of paper to stick around these windows and doors. And after applying this, see, it has a completely 3D
[06:47] effect. Now the work does not end here. We got this cute fence to put in it. And only after applying this the look of our house will be completely complete. I am telling the truth. After installing this fence, the house started
[07:00] looking very cute. And now let's see its final look.
[07:29] like more? Let us know by quickly commenting below. So tell us how you liked today's video by commenting. The rest you know what to do. Like, share, subscribe, do whatever you can. And I keep bringing short videos. So let's
[07:41] I keep bringing short videos. So let's meet again.



⚡ Saved you 0h 08m reading this? Transcribe any YouTube video for free — no signup needed.