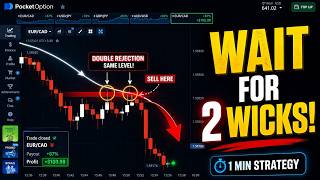

One wick is noise, two is a signal
42sReveals the core rule of the strategy with a catchy phrase, making viewers want to learn the double confirmation setup.
▶ Play Clip"Delivers precisely on its promise of a fast-paced, rule-based strategy with both win and loss examples—no fluff."
This video presents the 'Micro Double Rejection' strategy, a technical approach for trading 30-second binary options. By combining two rejection wicks at a key level with a 50 EMA trend filter, the strategy aims to create high-probability entries. The creator demonstrates the setup with live win and loss examples, emphasizing discipline and risk management.
A single rejection wick is considered noise, but two wicks from the same zone signal institutional resistance or support. This double confirmation is the core entry trigger.
The 50 EMA acts as a filter: only take sells when price is below the EMA, and only buys when price is above. This keeps trades aligned with the broader momentum.
A set of five clear rules: wait for both wicks to form, ensure a tight rejection zone, confirm price is clearly above/below the EMA, use a 1-minute expiry on a 30-second chart, and never risk more than 1-2% of the account per trade.
Winning trade example: price below the 50 EMA, double wick rejection at resistance, immediate move down. The trade closed in profit, validating the setup.
Losing trade example: the setup followed all rules (above EMA, double wick at support), but momentum shifted and price moved against the position, resulting in a loss. This demonstrates that even perfect setups can fail.
What is the 'double confirmation' in the Micro Double Rejection strategy?
Two rejection wicks forming from nearly the same price level.
00:29
What is the trend filter used in the strategy?
The 50 EMA, acting as a trend filter (buy only above, sell only below).
00:44
What is the recommended risk per trade?
No more than 1-2% of your account per trade.
01:56
What is the key difference between a 'failed trade' and a 'failed strategy'?
A losing trade vs. a failed strategy; the setup can be correct but the market moves against you.
06:12
How do 'losers' typically react to a series of losses?
They are likely to blame the strategy and jump to the next shiny object.
06:38
The power of double confirmation
Clearly distinguishes between noise and a valid signal, a fundamental concept for technical traders.
00:29Losses are part of the process
Provides a realistic and mature perspective on trading losses, crucial for long-term survival in the market.
06:12Structure over emotion
Highlights the importance of a predefined set of rules to avoid impulsiveness and maintain consistency.
02:09Patience is an entry condition
Reframes waiting for the right setup as an active, rule-based action rather than a passive state.
01:27[00:02] could be your entry signal? No complicated indicators, no guessing, just pure price action with one confirmation tool. This is the micro double rejection strategy, and it works on 1-minute charts. Stay till the end
[00:15] because I'm showing you live examples, including a losing trade, because that's Now, here's where most traders mess this up. They see one rejection wick and jump in immediately. Big mistake. We're waiting for the double confirmation.
[00:29] Why? Because one wick is noise, but two wicks rejecting from the same zone, that's institutional resistance or support screaming at you. And notice, we're not trading blind. The 50 EMA is our trend filter. Below EMA, we're
[00:44] hunting cells. Above EMA, only buys. This keeps us aligned with momentum instead of fighting it. Before we go ahead, listen carefully. Trading binary risk. You can lose your entire investment. This strategy is for
[00:59] educational purposes only. It's not financial advice. What works in these examples may not work in live market conditions. Never trade with money you can't afford to lose. Practice on demo accounts first. Test this strategy
[01:14] thoroughly before going live. And remember, past performance doesn't guarantee future results. Before we jump into live examples, let's lock in the rules because without rules, this is just gambling. Rule number one, wait for
[01:27] both rejection wicks to form completely. Don't rush the entry. Rule two, the rejection zone must be tight. Both wicks rejecting from nearly the same price rejecting from nearly the same price level. Spread out rejections? Skip it.
[01:40] Rule three, price must be clearly above or below the 50 EMA. If price is chopping around the EMA line, step aside. No trade. Rule four, 1-minute candle, 1-minute expiry. Don't overthink the time frame. Rule five, never risk
[01:56] more than 1 to 2% of your account per trade. This is a high-frequency strategy. Position sizing is everything. Stick to these rules like they're written in stone. And before we look at the live charts, I've put together a
[02:09] free PDF guide with the complete buy checklist, sell checklist, and a quick reference entry card you can print out and keep next to your screen. Links in the description below. Grab it now so you can follow along with the examples.
[02:22] All right, real talk. This strategy won't win 100% of the time. You're about to see a loss in this next example because I want you prepared for reality. But watch how the setup still followed the rules. That's discipline.
[02:34] Now, watch this next section carefully because I'm going to show you exactly what this looks like on the chart. All right, here we go. Live chart, 30-second time frame. Look at what's happening right here. Price is clearly below the
[02:47] 50 EMA, so we're in a downtrend. That's our first confirmation. We're hunting for sells only. Now, watch this carefully. See these two candles? Both of them tried to push higher, and both got rejected from almost the exact same
[03:00] level. That's not random. That's a resistance zone holding strong. The clean, and the second candle just confirmed the pattern. This is textbook double rejection. Price tried twice to break through, failed both times, and
[03:14] now it's showing weakness. The setup meets all five rules. Price below EMA, double wick confirmation, tight rejection zone, 30-second candle, and I'm risking only the right percentage of my account. I'm taking the sell trade
[03:28] right here with 1-minute expiry. Entry placed. Let's see how this plays out. Okay, trade is live now. Notice what's happening. Price immediately started respecting that rejection zone. It's not coming back up to retest.
[03:41] forming right now. It's pushing downward, which is exactly what we want to see. The momentum is on our side. This is why we wait for the double confirmation. If I had jumped in after just one rejection wick, I'd be sweating
[03:55] right now. But because we followed the rules, the setup is clean. The 50 EMA is still above price, acting like a ceiling. As long as price stays below that line, we're aligned with the trend. No second-guessing, no panic, just
[04:10] the plan. This is the boring part of trading, but it's also the most important. Discipline means letting the market do its thing while you sit on your hands. And there it is. Trade closed in profit. A clean
[04:25] win following the exact setup we discussed. Now, let's wait for the next perfect setup. I'm scanning the chart looking for that same pattern. Two rejection wicks, tight zone, price aligned with the 50 EMA. Patience is key
[04:40] here. We don't force trades, we wait for the market to give us what we need. All right, here's the next setup. Live chart, 30-second time frame. Look at the price action right now. We're clearly above the 50 EMA. That tells us we're in
[04:52] an uptrend, so we're only looking for buy opportunities. Now, focus on these two candles here. Both of them dropped down and got rejected from nearly the same support level. The wicks are clean, tight, and aligned. This is the double
[05:05] tested support twice, and both times it bounced back up. The setup looks solid. Price is above the EMA. We've got our double wick confirmation, the rejection zone is tight, 30-second candle with 1-minute expiry, and I'm following
[05:19] proper risk management. I'm taking the buy trade here. Entry placed. Let's watch how this unfolds. Okay, trade is running. And wait, something's changing here. Price isn't pushing up like we expected. Instead, it's starting to move
[05:32] downward. This is interesting. The setup followed all the rules, but the market doesn't care about our rules. It does what it wants. Notice how price is now dropping below our entry point? This is what a losing trade looks like in real
[05:45] time. The 50 EMA is still above, but momentum has shifted against us. This is the reality of trading. Even perfect setups can fail. The key here is not to panic. The trade is already placed, the expiry
[06:00] is locked in, and all we can do now is accept the outcome. And there it is. Trade closed at a loss. Full stop. No profit. This one didn't work. Now, here's the crucial part. This is not a
[06:12] failed strategy. This is a failed trade. There's a massive difference. The setup was correct, the rules were followed, the execution was clean, but the market moved against us, and that's simply part of the game. If you're watching this
[06:26] because it lost, you've missed the entire point. No strategy wins 100% of the time. What matters is that over 10, 20, 50 trades, you follow the same
[06:38] process and let probability work in your favor. This loss, it's the cost of doing business as a trader. It's the price you pay for being in the game. Winners accept this. Losers blame the strategy and jump to the next shiny object.
[06:52] You've now seen both sides, a winning trade and a losing trade using the exact same micro double rejection strategy. Same rules, same discipline, different outcomes. That's trading. So, what do we do now? We move on. We wait for the next
[07:06] setup. We don't revenge trade. We don't double our position to make it back. We stick to the plan, respect our risk management, and trust the process over time. Thanks for watching. Stay disciplined, stay patient, and I'll see
[07:19] disciplined, stay patient, and I'll see you in the next one.



⚡ Saved you 0h 07m reading this? Transcribe any YouTube video for free — no signup needed.