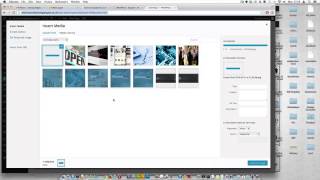

How to Add Images in WordPress: Step-by-Step
40sClear, actionable tutorial for a common task—perfect for beginners seeking quick solutions.
▶ Play Clip"The title 'Add Image' is simple and accurate; the video delivers exactly what it promises without exaggeration."
This video provides a straightforward, step-by-step tutorial on how to insert images into WordPress posts or pages. It covers the entire process, from logging into the admin panel to uploading, aligning, and inserting the image, as well as adjusting alignment after insertion.
To begin, navigate to your website and append '/wp-admin' to the URL. Enter your username and password to log into the WordPress dashboard.
Find the specific post or page you want to edit. The process is identical for both posts and pages. Click on the entry in the admin panel to open the editor.
Click in the content area where you want the image to appear. For example, place it under the first paragraph. Ensure the cursor is in the correct spot within the editor.
Click the 'Add Media' button in the top-left corner of the editor. This opens the Media Library where you can either select an existing image or upload a new one by dragging it from your computer.
On the right side, you can set the alignment: 'None' (default), 'Left', 'Center', or 'Right'. You can also create a link on the image to direct users to a specific page. The default is no link.
After configuring the settings, click 'Insert into page' (or 'Insert into post'). The image will appear in your content. You can also change alignment after insertion by clicking the image and selecting an option like 'Align right' to make text wrap around it.
After inserting the image, update the page or post. On the live site, the image will display according to the chosen alignment (e.g., centered or left-aligned).
The video concludes by reiterating that this simple process is all you need to insert images into WordPress posts or pages, ensuring your content is visually engaging.
Admin Access Method
Provides a clear, actionable step for accessing the WordPress dashboard, essential for any site management.
00:14Media Library Upload
Explains the drag-and-drop upload method, a quick and efficient way to add images.
01:14Alignment Options
Clarifies the default alignment and how to change it, which is crucial for layout control.
01:27Post-Insertion Adjustment
Shows that alignment can be modified after insertion, offering flexibility in content editing.
02:12[00:02] как добавлять изображения в записи блога или страницы вашего сайта. Первое, что нам нужно сделать, это войти в административную панель. Для этого перейдите на свой сайт, добавьте
[00:14] /wp-admin, введите свое имя пользователя и пароль, и вы попадете на панель управления. Затем нам нужно найти страницу или запись (это абсолютно одинаково для обеих страниц), которую вы хотите отредактировать. Как только вы найдете запись, щелкните
[00:30] по ней в административной панели. Затем, находясь в записи, в записи,
[00:42] хотите поместить изображение, если там уже есть текст или что-то подобное. Мы хотим поместить его под первым абзацем. Просто щелкните там и убедитесь, что выделена область «Типограф» в нужном месте. Нам нужно щелкнуть в верхнем левом углу, где написано «Добавить медиафайлы»,
[00:59] и вы увидите свою медиатеку. Если вы уже загрузили Если вы хотите загрузить новое изображение, все, что вам нужно сделать, это найти на своем компьютере изображение, которое вы хотите загрузить. Затем
[01:14] просто перетащите его в свою медиатеку. справа у нас есть несколько вариантов выравнивания. Выравнивание сейчас
[01:27] установлено на «Нет», что по умолчанию означает « Плавание по левому краю». Если вы хотите центрировать изображение, просто нажмите «Центрировать», а если хотите, чтобы оно плавало справа, нажмите «H». Вы также можете создать ссылку на изображение, чтобы при нажатии на него пользователь
[01:41] переходил на определенную страницу, которую вы определили. Сейчас по умолчанию установлено выравнивание по центру изображения, а здесь ссылки не будет. Просто нажмите «N». Как только вы будете довольны настройками, вам останется только
[01:56] нажать «Вставить на страницу», и вы увидите, что изображение будет вставлено на вашу страницу или в вашу запись. Мы также можем изменить выравнивание после вставки, нажав на изображение, а затем выбрав «
[02:12] Центрировать справа» или «Слева». Если мы выберем выравнивание справа, текст будет обтекать изображение. Вот так мы и сделаем сейчас. После загрузки и вставки После загрузки и вставки изображения обновите страницу или запись. На
[02:26] рабочем сайте ваше новое изображение снова отобразится на вашей
[02:45] изображение центрировано, оно отображается сверху, но мы можем разместить его и слева, а также сверху, но мы можем разместить его и слева, а также
[02:59] standard and that's how you insert your an image into a post or a page


⚡ Saved you 0h 03m reading this? Transcribe any YouTube video for free — no signup needed.