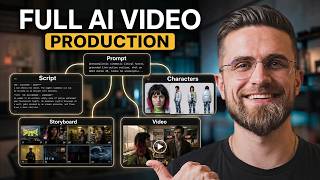

The AI Video Consistency Problem is SOLVED
54sAddresses a common pain point for creators and promises a solution, sparking curiosity.
▶ Play Clip"Delivers a solid tutorial with real steps, but the heavy sponsor integration and promotional tone slightly oversell the 'filmmaking' promise."
This video is a sponsored tutorial demonstrating how to create AI-generated cinematic videos using Buzzy, a platform that integrates over 50 editing tools and 70+ AI models in a single canvas. The host walks through a four-step pipeline—script, character, storyboard, and video—using Seedance 2.5 for animation, emphasizing character consistency and production-ready output.
Most AI video generators produce inconsistent results, with characters changing appearance between scenes, making them suitable only for memes, not professional production.
Buzzy is a platform that connects over 50 professional editing tools and more than 70 leading image and video models (e.g., Seedance, VEO, Kling, Runway, Nano Banana, GPT Image) in a single canvas, driven by one smart assistant.
The assistant is 'agentic,' meaning it works across multiple tools without needing a new prompt after each step, pausing only when user input is required.
The workflow always moves through four stops: script, character, storyboard, and video. These four nodes are the whole system.
You can select different AI models for generating text. For example, Gemini 3.1 Pro for longer, nuanced descriptions; Gemini 3 Flash for quick passes; Flashlight when speed matters more.
Upload a single reference photo, and Buzzy generates a full turnaround sheet (front, side, 3/4 view) locked to the same face, ensuring consistency across scenes.
The agent lays out a full storyboard automatically, one frame per shot. You can edit individual frames, adjust lighting, and change camera angles without re-rolling the prompt.
A wide establishing frame can be split into a grid of nine individual shots, each independently adjustable, providing coverage for short-form content like reels or TikToks.
Select a finished frame, choose a video model like Seedance 2.5, and enable Omni Reference to lock the render to the character node, keeping face, kit, and proportions consistent throughout the clip.
Buzzy offers thousands of clonable workflows built by studios and advertisers. Templates like 'Nature's Essence' for a candle brand show the full pipeline, including script and product diagrams, which can be cloned and edited.
Faceless channels can produce consistent characters without actors; small agencies can turn one product photo into a full commercial; freelancers can offer cinematic ads with shorter turnaround.
A branded ad can cost several thousand dollars with a studio day, photographer, and stylist. Cloning a workflow and swapping in your own product can be quoted at a fraction of that price, keeping most as margin.
Buzzy enables creators to produce professional, consistent AI videos through a streamlined four-step pipeline, replacing traditional production teams. The platform's clonable templates and agentic workflow make it accessible for beginners and profitable for professionals.
What is the four-step pipeline in Buzzy?
Script, character, storyboard, and video.
02:36
What does 'agentic' mean in the context of Buzzy?
The assistant does not wait for a new prompt after every step; it works across multiple tools on its own, pausing only when it needs user input.
02:08
How does Buzzy ensure character consistency?
By using a reference photo to generate a turnaround sheet, and then using Omni Reference to lock the render to the character node.
03:43
What is the purpose of the 'split storyboard' feature?
It breaks a wide establishing frame into a grid of nine individual shots, each independently adjustable, providing coverage for short-form content.
05:51
Which video model is used in the tutorial for animation?
Seedance 2.5.
06:30
What is Omni Reference?
A locked-in visual anchor that the model checks every new frame against before rendering, preventing drift.
07:25
How can creators monetize Buzzy workflows?
By cloning templates, swapping in their own product photos and scripts, and offering cinematic ads at a fraction of traditional production costs.
10:02
Agentic Workflow Explained
Clarifies a buzzword by explaining how the assistant works autonomously across tools, a key differentiator.
02:08Character Consistency via Reference Photo
Demonstrates a practical method to achieve consistent character faces, a major pain point in AI video.
03:43Storyboard Split into Nine Shots
Shows a practical way to generate multiple shots from one frame, useful for social media content.
05:51Omni Reference as Visual Anchor
Explains the mechanism behind consistent rendering, which is crucial for professional output.
07:25Cost Comparison for Clients
Provides a concrete business case for using Buzzy, showing potential profit margins.
10:31[00:15] shortcut. Most of them delivered a toy. You type a prompt and wait for 15 seconds of footage. By the very next shot, the face already looks like someone else. You re-roll the same prompt five times and burn through your
[00:29] credits. The character still ends up looking like a different person in every scene. For two years, that has been the ceiling. It works fine for a meme, but it falls apart the moment you put your name on it. That ceiling just moved for
[00:42] infinite canvas [music] built for real production, not party tricks. It's called Buzzy, and I'm building a full cinematic sequence with it today. I'll take it live from a blank canvas to a finished clip. Buzzy
[00:56] sponsored today's video. If you make videos or run paid ads, watch this whole tutorial. By the end, you will know the exact four-step pipeline professional creators are already using inside this tool. I am not a filmmaker and I do not
[01:10] own a camera crew. If I can build this scene from a blank canvas today, so can you. I'll explain every button along the way. Here's the entire workspace right now. I want you to see the scale of it before we touch a single tool. Buzzy is
[01:25] not one generator hiding behind a text box. It connects over 50 professional editing tools and more than 70 leading image and video models inside a single canvas. Cedance, VEO, Kling, Runway, Nano Banana, and GPT image all sit in
[01:40] the same window driven by one smart assistant. Normally, your workflow looks nothing like this. You write the script in one app, then jump to a second app just to generate a character. A third app handles the animation, and you still
[01:54] need an editor to stitch everything together. Every handoff loses quality, and every extra tool is another subscription. Buzzy just replaces that entire chain in one move. You get one assistant, one canvas, and every model
[02:08] in a single chat window. Let me explain the word agentic real quick, since it gets thrown around a lot right now. It just means the assistant does not wait for a new prompt after every single step. You give it a direction, and it
[02:22] keeps working across multiple tools on its own. It only pauses when it genuinely needs your input. The pipeline you're looking at always moves through the same four stops: script, character, storyboard, and video. Those four nodes
[02:36] are the whole system. I'll walk through each one so you can copy this exact workflow yourself. If you want the project open on your own screen while you follow along, the link is in the description. Clicking it drops you
[02:48] straight onto this canvas, ready to clone and edit. Everything starts in this side panel on the left. Click into it and start typing your scene with a short heading above each shot. Now, open the model drop-down at the bottom of
[03:01] this same panel. This is the part beginners always miss. You can generate every line with a different model. Just choose it right here before you hit generate. Click that drop-down now and pick Gemini 3.1 Pro for a longer, more
[03:16] nuanced scene description. Switch it to Gemini 3 Flash when you just need a quick pass. Drop down to Flashlight when speed matters more than nuance. Type your scene description into the chat box below the drop-down, then press
[03:28] run to generate the text. Your dialogue doesn't have to come from the same model as your visual descriptions. Feel free to switch models between lines instead beginners, here's the simple version. You are not locked into one AI brain for
[03:43] the whole project. You pick the best tool for each sentence, the same way a real writers' room would split tasks between people. Click the plus icon in the corner of the canvas and upload one reference photo. That single image is
[03:56] all Buzzy needs to lock in a face. Once the photo uploads, click run this next to the character prompt box. Watch the panel generate a full turnaround sheet automatically. You get a front view, a side profile, and a 3/4 angle all locked
[04:11] to the same face. On screen right now, one reference photo of a man in his 30s becomes exactly that turnaround sheet. Click the arrow icon connecting it to the next node. The platform pushes that same face into a full body pose sheet
[04:25] generated through model called Nano Banana Pro. You can run the same process Here's a goalkeeper in full kit generated from three separate angles with matching lighting on every frame. It uses the exact same upload and run
[04:40] steps you just watched. Once a character node like this exists on your canvas, next. The face carries over automatically and never re-upload the reference photo again. This is what flawless consistency actually means in
[04:55] practice. It's not just a marketing phrase. It's a literal grid of matching faces you can check with your own eyes. Most standalone image generators can give you one great portrait. [music] Ask for a second angle, and you're rolling
[05:07] dice again. Buzzy treats the character as a saved asset instead of a fresh technical difference behind the consistency. Click run this at the top of your script node. The agent lays out a full storyboard automatically, one
[05:21] frame per shot. Click on any single frame now to open its editing panel stops feeling like a slot machine. See the lighting icon in that toolbar above appears that you can drag left or right.
[05:36] directly without re-rolling the whole prompt. Click the multi-angle icon right next to it to swap the camera position. One toggle beats gambling on a new random seed. Once your storyboard looks right, click the button labeled split
[05:51] storyboard near the top of the panel. Watch this one wide establishing frame near the Eiffel Tower break into a clean grid of nine individual shots. Click into any one of those nine tiles to treat it [music] as its own directable
[06:04] frame. Adjust it separately from the rest. This is director level control, not prompt gambling. Every adjustment happens with a click instead of a fresh generation. That nine-grid split is also just practical for how most of us
[06:17] actually publish. Nine separate frames from one scene give you enough coverage to cut a short-form reel or a TikTok. You don't generate a single new shot >> Select a finished frame, then click the model draw full at the bottom of that
[06:30] nod. Choose a video model such as C Dense 2.5. Click the Omni reference toggle next to the model name before you generate. This locks the render to your character node, so the face, the kit, and the proportions stay consistent
[06:44] through the entire clip. Click run this and watch the agent animate that still frame from earlier into a full 15-second clip at 1080p resolution. The face stays exactly the same from the very first frame to the last because the canvas
[06:59] itself is infinite. None of this is limited to one isolated clip. Drag a new scene node next to this one and connect it to the same character. Click run this again to change scene after scene while every person stays recognizable. This is
[07:13] the part traditional production simply cannot match on cost. A single creator sitting at one canvas just replaced a script supervisor, a cinematographer, an entire continuity department. For beginners wondering what Omni reference
[07:25] actually does under the hood, think of it as a locked-in visual anchor. The model checks every new frame against that anchor before rendering it. That beats generating each frame blind. That is the mechanism behind clips that do
[07:38] not drift halfway through. Chain enough of these clips together and you are no longer making a 15-second demo. You're assembling something closer to a short film or a full commercial. It's built entirely from nodes on one canvas, not
[07:52] footage shot across multiple locations and multiple days.
[08:40] >> Here is the part most tutorials skip completely and it is honestly the most useful section for beginners. You do not have to start every single project from a blank canvas. Buzzy shapes with thousands of clonable workflows already
[08:54] built by real studios and advertisers. This candle campaign called Nature's Essence was built for a brand called Ember House. It's one of them built entirely inside the exact canvas you just watched me use. Templates like Back
[09:07] Room, The Last Key, and Before Rome Sunset follow that same clonable structure. Open the project and you can see the actual script node behind it. It reads like a real two-act short film treatment, not a product blurb. It opens
[09:21] on a damp, silent forest at dawn with a candle resting in the moss. Then it slowly transitions into a warm, sunlit living room. That same candle burns there, too, sitting on a wooden shelf. Right next to it sits a simple
[09:35] three-view product diagram, Front, side, and top with exact millimeter measurements. It's the same kind of reference sheet you saw earlier for character consistency. This time, it's applied to a product instead of a face.
[09:48] Open any of these templates and click clone the project. The entire pipeline drops onto your own workspace, fully editable from top to bottom. Swap the product, swap the script. The structure that took a professional studio days to
[10:02] design becomes yours in minutes. That is where the real money sits for creators watching this. Faceless channels can now produce consistent recurring characters without ever hiring an actor. Small agencies can turn one product photo into
[10:17] a full commercial without booking a studio, a location, or a crew. Freelance editors can offer cinematic ad creative on a much shorter turnaround. The crew is now just an agent running on one canvas. There's no team and no call
[10:31] canvas. There's no team and no call sheet involved. Picture the actual math for a moment. A branded ad like this candle campaign can easily cost a client several thousand dollars. That's once you add a studio day, a product
[10:44] photographer, and a stylist. Clone that same workflow and swap in your own product photo and script. You can quote a fraction of that price while keeping most of it as margin. If you want to build the exact character, storyboard,
[10:58] and clip you just watched, the workflow link is in the description. It's also pinned in the comments below. Click it and hit clone the project. You'll land on this same canvas, ready to swap in your own reference photo. Write your own
[11:11] script over the one I used today. Buzzy is running a launch discount right now. professional video tools before, this is a genuinely good moment to test one. Buzzy just launched official support for Seedance 2.5 inside the platform. That's
[11:27] the video model I used to animate every clip in this tutorial. It's live right now and the launch discount applies to it, too. Go build your first character sheet, run it through a storyboard, and generate your first clip today. Then
[11:40] drop a comment telling me what scene you ended up making. If you got value from this walk-through, that comment tells me exactly what to cover next. Maybe that's a deeper dive into camera control or a full tour of the template library.
[11:53] Thanks for watching and I'll see you in the next one.



⚡ Saved you 0h 11m reading this? Transcribe any YouTube video for free — no signup needed.