SaaS Multi-Tenancy with Separate Databases
31sExplains the core concept of isolated databases per tenant, appealing to developers building scalable SaaS.
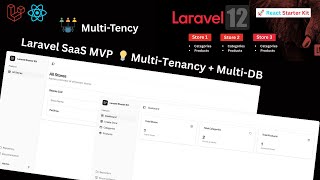
▶ Play ClipThis video demonstrates a scalable SaaS platform built with Laravel and React, featuring a multi-tenancy architecture with isolated databases for each tenant. The creator shows how users can register, create stores, and manage categories and products, with each store having its own dedicated database.
The video introduces a scalable SaaS platform built with Laravel and React, using multi-tenancy with multi-database architecture.
The system uses multi-tenancy with multi-database architecture, meaning each new store gets a completely isolated database.
The creator registers a new user named Afnan with an email and password to demonstrate the platform.
After account creation, the dashboard shows total stores, total categories, and total products for the user.
The central database contains a users table with roles (user and admin), a tenants table for store IDs and names, and a domains table for subdomains.
The creator creates a new store named 'Pet Shop' with a subdomain and description, demonstrating the store creation process.
The store is created successfully, showing the store name, subdomain, and description. The system also creates a separate database for the store.
A new database named 'tenant.petshop' is automatically created for the Pet Shop store, containing its own categories and products tables.
The creator adds categories (electronics, clothing) and a product (headphones) to the Pet Shop store, demonstrating data isolation.
The admin can see all stores, store owners, products, and categories across all tenants.
A new user 'unity' registers and creates a store named 'Gym' for health products, which also gets its own separate database.
The Gym store automatically gets its own separate database with its own categories and products tables, confirming the multi-database architecture.
The video successfully demonstrates a multi-tenancy SaaS platform with isolated databases for each store, ensuring data separation and scalability. The creator invites viewers to request a full tutorial in the comments.
"The title accurately describes the content: a Laravel 12 multi-tenancy with multi-database architecture for building a SaaS platform like Shopify."
What architecture does the SaaS platform use?
Multi-tenancy with multi-database architecture.
0:16
What happens when a user creates a new store?
The system automatically spins up a completely isolated database for that store.
0:21
What tables are in the central database?
Users table, tenants table, and domains table.
1:14
What roles are available in the users table?
User role and admin role.
1:30
What does the admin see that a regular user cannot?
The admin sees all users and all stores created, while a user only sees their own store, categories, and products.
1:35
What is stored in the tenants table?
Store ID, store name, slug, and tenant ID.
1:48
What is stored in the domains table?
Domain name and tenant ID.
2:13
What database name is created for the Pet Shop store?
tenant.petshop
4:20
What tables does each tenant database contain?
Categories table and products table.
4:29
How does the system ensure data isolation between stores?
Each store has its own separate database with its own categories and products tables.
6:15
Multi-Tenancy with Multi-Database
This is the core architectural decision that ensures data isolation and scalability for the SaaS platform.
0:16User Roles and Permissions
The distinction between user and admin roles demonstrates access control in a multi-tenant system.
1:30Automatic Database Creation
The system automatically creates a new database for each store, which is a key feature for scalability.
4:09Complete Data Isolation
Each store's categories and products are completely isolated, ensuring data privacy and security.
6:15Second User Demonstration
Creating a second user and store confirms the system's ability to handle multiple tenants with separate databases.
8:49[00:00] [music]
[00:04] Hello everyone, welcome back to my
[00:06] channel. Today I want to demonstrate a
[00:08] scalable SAS software as a service
[00:10] platform that I have built using Laravel
[00:13] and React. So my solution uses a
[00:16] multi-tenency with multi- database
[00:18] architecture. This means every time a
[00:21] user create a new store on this
[00:24] platform, the system automatically spin
[00:26] up a completely isolated database just
[00:29] for them. So let's start. So first of
[00:32] all, I just simple uh
[00:36] register a new user and I just simple
[00:39] name this user as my name Afnan. And uh
[00:42] in the email I just simple pass here my
[00:44] email. And in the password I just simple
[00:47] pass this
[00:49] password. Okay just simple create
[00:51] account.
[00:53] And now here you can see a user account
[00:56] is created. And now on the dashboard it
[00:59] show and reflect here total store total
[01:02] categories total products. So as I told
[01:05] you earlier uh every user can create its
[01:09] own store and its own categories and its
[01:12] own product. Okay. So I just simple
[01:14] simple uh show you the database overview
[01:16] as well. And now here you can see this
[01:19] is my database that is multi-reency.
[01:20] Okay. And within this database I have a
[01:23] users table and I just simple refresh
[01:25] it. And here you can see this is the
[01:27] user that we created and in the user I
[01:30] have a role. So in the role I have a
[01:33] simple user role and admin role. So
[01:35] basically admin see all the users and
[01:37] all the store that are created and user
[01:40] just simply see its own store its own
[01:42] store categories and products. Okay. So
[01:45] this is the users table and I just
[01:46] simple open the tenants table and in the
[01:48] tenants table whenever user create a new
[01:50] store it basically give uh give this
[01:54] store a id and uh pass here the name
[01:57] slug store name here in the ID place.
[02:00] Okay. and uh in the store uh it
[02:04] automatically add the store details,
[02:06] user ID, name, description, tenant ID
[02:09] and all the things. Okay. So this is it.
[02:11] This is the basic structure. And also I
[02:13] have a domain domains table as well. And
[02:16] uh in this whenever a user create a new
[02:19] store, it automatically add uh here the
[02:22] domain name that user put and uh tenant
[02:25] ID as well here. So these are the table
[02:27] in my central database multi-tenency
[02:29] database. Okay. So now uh I just simple
[02:32] show you
[02:34] uh we just simple come here and now I
[02:36] just simple create a new store. And now
[02:39] this page is showing very look good and
[02:41] amazing. And now I on this page I just
[02:44] simple create a new store. And I just
[02:46] simple name this as pet shop. And in the
[02:48] subdomain I just simple pass this name
[02:50] here. And in the description
[02:54] I just simple pass here.
[02:57] And in the description I just simple
[02:59] pass here all things related to pets
[03:01] like this. Okay. So you can add any
[03:03] other here. So I just simple create a
[03:07] store.
[03:10] And now here you can see uh the store is
[03:14] created and it pass here the store name
[03:16] pet shop and subdomain as well and
[03:19] description as well. So I can uh just
[03:22] simple click on this manage and uh and
[03:25] now here you can see my store is created
[03:27] and now uh I just simple show you a uh a
[03:30] thing that is most important and now I
[03:32] just simple come to database and uh just
[03:34] go here in the tenants and I'll just
[03:36] simple refresh it and now here you can
[03:38] see it pass here the uh tenant name pet
[03:40] shop and in the store as well it pass
[03:43] the ID pet shop description tenant ID as
[03:46] well and domain in the domain it pass
[03:48] here petshop.lohost local host. So you
[03:50] can change here for uh we can change
[03:52] here uh the domain name as well. And now
[03:56] in the domains it auto it also add here
[03:59] the data petshop.lohost and tenet ID. So
[04:02] that's great amazing and the most
[04:05] important thing here it it create the
[04:09] separate database for this uh store. And
[04:12] now I just simple show you here uh I
[04:15] just simple uh refresh it. And now here
[04:18] I just simple search here pet shop. And
[04:20] now here you can see tenant.patshop
[04:23] and it create a separate database for
[04:25] this specific store. And within this I
[04:29] have a categories and products. Okay.
[04:32] And now I just simple
[04:36] and within this I have a categories
[04:39] table and products table. Okay. So this
[04:42] is it. This is the thing like uh each
[04:45] store has its own uh database and uh
[04:52] now let's manage this store. I will add
[04:54] a category and a product uh in it. Okay.
[04:59] So I just simple come to categories and
[05:01] now this is uh the categories page and
[05:03] I'll just simple add here a category
[05:05] like uh
[05:07] electronics.
[05:10] Okay. And now here in the description
[05:14] uh it uh related to
[05:19] electric
[05:21] products. Okay. And now I just simple
[05:23] create this category. And now here you
[05:26] can see category is created. I can add
[05:27] it and delete it. But uh before this I
[05:31] just simple come here and go to
[05:33] categories. And now here as you can see
[05:34] I don't have a categories table. when
[05:35] I'll categories data when I'll just
[05:38] simple refresh it add this category data
[05:40] that we added in this table so this is
[05:43] it this is uh this store thing that is
[05:46] standard pet shop and that's why it add
[05:49] this store categories in its own
[05:52] database okay so this is it and now I
[05:55] can also edit it as well
[05:59] I just will pass here this and just
[06:01] click on save changes and now it's
[06:02] updated as well and in the database it
[06:05] also updated. So that's it. And now I
[06:07] just go to products and in the products
[06:10] when I just simple click on add product
[06:12] and now in the categories show me this.
[06:15] So basically it is completely isolated
[06:18] and each store has its own data and now
[06:21] that's why it is showing here its own
[06:24] store categories. Okay. And now I just
[06:26] simple add here another category
[06:30] like uh
[06:33] clothing
[06:35] and uh it's about clothes okay just
[06:40] create and now go to products and uh
[06:43] here in the categories table you also
[06:45] add it and now I just simple add product
[06:48] here and uh I just pass here headphones
[06:52] and select the category and I just
[06:55] select sect this category and pass here
[06:58] all things related to electrics. Okay.
[07:03] And I can pass here this uh price as
[07:06] well and stroke as well. Just click on
[07:09] add product. And now you can see my
[07:11] product is added and it pass here this
[07:14] category as well. And in the products
[07:16] table I show you this is the product
[07:20] that is added. So that's it. That's
[07:23] amazing. Okay. So this is basically the
[07:26] multi-ancy with multi- database
[07:29] architecture that I make. Each user can
[07:32] create its own store and so now here you
[07:35] can see each store has its own
[07:36] categories, products and create uh store
[07:39] thing as well. Okay. So now uh I just
[07:43] simple show you the overview from the
[07:45] admin side as well. And now I just
[07:47] simple login with admin. H and I already
[07:50] have admin user. I just simple show you
[07:52] from here from the multi-tenency. Here
[07:55] you can see I have a admin user and its
[07:58] role is admin. And now I just simple
[08:02] login with it.
[08:09] And now here you can see admin can see
[08:12] all the store store owner its products
[08:16] and its categories. Okay. So we can do
[08:18] in it many things many things. uh as
[08:21] well like separate domains. Uh already
[08:24] we done it but we can add in it more
[08:26] feature as well like each each user has
[08:30] its own store multiple products multiple
[08:33] add toart features checkout features and
[08:35] uh payment gateways payment plan as
[08:37] well. So this is the basic concept idea
[08:40] of multi- uh multi- uh tensy with multi
[08:44] database and uh I just simple show you
[08:47] one uh more thing. And I just simple log
[08:49] out here. And now I just simple uh
[08:52] register with a new user. And I just
[08:54] simple name this as unity and pass here
[08:57] unity at the rategmail.com and password
[09:01] and
[09:02] password. Okay. And now here you can see
[09:06] this user is created. And now I just
[09:07] simple uh create a store. And here I
[09:11] just name this as Jim. gym and it's uh
[09:15] related
[09:17] to
[09:21] health products. Okay, just click on
[09:23] create store. And now here you can see
[09:25] this uh store is created successfully.
[09:27] And now from the database, I just simple
[09:29] show you this is the multi-nc database
[09:33] that is the central database. And I'll
[09:35] just simple go to tenants. And here you
[09:37] can see I have this new store as well
[09:39] that is gym. And uh I just simple
[09:42] refresh my databases. And now just
[09:46] simple search here gym. And now here you
[09:48] can see it automatically create a new
[09:49] separate database for gym as well. And
[09:53] it's have its own categories products.
[09:54] Okay. And on the admin side I just
[09:57] simple show you. I just simple reloaded.
[09:59] And now here you can see I have an other
[10:02] store that is gym and its user is uh
[10:04] different and its products and
[10:06] categories are zero because we did not
[10:08] add it yet. So this is it. This is the
[10:11] basic concept idea of multi-tenency with
[10:12] multi database. We can uh use this
[10:16] concept this multi-tensy uh with multi
[10:19] database concept in many other ways as
[10:22] well. But this is the basic video basic
[10:24] idea of how we can use this multiency
[10:27] with multi- database architecture
[10:30] uh in this uh store creation or store
[10:34] like e-commerce project. You can use
[10:36] this in many other project as well. So
[10:40] this is it. This is the basic concept
[10:41] idea and I hope you like this video and
[10:44] if you want me to
[10:46] to make complete video on this uh
[10:50] project then comment below and uh I and
[10:53] see you in the next video. Thank you for
[10:55] watching.
⚡ Saved you time reading this? Transcribe any YouTube video for free — no signup needed.