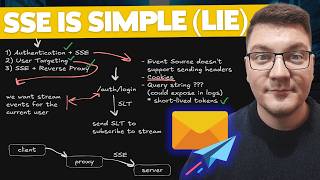

Don't Ship SSE Without THIS!
44sImmediately addresses a critical gap in a popular topic, creating FOMO for developers.
▶ Play Clip"Title promises production readiness and delivers exactly that—auth, targeting, and proxy setup—with zero fluff."
This video demonstrates how to make Server-Sent Events (SSE) production-ready in .NET 10, covering authentication, user targeting, and reverse proxy setup. It addresses the limitations of the EventSource API and provides practical solutions using short-lived tokens and channels.
EventSource API doesn't support custom headers, so authentication must use cookies or query strings. Cookies are preferred; query strings risk exposing tokens in logs.
Use a short-lived token (SLT) stored in memory with a 30-second expiration to minimize attack surface. Login endpoint returns SLT, which is then used to subscribe to the event stream.
A connection manager (singleton) maps user IDs to channels. Producer writes to the channel, and the SSE endpoint streams events to the client.
Client sends user ID to login endpoint, gets SLT, then creates EventSource with SLT in query string. Multiple users can be added, each with their own event stream.
YARP can be used as a reverse proxy. Configure AddHttpForwarder and MapForwarder with a catch-all route. SSE works fine through the proxy.
Access token may expire during long-lived connection. Options: do nothing (since auth happens once) or use refresh token to re-subscribe before expiry.
What are the two authentication methods for SSE when headers aren't supported?
Cookies or short-lived tokens in the query string.
00:58
Why should you avoid putting access tokens in the query string?
To avoid exposing the access token in logs and URLs.
01:11
What is a short-lived token (SLT) and how long is it valid?
A random token stored in memory with a 30-second expiration.
01:37
How do you scope channels for a specific user?
A connection manager that maps user IDs to channels.
04:09
Which reverse proxy is demonstrated in the video?
YARP (Yet Another Reverse Proxy).
09:07
What is the implication of authenticating only once with SSE behind a proxy?
The access token might expire while the connection remains open.
09:20
Short-lived token approach
Provides a secure alternative to exposing access tokens in query strings, a common pitfall.
01:24Channel scoping with connection manager
Shows a clean pattern for user-specific event streaming, similar to SignalR's IHubContext.
04:09YARP supports SSE out of the box
Clarifies that reverse proxies don't break SSE, contrary to common fears.
09:07Token expiry during long-lived connections
Highlights a subtle production issue and offers two pragmatic solutions.
09:20[00:01] how to use server-sent events in .NET 10. This can be used as a lightweight alternative to SignalR, but the video left a lot of things to be desired. So, in this video, we're going to close the gap to something more production-ready,
[00:15] authentication, user targeting, and how to run this behind a reverse proxy. So, there are three topics that I want to cover here: authentication with server-sent events, user targeting, and this is somewhat tied to authentication.
[00:30] might be interesting is running server-sent events behind a reverse proxy. So, I'll start with the first one, and let me zoom out of this a little. And what are we going to need when it comes to authentication with
[00:43] server-sent events? So, we have a couple of options here, but also a problem that server-sent events, or rather the EventSource API in JavaScript, doesn't support sending request headers. So, we have to go around this in some way. The
[00:58] first, and probably best, approach would be using cookies, which are supported. So, if you're using cookies for authentication or sending your JSON web token, then you're probably good to go. Our second option is using a query
[01:11] problematic because we don't want to expose the access token in the query string, and the concern here is that we could expose it in our logs. So, I'm going to show you an alternative that still uses the query string, but we're
[01:24] going to use short-lived tokens to authenticate the current user. So, let me show you what an implementation for this might look like. On the back end, we could expose an endpoint to log in a user and get a short-lived access token.
[01:37] This can be a random access token that we temporarily store in memory or in expiration time so that we minimize the attack surface from a bad actor. Now, in a real-world scenario, you definitely want this to use the authorize attribute
[01:52] or call require authorization with minimal APIs, but in our example, I'm going to make this much simpler. I've got a static class where I have a users that I'm going to use in this demo. So, all I'm going to do in this
[02:06] endpoint is provide the user ID in the login request, validate that it exists on my back end, and then generate our short-lived token. This is taken care of implementation I have here is the
[02:19] concurrent dictionary that stores my user IDs. What we want to do here is map an access token to our users' identifier. So, we can generate a random access token, convert it into a base-64 string, and then add that to our
[02:34] flow. I'm also firing off a task that's going to run in 30 seconds and remove hasn't been used by then. Our second endpoint just checks if this token is present in the dictionary and returns the corresponding user ID. So, going
[02:49] back to our endpoint, now you understand what's going on here, and this will allow us to implement our authentication with server-sent events. Our authentication flow is going to look like this. We're first going to hit the
[03:01] off login endpoint, which is going to return a short-lived token. I'll call this an SLT. And then, we can send the short-lived token to subscribe to the event stream. So, these are your options when it comes to authentication. If
[03:15] option, you probably want to explore using cookies, but our second approach with short-lived tokens could also be sufficient. Our second problem is going to be user targeting. And what we are solving here is that we only want to
[03:28] stream events for the current user. Now, obviously, this is closely tied to authentication. So, if we take care of this step first, then we can also end, we're going to expose our server-sent events endpoint. And
[03:42] starting from .NET 10, this is easy to do with minimal APIs with the new server-sent events result type. So, I'm using a type result here to stream my events. and the key piece of information here is the short-lived token that we
[03:56] are now accepting from the query string, and we are using it to fetch the user identifier for the current user. The next piece of the puzzle is how we are the current user. And for this, I'm going to use channels. But because
[04:09] anybody can listen to a channel, we need a way to scope the channel for a specific user. And one way to do this is through a connection manager, which I implemented here. What I've got here is also an in-memory implementation using a
[04:21] concurrent dictionary. We are going to map the user's identifier to a channel containing order placement events. There's a few simple methods to get a channel for a user ID. Alternatively, we can only expose the channel reader and
[04:33] also the channel writer if we want a more specific API. We can register this as a singleton service and then use it to manage the channels for the users in our application. SignalR also does something very similar to this with the
[04:46] you've ever worked with SignalR, you probably got a rough idea of what's going on here. So, then, once we have this channel inside of our server-sent events endpoint, we can use it to stream the events. I also implemented support
[05:01] for replaying any missed event by providing a last event ID, and then we're just using the read all async API exposed by our channel reader to stream these events using await for each. I'm running all of this in a local function,
[05:14] server-sent events method. So, this is our consumer side, but we also have to target a specific user on the producer side. Now, realistically, you're going to have some sort of mechanism that produces messages for a user, and it's
[05:28] involve some sort of message broker. So, we can imagine a scenario where we insert some data into a database and publish a message, and then one of the things that we can do in our message consumer would be publishing a message
[05:41] to a channel to notify the user on the client side. In this example, I have a background service that's going to generate a new order every second and publish it to a channel. I'm randomly selecting my users from the fixed pool
[05:53] of users that I've configured on the back end. And every second we're going use the connection manager to get the channel, and then write the order to this channel, which is going to kick off the async enumerable in our server-sent
[06:07] events endpoint and send a new event to the subscribed client. And this is very similar to the IHubContext abstraction that SignalR gives you, which lets you send messages to your clients from the server side. So, that's the gist of the
[06:20] to stream events to the client. Now, let's also take a look at the client-side implementation, and what I've got here is a bit more involved streaming messages for a single user, so I'll walk you through the most important
[06:34] bits. I hardcoded the API URL. What the UI does is it allows me to add panels multiple users at the same time, and the events for each user going to appear in a separate box on the user interface. Now, the key piece of code is here where
[06:50] we send a request to the off login endpoint by sending a user ID. I repeat, place where you send a valid access token to get back a short-lived token. And once we've got a short-lived token, we can start a new event stream for the
[07:05] newly authenticated user. The API for this is just creating a new event source server-sent events endpoint, and I'm appending the short-lived token in the that this is a temporary value that's going to expire in 30 seconds. So, if
[07:20] to get a 403 response from the server. And then the rest of the code here is pretty standard. We just accept an event from the server, and we know that it's user. So, let me show you what this looks like when we start the
[07:34] application. Here's the user interface with a panel to enter a user's identifier. So, if I add the ID for the first user and click login, you can see it kicks off a request to the login endpoint. And this returns our
[07:48] short-lived access token that looks something like this. It's a base64 encoded string. Then we send that to the server-sent events endpoint. And what we get back is an event stream. So you can see events are flowing from the back end
[08:01] for our current user. And we can add more than one user on the UI. So if I another request to get back a short-lived access token. And with that, we can authenticate to the server and start receiving events. So that's how
[08:14] grab the source code for this entire demo, it's going to be available for free in the pinned comment right below this video. So far, we've taken care of authentication with server-sent events and how to implement user targeting.
[08:27] Now, one thing I'd also like us to take a look at is how this is going to work when running behind a reverse proxy. So in this setup, our client wouldn't send a request directly to our back end. Instead, it's going to send the request
[08:40] to the proxy, and the proxy is going to be responsible for forwarding the request to the server. So now the communication flow is a bit more complicated, but it looks something like this. Our request lands on the proxy. We
[08:53] send a request to the server, which initiates a server-sent events request. a long-lived request. So depending on the implementation of the reverse proxy that you're using, you may have to tweak some configuration settings to implement
[09:07] this. I'll show you how we can implement this with a popular reverse proxy called YARP. But one thing I want to comment on is the authentication flow and the fact that we only authenticate with the server once. The implications of this
[09:20] are that our access token could expire while the connection remains open. We reauthenticate the user from the back end. Our options here are either doing nothing, which when you think about it makes sense because we really only
[09:34] authenticate a user once when they send a request. We don't check if the access token expired while the request was executing. Another option could be using a refresh token to obtain a new access token and then sending a new
[09:47] request through an event source before the access token expires. So, that's just a quick little digression. Now, let's go back to our reverse proxy implementation. So, I'm going to add a new project to the solution and I will
[09:59] pick ASP.NET Core Web API. I'm going to call this just the reverse proxy. I'll click next and let's say we just want to use HTTPS. Let's create this and I'm going to get rid of all of this scaffolded code so that all we are left
[10:14] with is these four lines of code. Now, I said we were going to use YARP for our implementation and YARP is distributed through a NuGet package. So, I have to install YARP reverse proxy. I'll go ahead and add the latest version. And
[10:26] what we want to do here is just use YARP as a request forwarder. To do this, we have to say builder.Services.AddHttpForwarder. And here we have to map the YARP middleware by calling MapForwarder. Now,
[10:40] catch-all wildcard, which is going to match any incoming request. And now I have to define where I'm mapping this. And you probably want to fetch this value from configuration in a real-world setting, but for our use case, I'm going
[10:55] to hardcode this to the address of our backend, which is HTTPS localhost and I believe the port is 7176. Now, I'm also going to update the launch Now, I'm also going to update the launch settings here to run YARP on port 3001
[11:10] HTTPS and port 3000 on HTTP. And I'm going to set up my solution to have multiple startup projects and let's start both of them without debugging. So, this should be sufficient to kick
[11:22] off YARP and our API and you can see that both the applications are running. messages. Now, if we go to the client and just set the address here to be 3001
[11:34] instead of the previous one, which means we are now targeting the proxy. And on the UI, I'm going to just refresh the screen to pull the latest values, and you can see that our request is working even though we are sending it through
[11:46] the proxy. So, running YARP as a reverse proxy supports using server-sent events. The connection will remain open and you'll continue receiving events from the back end as long as they keep coming in. If we add more listeners for, let's
[11:58] say, user eight, we're going to get back any messages that the server has generated. So, using server-sent events behind a reverse proxy isn't all too problematic. And with that, I'm going to take this one as well, and I think we've
[12:10] covered some important points here when it comes to running server-sent events in a more production-ready scenario. But obviously, you will have to adapt this to your implementation to use the authentication that you have in place,
[12:22] and also any messaging infrastructure for streaming the events to the client. consider using something like Redis channels to synchronize the messages between your multiple back-end instances. And again, a reminder, if you
[12:35] demo, you can do so from the pinned comment. It's going to be right below this video. If you're wondering how this compares to SignalR, then I recommend watching this video next, where I think you'll learn to appreciate how much a
[12:48] good abstraction, which SignalR is, saves time for you as a .NET developer. smashing that like button. That's all I ask of you. Thanks a lot for watching, ask of you. Thanks a lot for watching, and until next time, stay awesome.

⚡ Saved you 0h 13m reading this? Transcribe any YouTube video for free — no signup needed.