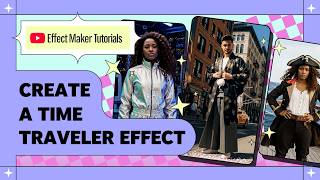

This AI Effect Works Differently on Your Phone
40sCreators are surprised to learn the effect's preview vs phone behavior differs, making it a must-know tip.
▶ Play Clip"Delivers exactly what the title promises — a clear, step-by-step tutorial with actionable prompting tips."
This tutorial shows how to build an AI-powered video transformation effect using YouTube's Effect Maker, turning a user's selfie into a short AI-generated video set in ancient Rome. The video walks through using the AI video transformation template, writing effective AI video prompts, customizing the preview GIF, understanding the visual script, and publishing the effect to YouTube.
Build an AI-powered video transformation effect using YouTube's video transformation template, customized into a historical time traveler effect back to ancient Rome. Unlike AI image transformation, this generates a short AI video from a selfie.
Open Effect Maker in your browser and select the AI template gallery. The template includes an AI video object with a visual script, a countdown, a flash object for the snapshot moment, and a GIF preview showing users what the transformation looks like.
You can add AI video capability to new or existing projects by going to the image and video section and selecting the AI video object, or by right-clicking in the objects panel, choosing Add Object > Image and Video > AI Video.
The workspace has four main panels: objects panel (left), assets panel (prompts and assets), visual script panel (bottom, houses the logic), and preview panel (bottom right) for real-time testing.
Tapping the screen or starting recording triggers a countdown, then a snapshot is taken, the generation page appears, and once the AI video is generated, it automatically plays.
On a phone, after the snapshot the recording stops and you're taken to a separate generation page; once the video is generated, the transformation video plays. In the preview panel everything happens in one go.
The effect consists of the AI video object, a countdown timer frame, a flash object (white image animating 0→1→0), an effect preview GIF, and an effect preview frame (thin black GIF). Most are hidden until the visual script shows them.
Go to the assets tab and select the AI video prompt. The video description field is where you write the prompt that tells the AI what kind of video to generate.
Write in English, keep the general idea simple and direct, use neutral terms like 'the subject' instead of he/she, use 'the room' or 'the background' for environment changes, and describe actions specifically — e.g., 'the subject puts on a golden laurel crown' instead of 'the subject wears a crown'.
Sequence multiple actions with commas, describe sounds or music, avoid dialogue/speech/singing, and keep prompts concise — usually under 250 characters.
A weak prompt like 'the subject transforms into a Roman' gives poor results. Improved: 'the subject puts on a golden laurel crown, their clothing morphs into a Roman toga, the background particulate disintegrates into stone columns with warm sunlight breaking through.' Adding specific actions, clothing, and background yields much better output.
After generating a satisfactory AI video, use the three-dot menu to download it. This video will be converted to a GIF to create the effect preview image.
A feudal Japan prompt: 'the subject stands still as cherry blossom petals begins to fall from above. Cherry blossom petals cover the user transforming the subject's clothing into a flowing silk kimono.' No background change is intentional — petals and kimono carry the transformation.
In the assets tab, select the effect preview and upload a new GIF. Use a free online MP4 to GIF converter, trimming the video to 3–4 seconds max before converting. Then switch to the objects tab and select the new GIF for the effect preview object.
The first section uses the start node to fade out the preview GIF after 3 seconds. On tap/record, the trigger checks if generation is already triggered; if not, it hides the preview, starts a countdown (3-2-1), then simultaneously plays a flash and takes a snapshot. After a 1-second delay, the 'create AI video' node uses the snapshot and prompt to generate the final video, ending the effect and stopping recording.
Use the preview panel to see the full effect, switch between different people to test across faces, and use the 'preview on phone' button with a QR code to test on an actual device.
Click submit, upload an effect thumbnail — a frame showing the transformation paired with the original state works best (before/after split). Enter a name and description, set trigger to 'record to start', and submit. The effect goes live after review and approval by the YouTube team.
By starting from the AI video transformation template and applying clear, specific prompting techniques, anyone can create engaging AI video transformation effects without building the visual script from scratch.
What does the AI video transformation template produce?
A short AI video generated from the user's selfie, not a still portrait.
00:16
What objects are included in the default template?
AI video object, countdown timer frame, flash object, effect preview GIF, and effect preview frame.
03:26
Why should prompts use neutral terms like 'the subject' instead of 'he/she'?
Because anyone can use the effect, neutral language keeps the result consistent for all users.
04:34
What is an example of a specific action in a prompt?
'The subject puts on a golden laurel crown' instead of 'the subject wears a crown'.
05:02
What should you avoid including in AI video prompts?
Avoid asking for dialogue, speech, or singing.
05:16
What is the recommended maximum length for an AI video prompt?
Keep prompts under 250 characters.
05:29
When converting the downloaded AI video to a GIF for the effect preview, how long should the video be trimmed to?
3 or 4 seconds maximum.
08:08
What happens simultaneously when the countdown ends in the visual script?
A flash animation plays and the camera snapshot is taken.
09:44
What is the recommended thumbnail style for AI video transformation effects?
A frame showing the transformation paired with the original state, like a before-and-after split.
11:25
How long does the effect preview GIF stay visible on screen before fading out?
It fades out after 3 seconds from effect start.
09:01
Prompt specificity matters
Using specific actions like 'puts on a golden laurel crown' instead of vague language dramatically improves the AI video generation quality.
04:34Snapshot drives generation
The camera snapshot taken at the end of the countdown becomes the input image for the AI video, making timing critical and explaining why the template is structured this way.
09:44Reusable prompt workflow
You can download the generated AI video and convert it to a GIF for the preview, ensuring the preview accurately reflects the actual effect.
06:41Thumbnail best practice
Using a before-and-after split frame as the thumbnail improves clarity for AI transformation effects, a simple but practical publishing tip.
11:25Template customization over from-scratch
Starting from the AI video template allows creators to focus on prompts and assets while the visual script is pre-built, saving significant effort.
01:23[00:02] you how to build an AI-powered video transformation effect using YouTube's video transformation template and customizing it into a historical time traveler effect taking the user back all the way to the ancient Roman times.
[00:16] Unlike the AI image transformation, this one doesn't produce a still portrait. This template takes a selfie and uses that to generate a short AI video. With this template, you can build amazing cool AI-powered effects like these.
[00:32] By the end of this tutorial, you'll understand exactly how to write good AI video prompts, [music] customize template assets, understand the visual script, and finally publish your AI video transformation effect to YouTube.
[00:45] To get started, open Effect Maker on your browser, and here select the AI template gallery. Once you open the template, you'll see this card pop up that will tell you about the effect and ways to customize it. I'll click on got
[00:58] it. This template already includes AI video object along with its visual script, a countdown and a flash object for the snapshot moment, and finally a GIF preview so the users can see exactly what the effect transformation is going
[01:11] to look like before the effect is even activated. With these pieces already in place, we can simply focus on customizing rather than building the entire effect from scratch. You can also add AI video capability to any new or
[01:23] existing project by simply going into the image and video section, and here select the AI video object. When you do this, Effect Maker automatically populates the scene with the basic visual script for you. Another way to do
[01:36] this is by simply right-clicking in the objects panel, go to add object, and here go to image and video, and select AI video. This will also do the same. Here's your workspace. On the left, we have an objects panel which shows all
[01:51] the objects in your effect. Just beside that, we have an assets panel where your prompts and other effect assets are stored. And here at the bottom we have the visual script panel which houses the logic that connects everything together.
[02:04] And finally at the bottom right side we have the preview panel where we will test everything in real time. For now I'll close the visual script area and scale up the preview panel. Let's see how the default effect works.
[02:17] Once we tap the screen or start recording we get a countdown timer. Once the timer ends a snapshot is taken and we are taken to the generation page. The generation page takes some time and generates the AI video.
[02:32] Finally once the video is generated it automatically starts playing. Wow, I love this safari transformation. It is important to note that all of this happens in one go when you try this effect in the preview panel inside of
[02:45] the effect maker tool. But when you try this effect on your phone it might work slightly different. The way it works on the phone is that as soon as you start recording the timer starts and until the snapshot moment it
[02:59] is same. But after the snapshot the recording stops and you are taken to a separate generation page. And once the video is generated the transformation video plays. Now let's look at the objects that make
[03:12] up this effect. I'll come to the objects panel and here you notice that only one object is visible and the rest of them are hidden. This is because the visual script controls when each one appears. Let me walk you through them one by one.
[03:26] First of all the AI video object. This is what captures the user's selfie which is then used to generate the AI video. Below that we have a countdown, a timer frame. Next we have a flash object which is
[03:41] just a white image that animates between zero to one and back to zero mimicking a camera flash. And here we have the effect preview which is an animated GIF that automatically plays showing a preview of
[03:53] the transformation before the effect is even activated. And finally, we have the effect preview frame, which is just a thin black GIF. Now, let's start customizing. The most
[04:07] important part in this template is the AI video prompt. To find it, go to assets tab and here select the AI video prompt. Here, you'll see the video description field. This is where you'll write your prompt. A prompt is just a
[04:20] text instruction that tells the AI what kind of video to generate. And the clearer and more specific you are, the better the result you'll get. So, before we write our prompts, here are a few things to keep in mind. Write
[04:34] in English and keep the generality simple and direct. Use neutral terms simple and direct. Use neutral terms like the subject instead of he or she. Since anyone can use the effect, neutral language keeps the result consistent for
[04:46] Similarly, use the room or the background for environmental changes. Describe actions specifically. Instead of something like the subject wears a crown, try the subject puts on a
[05:02] golden laurel crown. Specific actions ensure the AI clearly understands what you have in mind. If you want multiple things to happen, describe them sequentially and connect them with commas.
[05:16] You can describe sounds or music in the scene, but avoid asking for dialogue, speech, or singing. And finally, try to keep your prompts concise. I usually keep mine under 250
[05:29] Now, let's see how these tips work in practice. I'll walk you through a basic prompt and refine it as we progress. For the era traveler theme, my primary effect will be transforming the user back to the ancient Roman times.
[05:45] The main theme is ancient Rome. So, a weak version of this might be the weak version of this might be the subject transforms into a Roman. Let's preview that first. You can see that the result is not great. Let's
[05:58] improve this. For the entry action, I'll write the subject puts on a golden And for clothing change, I'll write their clothing morphs into a Roman toga.
[06:10] Then the background particulate disintegrates into stone columns with warm sunlight breaking through the stone columns. Notice how each part, the action, the clothing, the background gives the AI something very specific to
[06:25] generate. Now, let's see how this prompt actually generates. I'll click on actually generates. I'll click on preview AI video button.
[06:41] as a final prompt. Once you're happy with the result, click on these three dots and download the video. This will be used to make the effect preview GIF. By using the same prompting principles, I have generated
[06:54] these other transformations as well. Here you can see in the first one, the feudal Japan, it takes a softer approach. The transformation happens to by them. The prompt I used for this is the
[07:08] subject stands still as cherry blossom petals begins to fall from above. Cherry blossom petals cover the user transforming the subject's clothing into a flowing silk kimono. Notice there's no background change
[07:24] here. That is intentional. The petals and the kimono carry the transformation on their own. Here are some other examples as well.
[07:40] users see on effect start. This GIF is only visible for a couple of seconds when the effect starts. We can see this by going into the assets tab and here select the effect preview. Now, to replace it, I'll first upload my new
[07:55] replace it, I'll first upload my new GIF. Click on upload asset, navigate to your new GIF, and here select it and open. I used a free online MP4 to GIF converter to convert the downloaded MP4
[08:08] video to GIF. Make sure you trim the video to 3 or 4 seconds max before you convert it to GIF. Once uploaded, switch to the objects tab, select the effect preview GIF, here select your new preview GIF.
[08:28] and effect preview frame visible in the objects panel. The visual script automatically hides them after 3 seconds from effect start or whenever the record or tap trigger is pressed. Also, now that we have customized the effect
[08:42] preview GIF and the AI video prompt, let's see the visual script and understand how the effect logic works. I'll first scale down the preview panel and toggle the visibility for the visual script panel.
[09:01] This is the whole logic. The first section here controls the effect preview GIF using the start node. When the effect starts, the GIF When the effect starts, the GIF automatically fades out after 3 seconds.
[09:14] This gives user a moment to see what the effect does before it starts. Next is the trigger section. On screen tap or record start, the effect first checks if the snapshot is initiated. If the generation triggered variable is not
[09:30] true, it will set it to true and the output from this is used to hide the effect preview GIF. This same trigger moves forward and triggers a countdown, which it displays a 3-2-1 timer using
[09:44] the transition node. If you want to adjust the countdown duration, this is where you do it. Once the countdown ends, two things happen simultaneously. A flash animation plays, and the camera snapshot is taken.
[09:58] That snapshot becomes the input image for the AI video generation. Inside the camera snapshot subgraph, you'll see both flash image and the camera snapshot node sitting together. And finally, after 1-second delay,
[10:13] the create AI video node takes the snapshot image and the AI takes the snapshot image and the AI prompt to create the final AI video. Once this fires, the effect ends and the recording stops automatically.
[10:27] At this point, you are taken out of the camera view and into a generation screen. This is where the AI is processing your video. Once the video is screen. That is the full logic. You don't need
[10:41] to change any of this to ship a great effect. Now, let's preview the full effect. Now, let's preview the full effect.
[10:57] You can also switch between different people in the preview window to see how people in the preview window to see how the effect holds across different faces. Now, to test the effect on your actual phone, click on this preview on phone
[11:10] button and scan this QR code. Once you're happy with the result, click on the submit button. It will ask you to upload an effect thumbnail. and open. For AI video transformation effects, use
[11:25] a frame that shows the transformation paired with the original state. A clear before-and-after split works best here, Like the image that I have best here, Like the image that I have used. Click continue and for the name
[11:37] I'll type ancient Rome. For the description I'll write record your selfie and get transformed back to the ancient Roman times. Keep the trigger as record to start. Click submit. Your effect will be live once it's reviewed
[11:51] and approved by the YouTube team. Congratulations, you have successfully transformation effect. For more information on using Effect Maker, check out the links in the description below. [music] Thank you so much for watching
[12:04] and don't forget to hit the subscribe button for more tutorials like this and button for more tutorials like this and I'll see you in the next one.
⚡ Saved you 0h 12m reading this? Transcribe any YouTube video for free — no signup needed.