
Why You Shouldn't Replace a Laptop Keyboard
40sExplains a common misconception about keyboard replacement, offering a practical cost-saving tip that resonates with viewers.
▶ Play Clip"Title promises how to fix, repair, and replace HP keyboard keys, and the video delivers a solid, focused tutorial on normal-sized keys without wasting the viewer's time."
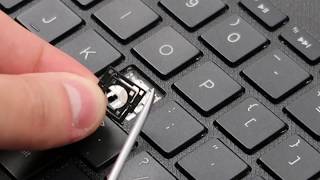
This video demonstrates how to safely remove and replace a normal-sized key cap (like the letter L) on an HP laptop keyboard. The presenter explains why such keyboards use plastic rivets (French inset design) and why replacing keys manually is preferred over replacing the entire keyboard. Step-by-step instructions are provided for prying off the keycap, freeing the retainer clip, and reinstalling both without damage.
The video focuses on removing and installing normal-sized square keys (letters/numbers). Larger keys like backspace, shift, enter, and spacebar are covered in a separate linked video.
Many keyboards are 'French inset' types, held together by plastic rivets that cannot be unscrewed. Once removed, the rivets are one-shot; reinstalling the same structure is never as secure or stable, so people buy loose keys or used keyboards and swap keycaps directly.
A small flat-head screwdriver is ideal (a standard household one is too big). The trick is wedging it between the keycap and the retainer clip, which is the internal mechanism holding the key down.
The presenter removes the keycap and shows the retainer clip — a two-part plastic piece held down by four metal clips toward the edges, with a small rubber bouncy element in the middle. These parts are common across most laptop brands; only shapes vary.
The rubber bouncy piece is glued down; if it rips off or is lost, it is hard to duplicate or reattach securely. To repair, the user would need to set it back gently and possibly use adhesive, so be careful not to lose it.
Look for the two plastic clips closest to the edge (here, the top ones), then gently push upward on the retainer and wedge out the plastic from under the metal clips. This is where the retainer is most likely to break, so be extra careful.
Installation reverses the removal: set the keycap into the bottom clips first, get the base centered, then press the top down until it snaps into place. Push the keycap from the top and click it on.
After fitting the keycap, test that it sits flat and symmetrical. Push down firmly to click it in. The completed key should sit flush and work correctly.
Why do HP laptops of this type not allow replacing the entire keyboard with screws?
They're French inset keyboards, held together with plastic rivets which are a one-shot deal; once removed, they are never as secure or stable.
00:29
What tool is recommended for prying off the keycap?
A small flat-head screwdriver, the smaller the better.
01:11
What are the four components that make up the key retention assembly?
A rubber bouncy dome, a two-part plastic retainer clip, and four metal clip anchors toward the edges.
01:56
How can you tell where the removal clips are located on the retainer?
They are the plastic clips that sit closest to the edge of the key well (e.g., the top ones in the video).
02:51
Which two clips are recommended to press first for releasing the retainer?
The plastic clips that are closest to the edge (the top ones in the video).
02:51
What should you do if the retainer clip separates into two parts?
Carefully reattach them together: set it back together, being gentle to avoid breaking it, then reassemble the key.
03:47
Purpose of Avoid Inexplicable Replacement
This explains why DIY key-cap replacement is the preferred fix – the French inset design makes the keyboard irreversible and unsafe to open once closed.
00:29Universal Retainer Anatomy
All laptop keys share a between similar parts—retainer clips, metal claws, and rubber bouncy—which makes the repair technique transferable across brands, not just HP.
01:56Care for the Rubber Bouncy
That tiny rubber piece can't be easily replaced if lost; it's glued and critical for key feel, so an important détails.
02:35Non-Breakage Check
The presenter explains that an intact retainer would have complete circles; a broken one would be partially missing, clever and practical diagnostic.
03:31[00:02] bringing you another computer repair video today we have an HP computer here remove one of these normal-sized square keys the letters the numbers on one of the normal sized keys if you're looking for a video on the larger Keys backspace
[00:15] shift enter spacebar check down below in the description we'll have a link for one of these they don't look the same inside so and we wanted to make two different videos now the reason why you would remove a key and then install a
[00:29] key is a lot of these keyboards are French inset keyboards what that means is these keyboards inside they're not held on by screws you can't just unscrew them and replace them they're held on by plastic rivets which is a one-shot deal
[00:42] once you rip this up to put a new one down it's never going to be as secure it's never going to be as stable so a lot of people if a key breaks off they'll choose to go online eBay or Amazon and either by a loose key or if
[00:57] an entire used keyboard and then they'll take a key off of that keyboard and put it on here and that way they keep the stability and the security of their keyboard and their palm rest so we're gonna show you how to remove a key
[01:11] to install it safely without breaking it so we're going to go after the L key flat-head smaller the better a normal household one will definitely be too big household one will definitely be too big but let's zoom in the L key what it
[01:25] looks like under there and how we're gonna take it off camera zooms in kind of slow sorry alright is my L key now what I want to do is I want to get my flat-head screwdriver underneath the key cap this top part but above the retainer
[01:40] clip which is the inside mechanism that holds it down so it's hard because you it out gotta get in between those two components I do this a lot so I can feel a little easier so that popped off relatively easily and as you can see my
[01:56] flathead is holding down this black component here that that's my retainer clip they'll generally all look the same regardless of model they'll be white or black and they'll generally look like this you'll have a little rubber bouncy
[02:09] thingy in the middle you'll have a two-part plastic retainer clip and it will be held down by four metal clips toward the edges they all all basically look like this they'll all be different shapes so like
[02:23] another model but but they'll all be laid out the same way side note if you lose this bouncy thingy there it's held on by glue if that rips off if you lose
[02:35] it it's kind of hard to duplicate that I mean you can put it in there and set it in there nice and gently and it should stay but unless you're gonna use some gonna be hard to repair that if that rips so be careful around that not to
[02:51] look for the plastic clips that are closest to the edge in my case the top ones see how they're closer to the edge and the bottom ones are so those are the ones that I'm going to go after now there's not a lot of wiggle room it's
[03:04] pretty tight in there but I'm gonna get what I can get I'm gonna push up a little bit on the retainer clip while I gently try to wedge the plastic out from under these metal clips and this is where you're gonna break it if you do
[03:18] break it so be careful I'll show you just push up pop that out that one out just push up pop that out that one out alright so there's your retainer clip
[03:31] and as you can see I didn't break it if I did these wouldn't be like complete circles part of it would be broken off but luckily I didn't break it so this is too freaked out if these parts come unfastened from each other sometimes
[03:47] they do it's it's painstaking but you got to get them back together as long as repair when I first started computer pair I would rather replace a motherboard in a key very easy to break and I often did so to get it back in
[04:01] there we're gonna go in Reverse we just took it off top first we're gonna put it in bottom first so set this key in there set it down nice and even nice and symmetrical get these bottom metal clips in where they should be and once you do
[04:16] you should be able to just push on the top and snap it into place you put your key cap on try to get it centered and just push and there you go
[04:30] so that's how you would remove safely and install a key on a normal size key on HP laptop again if you're looking for a larger size go to the video in the description this was helpful please like and share and if you enjoyed yourself
[04:45] computer affair please subscribe thank you for watching
⚡ Saved you 0h 04m reading this? Transcribe any YouTube video for free — no signup needed.