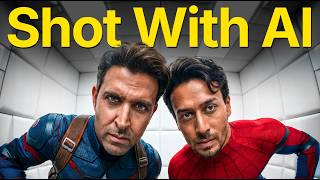

I Made a Full AI Marvel Movie
60sThe astonishing reveal that the entire Marvel-style movie is AI-generated grabs attention and sparks curiosity.
▶ Play Clip"Delivers on the promise of ultra-realistic AI films with a comprehensive walkthrough, though it's essentially a product demo."
This video demonstrates how to create ultra-realistic AI-generated videos using Artlist Studio, a tool that centralizes character creation, scene generation, and motion control. The creator showcases a Marvel spoof film to illustrate the platform's features, emphasizing character and location consistency, as well as the ability to control camera angles, lenses, and voice.
The video introduces Artlist Studio as a solution to the fragmented workflow of using different tools for images, video, voice, and regeneration. It promises to teach viewers how to create ultra-realistic videos with AI.
To start, click on 'New Project' and name it. The workspace is designed for studio production, with options for framing and directing.
Artlist's unique character feature allows users to select from existing characters or create new ones from scratch. Users can upload a reference image and choose 'Match Exactly' for high consistency or 'Inspiration' for variety.
Users can write a prompt describing the desired character, using style reference from one image and face reference from another. The prompt can be auto-enhanced for better results.
Artlist generates images of the character from multiple angles to maintain consistency. Users can also select a voice for the character, which will be used for dialogues, solving voice consistency.
The character is not just an image but includes full body, facial features, angles, and voice. This ensures consistency even in long productions, akin to casting in filmmaking.
Instead of the messy first-frame/last-frame workflow, Artlist offers a structured 'Write Prompt' area. Users can describe the scene, add characters, select or create locations, and specify actions and composition.
Users can choose from various camera angles (e.g., low angle, over-the-shoulder, eye level) and shot types (e.g., close-up, wide) that are commonly used in filmmaking.
In the directing section, users describe the action and sound effects. They can set clip duration (up to 15 seconds), camera movement (e.g., static, pan), and choose voice options.
Generated clips are organized in a timeline, keeping the production project clean. Users can easily create multiple shots and manage them.
Artlist makes it easy to create scenes with multiple characters while maintaining consistency, which is nearly impossible in other AI tools. Users can add reference images for exact scene matching.
Users can select the camera type and lens, giving them creative control to achieve the exact look they want. Different lenses yield different results on the same scene.
The workflow allows building characters, generating frames, controlling motion, and creating multiple shots all in one place. The final production is a realistic movie, as demonstrated with the Marvel spoof.
Artlist Studio simplifies AI filmmaking by integrating character creation, scene generation, and motion control into a single platform, making it accessible for creators to produce ultra-realistic videos with high consistency.
What is the main advantage of Artlist Studio over other AI tools?
It centralizes character creation, scene generation, and motion control, ensuring consistency across the entire production.
00:43
What are the two options when using a reference image for character creation?
Match Exactly (high consistency) and Inspiration (adds variety).
02:00
How does Artlist maintain character consistency across different angles?
It generates images of the character from multiple angles and stores them as part of the character profile.
03:07
What is the maximum clip duration you can generate in Artlist?
Up to 15 seconds.
07:22
What are the two main sections in the directing area?
Action and sound.
07:09
How does Artlist solve the problem of voice consistency?
You select a voice for the character, and that voice is used for all dialogues.
03:31
What is the benefit of the timeline feature in Artlist?
It keeps the production project organized and clean, making it easy to manage multiple shots.
08:02
What camera controls does Artlist offer?
Camera type and lens selection, as well as camera movement options.
09:43
AI-generated Marvel spoof
Demonstrates the tool's capability to create realistic, consistent characters and scenes.
00:30Character feature is special
Highlights the unique selling point of Artlist: character consistency.
01:33Voice consistency solved
Addresses a common challenge in AI video generation.
03:07Multi-character consistency
Shows that maintaining consistency with four characters is possible, which is difficult in other tools.
09:12All-in-one workflow
Emphasizes the convenience of having everything in one place.
10:26[00:05] No one ever called us. [MUSIC] Nobody even needed us. But what difference does that make? Because we are still here. we are still here. Ever since crime has reached its peak,
[00:18] heroes have fallen to their lowest ebb. That's why we're here to make things better.
[00:30] called the Avengers. We have to create terror in the city. is completely AI generated. But in this, along with character consistency, complete video I am going to teach you how you can also make ultra realistic videos with the help of AI. The
[00:43] how you can also make ultra realistic videos with the help of AI. The that you had to manage different work spaces and work flows. Images from somewhere else, video from somewhere else, voice from somewhere else and then
[00:55] regenerations from somewhere else to maintain character consistency. But Artly Studio has solved all these problems and I also used Artly Studio to make this video. To access Art at Studio, you have to click on the link given in my description, after which you will
[01:08] here you have to click on New Project. After which you can name your project. Now this is your workspace, completely designed with studio production in mind. Here, first of all, you are given the option of framing and directing.
[01:21] you are given the option of framing and directing. and you can generate video clips using the directing section. But other AIs are doing this too. So what's so special about Artlist Studio
[01:33] ? Their character feature is special. By clicking here you can choose which character you want to work with. Artlist already has a lot of But if you want to build a character from zero then simply you have to
[01:47] click on New Character. After which you will reach the new interface. This is your prompt area where you can generate characters by typing prompts. But here too you have been given a lot of control. For example, if you click on the reference image here,
[02:00] you will get two options. The first one is Match Exactly and the second one is Inspiration. If you select Match Exactly, the final output will be exactly the same as the reference image. That means the consistency will be higher. But
[02:12] Artlist will automatically add some variety. I will select Match Exactly here and insert the image whose face consistency is not broken. So let me put Tiger Shroff's image here.
[02:27] upload the image of Spiderman. After this you have to give a simple form telling what you want. Like I have written here that I want the style reference from image two but the face reference from image one. If you feel
[02:40] that your form is not good then you can get it auto enhanced by clicking here. n't even need to shift to chatty. Your pre-prepared work will also be done here. Now if I click on generate then my generation will start. You
[02:54] made Shahrukh Khan play Doctor Strange. And how perfect it is. Well, keeping this aside, my Spiderman generation is also ready. And you can see there's a slight change in the suit here , but it looks good. So I'll let it be. But I am
[03:07] sure if you guys watch my channel regularly then you must know that even after generating the character's image, the character consistency is not maintained. That's why Artlist has given you the feature of creating character. When you click on this,
[03:19] you will get the option to generate images of your character from other angles. You simply have to click on it. And during the time your character's angles are being generated , you can select any voice for your character on the right hand side.
[03:31] given many voice options. Whose bass, pitch and overall style are quite different. If you select any voice, that voice will be attached to your characters. ask your character to speak a dialogue, you will get the dialogue with the same voice. This means that the
[03:47] problem of voice consistency has also been solved here. Now our different angles are ready. And you can see that my character looks consistent from every angle. There is no variation anywhere. Now you just have to click on Use in Project here.
[03:59] After which you will come back to the old interface. And this time when you click on the character, your character will also be ready here which you can name. This character is not a normal image, rather the artist has a
[04:11] full body image of this character, facial features, how it looks from different angles and its voice, everything. And this is the main reason why character consistency is maintained even after a long production. I have also created characters of Woolon,
[04:24] Captain America, Iron Man and J Jonah Johnson using the same process and saved them. So basically we can say that the casting work that the film makers have to do all of that has been done here.
[04:36] only have the characters. Production is still pending. Now the normal work flow of production that all AI uses is that you have to generate a first frame and then generate a last frame. And then both have to be given motion to generate a final
[04:50] creep. Now this work flow is quite messy. Because both frames end simultaneously and all the regenerations get collected at one place. But You are given the option to write print in this area in the framing. You
[05:04] can either describe the entire scene here or you can simply click on the list option. After which you will see yourself in which structure you have to give the print. make some scenes with Spiderman. So I'll simply click on Add Character here and
[05:17] select my spider here. And he will come to the character part. After which, in Location, you can either describe the location or again you can select at least one pre-booked location by clicking here or you
[05:29] can also create your own location. The process of creating a location is similar to creating a character. And in this also you get different angles of the location so that location consistency is also maintained. So I have already created a location here. So let
[05:41] me select it. Now you have to explain the action. That means you have to Now you have to explain the action. That means you have to create a normal clip. So I will write the same thing here. After which,
[05:53] in the composition, you have to tell how the frame should look. For example, if I want a back shot of my character here, I will write it here. After which you have to choose whether you want animation or cinematic style.
[06:07] want to express. After you fill all these blanks, you get four more options below. The first one is the angle, that is, whether you want the frame generated from a low angle, over the shoulder type or something else. All the
[06:20] camera angles that are used maximum time in film making are already there here. So in this case, I select the eye level. After which, on the side is the shot type and here you are given many options which professional filmmakers do manually.
[06:32] It's basically a choice of how you want your shot. So right now I you can also select which type of lightning you want to show. from here you can select how many images you want to generate. For now
[06:45] I'll just keep one here. Now if I click on generate, I had this result in just a few seconds. Here 's the starting frame of my short one. If you want, you can also get the end frame generated in the same way. But I'm going to use this scene like this.
[06:57] So I will upload the same image in the end frame also. After which I will go into directing. This is the area where you can describe the motion of how you want your images to be converted into video. So here
[07:09] also you have two options. The first is action and the second is sound. In action you have to describe what you want to happen inside the clip? If you want effect or background music then you can explain that. After which
[07:22] again below you have four options. The first one is duration. Like how many seconds of clip do you want? You can generate clips up to 15 seconds here. Then there's the camera movement. Here again you are already given many types of camera movements
[07:34] which are used in film making. So you can select any one. For now I want static only. Next is the voice option where you you used while building the character or you can leave it to the artlist.
[07:47] And then again you have the option of how many videos you want. Now if I click on generate, in just a few seconds I had a result like this.
[08:02] you will see this thing in a very organized way in the timeline. visible here so that your production project remains completely clean. And if you want to start working on the second shot, you can simply click on it and
[08:16] create the second shot. In the second shot, I have to generate a scene for Woolen. So that's why I will follow the same procedure. But I will do one thing differently. This time I will add the reference image. Here in the top corner you are given the option to add a reference image.
[08:29] So if you want any kind of scene, then you can add it by selecting Match Exactly here. And then if you click on Generate, And then if you click on Generate, you will get the same scene as the reference image.
[08:47] I have prepared intro scenes for almost all the characters by following the same procedure. that all this can be done in some other tool also. But
[08:59] after watching the next feature I am going to show you, you will enjoy it because then making a movie will seem like child's play to you. So first of all let me add another shot here. After which we will now create a scene in which all four characters are there. So let me
[09:12] give them a prom. And after filling all the details I got a result like this. Can you imagine how easy character consistency and environment consistency is through this? Maintaining consistency with four characters is next to impossible in any other AI tool.
[09:28] in the art studio it becomes very easy. You can also generate the last frame by following the same process. After which, you just have to go into directing and write the script and you will generate a scene like this.
[09:43] Now if this is amazing to you then let me show you another amazing feature of Art Studio. Here at the top, you can literally
[09:57] But you can also select the camera type and camera lens. Can you imagine this? You have the freedom to choose the camera type you want to use. So that you can create exactly the scene you want to create. By changing the camera type and camera lens,
[10:10] you will get different results on the same scene. If I summarize everything then select the lens. You can build your character and generating the first frame and last frame, you can also control their motions.
[10:26] And that's exactly how you can create multiple shots. Everything in one place within one project. And then you can download all of them and edit them according to your needs and make realistic movies. Making realistic movies has never been easier
[10:39] because you don't just know what camera to use, how to compose a shot, the right pose, how to keep everything organized. But as you just saw all this is not a problem anymore. And by following this work flow, I have created some such scenes
[10:52] which no other AI tool has provided me till date because final production that we have prepared with the help of RT Studio is something like this. No one ever called us. [MUSIC]
[11:07] ever called us. [MUSIC] Nobody even needed us. But what difference does it make because we are still here. here. Ever since crime has reached its peak,
[11:21] heroes have fallen to their lowest ebb. That's why we're here to make things better.
[11:33] called the Avengers. We have to create terror in the city. Looks like we're drifting apart. Looks like we'll be working alone now. Spiderman get me out of here. Stay in your car. were safe. The
[11:55] I think crime is increasing further. People still think we're a team so maybe we should work together.
[12:19] Oh, this is going to be a problem. I don't know about you but it's really amazing to me because I always wanted to make a Marvel spoof. And you access Artlist from the link in the description. If you take the Pro plan of Artly,
[12:32] you will get 500 free credits in Literally to is available only till this date. So make sure you access it right away. And if forget to subscribe to the channel. See you in the next video.



⚡ Saved you 0h 12m reading this? Transcribe any YouTube video for free — no signup needed.