
Perfect PS5 Audio Setup? Meet the Wave XLR Pro
42sInstantly identifies a frustrating PS5 streaming problem and teases a game-changing audio solution.
▶ Play Clip"Delivers on the promise: the Wave XLR Pro genuinely simplifies PS5 audio, though the setup still takes a few software steps."
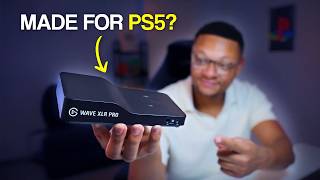
The Elgato Wave XLR Pro is a dual XLR audio interface and mixer that promises to simplify PlayStation 5 streaming by capturing microphone commentary, party chat, and console game audio simultaneously. This video walks through the hardware, WaveLink 3.0 software setup, PS5 integration, and a live in-game test, ending with a comparison and verdict.
The Wave XLR Pro is a dual XLR interface/mixer that captures mic commentary, party chat, and PS5 game audio simultaneously.
Back has two USB-C ports (host and AUX), line in/out, headphone jacks, and two XLR inputs; front adds a headphone jack and tripod mount with rubber desk strips.
Onboard DSP through Wave Effects Processor plus Clipguard 2.0 prevents voice peaking so viewers never hear distorted, overly loud audio.
Free Mac/Windows software recognizes the device; microphone input is shown as XLR mic one and headphones route through the output section.
Auto-adjust gain sets mic level (49 in this case) and gain lock prevents external software changes; Clipguard, phantom power, and inline boost filters are available.
Effects section can boost clarity; every mic can be tailored, and the sound check option records playback for testing.
Run a USB-C cable from the Wave XLR Pro's AUX port to the PS5, then set the console's output device to 'USB headset Elgato Wave XLR Pro USB AUX'.
In WaveLink, game audio appears as USB AUX; lower it to avoid peaking over voice, and use columns to control personal, stream, and chat mixes.
By adding a USB out to the Chat Mix, the same microphone feeds OBS and PS5 party chat simultaneously — no second mic, Chat Link cable, or Remote Play required.
The Rodecaster Duo causes on-and-off PS5 game audio distortion, while the Wave XLR Pro stays clean; at $350 it's recommended for podcasters, PS5 gamers, and dual-PC streamers.
The Wave XLR Pro turns a complicated PS5 streaming audio chain into a clean, unified setup, letting one microphone handle both stream commentary and party chat. At $350, it's a worthwhile upgrade for serious streamers, podcasters, and dual-PC users.
What two USB-C ports does the Wave XLR Pro have on the back?
Host and AUX ports.
00:32
What does Clipguard 2.0 do?
Prevents voice from peaking so the audience doesn't hear distorted, overly loud audio.
01:14
Which free software configures the Wave XLR Pro?
Elgato WaveLink 3.0, available on Mac and Windows.
02:21
What gain value did auto-adjust set for the presenter's Rode PodMic?
49.
03:17
How do you connect a PlayStation 5 to the Wave XLR Pro?
Plug a USB-C cable into the Wave XLR Pro's AUX port and the other end into the PS5.
04:49
What PS5 output setting must be selected to receive audio through the Wave XLR Pro?
'USB headset Elgato Wave XLR Pro USB AUX' under Sound > Output Device.
05:02
How can the same microphone be used for both PS5 party chat and stream commentary?
Add a USB out to the Chat Mix in WaveLink, then select that USB device as the PS5 microphone.
07:17
What issue did the presenter encounter with the Rodecaster Duo on PS5?
Game audio gets distorted off and on.
10:44
What is the price of the Wave XLR Pro?
$350.
10:58
Single mic for stream and party chat
Eliminates the need for a second microphone, Chat Link cable, or Remote Play when streaming PS5 gameplay.
07:17Simple AUX-to-PS5 hookup
A single USB-C cable from the AUX port is all that's needed for full console integration, making setup far less complex than alternative rigs.
04:49Rodecaster Duo vs Wave XLR Pro
Direct comparison shows the Wave XLR Pro avoids the Rodecaster Duo's on-and-off PS5 game audio distortion.
10:44Clipguard 2.0 protection
Onboard DSP and anti-peaking ensure the audience never hears distorted audio, a crucial reliability feature for live streams.
01:14Real-game validation
In-game testing confirmed perfect sync and no delays, proving the setup works outside the lab.
08:56[00:02] way to capture your microphone commentary audio, have your party chat be able to hear you, capture that party chat audio along with the PlayStation 5's game audio, then this device might be the perfect audio upgrade that you've
[00:17] never thought about before. I present to you the Elgato Wave XLR Pro, a dual XLR audio interface and mixer that looks like it would only be used for one or two-person podcast, which it would be great for, but it's capable of so much
[00:32] on the back of the device, you'll get two USB-C ports to connect two devices. You have line in and line out ports, a 3.5 mm or 6.3 mm headphones input, and
[00:44] two XLR microphone inputs. On the front, you have an additional 3.5 mm or 6.3 mm headphones input. That way, if you do have up to two people that need to hear each person will be able to have their own audio output without having to use
[01:00] mount to attach it to a tripod, and then there's these rubber strips to keep the device well placed on surfaces such as a desk. As for the Wave XLR's internal specs, it has onboard DSP processing through Elgato's Wave Effects Processor.
[01:14] And the thing that I love the most about this is Clipguard 2.0. This essentially keeps your voice from peaking so that your audience doesn't hear distorted, overly loud audio that could ruin their experience watching your content. So, of
[01:28] to the test, in addition to how well it integrates with a PlayStation 5. But quick shoutout to our sponsor, Nexus Clips. If you're already thinking about how to level up your audio, why not do that for your short-form content as
[01:41] your reach faster with shorts using their AI-powered video editing tool. It moments from your long-form videos or live streams that can then have its start and end time adjusted, set the face cam and gameplay positioning, add
[01:56] captions, subtitles, and when you're ready, you can easily download or upload TikTok. If you'd like to check it out, feel free to use my link in the description below and use code midnight for 10% off. All right, so right now I
[02:08] have the Wave:XLR connected to my computer using the host USB-C port on the back of the device. As for my microphone, I'm using the Rode PodMic, which I've connected to this device using the first XLR input. Now, to
[02:21] configure the audio going through the Wave:XLR Pro, you're going to want to use their free software called WaveLink 3.0. You can get it on Mac or Windows, should see that your device is connected like you do in my case. So now, within
[02:36] this tab, you can see that I have the microphone audio coming through just fine on that XLR mic one connection. I've also plugged in a pair of going through the device, and you can see that in my output section over here.
[02:50] So the first test I want to show you guys is within the XLR mic one connection. Here, you can set a variety of different filters and settings and directly. One of the cool things within
[03:03] the WaveLink 3.0 software is the auto-adjust gain option. So if I select this and then start the test, I can just speak into the microphone. The goal of this is to see what my microphone level should be set to with the mic, of
[03:17] course, set. I would say about 6 in away from my mouth, which is just a length that I love. gain that the software set me to is 49, and I've also set the gain lock so that no other software can control the gain outside of WaveLink. So
[03:30] There's a filter here for 48-V phantom power, which is for condenser microphone that I'm using here, so I'm not going to have this checked off. You also have inline boost compatibility. ClipGuard is a must. You're always going
[03:44] screaming into the microphone, your audio isn't going to peak. If you jump over to the effects section, I'm a madman and decided to turn all of these on because they all offer some level of enhancement to the microphone quality.
[03:58] by selecting the settings icon on the right-hand side. Every microphone can be nice setting to play around with. Once you have all of your filters and effects supplied to your microphone, you can give it a test by going to the sound
[04:11] check option here. All you need to do is select the record option here, and you whatever you want. When you're done, stop the recording, and then you can play it back to hear what your audio sounds like to make further adjustments
[04:23] to the audio quality from the Rode PodMic with all of the filters and effects supplied within the WaveLink software. And now listen to how the microphone audio quality sounds without any of the effects supplied within
[04:36] WaveLink. You might be able to hear some background noise now, maybe some room comments section below if you can hear a difference in the audio quality. Now, is how well you can integrate a PlayStation 5 with this setup. To
[04:49] connect the console, you're going to want to take a USB-C cable and plug it into the AUX port of the Wave XLR Pro. The other end of that USB-C cable would be plugged into the PlayStation 5. Then, to make sure that the PlayStation sends
[05:02] its audio to the Wave XLR Pro, in your console settings, you're just going to want to go to sound, and then for output device, make sure that USB headset device, make sure that USB headset Elgato Wave XLR Pro USB AUX is selected.
[05:14] And if you have that configured correctly, back inside WaveLink, you'll correctly, back inside WaveLink, you'll see the USB AUX is receiving audio, which is exactly what you want to see. Now, if I just jump into this real quick
[05:26] and go to effects, I'm not going to have voice focus on for AI Acoustics. It's just not something that we need for game audio, so I've gone ahead and turned raw quality of the game audio. So, now
[05:38] setup, we can go to our mixes to configure the audio for our stream. So, here, you can see that the USB AUX has the game audio coming through right down just a little bit so that it does not peak over my voice. And then my
[05:55] microphone voice right here for XLR mic one, I'm going to keep that as is. Now, microphone input, I could control that audio in this row right here cuz it's tied to XLR mic two. And then if I had any line in audio coming through the
[06:11] Wave XLR Pro, I could control that right here as well. Now, the added bonus of using this software is that you can easily control and add all of your system or application level audio. System you can see is applied in this
[06:24] row right here, but I can create another channel and add any of the apps that are running on my computer, such as Discord, Chrome, Edge, Spotify. When you're ready to add that Stream Mix into applications such as OBS Studio, Streamlabs Desktop,
[06:39] such as OBS Studio, Streamlabs Desktop, Melda Studio, in the settings of those applications, you're going to want to go to the audio option. And then for one of your mic auxiliary audio devices, you're going to want to choose the Stream Mix
[06:51] Elgato Wave XLR Pro. Real quick, the other columns that you see here are other mixes that you can control. One is for personal mix, which is the audio your headphones, for example. Since our PS5 audio is going through USB AUX, we
[07:04] can just select the plus button in this column to be able to hear our game and party chat audio. And now your chat mix is an input that can be used in apps such as Discord, but also your PlayStation 5. And this is where the
[07:17] true ultimate power of using the Wave XLR Pro comes into play. Let's first because I wouldn't want anyone that I'm gaming with to hear the game audio coming back through as feedback to them. Let's mute XLR mic two. Let's delete
[07:32] line in and just keep our microphone right here. Now, what I can do is select the edit chat mix option. We're going to add an output and choose the USB out option. And once we do that, we can go ahead and close this window. And check
[07:46] this out, guys. I'm going to go into my microphone settings of the PlayStation 5. I have the USB headset Elgato Wave:XLR Pro USB Aux selected. And then, if we go to adjust microphone level, you can see that that audio is coming
[08:00] through from this microphone. So, this means, guys, that you can use one microphone for both your commentary that goes through OBS Studio for your stream your party chat or people that you're talking to directly on the console to be
[08:17] able to hear you, too. All at the same time. No more need to be using two microphones, using an Elgato Chat Link cable to add more complexity to your setup with wires coming out of your controller, and also no need to use
[08:30] Remote Play on your computer to pull in game and chat audio. And just in case see that the microphone audio is coming through right there. And now, if I go ahead and mute this audio, see, it's muted now. No audio is coming through
[08:43] when I'm speaking. All right, guys, I decided to jump into a quick game just to show you an example of how everything looks when it's put together, quality-wise. Honestly, the audio sounds perfect.
[08:56] Absolutely perfect. I don't hear a single issue with it. far. This guy right here. Oh, I don't want to get embarrassed. Not today.
[09:13] it's it's it's perfect. Everything is in sync. There's no delays whatsoever. say, "You know what? I want to make sure I'm chatting with my party."
[09:27] I can just go up to my mic settings, go to adjust microphone level, and I can duplicating. It sounds so so weird. No issues with game chat whatsoever. Commentary is coming through, perfect, as you can hear, too.
[09:48] You're cooked, buddy. You're cooked. There's a guy right here. That was toasty. Somebody has a target on me.
[10:01] on me. Don't know exactly. Oh, I see him.
[10:31] this device is an understatement. This thing is spectacular. The only other device that came close to functioning like this one is the Rodecaster Duo. This, of course, has the physical dials if you're more into that, but it
[10:44] PlayStation 5 because it has a fatal issue where the game audio gets distorted off and on. I reached out to Rode to see if they would ever get a fix about it. Didn't hear any audio distortion issues using the Wave XLR
[10:58] Pro. As for pricing, it does come in at $350. So, if this is something in your budget range, this is an absolute must-have for podcasters, PlayStation 5 must-have for podcasters, PlayStation 5 gamers, and even dual PC setup users.
[11:11] pushing the evolution of what we can do highly recommend it. I put affiliate links in the description below if you do want to support the channel. Thank you so much for staying to the very end of
[11:24] the video. Like, subscribe, and watch this video if you want to learn how good Wave Link 3.0 works on macOS. With that, I'll see you on the next one. Peace.
⚡ Saved you 0h 11m reading this? Transcribe any YouTube video for free — no signup needed.