Starfox 64: Shortest Nintendo Game? Not with Alternate Paths!
45sReveals the hidden depth of a classic game, sparking curiosity about missed content.
▶ Play ClipThis video provides a detailed guide on how to unlock every alternate path in Star Fox for the Nintendo Switch 2. It explains the branching mission structure, specific in-game actions required to access hidden stages, and how to achieve the true ending.
Star Fox 64 is considered short, but a single playthrough shows only a fraction of the campaign. There are 16 stages, nine with alternate paths required to access most of the game.
On Corneria, after the checkpoint, destroy enemies chasing Falco to keep him alive. Then fly under all seven stone arches and follow Falco through the waterfall to unlock a choice between Sector Y and Titania.
On Titania, after the checkpoint and Slippy mentions a strange energy source, fly through seven orange warp rings after the cluster of meteors to trigger a cutscene and enter an alternate version, leading to Katina. Ignoring the warp takes you to Katina normally.
On Sector Y, earn 100 hits or more to unlock the hard route to Aquas. Score 99 hits or fewer for the easy route to Katina. Split up with Peppy and take the top route for more enemies. Bosses give 16 extra hits combined.
Titania requires defeating Star Wolf before time runs out to go to Solar; failure sends you to Sector X. Katina requires destroying Saucerer's core within one minute after destroying four vents to go to Solar; failure sends you to Sector X. Aquas always leads to Zoness.
Sector X has three outcomes: left fork after checkpoint, shoot four large rectangular panels to trigger a cutscene and warp to Sector Z. Standard route leads to Spyborg; if Slippy reprograms Spyborg quickly, you go to Macbeth; otherwise, Slippy is destroyed and you go to Titania.
On Zoness, shoot all spotlights without being detected to unlock alternate path to Sector Z. If any spotlight detects you, you go to Macbeth. Kat helps but misses often.
On Macbeth, shoot all eight train locks and the track switch to reach Area 6. Locks appear on both sides, with the hardest (lock five) during the boss fight. Missing any or the switch sends you to Bolse.
On Sector Z, destroy six Copperhead missiles (in three waves of 1, 2, 3) headed for Great Fox to unlock Area 6. Any missile hitting sends you to Bolse.
Mission 6 branches: Bolse always leads to Venom 1 (fake ending). Area 6 always leads to Venom 2 (true ending). If on Bolse, restart campaign for true ending.
Venom 1 is easier and leads to fake ending with no true final boss. Venom 2 leads to true ending with true final boss and credits.
Video covers all alternate paths. Encourages viewers to check IGN wiki for stage medals and other game guides.
To get the true ending, you must navigate through a series of specific alternate paths culminating in Area 6 and then Venom 2. Mastering these routes is essential for experiencing all the content in Star Fox on Nintendo Switch 2.
"The title accurately describes the content, as the video systematically explains how to unlock every alternate path in the game."
How many stages are in Star Fox on Nintendo Switch 2?
16 stages.
0:14
How many missions make up a full campaign run?
Seven missions.
0:31
What triggers the alternate path on Corneria?
Destroy enemies chasing Falco, fly under all seven stone arches, and follow him through the waterfall.
1:49
What is the hit requirement on Sector Y to unlock the hard route?
100 hits or more.
3:49
What happens if you fail to defeat Star Wolf in time on Titania?
You are routed to Sector X.
4:54
How many outcomes can Sector X have?
Three outcomes: warp to Sector Z, or standard route with Spyborg leading to Macbeth or Titania.
5:56
What must you do in Zoness to unlock the alternate path to Sector Z?
Destroy all spotlights without being detected.
8:59
How many train locks must be shot on Macbeth to reach Area 6?
All eight train locks plus the track switch.
9:39
What happens if you miss the final track switch on Macbeth?
You are sent to Bolse.
11:22
What is the objective on Sector Z to unlock Area 6?
Destroy all six Copperhead missiles before they hit the Great Fox.
11:34
Which Mission 6 stage always leads to the true ending?
Area 6 leads to Venom 2 (true ending).
12:26
What is the difference between Venom 1 and Venom 2?
Venom 1 gives the fake ending; Venom 2 gives the true ending with final boss and credits.
12:53
Game Overview: Short Campaign with Hidden Depth
Establishes the core premise that Star Fox 64 is short but packed with alternate paths that significantly extend gameplay.
Corneria Secret Path Technique
Provides a specific, actionable method to unlock the first major branch, demonstrating performance-dependent routing.
1:49Sector X Complexity Warp and Branch Combination
Highlights the most complex stage with three possible outcomes, illustrating the depth of the game's routing system.
5:43Macbeth Train Lock Precision Challenge
Details one of the hardest alternate path conditions, emphasizing precision and timing under pressure.
9:21Final Route Collapse to Two Endings
Explains how all branching paths converge into Bolse or Area 6, determining the true ending, a key insight for completionists.
12:01[00:00] Starfox 64 is known in part for being
[00:03] one of the shortest Nintendo first-party
[00:05] games of all time, at least if your only
[00:07] goal is to beat Andross on the basic
[00:09] route. But, a single playthrough only
[00:11] shows a fraction of what's actually in
[00:14] the campaign. There are 16 stages in
[00:16] Starfox on Switch 2, and nine of them
[00:19] feature alternate paths that are
[00:20] required to access a large portion of
[00:22] the game. In this video, I'll go stage
[00:25] by stage to explain how to unlock every
[00:27] alternate path in Starfox for Nintendo
[00:30] Switch 2.
[00:31] A full campaign run consists of seven
[00:34] missions, with the first always being
[00:36] Corneria and the final being either
[00:38] Venom 1 or Venom 2, depending on the
[00:40] route you take and whether you're going
[00:42] for the true ending. But, when I say
[00:44] seven missions, each of the missions
[00:46] between Mission 2 and Mission 6 can be
[00:49] one of two or three stages. Note that if
[00:52] you're trying to get the true ending,
[00:54] you'll need to make sure that your sixth
[00:56] mission takes place on Area 6. There are
[00:59] multiple routes that will take you
[01:00] there, so don't worry if you mess up an
[01:02] early alternate route, as there will be
[01:04] more points that will allow you to get
[01:06] back on track. Also, another thing to
[01:08] keep in mind is that when I mention that
[01:10] one path leads to one stage, while
[01:12] another path leads to another,
[01:14] oftentimes achieving the alternate path
[01:17] will let you choose what your next stage
[01:18] will be out of the two you just
[01:20] unlocked. It's not always the case,
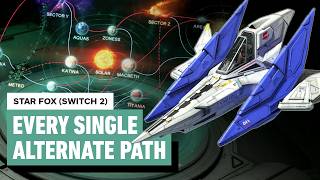
[01:22] though, so take a look at this map to
[01:24] get a full scope on where every path
[01:26] could lead you.
[01:28] With all that in mind, let's start from
[01:29] the beginning and break down how each
[01:31] branch unfolds and how to achieve those
[01:34] branching paths, mission by mission.
[01:39] Corneria is where the game first teaches
[01:41] you that your performance actually
[01:42] matters and that listening to what your
[01:44] teammates are saying is often a clue on
[01:46] how to get the secret exits. Corneria's
[01:49] alternate path begins shortly after the
[01:51] checkpoint. When Falco says he's lining
[01:54] up enemies for you, destroy the group
[01:56] chasing him to keep him alive. As you
[01:58] reach the water, Falco will point out
[02:00] the archways and lead you through them.
[02:02] Fly underneath all seven stone arches,
[02:05] then follow him through the waterfall to
[02:06] defeat the boss.
[02:10] >> That was the easy part, Fox.
[02:18] Beginner's luck.
[02:23] I've got eyes on a high-value target.
[02:25] Follow me.
[02:28] >> You'd better be right about this, Falco.
[02:30] >> Completing Falco's challenge unlocks a
[02:32] choice between Sector Y and Titania. If
[02:35] Falco is defeated or you miss the
[02:37] challenge, you'll be forced into
[02:39] Titania.
[02:42] From here, the campaign immediately
[02:44] splits, and Mission 2 becomes one of the
[02:46] first major branching points in the
[02:48] game. For Titania, it has two exits, one
[02:51] of which is a warp. Around the middle of
[02:53] the stage, you'll pass through a
[02:54] hollowed-out asteroid before reaching a
[02:56] checkpoint. Shortly after, Slippy will
[02:58] mention a strange energy source, and
[03:01] you'll see a cluster of small meteors
[03:03] ahead. After the cluster, you'll spot an
[03:05] orange warp tunnel. Enter it, and your
[03:08] Arwing will begin to spin. There are
[03:10] seven warp rings in total. Fly through
[03:12] all of them to trigger a cutscene and
[03:14] enter an alternate version of the stage.
[03:16] >> Never give up. Trust your instincts.
[03:34] >> Completing this will get you access to
[03:36] Katina. If you ignore the warp rings and
[03:39] complete the stage normally, you'll
[03:41] instead go to Katina.
[03:43] If you chose Sector Y as your second
[03:45] mission, the alternate path is as
[03:47] follows.
[03:48] Earn 100 or more hits to unlock the hard
[03:51] route, which leads to Aquas.
[03:54] Score 99 hits or fewer and you'll take
[03:56] the easy route to Katina. About halfway
[03:58] through the stage, Peppy will shout out
[04:00] that you guys should split up. I
[04:02] recommend taking the top route as it has
[04:04] far more enemies than the bottom route.
[04:07] This should give you more than 100 hits
[04:08] easily. As you can see, I enter the boss
[04:11] with over 150. But, if you're a bit
[04:14] short of 100, the bosses will give you a
[04:16] combined 16 extra hits. You want to keep
[04:19] that in mind if you want to stay under
[04:21] 100 hits as you'll need to enter the
[04:23] boss with fewer than 83 hits. Which is
[04:25] easy. Just don't shoot that many things.
[04:28] >> The time bomb has been planted.
[04:30] >> By mission 3, the game starts layering
[04:32] both time pressure and objective-based
[04:33] conditions on top of each other, making
[04:36] route control much more demanding.
[04:38] Titania's hard route requires you to
[04:39] defeat Star Wolf before the time runs
[04:41] out. This isn't very difficult. Just use
[04:44] the mini-map to keep track of the enemy
[04:46] crew. They're the purple icons. After
[04:49] defeating them, Fox will diffuse the
[04:50] bomb and the mission will be complete
[04:52] and you'll be shipped off to Solar. If
[04:54] you fail to defeat Star Wolf in time,
[04:57] you'll be routed to Sector X. Katina
[04:59] follows a similar structure to Titania
[05:02] in that it's an all-range battle that
[05:03] pitch you against an enemy with a time
[05:05] limit. But, instead of a crew, it's a
[05:07] boss named Saucerer. There won't be a
[05:10] timer at first, so you'll need to make
[05:12] multiple passes destroying the
[05:13] Saucerer's vents as they open. Once all
[05:16] four are down, the core will be exposed
[05:18] and a minute-long timer will begin.
[05:21] Simply destroy the core to complete the
[05:22] stage and be sent to Solar. If you fail,
[05:25] you'll be treated to an Independence Day
[05:27] style cutscene and you'll be sent to
[05:29] Sector X. Aquas is the only exception
[05:32] here in mission 3, acting as a linear
[05:35] stage with no branching conditions. It
[05:38] always leads to Zoness regardless of
[05:40] performance.
[05:43] In the mission 4 stages, the route
[05:45] structure becomes significantly more
[05:47] complex, combining hidden triggers,
[05:49] performance gates, and conditional
[05:51] branching across multiple possible
[05:53] destinations. Sector X is the only stage
[05:56] in the game that features both a hidden
[05:57] warp route and two branching paths,
[06:00] giving you three possible outcomes. For
[06:02] the warp route, after the checkpoint,
[06:05] take the left fork and shoot the large
[06:07] rectangular panels until they open.
[06:09] You'll spot these after the obstacle
[06:11] course of moving platforms. Shoo and fly
[06:14] through all four of them, which then
[06:16] triggers a cutscene and an alternate
[06:18] ending of the stage.
[06:24] >> Heads up, Fox.
[06:26] Keep at it.
[06:34] Get your eyes checked, Fox.
[06:39] Warping out? You've got guts, Fox.
[06:43] We've got to see where this leads.
[06:48] >> Taking the warp path takes you to Sector
[06:50] Z.
[06:52] Alternatively, if you take the standard
[06:54] route, you'll face Spyborg. To reach
[06:57] him, just play the stage like normal
[06:58] without entering the warp zones. Going
[07:00] left or right at the split doesn't
[07:02] matter. Spyborg has two phases, and
[07:05] depending on how the second phase goes
[07:07] is what determines what path you'll get.
[07:09] After destroying his eyeballs, Spyborg
[07:12] will power down for a moment before
[07:14] kicking back into gear for phase two.
[07:16] Once this happens, Slippy shouts that
[07:18] they are going to attempt to get close
[07:19] and reprogram Spyborg. You need to
[07:22] prevent this from happening to get the
[07:23] alternate path exit. To do that, focus
[07:26] your firepower on the head where the
[07:28] lights are.
[07:44] If you succeed
[07:45] >> take him down before Slippy gets to him,
[07:48] Slippy will pout about not being able to
[07:50] reprogram him, but you'll have achieved
[07:52] the alternate path which leads to
[07:53] Macbeth. If you don't defeat Spyborg
[07:56] before Slippy approaches him, he'll swat
[07:58] Slippy out of the way, destroying their
[08:00] ship and preventing you from heading to
[08:02] Macbeth. You'll instead be sent to
[08:04] Titania. If your goal is to reach
[08:06] Macbeth, the moment Slippy goes down,
[08:09] pause the game and hit restart, then
[08:11] restart from the latest checkpoint. This
[08:13] will prevent you from having to replay
[08:15] the entire stage and quickly give you
[08:17] another shot at saving Slippy. If your
[08:20] fourth mission is Solar, then your job
[08:22] is easy. Solar has no branching paths at
[08:25] all. Defeating the boss will always lead
[08:27] you to Macbeth.
[08:28] If you did Aquas in mission three, then
[08:31] mission four will always be Zoness,
[08:33] which introduces a stealth style
[08:35] objective into the routing system,
[08:37] requiring you to shoot all of the
[08:39] spotlights throughout the stage. There
[08:41] are a lot of them and they typically
[08:43] show up in clusters. Luckily, your
[08:45] charged laser targeting can lock onto
[08:47] them and Kat, an old friend of Falco's,
[08:50] will show up during the second cluster
[08:52] to help you out. Though, my
[08:54] recommendation is to not rely on her
[08:56] help too much, as she misses more than
[08:59] she hits. If you destroy all the
[09:01] spotlights without being detected,
[09:03] you'll unlock the alternate path to
[09:04] Sector Z. If any searchlight spots you,
[09:08] you'll instead be routed to Macbeth.
[09:12] By mission five, most of the remaining
[09:14] branches are determined by execution
[09:16] under pressure, where small mistakes can
[09:18] permanently alter your path. Except for
[09:21] Titania. If you fail to save Slippy
[09:23] against the Spyborg in Sector X, your
[09:26] mission five will be Titania, which is
[09:28] linear and will always send you to
[09:30] Bolse. If your fifth mission is Macbeth,
[09:33] the branching path revolves around
[09:35] precision during the train lock sequence
[09:37] at the end of the stage. To achieve the
[09:39] alternate path condition, you'll need to
[09:41] shoot all eight train locks with the
[09:43] tank, as well as the track switch. This
[09:46] is honestly one of the hardest alternate
[09:48] path conditions in the game, as it
[09:50] requires you to not only keep track of
[09:52] finding all eight locks, but the final
[09:54] four locks are during the boss fight. As
[09:57] you approach the final stretch of the
[09:58] stage, Peppy will say that you need to
[10:01] shoot all eight locks. This is your cue
[10:03] that the first one is coming up. Lock
[10:05] one is on the right side of the track.
[10:08] Lock two is also on the right side of
[10:10] the track, just behind and to the right
[10:12] of lock one. Lock three is on the left
[10:15] side of the track, so you'll need to
[10:16] make sure enough of the train cars are
[10:18] destroyed to cross over. Lock four is
[10:20] right in line with lock three, but on
[10:22] the right side of the track. I recommend
[10:24] using your brake here to make sure you
[10:26] have time to shoot them both.
[10:28] Lock five is the hardest one to hit, as
[10:30] it's on the left side of the track as
[10:32] the boss emerges. So, go slow, brake
[10:34] often, and make sure to not miss it.
[10:36] >> Lucky you.
[10:39] >> At this point, you'll need to just
[10:40] ignore the boss. We won't be fighting
[10:42] him at all. Lock six is on the right
[10:45] side of the track behind a shutter that
[10:46] you need to shoot to open up. Three
[10:49] shots open it, but hitting it again will
[10:51] force it closed. Lock seven is once
[10:53] again on the left side of the track,
[10:55] which is even with lock eight, which is
[10:57] on the right side. Luckily, if Falco is
[10:59] alive, he will offer to shoot the eighth
[11:02] lock. Once you've hit all eight locks,
[11:04] you'll need to hit the final rail
[11:06] switch. It's on the right side of the
[11:07] track just after the falling spikes.
[11:10] It's fine if you have the health to take
[11:12] some damage here. Just make sure you
[11:13] don't miss the switch. You'll know you
[11:15] hit it when the hits plus 50 icon shows
[11:18] up. Completing the train lock puzzle
[11:20] will send you to area six. If you fail
[11:22] to hit all of the locks or the final
[11:24] switch, you'll be shipped off to Bolse.
[11:27] If Sector Z is your mission five, you'll
[11:29] be treated with one of the easiest
[11:31] alternate path
[11:33] Halfway through the mission, a cutscene
[11:34] featuring Rob 64 will play showing you
[11:37] that six Copperhead missiles are headed
[11:39] towards the Great Fox. These move super
[11:42] slow and are easy to hit. They'll come
[11:44] in three waves. First one missile, then
[11:46] two,
[11:47] then three. Destroy them all before they
[11:49] reach the Great Fox to unlock Area 6. If
[11:52] any missile hits, the mission will end
[11:55] and you'll be routed to Bolse.
[11:59] Mission 6 is where most of the paths
[12:01] converge. At this point, the branching
[12:03] structure collapses into a final split
[12:06] between the game's two end-game routes.
[12:08] If your Mission 6 is Bolse, it only has
[12:11] one route and always leads to Venom 1,
[12:13] the easier path to the ending. Venom 1
[12:16] will pit you against Andross, but this
[12:18] is not the true ending. This means that
[12:20] if your Mission 6 is Bolse, you'll need
[12:22] to restart the campaign if you are
[12:24] seeking the true ending. Area 6 is the
[12:27] same as Bolse and that it only has one
[12:29] route which leads to Venom 2. If you are
[12:32] in Area 6, congrats, you are on your way
[12:35] to the true ending.
[12:38] All right, time for Mission 7. Just
[12:40] note, although Venom appears as a single
[12:42] location on the map and only has one
[12:44] medal in the main game, it's actually
[12:47] two separate missions depending on your
[12:48] route, as I just mentioned with Area 6
[12:50] and Bolse. At this point, everything
[12:53] funnels into the final confrontation,
[12:55] but the game still tracks how you got
[12:56] there. Venom 1 leads to the fake ending
[12:59] and does not allow you to face the true
[13:01] final boss or see the true ending.
[13:03] Complete this mission to finish this run
[13:05] of the campaign. Venom 2 leads to the
[13:08] true ending and allows you to face the
[13:10] true final boss. Completing this mission
[13:12] will let you see the true ending and
[13:14] will reward you with the game's ending
[13:16] credits.
[13:18] And that is it. That is every single
[13:20] alternate path detailed in Star Fox for
[13:22] Nintendo Switch 2. I hope you enjoyed
[13:25] the video and for more on Star Fox, make
[13:27] sure to head on over to our wiki over on
[13:29] ign.com, where we have written guides
[13:31] for obtaining all the stage medals. And
[13:33] of course, for everything else video
[13:34] games, stick with IGN.
[13:40] >> Enemy fighters here.
⚡ Saved you 0h 13m reading this? Transcribe any YouTube video for free — no signup needed.