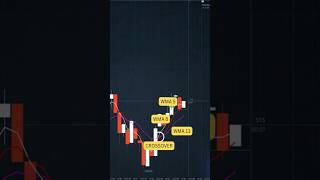

Stop Trading Crossovers! Do This Instead
41sChallenges a common trading strategy with a contrarian approach, sparking curiosity and debate.
▶ Play Clip"The title promises an alternative to crossovers, and the video delivers a specific ribbon-based strategy, though it lacks depth and examples."
This video presents a trading strategy that replaces traditional moving average crossovers with a ribbon-based approach using three weighted moving averages (WMA 5, 8, and 13). The core logic is to trade the failure of a crossover during pullbacks, entering trades when the fast line snaps back in the direction of the prevailing trend.
Load three weighted moving averages (WMA 5, 8, 13) and assign them completely different bright colors to avoid confusion during fast market movements.
In a strong trend, the market rarely moves in a straight line. The fast WMA 5 dips back toward the ribbon (WMA 8 and 13) during temporary pullbacks, but the price rejects the ribbon and snaps back in the original direction. The strategy trades the failure of the crossover at the exact moment the pullback dies.
For a buy trade, all three WMAs must fan out in a specific sequence: WMA 5 on top, WMA 8 in the middle, WMA 13 at the bottom. All three lines must have a distinctly upward slope. When the fast WMA 5 dips down, touches or approaches the ribbon, and instantly snaps back up, execute a 1-minute buy trade (approximately four candles on the chart).
For a sell trade, the sequence reverses: WMA 13 on top, WMA 8 in the middle, WMA 5 at the bottom. All three lines must have a clear downward slope. When the price attempts a minor pullback up into the ribbon, fails, and the WMA 5 snaps back lower, place a 1-minute sell trade.
The strategy focuses on entering trades at the precise moment a pullback fails, using the ribbon of three WMAs to confirm trend direction and momentum. This approach aims to capture the continuation of a strong trend rather than reacting to crossovers.
What are the three weighted moving averages used in this strategy?
WMA 5, WMA 8, and WMA 13.
00:15
What is the core logic of this trading strategy?
Trade the failure of a crossover during pullbacks, entering when the fast line snaps back in the direction of the trend.
00:28
What is the exact sequence for a buy trade?
WMA 5 on top, WMA 8 in the middle, WMA 13 at the bottom, all with upward slope.
00:54
What is the exact sequence for a sell trade?
WMA 13 on top, WMA 8 in the middle, WMA 5 at the bottom, all with downward slope.
01:34
When do you execute a buy trade?
When the fast WMA 5 dips down, touches or approaches the ribbon, and instantly snaps back up.
01:08
When do you execute a sell trade?
When the price attempts a pullback up into the ribbon, fails, and the WMA 5 snaps back lower.
01:50
Trading the Failure of the Crossover
This is the core principle that differentiates the strategy from traditional crossover methods.
00:28Specific Buy Sequence
Provides a clear, actionable rule for entering buy trades.
00:54Specific Sell Sequence
Provides a clear, actionable rule for entering sell trades.
01:34[00:01] to exactly 15 seconds. Next, we're going to load three weighted moving averages. It is absolutely crucial to give these completely different bright colors, so you don't get confused when things start moving fast. Here's the breakdown. Our
[00:15] moving fast. Here's the breakdown. Our fast line is the WMA 5, our middle line is the WMA 8, and our slow line is the WMA 13. Now, understand the core logic here. In a strong trend, the market rarely
[00:28] moves in a straight line. What happens is the fast WMA 5 will constantly dip back toward the ribbon, which is the 8 and 13 lines, during temporary pullbacks. But because the underlying trend structure is heavy, the price will
[00:42] reject that ribbon and literally snap back in the original direction. We are trading the failure of the crossover, entering the exact second that the pullback dies. Let's look at the exact rules for a buy trade. You're looking
[00:54] for the exact moment all three WM as fan out in this specific sequence. as fan out in this specific sequence. WMA 5 must be on top, WMA 8 in the WMA 5 must be on top, WMA 8 in the middle, and WMA 13 at the very bottom.
[01:08] Crucially, the slope of all three lines must be pointing distinctly upward. The must be pointing distinctly upward. The moment that fast WMA 5 dips down, touches, or approaches the ribbon, and instantly snaps back up, you execute a
[01:21] 1-minute buy trade. On our chart, that is exactly four candles. Now, for a sell trade, we just flip the script. The sequence reverses. WMA 13 is on top, WMA
[01:34] 8 is in the middle, and our fast WMA 5 is at the bottom. All three lines must have a clear downward slope. When the price attempts the minor pullback up into the ribbon, fails, and the WMA 5 snaps back lower, you instantly place
[01:50] snaps back lower, you instantly place that 1-minute sell trade.




⚡ Saved you 0h 02m reading this? Transcribe any YouTube video for free — no signup needed.