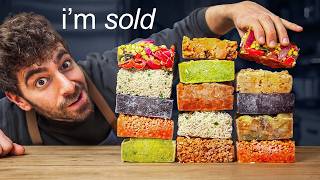

I Tried Freezing Meals in LEGO Cubes
44sThe unique concept of freezing meals into LEGO-like cubes sparks curiosity and is visually intriguing, perfect for a hook.
▶ Play Clip"Title promises a revolution, and while the method is innovative, it's a practical meal prep technique rather than a true revolution, but it delivers on the core promise."
This video demonstrates a meal prep method using stackable silicone molds, where the creator prepares 10 Mexican-inspired dishes, freezes them into cubes, and randomly combines them for a week of lunches. The process includes recipes for proteins, veggies, and starches, with a focus on efficient reheating and flavor preservation.
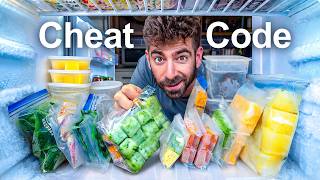
The creator highlights freezing as a time- and money-saving technique that has helped them thrive as a home cook, leading to experimentation with different freezing methods.
The creator discovers a trend of freezing meals into stackable silicone molds, specifically from a company called Super Cubes, which are food-safe and designed for freezing.
The challenge involves making 10 prepped items (3 proteins, 4 veggies, 3 starches) that are frozen into blocks. Each meal consists of three blocks, randomly selected via a wheel, with a focus on Mexican cuisine for flavor compatibility.
The first protein is a green chicken dish made with chicken thighs, tomatillos, jalapeno, cilantro, and lime, stewed in salsa verde for 30-45 minutes until shreddable.
A turkey chili is developed using dried Mexican peppers (anchos, arbals, guajillos, casabels), tomatoes, and bone broth, blended with immersion blender for a rich texture.
A vegetarian option made with firm tofu, garlic, adobo sauce, chipotle, maple syrup, and soy sauce, cooked until crispy and flavorful.
Napa cabbage is seared, then braised with jalapeno, garlic, ginger, and chicken stock until tender, providing a savory vegetable component.
Corn, poblano peppers, and red peppers are grilled until charred, then mixed to freeze while retaining shape and caramelization.
Sweet potatoes and plantains are roasted at 450°F for 40 minutes, then mashed together for a sweet and starchy side.
Roasted eggplant is blended with chickpeas, garlic, cumin, and paprika to create a hummus-baba ganoush hybrid with Mexican spices.
Rice is cooked with chicken broth, then mixed with fresh cilantro, lime juice, and salt for a fluffy, flavorful base.
Dried black beans are pressure cooked with jalapeno, ginger, onion, and garlic for 18 minutes, then partially blended for a chunky texture.
Farro is toasted, then cooked with a tomato-onion-garlic sauce and chicken broth for 25 minutes until tender, offering a nutty alternative to rice.
The creator spins the wheel to combine cubes, reheats in the microwave (6-7 minutes), and notes that portion sizes vary by density, with undercooking recommended for better reheating.
The creator concludes that the freezer molds are not a gimmick, providing a viable way to cook more food in less time, with all meals tasting fresh and flavorful.
The video concludes that freezing meals in stackable molds is an effective meal prep strategy, offering convenience and quality without sacrificing taste, making it a valuable tool for busy home cooks.
What is the recommended cooking time for chicken thighs in salsa verde?
30 to 45 minutes, until shreddable.
02:36
What type of peppers are used in the Mexican turkey chili?
Anchos, arbals, guajillos, and casabels.
04:07
How long are black beans pressure cooked?
18 minutes.
13:56
What is the recommended microwave reheat time for the frozen cubes?
6-7 minutes, depending on density.
16:22
What is the key to making crispy tofu?
Cooking out the water first, then frying.
06:41
Lego Cube Freezing Trend
Introduces a novel, visually appealing method for freezing meals that enhances organization and portion control.
00:15Pollo Salsa Verde Recipe
Provides a simple, flavorful protein that freezes well, demonstrating the core principle of batch cooking.
01:33Mexican Turkey Chili Development
Shows how to build depth of flavor using dried peppers and bone broth, a key insight for meal prep.
03:13Freezer Molds Not a Gimmick
Confirms the practical value of the method, encouraging adoption for time-efficient cooking.
18:50[00:01] absolutely invaluable aspect to my meal prep. It has saved me time. It has saved me money. And honestly, it's just help me thrive as a pro home cook. And after years of experimenting with different freezing techniques, I thought I'd seen
[00:15] it all. And then I stumbled across this trend where people were freezing their meals into these stackable Lego cubes. And let's just say I was very intrigued. molds. This is from a company called Super Cubes. not sponsored. They're just
[00:30] high quality foods safe silicone molds specifically designed for freezing food. But like any product, you can find knockoff cheaper versions on Amazon that can just use any larger silicone ice cube mold like these, which I've used
[00:44] for years. They're just slightly smaller. So, you'll need a few cubes to here's the breakdown of how this challenge is going to [music] work. First, I'm going to be making 10 prepped items that I will freeze into these
[00:56] blocks. And each meal that I consume will be made up of three blocks total. So to create balance, I'm making three proteins, four veggies, and three is actually an efficient way to meal
[01:08] prep, every day for lunch for a week, I will be spinning the wheel of frozen these frozen cubes that I'll reheat for lunch. And since it's random, I wanted to pick a singular cuisine so at least all of the flavors would work together.
[01:21] And a lot of the other videos that I'd seen using these molds made Mexican food. So, I just followed their lead since I love Mexican [music] food. Plus, I know it freezes very well. And since I love you all, I put all of the recipes
[01:33] down below in a Google doc completely [music] for free. All right, so up first, we have three absolutely banging protein options. And the first one, I will say, is probably my favorite recipe from all 10 today. It's a poo and salsa
[01:47] verde or a green chicken, which could not be easier to make. I'm starting with a fourack of chicken thighs with the bone in and skin on. You can of course do boneless and skinless as well. It just won't be as flavorful. And I'll
[01:59] season the thighs with salt and pepper on both sides. I'll get a sauté pan on a medium heat. I'll add in my oil. And I'll start to get that skin side nice and crispy. Now, while that skin is rendering, to a blender, I'm going to
[02:11] add in some onion, garlic, a deseeded jalapeno, or you can go full-on seeds if you're not a wimp like myself. Then I'll go in with a bunch of toatillos, which handful of fresh mint, a bunch of fresh
[02:24] cilantro, some lime juice, and finally some salt. And I'll blend that up until it's nice and smooth, just in time for some perfectly crispy skin on those thighs. So I'll flip the chicken over, and it really only needs a few minutes
[02:36] because what I'm going to do is just dump in all of that salsa verde right into the hot pan. And I'll cover the chicken so it stews in the sauce, which takes around 30 to 45 minutes. The longer you go, the more shreddy that
[02:51] chicken will become. And you can see the sauce completely transforms and those tender. So, I'll just shred them up manually with a few [music] forks. I'll I'll pop everything in the molds to freeze.
[03:13] >> right, next up is another heavy hitter. It's something I developed myself. It's a Mexican turkey chili. Another really easy one to make a big batch of and [music] it is just packed with flavor. I'll first get a pan on a medium heat
[03:25] and add in a good bit of oil since turkey is rather dry. And I've got two only find white meat, but you can certainly use dark meat or a blend, breaking up the turkey. And you just initially have to remove all that water
[03:41] before you start getting some nice color on the meat. In the meantime, I'll slice up some onion, some green pepper, and a few cloves of garlic. And once the turkey has some nice color on it like this, I'll give it some salt, and I'll
[03:53] needs it at this point, just go in with a little bit more oil. Then I'm going to caramelize. Now, to really flavor up this chili, I've got some Mexican dried peppers. I'm going to deseed some anchos, some arbals, some guajillos, and
[04:07] some casabels. And I'll just pop those in the pan and toast them up with the minutes for your kitchen to start smelling amazing from those toasted can of tomatoes and some chicken broth. And I'm using some chicken bone broth
[04:21] from Kettle and Fire, which is actually the sponsor of today's video. And if am big on homemade bone broth. Over the years, I've put out tons of videos with techniques. And while I love making it myself, being a busy parent means I
[04:35] don't always have time to make it completely from scratch, which is where Kettle and Fire comes into play. It's really the only bone broth that I trust out of the box. They use organic freerange chickens and grass-fed
[04:48] grass-finish beef bones, which they simmer for 14 hours for maximum nutrient that collagen, all the nutrients, and all of the flavor you'd be used to if you're making broth the right way at home. It's bone broth done right in a
[05:02] very convenient package. So, all I have to do is just a quick tear and boom, I've got an instant flavor nutrient enhancer to my soups, curries, stews, pastas, whatever the dish is. So, if you're looking for a really quality way
[05:15] to just enhance the depth and the flavor of your food, check out my link below and use code Mike G for 20% off your first order of Kettle and Fire. [music] on top of the broth, I'm going to add a few corn tortillas, which is going to
[05:29] this up to a simmer, and I'll cook it for around 5 minutes. Then I'm going to take my immersion blender and start blending everything nice and smooth. which was spot on. Then I'll dump that turkey meat back in and cook everything
[05:44] together for a few more minutes before it was ready for the cubes. And I had a nice portion left for a fresh [music] meal. Okay, meal. Okay, spinach.
[06:00] diverse set of meals for the week, I wanted at least one vegetarian protein option. So, I'm going to do a tofu charresa. It's another very easy recipe with really delicious results. What I'll do is I'll get a non-stick sauté pan on
[06:13] coconut oil. And once that melts, I'm going to dump in a bunch of chopped garlic. And I'll get that in the pan to caramelize so I can build some flavor to go along with that tofu. And I'm using two full blocks of firm tofu here. You
[06:29] can use anything from semi firm to extra firm. I'll first drain off all that water and I'll start ripping up the tofu right in the pan. And over the next 10 to 15 minutes, what's happening is that water is slowly cooking out of the tofu,
[06:41] which then will start to activate the actual frying process. Of course, the you cook it, the more crispy you can get that tofu. When I was personally happy with my crispy levels, I dumped in some adobo sauce from a can of chipotles and
[06:56] adobo, plus one full smoked jalapeno. And for some extra smokiness, I added finally, some maple syrup and some soy sauce. And I cooked everything together until that sauce absorbed right into the tofu for adding it to the molds and
[07:12] tofu for adding it to the molds and getting it into the freezer. veggies, I want to introduce you to the wheel of frozen foods.
[07:27] Oh, hell yeah. Thank you, Amazon. So, I'll spin the wheel. I have all 10 recipes on here. Whatever I land on, I will peel off. Boom. Cilantro rice, which is coming up. And I'll keep spinning until I have one
[07:40] starch, one protein, and one veggie to bring together a full meal. Now, there is one other caveat to this challenge, which again is just a realistic way that I eat. I'm allowing myself to also add a pickle or fermented food to these
[07:54] dishes. Since, you know, I have a full fridge of options, and these are things that I treat like condiments, plus these two secret weapons. Cilantro crema and a Mexican barbecue sauce. I'm not going to go over these recipes, but they are
[08:07] These will be my main flavor [music] enhancers since, of course, we all need a good sauce in our life. All right, so I have four veggie options that I thought would freeze very well. And first up, we've got a nice brazed
[08:19] cabbage. Now, you can really use any cabbage you want. I happen to have some nappa cabbage still in the garden. pretty much the last greens of the year. will turn into kimchi for the winter. And after I got the cabbage all cleaned
[08:32] up, I sliced it into quarters. I've got a nice wide sauté pan on a medium heat. start searing the cabbage on the first side. Now, once it's nice and brown, I will flip it over and get some color on the other side. And when it's nice and
[08:46] wilted, I'll remove it and I'll continue that process until all of my cabbage is cooked. Now, I'll add some ghee to the pan for a little extra flavor. You can well. And I'm dumping in some chopped up jalapeno, garlic, and ginger, which I'll
[09:00] fry in that ghee for a few minutes to really add some wonderful aromatic flavor. Then in goes all of that brown and wilted cabbage, which I chopped up into smaller pieces. And I'll top that with some chicken stock, a little water,
[09:13] and some salt to season. And I'll pop a lid on that pot so that cabbage can simmer in that brazing liquid until it softens up and gets super tender. And softens up and gets super tender. And it's off to the molds.
[09:35] veggies, fajitas. Just a absolutely classic meal [music] prep tactic. Been using it for years. Grilling up a whole bunch of veggies at once. And of course, to stick with the Mexican theme, I've got some
[09:51] whole corn. I've got some pablano peppers, some red peppers, and some red coated everything in oil. Took the veggies out to the grill. It was when I made these. And I just grilled
[10:04] them on a medium low heat until they were slightly charred, just a little bit of color. But what I was really going for was that caramelization and that brought them in, the skins of the peppers could just slip off very easily.
[10:18] mixed it together so those veggies would freeze up nicely and still hold their shape. So this is like
[10:37] Doesn't get easier. Sweet potato plantain mash. This is a great side dish kind of in between that veggie and starch option. I've got a bunch of ripe I peeled. And I'm going to slice up the
[10:52] sweet potatoes into mediumsized chunks. And for the plantains, of course, I peeled them out of the skin and then I sliced them up into thick rounds. The important thing is cutting the plantains about doubled the size of the sweet
[11:04] together and they're going to cook much faster than the potatoes. I popped everything on the roasting tray, gave it a nice coating of some grape seed oil, hit it with a little bit of salt, and [music] mixed everything together until
[11:16] it was well coated. Then I popped the veg in the oven at 450° for 20 minutes. After 20 minutes, I took the pan out, gave the bottom of the pan a nice scraping with a metal spatula to release that brown side of the veggies. I gave
[11:31] everything a mix and then tossed it back in the oven for another 20 minutes to roast everything until it was nice and soft and evenly roasted. And then all I'm going to do is simply just mash everything together with a potato
[11:43] masher. And it's off to the Lego [music] molds.
[11:56] was a bit of a leftover special, I would say. just things I had lying around the eggplants while I was roasting those other veggies. And what I do is just roast them very slow for a long time until that internal flesh turns into
[12:10] mush. And then you can just scrape that right away from the skin. I've popped all of that eggplant in a food processor along with some cooked chickpeas, a few garlic cloves, some whole cumin seeds, a sprinkle of some smoky paprika, a nice
[12:23] seasoned it with salt. And I just did a rough blending on this, not completely smooth. And this is right in between a hummus and a baba ganoush, which both of those things I like to eat warm. And I just added some of those Mexican spices
[12:36] in there to bring everything [music] together. great options. Of course, you can't go without a nice cilantro rice. Doesn't
[12:51] get easier than that. I used my rice cooker. I dumped in my rice, added some water and some kettle on fire chicken broth for a little extra flavor. Turn heavy lifting. Then when that rice is done, it goes into a large mixing bowl
[13:06] followed by a bunch of fresh chopped cilantro, the juice of a few limes and some salt to season. And I just mixed everything up for some beautiful fluffy cilantro lime infused rice ready to [music] be frozen.
[13:27] mandatory starchy Mexican side. Oh, I landed on it. Beans, baby. Those are black beans specifically. Love me some good black beans. This is generally how I meal prep them for maximum [music] ease and deliciousness. I've got a pack
[13:41] of dried black beans, which are going to go directly in the pressure cooker. I've got a jalapeno, some ginger, some onion, and finally some garlic. I'll top of course, add broth or stock for more flavor. And I'll pressure cook the beans
[13:56] for just about 18 minutes, which is all they're going to need to transform dried beans into perfectly cooked, tender black beans. Pressure cooker for the meal prep win. I remove those thicker pieces of ginger since those aren't
[14:10] just simply seasoned up the beans with salt and pepper. Now, a proper reffried beans would take it a step further by frying up some more aromatics in a pan, dumping in those beans, and fry [snorts] them together. I don't have time for
[14:23] that. This right here is enough flavor and deliciousness for me. So, I'm just going to take my immersion blender, pop that in there, start blending it up. I beans chunky so you have that smooth and chunky texture coming together. And
[14:36] chunky texture coming together. And boom. This is ready for the freezer.
[14:49] And finally, this next dish is a play on O's Rojo, which is a Mexican rice dish, tomatoes. But since I already have a rice dish, I'm swapping out the starches, and I'm going to be using fo for a fo rojo. So, what I did was got a
[15:04] pot on a medium heat and I added in some oil followed by my farro to start toasting in that oil which is really going to bring out the nuttiness of the grain. In the meantime, to a blender, I added some fresh tomatoes, onion, and
[15:17] garlic. And I gave that a blend until it was smooth. And when the farro was smelling nice and nutty, I added in that tomato sauce, followed by some chicken season. And I brought that to a simmer, added the lid, and just cooked that far
[15:31] for about 25 minutes until it was perfectly tender and cooked through and perfectly tender and cooked through and ready for those freezer bolts.
[15:45] >> [snorts] >> uh [laughter] amazing art skills. >> My pleasure. >> So, we're going for a protein, a veggie, and a starch. We'll spin until we uh Oh,
[15:58] >> All right, let me get some glue. >> Be right back. >> First spin. >> Ooh, I love that one. So, that's
[16:10] >> Sweet potato plantain. Go for it, Carly. [snorts] >> Farro. [laughter] Yeah. Oh, we're building a meal here. >> That sounds so good so far. >> Farro. We need a protein.
[16:22] >> We need a protein. Ah, a turkey chili. All right, so a very red meal, but uh >> Into the microwave. All right, so this was 6 minutes in the microwave. That's just falling apart. Nice. Chili. Oh, yeah. Chili's still frozen in there. So,
[16:37] I'll break it up. Wow, that is a big portion of goodness. I think I did make going to flip this up. >> So, it's like I know the food tastes good. It's more about uh reheating portion size, which I already see that I
[16:51] kind of effed up a little bit. I think they had it right with this being a portion. We needed to fill up the cubes a little less cuz reblocks almost made two meals and which is fine. You could do it like that or you could fill the
[17:05] blocks up less and do you know single portions. >> M it reheats all this food. >> Yeah. I mean I I would have never known little bit worried about. >> Plantaines didn't dry out at all.
[17:18] >> Plantaines didn't dry out at all. >> The turkey took a lot longer to reheat. frozen compared [music] to the barley. >> Yeah. This is delicious though. Like I >> No. It tastes identical to coming
[17:32] food is better cuz it's like marinated and settled a little bit. >> The only bad thing about this is the unfortunate color scheme of the three >> If you're going to do anything, undercook instead of overcook. Because
[17:45] if you're microwaving, you can really take that into account if you're trying the food a little bit. >> But if I could whip this out of my minutes, I would be happy. >> And here's what the whole thing, the
[17:58] whole thesis on freezing food is that you cook more food at once to account for a little extra to be frozen and then you're ultimately cooking less food. You're in the kitchen less, which is optimizing your meal prep. So, I think
[18:11] it's kind of genius to have these things around. So, for day two, we had the cilantro rice. And it seems like for my microwave, 7 minutes was really the sweet spot for a perfect reheat. And I have to say that these three cubes
[18:24] actually made a perfect portion for this meal. So, I guess the portion size actually depends on the density of each specific thing that you prep, which is something that I'll personally just get used to and learn as I continue to test
[18:36] different frozen meals. But this specific meal was unbelievable. Such a honestly, that's how it went for the next three meals. You would never know that any of this food was frozen. It all reheated perfectly and it all tasted
[18:50] really get a bad combo with these 10 dishes, which was really the whole entire goal when I was planning out this video. So, overall, I would say these freezer molds are not a gimmick at all and a super viable option to get more
[19:03] food out of less time meal prepping, which is a huge win for any pro home which is a huge win for any pro home cook.

⚡ Saved you 0h 19m reading this? Transcribe any YouTube video for free — no signup needed.