Mind-Blowing Photo Upscaler Test
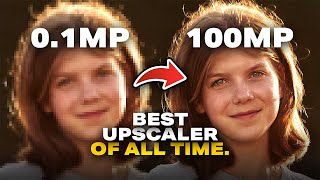
45sThe dramatic before-and-after comparison of a cropped photo instantly grabs attention and showcases the tool's power.
▶ Play ClipThis video compares several AI image upscalers, focusing on Magnific AI's 'precision' mode. The creator demonstrates that while Magnific excels at upscaling faces, portraits, and landscapes, it can introduce unwanted artifacts on plain areas, gradients, and product photography. The video tests Magnific against Photoshop's Firefly and Topaz Gigapixel using various image types, and explores additional features like skin enhancement within the Freepik platform.
To judge accuracy, the creator downsamples a high-res photo to 600px width, upscales it, and compares it to the original. Results show Magnific preserves skin texture very closely.
Magnific introduced a 'precision' mode to reduce unwanted creative detail added during upscaling. The creator uses this mode for all tests through the Freepik platform.
Upscaling a cropped portrait to 8x: Magnific retains the most detail, especially in the eyes and skin texture, outperforming Topaz and Photoshop Firefly.
An old, low-res family photo is restored using Freepik's image generator with a text prompt and then upscaled 8x with Magnific's Sublime model. Result: 113 MB image with incredible detail in fabric and texture.
A low-res (1200px) photo with intricate jewelry and fabric is upscaled 4x. Magnific recreates individual beads, hair strands, and fabric texture, far surpassing Topaz (which creates artifacts) and Photoshop Firefly.
Freepik's skin enhancer adds detail to over-retouched images, but currently may introduce patchy artifacts. The result is more skin detail but imperfect, especially on real photos.
Magnific can alter text (e.g., 'Made in Japan' losing letters) and add false emboss effects or shapes. For product photos, a high-res camera is recommended over AI upscalers.
Landscape photos upscale very well, recovering detail in mountains, hair, and clothing. However, plain areas and gradients show 'blotchy banding' artifacts.
Upscaling a photo of ornate Parisian architecture (statues, clock face) causes Magnific to invent 'alien' details, destroying the original artistic integrity.
A completely blurry photo is restored using Freepik's image generator (Cream 4.5 model) and then upscaled 8x. The final result shows incredible skin texture and facial detail, even recovering eyelid lighting.
**Pros:** Outstanding detail in faces, outfits, wildlife; resolution limit around 10K; best overall quality. **Cons:** Cloud-only (uses credits), expensive for heavy use, patchy artifacts on plain areas/gradients, no offline or unlimited version.
For most creative and restoration tasks, Magnific AI combined with the Freepik ecosystem offers the best image upscaling quality available, especially for faces and landscapes. However, it should be avoided for product photography because it introduces inaccurate details, and the web-based credit system remains its biggest limitation.
"The title is nearly accurate: after testing multiple scenarios, Magnific AI consistently delivers the best upscaling quality for most use cases, though not universally (product, art, gradients)."
What is the name of the new Magnific AI setting that reduces creative detail addition during upscaling?
Precision
1:27
Which platform is used to access Magnific AI for the tests in the video?
Freepik
1:50
What is the maximum upscale factor shown using Magnific AI?
8x
2:13
What upscale factor limit does Adobe Photoshop's Firefly upscaler have according to the video?
4x (cannot do 8x)
2:29
Which upscaling model within Freepik's precision tab is recommended for flexibility?
Sublime
4:32
What file format is recommended for download to preserve absolute high quality after upscaling?
PNG
4:32
In the product photography test, what issue did Magnific introduce to the watch text 'Made in Japan'?
It removed the letters 'N' and 'E' and made 'Japan' incomplete.
9:40
What type of artifact does Magnific create on plain or gradient areas?
Blotchy banding or patchy artifacts.
11:41
For which two types of images does the creator advise against using Magnific upscaling?
Product photography and images with artistic or intricate details (e.g., statues, clock faces).
12:07, 9:13
What is the approximate file size of the old restored photo after 4K generation and 8x upscale?
113 MB
4:32
Which AI model inside Freepik allows generating 4 images at once and is used for restoring blurry photos?
Cream 4.5
13:06
What is the approximate resolution limitation mentioned for Magnific AI?
Around 10K
15:03
Magnific Outperforms Topaz and Photoshop
In direct side-by-side comparison of eye details, Magnific preserved significantly more sharpness and texture than competitors.
2:41Old Photo Restoration Breaks New Ground
An old, low-res family photo was restored to a 113 MB PNG with incredible fabric and wood texture, something impossible months earlier.
4:32Jewelry and Hair Recovery Reveals AI's Strength
Magnific reconstructed individual beads and hair strands from heavily pixelated images, demonstrating its ability to infer fine details accurately.
6:57Product Text Corruption Shows AI Uncanny Flaw
AI upscalers like Magnific can alter or remove text (e.g., watch engraving), making them unreliable for commercial product photography where accuracy is paramount.
9:40Artistic Detail Replaced with AI Hallucinations
Upscaling ornate statues and a clock face caused Magnific to replace artistic features with invented, alien-like details, highlighting the tool's limits on creative content.
12:37[00:00] So, whenever you try to crop a group photo, usually the resolution is absolute crap. But if I were to process the same cropped photo in this wonderful upscaler. So, here's the before and here is the after. If that's not crazy, I don't know what is. But how do you make sure it's the same person? Sometimes while upscaling, it generates new details and makes it an entirely different person. Here's the trick. We going to take a super highresolution photo. turn this into a lowresolution
[00:29] photo by going to image image size and let us just reduce it to width 600. Why not? And hit okay. Right now this is super low res pixels are bleeding out. Now how about we upscale this one and compare it with the original high-res. And here's three of them side by side. On the left you have the absolute original high resolution and this one is the upscaled one. And as you can see there is a bit of a change in skin texture but it's pretty darn close. And remember, this was upscaled from this
[00:59] image. And if you're ready to get your minds blown, let's zoom in a little more towards the eyes. Here's the absolute original one. This is the upscaled one. And here's the image that we upscaled from. What is happening? Now, these were extreme cases with faces. What about wildlife, old photos, landscapes, products, or maybe you entirely missed the focus? Can we recover all that? and how does this tool compare with upscalers from Photoshop and Topaz? All that and more. So, without any further
[01:27] ado, let's get started. A few years ago, I made a video about Magnificai, a tool that upscaled like no one else. The only downside for precise results was that it added a lot of creative details while upscaling, thus changing the original image by a lot. Since then, they created a brand new setting called precision. Does that get rid of the crazy creativity? Let's see. Let's take a look at this example. It's a great shot, but due to cropping, the resolution may not
[01:50] be the highest. To upscale it, we can access Magnific through Freepig. It's one of the best platforms to have everything under one roof, all the tools you need. So here, I'm just going to click on image upscaler and let's simply drag and drop this photo. Now, Magnific still has creative upscaling, which adds a lot of creative detail. We don't want that. We are interested in precision for precise upscaling. And I don't want to introduce any additional sharpness or
[02:13] grain. Again, these are my preferred settings. You can use whatever you wish. Here's an important setting. How much you want to upscale. 2x, 4x, 8x, up to you. Let's go 8x and click on upscale. Now, while it's processing, let us also upscale it through Photoshop and Topaz. In Photoshop, let's go to image generative upscale. Inside of that, choose Adobe's own Firefly upscaler 4x. Now, Firefly has a limit. It cannot go 8x. Click on upscale. Now, I'm going to process the same image in Topaz
[02:41] Gigapixel. Right now, by default, it is doing 2x. Let's see if we can do 8x. Custom. It is doing something. And here's four of them side by side. And the results, I must say, it's pretty clear. Here is the original one. Topaz, Gigapixel Photoshop Firefly and Magnific. And no matter how you look at it, there is no doubt that Magnific killed it right there. Now, if you were to zoom in further and let's have a look at the eyes, this is insane. Let's have a look at Topaz. Very less detail as
[03:10] compared to Magnific Photoshop. Although it was 4x, it's just very, very soft. Now, let's have some fun with some old photos. As I told you, everything can be done inside of Freepic. So, here I have this photo. Let's see how much we can restore it. So, let's upload it inside of Freepic. I'm just going to open the image generator. Inside of that, let's drag it and drop it right there. For model, there are so many models available. I'm just going to go to possibly Google right there. Nano Banana
[03:38] Pro. Now, Freepick is one of the few platforms that give you absolute flexibility. I can just type something like restore this old photo to look as if it was taken today with high resolution modern digital camera. Now I have the option to choose the resolution 1K, 2K, 4K. Let's go for 4K. Let's keep the aspect ratio auto and we can generate with Adobe Firefly. You can definitely choose Nano Banana Pro, but there is no option to choose the resolution. And by default, at the
[04:06] moment of recording this video, it only does 1K. So let's go back to this. Let's click on generate. And if you're not shocked by this result, I honestly don't know what to say. And you can upscale it even further directly from here. Let's click on upscale. And of course, we are going to go to precision. Now, when it comes to precision upscaling inside of the precision tab, there are many models that are available. Most of the time I use the Sublime model. There are other
[04:32] ones that you can try, but the Sublime gives you a lot of flexibility while upscaling. Once it is done, simply click on it. Click on the download button right there. And let's examine it. PNG is fine. Click on download. PNG restores the absolute high quality. And have a look. This is 113 MB. So here is the before and here is the after. I don't even know what to say. Let's zoom in even further. You can even continue to zoom in. That's insane. You can use liquify to slightly move the eyes a
[05:01] little bit to create an exact match. But apart from that, have a look at the details in her dress. texture of the wood, texture of her clothes before, after. Now, if you have a look at the entire image as a whole, you would realize that this was impossible just a few months ago. Creating something like this would be a thing of dreams and especially an image that is coming from this to this. I did one more example with another image with a lot of complexity and it boggled my mind. Here
[05:30] is the before and here is the after. Even if we zoom in and if we zoom in a lot, have a look at the face of the lady. Here's the before. Here's the after. And you can zoom in further and further. Look at the resolution of this photo. Now, we saw that it can do great things with faces. But what about other areas? Many upscalers enhance the face and leave out the rest like the jewelry or the details in the clothes. So, here we have a low resolution photo only 1200
[06:00] pixels wide. If you were to zoom in, you would notice that this is quite pixelated. What's even concerning is that if you have a look at the jewelry, there is no detail left. Similarly, right here, no detail there. Have a look at her outfit. No detail right there. Can Magnific recover it? Let's see. Now, you can choose to upscale it by 4x or 8x. That's up to you. For this one, let's keep it 4x. So, I have opened it up in Photoshop and we're going to compare the before and after. So, here
[06:28] is the before and here is the after. As you can tell, for the face, it did a pretty amazing job. But how does it stand in comparison to Photoshop's Firefly and Topaz? Let's see. Here's three of them side by side. As you can see, Magnific is miles apart. Look at the skin texture with Magnific. Nobody has been able to replicate that. If you were to scroll down on the jewelry, there is no detail here on the topaz. And when it comes to the hair and the strands, Magnific created every single
[06:57] strand. This is where Topaz absolutely messes up. Fireflies one is more natural than Topaz, but not as good as Magnific. Again, it messed up the jewelry entirely here in Topaz. The details are crazy amazing with Magnific. This one is soft. If you have a look at the outfit and all of these details, Topaz just messes it up. Look at the details here. Even Adobe Firefly has done a pretty amazing job even though it's soft. Have a look at the fabric details here. This is
[07:27] insanely bad. This is much better. Let's take a look right there. This is an alien planet jewelry with Magnific. It even created all the single beads. Even Adobe Firefly did that. This is I don't know what they're doing. Water droplets all throughout. No matter where you look, magnific miles better. Adobe Firefly in this case is second and Topaz has just turned it into trash. Now, we have talked about a lot of details here. Can we introduce more details in an existing image that probably doesn't
[07:58] need upscaling, but may need more details, especially the skin areas. So, here we have an image. It's quite high resolution, but it looks overly retouched. Let us drag and drop it inside of the image editor for Freepic. Now, here's the upscale setting that we already talked about. Right beside it, there's this new thing called skin enhancer. Now you can choose flexible skin enhancing. I'm just going to choose faithful so that the original stuff is restored and the default settings are
[08:22] fine. Let's click on enhance. Do keep in mind though every time you apply any of these effects it just does consume certain credits. I wish we had an unlimited plan for everything or wish there was an offline version of this but unfortunately we don't. Anyway, what in the world? It did flip the image. This is weird. Let us download it and flip it back in Photoshop. We definitely do have more detail, more detail in the skin, but it introduces some kind of patch
[08:46] line. It's hard to explain, but it's there. Before, after. Again, it's way more detailed. Helps you prevent plastic skin in AI generated photos, but in real photos, I'm not so sure, especially because of these patches, but I'm sure with time they're going to make it better. One thing we have not covered yet are products. And for product photography solely, I wouldn't recommend any of the AI upscalers. Here's why. So this is a picture of a watch that I took with my phone and as you can see even
[09:13] though this is just 12 megapixels this is very detailed. If I were to upscale it to get the absolute maximum quality this is what would happen. So here in magnific it's already 12 megap so we cannot go 4x but we can go 2x. Let us upscale it and let's see what happens. Now even though the upscaling might seem great and it may seem to have more detail there is a big flaw. It deviates the product slightly. For example, this here in the original one says made in
[09:40] Japan. It's slightly covered. And when we process it for upscaling, it makes it made in Japan and N is gone. E is gone right there. And you don't want to show pictures of a product that is not the actual one. Similarly, with certain textures, have a look right there. Here's the original one. Here's how citizen is written. In the upscaled one, it adds an emboss effect which is not there in reality. And even if you were to look at the honeycomb design in the original one,
[10:10] that is how it should be. In the after, it introduces some additional shapes and lines which were not there. So for product photography, I just recommend get a high resolution camera and capture directly. You don't want any of your product photos to deviate and mislead the customer. Now when it comes to landscapes, you can apply it, but not all the time. When there are mountains and rivers and water and foliage, trees and stuff where details can slightly change, that's fine. This is safe. Let
[10:40] me share with you an example with this image. Let's have a look at the before and after in Photoshop. So, if you were to zoom into the mountains, it's all jaggedy, pixy, and here is the after. That's crazy good. No matter how much you zoom in, before. After. Let's look at all of these areas. Everything is just so detailed. before. No detail there. It's all messed up. And here is the after. Now, let's have a look at the lady right there. Beautifully upscaled. Before, nothing
[11:10] there. And if you have a look at the after, all the hair, everything is just wonderfully done. Jeans, clothes. Now, parts of the grass, I would say it could have done better. This is where it's slightly smudged. But overall, if you look at the entire image before, very less detail, after all that detail back in place. Now, there's one critique here. Whenever it comes to plain areas or areas with gradients, Magnific creates artifacts, some kind of blotchy banding. Have a look right there. You
[11:41] see all of these blotches in these areas? If you were to zoom out, this would be clearer. You see all these blotches? I hope I really hope they make it better with an update. Now, one of the areas where I would not recommend upscaling is when you have artistic details. So, this is a photo that I took in Paris, just a snapshot from my phone. And as you can see, there are these artistic details all over this building. And if you were to upscale it, wait for the magic to happen. Let's zoom in onto
[12:07] the results. So, here's the before. Here's the after. After looks more detailed, but if you were to zoom into the statues right there, what is this before? Artistic. Nice. Everything is beautiful. After it tried to invent all the monster details right in there. Similarly, have a look at the design of the clock. Before, so beautiful, so elegant. After it tried to merge a lot of things just to create detail. Before, see the artistic detail even in low res. This looks like a masterpiece. And it
[12:37] is. After. What in the alien is this? Now, so far you and I did a lot of work with the upscalers and the comparisons. Time for something fun. Let's have a look at this photo. The focus is entirely lost. Maybe on purpose just as a creative project. Can we bring it back to the girl with all the tools we have inside of Freepick? Let us try it. So, we are just going to go to image generator right there. Inside of that, let's drag and drop this photo right here and upload this as a reference.
[13:06] Right now, it is not letting me upload because this is not the right model. Let's try a new model. Let's try Cream. And 4.5 is the latest one. Why not try it? It's a preview. So, let's go to our Finder again, upload this photo, and this should work. And let's type in restore and sharpen this blurry person. And add details. Now, let's pick the resolution. 4K is fine. Aspect ratio, this was about 2 to three. And the great part about this model is that you can generate four images at once. Click on
[13:35] generate. And for certain plans, for right now, this is unlimited as you can see. Let's have a look at the results. These are pretty amazing. Even this one, that's pretty good. Now this is already crazy but I was wondering what if we could upscale it further. Moment of truth. I did a few tries and this is the result we can get. This is where the focus was entirely missed. This is what we can restore from it. Again here is the before and here is the after. If
[14:05] that was not enough, we upscaled it and now this is the result. Doesn't seem like much. Let's zoom in further. What in the world is this? Here's the before, after restoration. And as you can see, there's some pattern in there that can be created with any form of generation. And again, here is the after. All that skin texture. Every pore just shows up. Look at the light on the eyelid. This is insane detail. Now, keep in mind, we came from here to here. With all that
[14:40] being said, as for the pros, Magnificai is definitely magic. and combine that with all the tools inside of Freepic. It becomes an absolute workhorse. I highly recommend that you check out Freepic. I'll leave a link in the description or somewhere so that you can get the highest discount possible, but it will be there. Just check it out. Whether we compare the details in the face or the outfit, wildlife or anything in each and every example, Magnific just stood out.
[15:03] Although it has a resolution limitation around 10K, it is much higher than most of the competition. Now, as for the cons, this works in the cloud and many do. But the bigger problem is it consumes a lot of credits. Depending upon your resolution, the amount of credits it is consuming may change. So, there's only a limited amount of time you can use it as per your plan. And if you want to use it more, you would have to buy more credits. Unfortunately, that's where the world is going at the
[15:27] moment. As far as the technicalities go, I really hope they improve upon those patchy artifacts, especially on blurred, plain, or gradient areas. I only wish there was an offline or unlimited version, but that's wishful thinking. Apart from that, I wish them the best and you don't have to take my word for it. I highly recommend that you try Magnific. I hope you enjoyed this video and if you did, make sure to give us a like and also don't forget to subscribe and not
[15:51] just subscribe. Ring the bell so that you, my friend, don't miss any other future tips, tricks, or tutorials. Thank you so much for watching. I'll see you in my next one. Till then, stay tuned and make sure that you keep creating. I've been to the top of Mount Everest. I've sailed the seven seas. I've shared the stage with all the best. Lot of good it did for me.
⚡ Saved you time reading this? Transcribe any YouTube video for free — no signup needed.