
Run AI Locally for Free with Ollama
44sHigh educational value showing how to run an LLM locally without cost, appealing to developers seeking free AI solutions.
▶ Play Clip"Delivers exactly what the title promises: a step-by-step guide to building a receipt scanner with .NET and local AI."
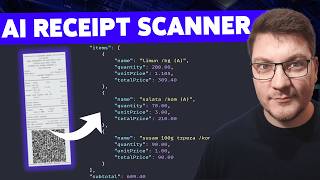
This video demonstrates how to build a receipt scanner application using .NET and a locally running AI model (Ollama). The presenter shows how to use a vision-capable large language model to extract structured data, such as line items and totals, from receipt images, all within a .NET environment.
Use a large language model to extract structured data from images, all within .NET.
Run locally to avoid costs and ensure repeatability. Source code available in the pinned comment.
Llama 3.2 Vision and Granite 3.2 Vision are installed. Sizes vary; choose based on hardware.
Install NuGet packages: Microsoft.Extensions.Hosting and OllamaSharp. Microsoft.Extensions.AI is the building block.
Create a host application builder, add a chat client, and resolve an IChatClient. Default Ollama URI is http://localhost:11444.
Send a message and get a response using ChatClient.GetResponseAsync.
Pass an image to the model using DataContent. Simple prompt 'what's in this image' yields poor results.
Instruct the model to extract line items in a JSON format. Results are accurate for clean images.
Use a type to specify the response format. Add a system prompt for context. Control temperature for consistency.
A JPEG photo of a receipt also parses correctly, showing robustness.
Run the request multiple times and compare results to ensure consistency.
The video successfully demonstrates how to build a receipt scanner using .NET and local AI, providing a practical foundation for more complex applications.
What is the default port for Ollama's local API?
11444
04:17
What are the two vision models mentioned in the video?
Llama 3.2 Vision and Granite 3.2 Vision
00:54
What is the purpose of the temperature parameter in LLM requests?
Controls randomness; lower values reduce randomness.
10:34
What NuGet package is used to integrate Ollama with .NET?
OllamaSharp
02:01
How can you get a strongly typed response from the chat client?
Pass a type parameter to the GetResponseAsync method.
09:15
Local AI for cost and repeatability
Highlights the benefits of running AI locally: no costs and reproducible results.
00:16Prompt engineering for structured data
Shows how a well-crafted prompt can extract structured data from images.
08:18Strongly typed responses
Demonstrates how to get structured, typed data from an LLM, making it usable in code.
09:15Testing for consistency
Emphasizes the importance of testing LLM outputs for reliability.
12:46[00:01] I want to show you how you can use AI for image recognition. We're going to use a large language model to extract structure data from a received image and we're going to be doing all of this inside of net. The first thing we're
[00:16] going to need is a large language model and I'm going to be using O Lama to run this locally. Firstly, because I'm going to keep everything on my machine and not have to pay any costs to AI providers. And the second reason is because this is
[00:29] going to be repeatable, which means you can test it out on your system. And of source code for this entire video for free from the pinned comment right below. Now, let me jump into my CLI because I've already got Olama installed
[00:41] with a couple of large language models. So, the first thing I'm going to do is the names of any models that I currently have available on my system. Right now, I've got two of them, Llama 3.2 Vision
[00:54] and Granite 3.2 Vision. Now you can see the sizes of these models can vary with Llama 3.2 vision being significantly larger than the more simple model. So depending on your hardware, you can decide which one might be better suited
[01:08] for your use case. On the O Lama website, you can also find many other models that you can use for testing purposes. So to actually run your model, you have to say O Lama run and then write the name of the model that you
[01:20] have installed. So what I have is Llama 3.2 version latest and I'm going to run this. And now this is going to spin up the lama process and make this available for use in my system. So what we want to do is to connect to this from our net
[01:34] application. And we're going to start from a literal hello world example with just a console right line command. And to be able to integrate with Olama and use its capabilities, we have to install a couple of nougat packages. So I'm
[01:48] going to install Microsoft extensions hosting which is just there to let me integrate some hosting capabilities mainly for dependency injection into my application. And then I want to look for
[02:01] Olama. So the surface area for these AI libraries is constantly changing. The one constant that's currently maintained is the Microsoft extensions AI. So this is kind of the building block. And then you've also got semantic kernel which is
[02:16] another building block that you can use for interacting with AI. But when it comes to Olama, there are a couple of libraries. The most popular one being library which is now deprecated. And this is also another reason why I'm
[02:30] making this video. Within the readme of the Olama Sharp package, there's actually documentation of how you can use this with Microsoft Exensions AI and how to use this with semantic kernel. And they also lay out some use cases of
[02:42] when you should use which. So you can prefer Olama if you plan to use only Olama models. Microsoft text engines AI is great if you want to do chat and embeddings. And it's a very simple API surface to work with. So it's something
[02:55] I recommend for starting out. And then you've got semantic kernel which is also a bit more complicated. So there's a learning curve here and it has the advantage of allowing you to work with any other AI provider and easily be able
[03:08] to swap out large language models. So what I'm going to install is Olasharp and let me add the latest version and this already has a reference to Microsoft extensions AI abstractions which should be enough to let us use
[03:21] this with an IAT client. So how do we integrate this at the most basic level? First I'm going to create a host application builder and this is coming from the Microsoft extensions hosting namespace and I want to create an
[03:33] application builder. This will give you access to many familiar properties like the I service collection where I want to add a chat client. Now I can't do this because this method doesn't exist and this is actually available inside of
[03:47] Microsoft extensions AI. So let me install this library as well with the latest version. And now this method should show up once this is installed. statement we'll be able to call this successfully. So what do we want to pass
[04:01] in here? I need an implementation of an I chat client and the O lama API client implements the I embedding generator. So if you want to use it to create embeddings, this is the route to go. The constructor here expects a URI pointing
[04:17] to our Olama instance and by default this is running on HTTP localhost and the default port is 11,444. The next argument is going to be our default model and we want to use llama 3.2 vision and the model name that we
[04:34] have is latest. So now I can build my application by saying builder build and this will let me resolve my services from the service collection and I can say get required service and resolve an ichat client. Using the chat client is
[04:48] the simplest way to interact with a large language model. So let's start with a hello world example for AI at least and that is just being able to send a message and get back a response. The API surface is creating a chat
[05:01] message where you can define a role for who is sending this message. So let's say that we want to ask some question and I'll use a chat role of user and then my question will be what is better if core or tapper. This should be a
[05:16] controversial enough of a question to make this interesting. To get back a response, you have to use the chat client. So I'll say await chat client get response async. We have to pass in our message. And that's basically it. So
[05:30] now the response is going to contain some data. The simplest one can be accessing the response text. So I can say console write line and write the language model. So if I start this, we should get back a response. And you can
[05:44] some mistake here. And oh yeah, here it is. So I actually typed out the name of the model wrong. I misplaced the dash and the colon. So let's rerun this. And now it should connect to our Olama instance and ask the question to the
[05:58] large language model. Now be aware that this is a vision model and it what we're actually going to use it for. But this is just to confirm that we can send a request and get back a response. Notice also that this is taking a
[06:12] non-trivial amount of time. So be aware that depending on your hardware capabilities, the inference or how fast the AI can process the request can definitely take a couple of seconds. So we get some response back explaining
[06:24] what the difference is and it suggest that ultimately this depends on what your project specific needs are and what your personal preference is and your good so far. Now what are we going to actually do with the vision aspect? So,
[06:37] what I have here is a picture of a receipt from a grocery store the other day where I bought some lemons, some salad, and some sesame seeds. So, what I want to do is to ask the large language model to process this receipt and
[06:51] extract the line items one by one. Parse the price, the quantity, the line item total, and the order total into some response. So, how do we do that? The simplest prompt for this specific task is asking it what's in this image. Now,
[07:06] how do we actually pass in the image? Well, the message has a contents property where you can add some AI content. And what we want to do is new up a data content object where we can specify the data that we want to pass in
[07:20] to our large language model. And in this case, this is an image. So, I'm going to I'm also going to specify the media type, which is image/png. So the only change here is to our prompt and passing in the image that I just showed you. And
[07:35] I'm going to rerun this example. And of course I have to make sure to respect the folder path before running this example. And now we are going to send off the request to the large language model. And let's see what we get back.
[07:49] contents of this image. And we get a response back where it recognizes mostly the QR code without going into details of what's actually in the image. So we instructions on what we want it to do. Now I'm going to use this as a separate
[08:04] example. Let me comment this out. I'm going to drop the code below and I want to just separate the examples to make it easier later when you grab the source individually. And what I'm going to change here is update the prompt that we
[08:18] are sending to the large language model. So I'm telling it that I wanted to extract all the line items from this received and I'm also giving it a JSON format in which to respond to. So if we rerun the same example using the same
[08:31] image with a different prompt this time, we should expect to get back a different responds with. And you can see that right now this is looking significantly better. It's actually accurately detecting all of the line items on the
[08:45] receipt. So here are the lemons. Here's the salad and the sesame seeds. Notice parsed together with the unit price and the total price. Now, this is obviously it shouldn't be able to parse a number on a different receipt regardless of the
[09:00] definitely take some data from this image and turn it into a structured format. Now, JSON on its own isn't particularly useful. So, I'm going to also comment out this example and create another one. And what I want to change
[09:15] here is use the capability of our chat client to return a strongly typed response. You can actually use a type here to specify the exact format that we want to get back. So I'm going to drop in the types that I want to use and I'm
[09:28] going to ask it to return a receipt where the receipt contains the line items and the subtotal. And each line item has a name, a quantity, a unit price, and a total price. Now, what you can also do is pass in what's called a
[09:41] system prompt, which I'm going to drop here. And this can be particularly powerful to give some additional context to the large language model before you actually ask your question or send your request. So I'm instructing it to be a
[09:54] tailoring this prompt based on the examples that I've been experimenting with, but obviously we can generalize this to whatever extent is needed to make this practically useful in the real world. And I'm just trying to cover some
[10:06] test cases that I ran into while testing this out. So, we've got our system message as well as our user requested message. And we can send both of these into our request here by passing them in the array. So, I can send my system
[10:21] message and then my request message. Now, you can also pass in some chat options. And this allows you to control a couple variables when sending a request to a large language model. And one of those that I want to control is
[10:34] the temperature variable. And basically the lower the value that you use, the less the randomness of the expected response. So note that now we get back a chat response wrapping a received. And instead of writing the response text to
[10:48] the console, I'm going to try to iterate over the line items of this object and write out the individual data properties. So let's see if we are able to do this. And notice that we have now moved into a significantly more complex
[11:01] setup with a system prompt, a user prompt, and also a strongly typed couple of moments and we are going to see if we're able to get the correct results back. And so far, it's looking good. Here's my line item name, the
[11:14] quantity seems correct, the unit price, and the line item total. I can swap out the currency to be whatever I want it to be, but so far this checks out. Now remember that our original receipt is a pretty clean image which may not always
[11:27] be the case. But I've also got another image which looks something like this. It's from a new desktop ad that I got also recently. Now while this is a clean image, it's not a digital copy. So let's see how the large language model fares
[11:39] with this one. Inside of my code, I'm just going to tell it to use the second receipt here. And I'm not going to change anything else. And let's rerun our example. Now, because this uses a different file extension, I'm going to
[11:51] update that to be JPEG. And then let's rerun this and wait a few moments to get back the response. And if everything works okay, we should see a structured response containing the line items, which consists of the shipping costs,
[12:06] which is this part here. This checks out, and then we also get the price for order total. So, we are also able to parse data from an image that you took you can see how we can start turning this into some practical use case. Let's
[12:21] say you build yourself an app where you want to take a quick image of some receipt that you got. The AI is going to process that, pull out inline items, store them inside of a small database or maybe an embedded one within your app
[12:33] your personal finances. And one final thing I want to show you is how you could test something like this. because the responses from the large language models can vary. What you can do when developing this locally is just ask it
[12:47] to do the same request a couple of times. Let's say I want to run this for five times and I want to compare if the results I'm getting back are consistent. example from before aggregating the result and then in the end comparing
[13:01] them to one another with the idea to make sure that they are all identical. request three. Now request four is processing and before you know it we'll then we're just going to compare if they are identical to the first run which we
[13:16] And you can see in the comparison that I'm getting back consistent results even times. So I can be confident that at least on this example everything is working as I would expect. So then you can extend this to categorize the
[13:31] individual line items based on the name of the set line item. and you can do a hopefully this is enough to get you interested and then you can try this out on your own and see where you can take it. If you want to grab the source code
[13:45] the pinned comment right below. If you want to see how you can do something more complex with Microsoft Extensions AI, here's a video going through how to implement vector search by creating embeddings and then implementing it in
[13:59] MongoDB. If you enjoy this video, smash that like button. I would really appreciate it. Thanks a lot for watching and until next time, stay awesome.
⚡ Saved you 0h 14m reading this? Transcribe any YouTube video for free — no signup needed.