
Shoot Once, Get All Angles with AI
45sThe promise of saving time and money by generating camera angles in post is highly appealing to creators.
▶ Play Clip"The title promises a glimpse into the future of production, and the video delivers on that with a practical demonstration, but it's padded with a lengthy promotional segment for Curious Refuge."
This video explores a new AI-powered filmmaking workflow that allows creators to generate multiple camera angles from a single wide shot in post-production. The presenter demonstrates how AI can interpret a scene and create close-ups and different angles, potentially saving significant time and money on reshoots. The video includes practical examples, tips for iteration, and a promotional segment for Curious Refuge.
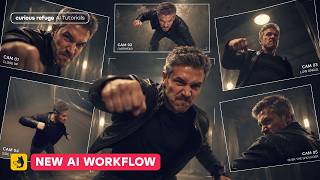
Traditional filmmaking requires shooting multiple camera angles. This video introduces an AI workflow that can generate close-ups and different angles from a single wide shot in post-production.
The presenter shows a side-by-side comparison of a scene: the original wide shot and the AI-generated version with different camera angles. The AI was prompted to cut to different angles without specific instructions.
The AI's initial attempt at interpreting the scene had issues with continuity and action, such as incorrect eyelines and characters not interacting with props realistically. However, the results were still surprisingly good.
A more effective approach involved using timecode-based editing, where the creator specifies the desired camera angle for specific parts of the scene. This method produced better results with fewer continuity errors.
The workflow requires about two to three iterations to get the desired result, costing roughly $1 per second. This is still significantly cheaper than a full reshoot and can save a lot of money on location shoots.
The presenter promotes Curious Refuge, a community and training platform for AI filmmakers, highlighting weekly workshops, office hours, and creative challenges. A community member's project is showcased as an example of the workflow's potential.
This AI-driven approach to generating camera angles in post-production represents a significant shift in filmmaking, offering a cost-effective and efficient alternative to traditional reshoots. While not perfect, the technology is rapidly improving and provides a glimpse into the future of production.
AI Can Generate Camera Angles from a Single Wide Shot
This is the core premise of the video, demonstrating a paradigm shift in filmmaking where post-production can replace on-set multi-camera setups.
Timecode-Based Editing Provides More Control
This technique shows a practical method for guiding the AI, resulting in more accurate and usable output compared to general prompts.
11:30The Workflow is Cost-Effective
At roughly $1 per second, this method is significantly cheaper than a traditional reshoot, making it an attractive option for budget-conscious productions.
13:35[00:00] If you've ever worked on a film project, then you probably know a lot of time is spent getting different camera angles of your scene. But what if it was possible to shoot a simple wide shot and then get all of your close-ups in post-production?
[00:15] Well, that's what this video is all about. Using some brand new AI workflows, you can virtually change your camera to any angle using post-production tools. So in this video, I'm going to show you a glimpse into the future of production by utilizing real live-action footage along with AI scenes.
[00:35] I'll share a few tips and tricks that we learned along the way, and give you some advice on how to save maximum money on your project. I hope you enjoy, now let's hop in. My name's Caleb, welcome to Curious Refuge. Be sure to like and subscribe if you want more videos like this in the future.
[00:52] So to kick things off, I want to show you a quick little scene here. Okay, so we have a cooking segment here, and honestly, it's a little strange.
[01:05] Like, the action's kind of weird, how the fire's so big and they're pouring the onions, and then she, like, picks up an orange and then just puts down the orange, and then grabs the greens and decides she's going to do some shopping while there's an active flame happening right in front of her.
[01:18] Regardless, I want to show you both of these video clips side by side because, as you can imagine, given the topic of this video, the actual video where we cut to all of those different camera angles was actually created using artificial intelligence.
[01:33] The actual source video for this entire scene comes from a single wide shot. So let's say that you are working on a live-action on-location video shoot, and you have a wide shot, but you need different angles of your overall scene.
[01:48] Now, obviously, the best way to go about that is to literally move the camera, move your lights around, and get the exact angles that you're looking for. But because of logistical reasons and schedules and timing,
[02:01] sometimes you only are able to get certain shots. But utilizing this workflow in artificial intelligence, you can actually change your camera angle very easily. Now, the first test that I want to show you is actually using AI to pull this off automatically.
[02:17] So I've seen a lot of influencers talking about how AI can literally pull this off without any human intervention whatsoever. So let's test it to see how good that actually is. So I'm inside of Magnific here, and I'm utilizing C-Dance 2.5.
[02:33] Now, you don't have to use Magnific. you can use any AI tool that has Seedance 2.5 built in. So under the video model, we have Seedance 2.5, and under our media assets, we want to bring in our starting video clip.
[02:47] So again, we're going to utilize this clip that we have from Artlist, and I should note that the clip needs to be under 30 seconds because 2.5 can only ingest up to 30 seconds of video. So we'll go ahead and drag and drop that into the add media section.
[03:02] And for our prompt, I'm not going to read out the entire thing. You can find the link below this video, but we said that we want the actual action and the overall scene to remain unchanged, except for the camera angle.
[03:14] The only caveat is, for this prompt, we said, cut to close-ups and interesting angles to best showcase the action that is happening. And down here, we're in 1080p, which will give you really good resolution that, of course, you can up-res to 4K if you need to.
[03:30] The overall scene is 24 seconds long in 16 by 9 aspect ratio. And for this generation, we'll have sound on, but of course you can turn it off. It really just depends. We'll talk more about that in just a second.
[03:43] And before I hit generate, I should note that that's going to cost you about 25,000 credits, which is $25. So this generation cost us and quite a few of the other generations that I going to show you inside of this video cost a lot of money So we spent way too much money on these tests Hopefully you will save money because we spent it on your behalf So we go ahead and hit generate And after about
[04:06] 10 minutes, we get this video clip here. Again, all of the camera angles were generated with artificial intelligence. But let me know, is this exactly like the reference video that
[04:18] we uploaded? Let's take a look. okay let's see
[04:41] so Perfect. Perfect. I don't know what she did to those onions to make it turn into an egg, but she's pulling off some magic there. So as you can see, if you use AI to give you the different camera angles
[04:56] and you don't specifically prompt, it gets kind of wonky. And so that's not exactly what we're looking for. So the next obvious test is to use time code to define where we want the angle to be at certain points in time.
[05:10] So we're back inside of Magnific now, and we've made some changes to our prompt. So we have a very basic prompt at the very beginning, trying to reinforce that we want the action to be the exact same, but you'll notice that at the bottom,
[05:23] we've now defined certain time codes and where we want the camera angle to be. So for certain angles, we want it to be the original wide shot, and then for other angles, we want it to cut to a close-up. So again, we went ahead and hit render instead of CDANCE 2.5,
[05:38] and after about 10 minutes, we got this. Okay, so again, it's kind of weird, right?
[05:56] Because some shots almost feel very close to the original source footage, and some of the close-ups feel okay, and other shots are just really strange. For example, when it cuts to the overhead shot, she grabs the bell pepper instead of the orange.
[06:09] And so it really took some creative liberties. And so altogether, again, I don't think that would be usable on a professional project. So as you can imagine, the way that you want to pull this off with live action footage inside of Feed Dance
[06:21] is to actually give it the exact video clip that you want the angle to change. So rather than uploading the entire 30-second video clip, you're only going to upload the 3 to 5 seconds that you need for that individual shot.
[06:35] Now I want to show you really quickly how I would go about the process of pulling that off. So I have the original video clip here inside Adobe Premiere Pro, but of course you could use Adventure Resolve or Final Cut Pro, whatever tool you like using for video editing, and I'll go ahead
[06:50] and drag and drop that video clip into my timeline. So I'm going to go ahead and do playback here. Again, that's the space bar inside of Adobe Premiere Pro. Now the keyboard shortcut Command K on a Mac
[07:03] will set a splice point, but will allow the video clip to continue to play. So I'm essentially going to define what angles I want to see in real time. It's almost like I'm a technical director doing live television here.
[07:17] So we'll go ahead and play back and set a cut. So let's say I want to cut there as she pours the onions, and then we'll cut back to the
[07:29] wide shot here, and then cut to above as she's messing with the orange, cut back to the wide shot, cut to a close-up as she grabs the greens, and then cut back to the wide shot. So now inside
[07:43] of our timeline, we have a bunch of individual clips here, and of course, you can drag them around and define exactly what you want from the individual clips. Now, if there's any specific shot that I want to export now to get a different camera angle I can essentially go in and set an in point go to the end of that video clip set an out point and then I can export the video clip of course by going file export and then I can go to media or send it to media encoder That not the purpose of this
[08:09] tutorial so I'll leave it at that. And that will leave you with a video clip that looks something like this. Okay so you get the idea. Essentially we have a short video clip that is the exact part in which we want that close-up tracking
[08:22] shot of the vegetable as she grabs it and then puts it on her right side. So to So to pull this off, we're back inside of Magnific, and again, we have Seedance 2.5 selected. So I uploaded that very small individual video clip here, and for our prompt, we'll say Edit Video 1,
[08:40] and then we'll get into the reinforcing language again that you'll find below this video. The long and the short of it is the prompt is trying to reinforce that we don't want any of the action to change, but we want the camera angle to specifically change.
[08:54] And I'm also reinforcing that I want it to be normal speed, no slow motion, and no cuts. Now, that's easier said than done. I do find that these AI tools sometimes want to push a certain generation to be slow motion,
[09:09] thinking back to the onion shot, but for the most part, it does a decent job at keeping things live action whenever you're actually reinforcing that it should be live action. And so, let's go ahead and hit Generate. And that gives us this video clip here, where she grabs the greens,
[09:24] She pulls them, and then she puts them down. And so now the movement and action is virtually indistinguishable from the footage that we uploaded. There can be small differences, but the truth is, if you're on location doing a shoot where there's repeated action,
[09:39] there's going to be small differences. And so that's more of a post-production problem to edit around than something that is set in stone and that you're absolutely not able to overcome whenever you're working in an AI workflow.
[09:51] So that's how to pull this off with live action footage. and the results are, frankly, very impressive. I do find that it works better with things that are staged, so people talking to the camera or actions that are happening around an environment
[10:05] where you can really tell what's going on as opposed to very, very dynamic movements. But all things considered, it's very impressive and absolutely worth considering if you're working with live-action footage, really no matter what project you're working on.
[10:19] However, I wanted to take a look at this same result utilizing AI video footage. And so we prompted for a 30-second scene of me and Shelby in basically some sort of like murder mystery type film,
[10:32] but the entire scene is just a wide shot. So, let's take a look at the original footage. Again, this comes directly from Seed Dance, and that's why the acting is a little strange, frankly. And he still hasn't noticed.
[10:45] He never does. This came from me. It's your handwriting. I haven't written anything.
[11:00] I love that, like, the music hits and then their moods completely change. It's like they heard the, like, sleeper agent signal and their brains, like, snapped. It's so good.
[11:12] But it's a great candidate for testing out this workflow. So again, the first thing that I wanted to do is see if AI could actually interpret and cut to different camera angles. So we used that same prompt from before where we asked AI to pull off the different camera angles without us being specific about what we wanted to see.
[11:30] And that gave us this result. He still hasn't noticed. He never does.
[11:42] This came for me. It's your handwriting. I haven't written anything. I haven't written anything. Okay, so the scene falls apart, the eyelines make it look like you're watching a Saturday Night Live segment,
[11:57] and he doesn even take a sip of the drink So yeah there a lot of weird stuff happening there Now we went in and did the same approach using time code editing where we described where we wanted the camera to be for different parts of the scene And that gave us this He still hasn noticed He never does
[12:21] This came for me. It's your handwriting. I haven't written anything. Okay, so, yeah, it's actually not bad. There are small details that are different in the timecode version here.
[12:37] So, again, if the action is specific that you needed to pull off, and if you're working on a film project, that probably is the case, then you probably, again, need to do this single shot method where you define the individual shot that you're looking for.
[12:51] So, let's take a look at one very quick example. So, we have this quick little shot here of Shelby taking a sip of the beer, and then you can tell by the time the beer goes down, her eyes have changed and they're like angry and focused all of a sudden, right?
[13:05] So we asked AI to give us a different angle and that gave us this. And yeah, that's basically exactly what we were working for. We also asked for an over-the-shoulder shot of me looking at the letter and that gave us this.
[13:21] Again, not too shabby. I do think there's some continuity issues in the way in which he's holding the object, But again, this can be fixed with iteration. We found that in our test, it takes about two to three iterations to get exactly what you're looking for.
[13:35] But frankly, that's only $1 per second as opposed to entirely having to go about the process of doing an entire reshoot or even not having to be on location and shoot as much. You're frankly going to save a ton of money utilizing this workflow.
[13:50] And so we did this for quite a few different angles in this scene and got this. And he still hasn't noticed. He never does.
[14:03] This came for me. Your handwriting. I haven't written anything. Okay, I mean, it's pretty cool. Of course, we can begin to dissect this and point out things that are potential issues,
[14:19] but the truth is, again, you can use iteration to solve a lot of those problems. You're more than likely not going to get it right in the very first take, but frankly, that's always been true in filmmaking. If you want to learn more about this workflow, along with a ton of updates that have been happening in the world of narrative storytelling,
[14:37] I highly recommend checking out our training over at Curious Refuge. Our members have access to weekly workshops with experts, office hours where you can get your pressing AI questions answered, live events all over the world and the world's most up-to-date AI courses,
[14:54] and we would love to have you inside the community. You can learn more over at CuriousRefuge.com. Inside our membership, we also challenge our community to come together and do creative experiments that can help them build up their portfolio and demo reel
[15:08] so that they can practice the skills that they need to land real-world opportunities. And I want to give a shout-out to the latest winner of our build competition. Jeremy Herman put together a short film called The Nose Tirade, and it's his take on a famous speech from Serrano, and it is an incredible project.
[15:29] We basically asked him to create a photorealistic 60-second scene that includes two to three primary characters with clear motivation in a setting with very clear conflict, and Jeremy knocked it out of the park.
[15:42] He's actually a director based in France with 20 years of traditional filmmaking experience and it's completely apparent from the incredible piece. If you want to check out the full project, you can see it over inside the Curious Refuge portal
[15:55] where you can also create your very own profile for free. Again, thank you so much for watching this video. Be sure to like and subscribe if you want more tutorials like this in the future.
⚡ Saved you 0h 16m reading this? Transcribe any YouTube video for free — no signup needed.