Topaz Astra vs Crystal: Which AI Upscaler Wins?
50sDirect comparison sparks debate among creators choosing between two popular AI upscalers.
▶ Play ClipThe video compares two leading AI video upscalers, Crystal and Topaz Astra, across various footage types including AI-generated clips and archival material. It provides a step-by-step tutorial on using each tool and evaluates their performance in terms of quality, cost, and processing time. The conclusion offers recommendations based on project needs.
Crystal and Topaz Astra are the primary AI video upscalers discussed, with Crystal accessed via Fall AI and Astra via its own website.
Crystal costs about $1.40 per four seconds for HD to 4K; Astra costs about $0.10 per second, making it three times cheaper.
Astra takes about 30 minutes per clip, while Crystal is faster.
For AI-generated clips, Astra consistently produced better detail and natural sharpness compared to Crystal's over-sharpened look.
For archival footage, both tools removed grain, which may not be desirable for vintage documentary aesthetics.
A multi-step workflow using Astra for upscaling and Topaz Video AI for stabilization improved shaky, low-res iPhone footage.
Runway and Google Flow offer native 4K upscaling for AI-generated videos.
"The title is accurate; the video thoroughly compares AI upscalers and provides actionable results."
What are the two primary AI video upscalers compared in the video?
Crystal and Topaz Astra.
00:53
How much does Crystal cost to upscale from HD to 4K?
About $1.40 for every four seconds of video.
03:34
What is the pricing for Topaz Astra?
About 10 cents per second, making it about three times cheaper than Crystal.
04:27
What online aggregator is recommended for using Crystal?
Fall AI.
02:57
How long does Astra typically take to render a clip?
It takes about 30 minutes.
04:27
What tool is used for stabilization after upscaling?
Topaz Video AI.
09:45
Which model is selected in Astra for upscaling?
Starlight for size two.
04:15
Which two AI video generators offer native 4K upscaling?
Runway and Google Flow.
11:25
Why might Crystal and Astra not be ideal for archival documentary footage?
It removed the grain, which may not be desirable for vintage documentary aesthetics.
07:05
Multi-step workflow for low-quality footage
Describes a practical method combining Astra upscaling with Topaz Video AI stabilization to improve shaky, low-res clips.
08:11Astra outperforms Crystal for AI-generated clips
Direct comparison shows Astra delivers significantly more detail and natural texture, making it superior for high-budget projects.
05:46Grain removal may harm documentary authenticity
Both tools removed grain from archival footage, which could detract from the vintage feel desired in documentaries.
07:05Cost and time trade-offs between tools
Crystal is faster but more expensive; Astra is cheaper but slower, affecting workflow decisions.
04:27[00:00] In this video, we are going to take a look at the best AI tools for upresing video footage. If you've ever wanted to create cinematic, high quality video clips using AI,
[00:12] this is the tutorial for you. Let's hop in. Be sure to like and subscribe if you want more AI video tutorials in the future. Okay, so let's talk about the best AI video upresures on the market. Now, for the sake of this video,
[00:25] we're going to take a look at two different examples. The first is clips that were generated using artificial intelligence and upresing them to higher quality. The second example that we're going to take a look at is using archival footage and upresing it
[00:39] so you can use it inside a documentary project. Now, if you're interested, we made a similar video tutorial about the best AI image upresures recently. I highly recommend checking out that video. So there's been a lot of chatter in the AI video space
[00:53] over the last few weeks regarding two primary tools. The first is Topaz Astra and the second is Crystal. Both of these tools are AI video upresures
[01:05] that introduce more information into your video frame. Long story short, you have the ability to upload a low res video clip and these tools will take that video clip add in more information while still maintaining
[01:18] the overall integrity of the source video giving you 4K quality with hypothetically more resolution and information so that you can use the clip in a professional project. We're going to use five different unique examples
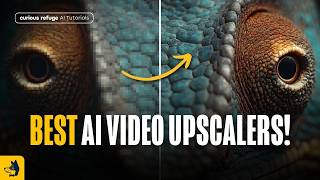
[01:31] for our workflow here. The first is this super close-up shot of this lizard and this was generated inside of cling with a base image reference coming from a mid-journey image.
[01:43] It looks very good by itself, but you can tell there's a lot of fractalling happening and this video clip might not be ready to be used inside a television quality or silver screen quality use case.
[01:56] We also have this VFX shot here. Again, generated using cling image reference and you have the car, it flies away. A pretty compelling shot, not too shabby. We also have this VFX shot here
[02:08] again with a base image coming from mid-journey and it was animated inside of cling. The VFX are incredible. The VFX industry is changing incredibly quickly. I think it did an amazing job. Now, for our documentary examples,
[02:20] we have two different clips here. First, we have this archival clip of this baby walking here and then we have this video clip here shot on an old iPhone and you can see it's just super shaky.
[02:32] The quality is really bad and so hypothetically, how do we upscale this video footage to be better quality so that we can use it inside a documentary project? So like I said, we have Crystal and we have Topaz Astra.
[02:44] Now, there are other tools that we will talk about later inside of this video but the two primary tools for giving you maximum quality are Crystal and Topaz at this point. So to use the Crystal video upscaler, the easiest tool is Fall AI.
[02:57] It's essentially an online aggregator that really strips back a lot of the UI elements that you might find in other aggregators like Free Pick or Higgs field and it gives you exactly what you need and really nothing else.
[03:09] So in order to use the tool, all you have to do is upload your base video. So for our example, we'll upload our shot of our lizard here and as you note, that shot is in 1080p. We want to upscale this to 4K.
[03:22] Now, down here under Settings, you can see we have this additional setting slider here and we'll make this twice as large basically going from HD to 4K. You can of course upscale it as much as you want.
[03:34] Now, you may be wondering about pricing here long story short. If you want to go from HD to 4K, it's going to cost you about $1.40 for every four seconds of video. And when you're ready, go ahead and click Run. Now, before I show you the output from Crystal,
[03:48] I want to show you how to do the exact same thing inside of Topaz and then we'll compare and contrast the two tools. To follow along with this tutorial, I do want to note you can download all of the assets that I'm using by clicking the link below this video. It's completely free and available on our website.
[04:02] To use Astra, all you have to do is hop over to the Astra website and we will drag in our reference video clip here. So we have our lizard will drag and drop it in here and we're going to select the precise model
[04:15] for Starlight for size two. We'll select 4K and you do have the ability to change the output frame rate if you want to. You definitely don't have to. It is available to you if you want though.
[04:27] And when you're ready, go ahead and click render. Now, Astra does take longer. It usually takes about 30 minutes to get your final clip from Astra and overall pricing is it cost you about 10 cents per second making it about three times cheaper than Crystal.
[04:42] Okay, so we ran our video clips through the upscaling models. Now let's compare the results. So again, this was our original video clip of the chameleon here and it looks good, but again, it's very soft.
[04:54] Now here's the result from Crystal. You can see there's just much more information. I do think it's a bit hyper sharpened like a little unnatural in the sharpness, but not too bad. It's definitely better quality than the base video
[05:08] that was uploaded. And then we have this result from Astra. I gotta say this is incredible. The fact that you can through visual effects render a shot like this so quickly is truly amazing.
[05:21] I think it absolutely knocked it out of the park. Now, for our second shot here, we have this VFX shot of the ship flying. And I do want to point out there's a lot of noise in the background, a lot of banding in the sky. There's just issues here.
[05:33] And we get this result from Crystal and there's definitely things to like. There's a lot of details in the buildings. There's a lot of sharpness, maybe a little too much sharpness, but not too bad. Here's the exact same result from Topaz Astra.
[05:46] And it's just not even on the same planet. You are getting a lot of reflections. You can tell what type of texture, the roof is of this building, and it's just a much better result. Now, it is not solving the banding problems
[06:00] that we are seeing in the background. So you would more than likely need to fix that in your video editing application if you wanted to use this in a professional project. Now, again, we have this reference shot that was generated inside of Kling.
[06:13] It looks really good, but there is some distortion in the details. Hopefully all that's coming through on YouTube. Now, here's the same result from Crystal. Looks very nice again, a little overly sharp,
[06:26] but altogether a very good generation from Crystal. And here's the same result from Topaz. It's incredible. Like this looks like a very high budget VFX project. Are there small things that I would want to change
[06:39] in the video clip, of course, but all things considered the fact that you can do this is just truly mind-blowing. So for our documentary example, here's our reference footage of our person walking and, you know, it looks cool,
[06:52] but let's say we want more resolution here. Here is the result from Crystal, and it's not too different. If anything, it just kind of took away the grain. Maybe there's more information here. I wouldn't say it did a better job, especially from a storytelling perspective.
[07:05] It just looks very similar. And here's the same result from Astra and there are sharper details in the character, but again, really all it did is remove the grain. So depending on the project you're working on,
[07:18] that may be desirable, but I think if it's a vintage documentary like this, you probably want the grain because it just plays into the authenticity of the piece. So I don't actually think that the video upresurs did a better job than just using the base video footage.
[07:30] For our final example here, we have this iPhone footage. It's just shaky and low quality, not the best video clip. Honestly, it's kind of distracting how shaky and bad it is. So here is the same video clip ran through Crystal,
[07:43] and there's definitely more information, but it's just very shaky, and I think as an audience member, it would almost bring you out because the quality is just so bad. And we ran the same video clip through Topaz Astra. We got this result here, which does look good.
[07:57] It's not perfect, and it's definitely still shaky, and it also was shot in 18 frames per second, and that's still coming through here. So not a terrible result. Definitely is better, but it's not the best. So let's say that you have an old digital video clip like this,
[08:11] but you want to improve the quality and make it to where you could use it inside a modern project. What are you going to do? Well, we figured out a workflow that I think is really interesting. Let me show you. The first thing you're going to do is go to Astra.
[08:25] So let's go ahead and bring in that reference video clip. Again, 18 frames per second, super shaky, very weird. We'll go ahead and drag and drop that video clip into Astra. And again, we're going to select 4K. Now, because this original video was in 18 frames per second,
[08:40] we're actually going to change this to 60 frames per second to really smooth out the overall video clip. You can of course select 30 frames per second or 24. If you wanted to, I'm selecting 60 because it's going to give us more information
[08:53] and just help with the smoothing process. You also have the ability to change it to slow motion if you wanted to. I don't want to do that. So let's go ahead and click render. And after a few minutes, we have this video clip here, which has way more information than the original video.
[09:08] But it still feels very similar to the source footage. Obviously, it's not quite as high resolution as if you shot it on a modern 4K camera. But the fact that the resolution of the original video clip was so bad and it was so shaky,
[09:21] this is a huge step forward. But we're not done. So I do like the amount of details in this video clip, but it's still pretty shaky. It kind of, I think, would give the audience a bit of vertigo if they were watching it. So how do we smooth that out?
[09:33] Well, there's a lot of different tools that are out there. For example, you have the warp stabilizer over in the Adobe suite, but the tool specifically that I want to use is another tool developed by Topaz.
[09:45] This tool is called Topaz Video AI. There's an online version and then there's a version that you can download to your computer. I'm going to use the version that's on my computer here. So let's go ahead and grab that video clip
[09:57] that we got from Starlight precise two. And let's drag and drop it into our Topaz Video AI panel. Now I'm not going to select enhancement because I want it to just continue to be in that 4K quality.
[10:10] And I'm not going to change the frame interpolation, although I totally could change it now into any frame rate I want, including 24 frames per second or any frame rate that makes sense for the project you are working on. What I am going to select though
[10:22] is the stabilization button here. So go ahead and select that stabilization button and you can turn the strength to whatever you want. For this example, I'm going to select 35 and I'm not going to select jittery motion.
[10:35] Sometimes for your video clips, if you select jittery motion, it will make the jitter as much less. The problem is it also can add in a lot of distortion and weird blurring inside of your video depending on the clip and the amount of movement.
[10:48] So you can just kind of pick and choose and see what makes sense for the project that you are working on. And when you're ready, go ahead and click export. And after a few minutes, we get this video clip here. Yeah, not too bad.
[11:00] Obviously, there is still a little bit of warping in the background, like a little bit of warping, some of the details around the person's eyes, they get a little blurry for a second. But if you compare that to the original source video,
[11:13] it's not even on the same planet. So if you require more resolution for a documentary project, I think that this specific AI workflow is really helpful. Now I should note that in two other AI video generators,
[11:25] you do have the ability to get 4K resolution natively inside of the applications. The first is on runway. If you generate a video clip in runway, all you have to do is click on that upscale to 4K button and it will upscale the video footage to 4K.
[11:39] And the second is in Google Flow. If you generate any video clip at all, you can click that download button and click upscale to 4K to get 4K quality. Now I made a video recently about getting a maximum of cinematic quality from your AI videos
[11:53] that show you a very specific workflow that I think is really helpful or getting really good results from your generated AI assets. I highly recommend checking that out. And of course, if you want to learn industry standard workflows
[12:06] inside the world's largest AI filmmaking community, I highly recommend checking out our courses over at Curious Refuge. We train artists at every major studio and have multiple live events every single week.
[12:18] We would love to have you inside of the program. Thank you so much for watching this video. If you have any questions or tool recommendations, we would love to hear about them inside of this video, best of luck on all your projects.
⚡ Saved you 0h 12m reading this? Transcribe any YouTube video for free — no signup needed.