
Create Your First Form in ConvertKit
45sClear step-by-step instruction for beginners, high search intent for 'how to create form'
▶ Play Clip"The title likely promises a tutorial and delivers exactly that—a straightforward, step-by-step guide without fluff."
This video is a step-by-step tutorial on creating and customizing forms and landing pages using a platform (likely ConvertKit). It covers form creation, customization of content and settings, display styles, and embedding options.
After account setup, click 'Create Form' to start. You can name it and choose between a form or a full landing page.
Selecting landing page gives more options. This video focuses on creating a form, with a separate video planned for landing pages.
Edit the form title (e.g., 'Join my newsletter'), button text, field labels (e.g., first name, email), and add a description. You can also upload a small icon.
After customizing, hit save and go to the settings tab. Options include converting to a landing page, customizing post-signup text, and email content.
Decide whether to send an incentive or confirmation email. For double opt-in, customize the confirmation message and email content.
Alternatively, set up a bonus content email, e.g., 'Download the sample chapter' or 'Download your bonus'.
In main settings, under 'Sign up and send up', you can enter a URL, upload a file (like a PDF), or link to a custom page (e.g., yoursite.com/thanks).
If you have a course, you can connect it here to send a series of emails after signup.
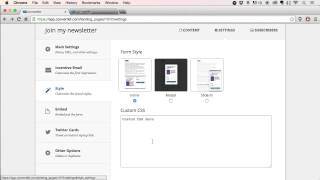
Under style, you can add custom CSS or change the display style: inline (responsive), modal (over content), or slide-in (from left or right).
For modal, set display triggers: scroll percentage (e.g., 70%), timing (e.g., 10 seconds), or exit intent (when visitor is about to leave).
Slide-in forms can't use exit intent, but you can choose bottom left or bottom right position and set a timing trigger.
Under embed, copy a single line of code to drop into your site. For advanced customization, use full HTML, but 99% of users only need the one-liner.
A WordPress plugin is available in the knowledge base for easier integration if you use WordPress.
The video provides a clear, practical walkthrough for setting up a form, from creation to embedding, with options for customization and display triggers to optimize signups.
What are the two main options when creating a new form?
A form or a full landing page.
What is the purpose of the 'Sign up and send up' setting?
It determines what happens after a user clicks the submit button: redirect to a URL, upload a file, or link to a custom page.
02:22
What are the three display styles for forms?
Inline (responsive), modal (over content), and slide-in (from left or right).
03:17
What triggers can be set for a modal form?
Scroll percentage (e.g., 70%), timing (e.g., 10 seconds), or exit intent.
03:32
Can slide-in forms use exit intent?
No, slide-in forms only have timing and position options, not exit intent.
04:09
What is the simplest way to embed a form?
Copy the one-line embed code and paste it into your site.
04:36
Form vs Landing Page
Clarifies the distinction and helps users choose the right option for their needs.
Double Opt-In Setup
Explains how to implement double opt-in, a key email marketing practice for list hygiene.
01:25Exit Intent Trigger
Introduces a powerful conversion tool that captures visitors about to leave.
03:32One-Line Embed Code
Simplifies integration, making it accessible for non-technical users.
04:36[00:00] Once your account is fully set up, you can go about creating your first form or landing page. To do either of those, click Create Form. On this page, you can name it, and then you can also choose whether you want just a form or a full landing page.
[00:14] You can see if you select the landing page, you get a few more options. For this one right now, what we're going to do is create just a form. In another video, we'll show you a landing page. landing page. So if we're creating just a form, what we're going to do is say, call
[00:30] it join my newsletter, and create that form. And then here you can change any of this content. So we're going to say join my newsletter, and then you can customize the button text.
[00:46] You can customize any of this. You can even change first name and email address if you I'm going to translate those to another language. And then you can talk about why you should join my newsletter.
[01:02] When you're done with all that, you can also upload a photo right there, just a small icon that will sit next to the text. Hit save when you're done. And then we can move on to the settings tab Over here you can do a few different things So you could convert it to a landing page if you change your mind later You can customize the text that going to show up after they sign up
[01:25] And you can customize the email that they're going to get sent. You can first decide after they sign up, do you want to send them an incentive or a confirmation email? You can uncheck that box if you don't want to.
[01:37] Leave it checked if you do want to. So what you'd say is, thanks, now I just need you to confirm.
[01:50] And then you could fill this out saying, hey, thanks for signing up, confirm your subscription. If you wanted to do a double opt-in. And then you could say, talk soon, Nathan.
[02:04] Whatever you want. So that's how you would set it up as a double opt-in. Or you could do it where you give away special bonus content, and so you'd set this content to say, download the sample chapter, download your bonus, whatever it is.
[02:22] Now, to set what happens when they click that button, you're going to go over to the main settings, and it's this sign up and send up right here. So you can either enter a URL, and by default, it going to just send them to a page that says your subscription is confirmed But you can also upload a file and select you know PDF whatever it is or you could put a new URL and put it
[02:46] at you know your site comm slash thanks for joining my newsletter and maybe that page would have links to your products or some other things the last thing I want to show you in here is you can select course so if we had a course
[03:00] created here's where you would connect it if you wanted to send a series of emails after they signed up. Okay once you have all of that done make sure to hit save and then you can come under style if you wanted to change anything there like adding some custom CSS or what you can also
[03:17] do is you can change the display style and so by default we're going to have this nice responsive form that sits inline or you can change it to a modal that is going to display over the content or a slide-in form that's going to slide up from the bottom, either
[03:32] in the left or the right. And with either of these, you're going to see some additional settings. And so what we've got is you can do a scroll percentage.
[03:44] So this is when the modal is going to be displayed. If someone scrolls down at least 70% of the page, this form is going to fade in. You can do it after timing of 10 seconds or you can do it on exit intent And what that is is we wait a certain amount of time and then if we get the feeling that the visitor about to leave the page so they heading for the back button then
[04:09] we're going to show that modal, basically when they show an exit intent. Now, the next thing is the slide-in, and you're going to see, you can't do the slide-in on exit intent, you just have the two options, but you have a new option of displaying it
[04:23] in the bottom right or the bottom left, where you want it to slide in from. So we could say you want it to slide in after 10 seconds. Or if you want it to just appear inline in the content, in your sidebar, in your footer, wherever it is,
[04:36] you'd select the inline option. And then no matter which option you choose, you can come over here under embed, and what you're going to want to do is just select this one line of code and drop that right into your site.
[04:51] and that's pretty much it if you need to do a lot of customization or something like that you can use this full HTML here but 99% of users just need this one line of code there's also a WordPress plugin
[05:03] that is in the knowledge base you can get access to and that makes it easier if you use WordPress
[05:17] ...



⚡ Saved you 0h 05m reading this? Transcribe any YouTube video for free — no signup needed.