Build the Desk Back Frame Fast
35sShows a clear, step-by-step assembly of the desk's back structure, which is satisfying for beginners and demonstrates precise alignment using a spacer.
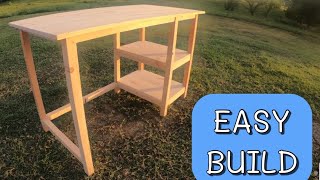
▶ Play ClipThis DIY tutorial walks beginners through building a simple desk from scratch. The host provides a complete cut list, demonstrates pocket hole joinery, and shows assembly of the frame and top. The video is designed for those new to woodworking.
Six 12-inch, seven 18.5-inch, and two 27.5-inch 1x2s; six 30-inch, one 27.5-inch, and one 18.5-inch 2x2s.
All boards except the 30-inch 2x2s need two pocket holes on each side; some 1x2s also get centered holes for top attachment.
Marks at 3 inches and 15 inches from bottom on the 30-inch 2x2s guide shelf placement.
Back side assembled with 30-inch uprights, 27.5-inch 2x2 at 3 inches, 27.5-inch 1x2 flush top, and 12-inch 1x2s at marks.
Front side mirrors back but omits bottom 2x2 on large opening.
Four 1x8 boards cut to 21 inches, notched to fit around 2x2s, glued and nailed.
Two 4-foot 1x12 edge-glued boards joined with glue and pocket screws, attached with overhangs: 2" sides, 1.5" front, 1" back.
Fill blemishes, sand, then paint or stain.
"The title accurately describes a step-by-step desk build for beginners, including all cuts and assembly."
How many 1x2 boards are needed and what are their lengths?
Six 12-inch, seven 18.5-inch, and two 27.5-inch.
0:27
How many 2x2 boards are needed and what are their lengths?
Six 30-inch, one 27.5-inch, and one 18.5-inch.
0:38
Which boards do NOT require pocket holes on each side?
All boards except the 30-inch 2x2s need two pocket holes on each side.
0:55
Why are two pocket holes placed in the center of some 1x2s?
To attach the table top later.
1:19
What two marks are made on the 30-inch 2x2s?
3 inches and 15 inches from the bottom.
1:27
What size pocket screws are used to attach the boards?
1.25-inch pocket screws.
1:51
What is used as a spacer to offset the 1x2s from the edge of the 2x2s?
Quarter-inch plywood.
2:09
How many 1x8 boards are needed for the shelves and what length?
Four 1x8 boards cut to 21 inches.
3:57
What is the table top made from?
Two 4-foot pieces of 1x12 edge-glued lumber.
4:43
What are the overhang measurements for the top when using edge-glued lumber?
2 inches on each side, 1.5 inches front, 1 inch back.
5:14
Save money by cutting 2x4s into smaller lumber
Provides a cost-saving tip for beginners.
0:20Using a Kreg R3 jig for pocket holes
Highlights a key tool for strong joints.
0:47Using a spacer for consistent offset
Ensures uniform alignment of boards.
2:09Overhang measurements vary by lumber type
Important detail for proper fit.
5:14[00:00] today on diy man i'm going to walk you
[00:02] through a step-by-step build of this
[00:04] nice little desk
[00:10] let's start the desk by cutting out some
[00:11] one by twos and two by twos
[00:17] i'll put the materials list in the
[00:19] description below
[00:20] also don't forget that you can save a
[00:22] ton of money by cutting up those two by
[00:24] fours into those small lumber pieces
[00:27] for the one by twos we need six that are
[00:29] twelve inches
[00:31] seven at eighteen and a half inches and
[00:34] two at
[00:34] twenty seven and a half inches next for
[00:38] the two by twos
[00:39] we need six at thirty inches one at
[00:42] twenty seven and a half inches and
[00:44] one at eighteen and a half inches now
[00:47] i'm gonna make some pocket holes and
[00:48] some of these boards with my craig
[00:50] r3 jig this is probably the best thirty
[00:53] dollars i've ever spent
[00:55] we're going to need to put two pocket
[00:56] holes on each side
[00:58] of all of these boards except the thirty
[01:01] inch two by twos
[01:03] [Music]
[01:07] also on two of the eighteen and a half
[01:09] inch one by twos
[01:11] two of the 12 inch one by twos and the
[01:14] two
[01:14] 27 and a half inch one by twos we'll
[01:17] need to put two pocket holes in the very
[01:19] center
[01:20] these are going to be to attach the top
[01:22] later on
[01:23] let's make a few marks on the 30 inch
[01:25] two by twos
[01:27] we need to make one mark that's three
[01:29] inches up from the bottom
[01:30] and then another mark that's 15 inches
[01:32] up from the bottom
[01:34] i'll start by laying out the back of the
[01:36] desk
[01:37] the 30 inch two by twos are going to
[01:39] make up the uprights
[01:40] the 27 and a half inch two by two will
[01:43] be three inches up from the bottom
[01:44] then that twenty seven and a half inch
[01:46] one by two will be flush with the top
[01:48] these are 12 inch boards now we'll just
[01:51] attach these with one and a quarter inch
[01:53] pocket
[01:54] screws the bottom of the lower boards
[01:56] will be flush with the top of that three
[01:58] inch mark
[01:59] then the bottom of that middle board
[02:01] will be flush with the top of that 15
[02:03] inch mark
[02:04] the top one by twos are just flush with
[02:06] the top of those 30 inch two by twos
[02:09] as you can see i laid a piece of quarter
[02:11] inch plywood underneath those one by
[02:13] twos
[02:14] next on the bottom left we'll attach
[02:16] that eighteen and a half inch two by two
[02:23] then we'll put one of the eighteen and a
[02:24] half inch one by twos
[02:26] up at the top there those last six
[02:29] eighteen and a half inch one by twos
[02:31] will go flush with the top
[02:33] on that 15 inch mark then on that three
[02:36] inch mark from the bottom
[02:38] as you can see i'm still using my
[02:40] quarter inch plywood to set these back
[02:42] from the edge of the two by twos
[02:44] just a quarter of an inch
[02:48] here's a quick look at the desk before
[02:50] moving on
[02:54] as you can see for these top boards i
[02:56] use the ones with the pocket holes in
[02:57] the center
[02:58] like i said this is going to be to
[03:00] attach the table top here in a little
[03:02] bit
[03:04] now let's put the front side together
[03:06] just remember this side is going to be
[03:08] the exact
[03:08] opposite of that other side one
[03:10] exception is that this side doesn't have
[03:12] a two by two on the bottom side of that
[03:14] large opening
[03:16] once again i'm offsetting those one by
[03:18] twos
[03:19] and the bottoms of those boards are on
[03:21] the tops of those marks
[03:30] now for the fun part let's put these two
[03:32] sides together
[03:34] it's actually kind of starting to look
[03:36] like a desk now
[03:47] [Music]
[03:50] here's what the basic frame should look
[03:52] like once it's completed
[03:54] [Music]
[03:57] let's cut four 1 by 8 at 21 inches
[04:02] let's mark the two corners on each of
[04:04] these four boards that's going to sit up
[04:05] against these two by twos
[04:08] i'm making my marks so that when i cut
[04:10] out the notches on the one by eights
[04:12] the edges will be flush with the edges
[04:14] of the one by twos
[04:16] let's cut those out real quick
[04:21] [Music]
[04:23] then we'll just install those with wood
[04:25] glue and a small nail gun
[04:28] this 18 gauge brad nailer that i'm using
[04:30] came as a three-part
[04:31] set i use these things all the time and
[04:34] they're actually a really good quality
[04:36] for the price
[04:37] i have a link in the description if
[04:38] you'd like to check out the reviews on
[04:40] amazon after this video
[04:43] now let's cut up our 1 by 12 or our 12
[04:46] inch edge glued lumber
[04:47] into two 4 foot pieces
[04:56] let's put these two boards together with
[04:58] a little bit of wood glue and four or
[04:59] five pocket screws
[05:02] [Music]
[05:07] now we'll just attach the top using wood
[05:09] glue a couple nails
[05:11] and those four pocket screws from the
[05:13] bottom
[05:14] the left and right sides should overhang
[05:17] two inches
[05:17] on each side if you use edge glue lumber
[05:20] like i did
[05:21] the front should overhang an inch and a
[05:23] half and then the back should only
[05:25] overhang an
[05:26] inch now if you use normal one by
[05:29] twelves the front and back should both
[05:31] overhang a half an inch
[05:37] [Music]
[05:50] here i am flipping it over and
[05:51] installing those screws from the bottom
[05:53] this will also help prevent the 1 by 12s
[05:55] from warping
[05:57] next fill in all your blemishes with a
[05:58] little bit of wood filler and sand it
[06:00] down really good
[06:12] once your desk is sanded down it's ready
[06:14] to paint
[06:15] stain or do whatever you want with it
[06:19] if you do build this desk though would
[06:21] you share your photos with me
[06:23] on my handmade diy projects facebook
[06:25] page
[06:26] also if you're new here please consider
[06:29] subscribing
[06:30] and be sure to smash that like button if
[06:32] you got value out of today's video
[06:35] also if you're needing a chair to go
[06:37] along with that desk
[06:38] i've got the perfect video for you
[06:41] check it out in the description and i'll
[06:43] see you next time on diy man
[06:51] [Music]
[06:59] you
⚡ Saved you 0h 07m reading this? Transcribe any YouTube video for free — no signup needed.