Why I'm Building My Own Meeting Pod
45sHigh relatability and frustration with expensive office solutions, plus the challenge of DIY vs. buying.
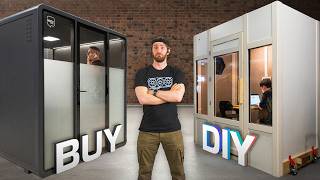
▶ Play ClipThe video documents the process of building a two-person call pod from scratch to compare its cost and time investment against a commercial solution. The host aims to prove that commercial pods are overpriced by constructing a DIY version.
The Tuesday Plus pod from Bureau retails for about $14,000 US plus $1,000 installation.
The DIY pod will have similar dimensions, built with a plywood base, 2x2 frame, 1x4 posts, hardboard, and fabric.
The base is simple floor framing with 2x2s and plywood, using the plywood as a template for cutting.
Crossmembers are added for stability, but dovetail joints prove problematic, leading to a switch to stick framing.
A quarter-inch discrepancy in wall dimensions causes uprights to angle, requiring adjustment.
Dovetail joints fail near the top, so the team switches to 2x2 stick framing for rigidity.
Acrylic windows are cut with a plastic-specific blade and double-paned with an air gap for soundproofing.
Fabric is applied to hardboard panels using spray glue and an iron to remove wrinkles.
A door is built from 2x4s with pocket holes, soundproofing, and double-pane glass.
The pod features double-pane glass, soundproofing (30 dB reduction), a USB-C screen, and a fan/light unit.
Materials cost $4,400 CAD ($3,100 USD), but labor was 176 hours, making total cost $8,380 USD at $30/hr.
While materials are cheaper, the time investment makes it impractical for most businesses unless they have in-house labor.
The DIY call pod succeeded in function and material cost savings, but the extensive labor hours make it economically unviable for most organizations. The pod will be deployed after solving mobility issues.
"Title accurately reflects the content: building a DIY pod to challenge commercial pricing, with honest cost breakdown."
What is the retail price of the Tuesday Plus pod from Bureau?
$14,000 US plus $1,000 installation.
01:52
What material was used for soundproofing inside the walls?
Sonopan (recycled fiber soundproofing material).
08:31
Why did the team switch from dovetail joints to stick framing?
Dovetail joints failed near the top due to insufficient material holding them together.
10:18
How much did the DIY pod cost in materials?
$4,400 CAD ($3,100 USD).
21:30
How many hours of labor were spent on the DIY pod?
176 hours.
21:42
What was the total cost including labor at $30/hr?
$8,380 USD.
21:51
What technique was used to reduce noise through the windows?
Double-pane acrylic with an air gap between layers.
12:46
What tool was used to cut the acrylic?
A saw with a plastic-specific blade (more teeth).
12:54
How much sound reduction did the DIY pod achieve?
About 30 dB.
20:14
What was the main reason the DIY pod was not economically viable?
The high labor cost (176 hours) made it comparable to or more expensive than buying commercial.
22:26
Commercial Pod Cost
Establishes the baseline cost for comparison.
01:52Design Failure and Pivot
Shows real-world problem-solving and adaptation.
10:18Soundproofing Performance
Quantifies the DIY pod's effectiveness.
20:14Material Cost vs. Labor
Reveals the true cost of DIY when labor is accounted for.
21:30Economic Verdict
Provides a balanced conclusion on the buy vs. DIY decision.
22:26[00:00] We've got a ton of cool spaces here at
[00:02] Linus Media Group. We've got office
[00:03] spaces, testing spaces, studio spaces,
[00:06] soundproof spaces, hidden spaces, even
[00:09] parking spaces. But there's one kind of
[00:11] space we always need more of, and that
[00:14] is
[00:16] meeting spaces.
[00:20] >> Can I help you?
[00:21] >> Actually, I think you can see this is my
[00:24] office,
[00:25] >> but it's also call room 104B. Did you
[00:27] book it today? No, I didn't. Which is
[00:30] exactly the problem that we're trying to
[00:33] solve. That's where call pods like these
[00:35] come in. Whether you need to jump on a
[00:37] conference call or host a meeting or if
[00:40] you just plain can't take Sean's chair
[00:43] squeaking anymore, you just jump into
[00:45] one of these and your problem goes away.
[00:49] I need you to get some more call pods
[00:50] right away.
[00:51] >> I can tell procurement, but you know
[00:52] these cost, right?
[00:54] >> Seven grand for what? An upholstered
[00:57] phone booth. $40,000 for this meeting
[01:00] room? Come on. These things can't be
[01:02] that complicated. You built an arcade.
[01:04] You built a server rack. I bet you could
[01:07] build one of these for cheaper.
[01:08] >> I probably
[01:09] >> I'll take that as a yes. So, on this
[01:11] episode of Buyer DIY, Jordan is going to
[01:14] be tackling the challenge of building a
[01:15] twoperson call pod and seeing both in
[01:18] terms of time investment and money how
[01:22] that compares to a commercial solution.
[01:24] >> Let's go.
[01:26] And the best part is, check this out. I
[01:29] got my office back and I can use it to
[01:31] tell you about our sponsor,
[01:33] >> Squarespace. Build a professionallook
[01:35] website for your business. It's easy to
[01:37] use, efficient, and can even help you
[01:38] with payment processing. You can save
[01:40] 10% at squarespace.com/ltt.
[01:42] Today
[01:52] we'll be comparing our efforts to this
[01:54] Tuesday plus pod from Bureau. It's a
[01:56] twoperson pod that retails for about
[01:58] 14,000 US plus installation, which I say
[02:01] is about another grand. I'm pretty
[02:03] confident we can make our own for a lot
[02:04] less. So, let's go do some drawing. I
[02:06] want to keep roughly the same dimensions
[02:08] of the Tuesday pod. So, our base will be
[02:10] a little smaller than the 4x8 sheet of
[02:12] plywood built on top of a 2 by two
[02:14] frame. We'll put posts around the
[02:15] perimeter made up of 1x4s that will glue
[02:18] together into different profiles. And
[02:19] then between those posts, we'll sandwich
[02:22] between some hardboard and then cover it
[02:24] with some fabric that we'll figure out
[02:25] later on. If you didn't follow any of
[02:27] that, don't worry. We'll cover it as we
[02:29] go along. Now that we've got a plan,
[02:31] we're going to start trimming down our
[02:32] 1x4s.
[02:39] Yeah, I got like a fingers gap.
[02:41] >> That's fine. It'll tighten up on me.
[02:43] >> Yeah. So, we'll just have to like
[02:44] section it down.
[02:44] >> Fine.
[02:45] >> We're going to glue and then nail these
[02:47] together because we really don't have
[02:48] enough clamps to do it the proper way.
[03:00] The base is just a simple floor framing.
[03:02] It's 2 by twos and some plywood on top
[03:04] and should be no problem.
[03:08] >> This is exactly how the Egyptians built
[03:09] the pyramids.
[03:10] >> Yeah,
[03:12] >> with a table saw.
[03:13] >> Same technology. We've just trimmed our
[03:15] plywood down to size. And now, because
[03:17] we know that's the right size, we can
[03:19] actually just use it as our template for
[03:21] all our 2 by twos and not have to
[03:22] measure them. We just put them on flush,
[03:25] use our pencil to mark, and we'll just
[03:27] cut on that line that we just made.
[03:35] And I guess this one's times three. Oh,
[03:38] no. Five. Hey, actually, can we do six
[03:42] instead of five? I want to make this a
[03:43] little beefier, I think.
[03:50] All right.
[03:50] >> Okay.
[03:51] >> Now, we can
[03:52] >> drop it like it's hot.
[03:53] >> Yeah.
[03:59] >> Floor.
[03:59] >> All right. work here is done.
[04:02] >> This feels bigger.
[04:04] >> Yeah, maybe a little bit.
[04:05] >> I definitely got more leg room cuz I
[04:07] think the difference between ours and
[04:09] theirs,
[04:11] >> you have the walls set on the outside,
[04:13] right?
[04:14] >> They're kind of along the edge.
[04:16] >> The outer part will be theirs are more
[04:18] in more inward set.
[04:19] >> Okay. How this is going to work is our
[04:22] outside corners
[04:24] will get screwed into the base here.
[04:27] We'll layer this up with cardboard,
[04:29] sonopen, more hardboard, and some kind
[04:32] of fabric on the inside. And then these
[04:35] guys,
[04:37] we'll sandwich it all in, and they'll
[04:40] staple or screw or nail or whatever in
[04:42] to hold it all together. I think if we
[04:44] go about 79, that gives us 3 or 4 in for
[04:47] our ceiling assembly.
[04:48] >> Yeah, that should be fine. Just keep in
[04:50] mind, inner ones are going to have to be
[04:51] shorter. Now the question is, are we
[04:54] putting that internal flooring stuff
[04:55] down first before that?
[04:57] >> Well, this goes on the outside,
[05:00] right?
[05:00] >> Talk about the inner wall portion
[05:02] >> and then the flooring goes down
[05:04] and then the wall.
[05:06] >> So, we're going to measure from the
[05:07] floor.
[05:08] >> Measure from the concrete.
[05:11] >> This side is 8T. This side is 8t of it.
[05:15] >> Okay, let's go 7' 10. It's more than
[05:18] enough wiggle room.
[05:19] >> Yeah. and Lucas might have to duck.
[05:22] We'll see. Good enough. We'll see you
[05:24] guys tomorrow. We're back on day two.
[05:26] Our first task is to chop these guys
[05:28] down to size and then we can start
[05:29] attaching them to the base.
[05:42] We're going to add crossmembers to make
[05:44] this a little bit more stable. It's kind
[05:45] of kind of wiggly right now. The problem
[05:47] is we're going to dovetail those in to
[05:51] those uprightes. And we really probably
[05:53] should have done that before we glued
[05:55] everything together. We made these 3D
[05:57] printed templates to make it easier to
[05:58] figure out our dovetails. That'll go in
[06:00] the crossmember.
[06:02] And we'll cut out that hole.
[06:04] This will go on here. That is backwards.
[06:08] >> If we mess up something.
[06:09] >> Yeah, this is backwards.
[06:11] >> Oh.
[06:11] >> Uh, make that more different.
[06:13] >> Make more different. Okay.
[06:15] >> I think this one's okay. What a guy
[06:17] making me print more stuff all the time.
[06:20] But here is the new piece. It is more
[06:23] different. Let's go see how.
[06:25] >> The issue was I had this stop block on
[06:27] the wrong side on the previous version.
[06:29] So, it would have been impossible to
[06:30] mark the wood properly.
[06:31] >> This is a Milwaukee multi-tool. It is a
[06:34] vibrating saw, so the saw head just kind
[06:36] of goes back and forth really fast like
[06:38] that. Makes it super easy to get into
[06:40] tight to reach spaces like this. And fun
[06:42] fact, this is very similar tool to what
[06:44] they use for taking casts off. So you
[06:46] could even touch this while it's moving
[06:47] and it won't hurt you.
[06:56] This is a Rioba or Ryoba. I'm not sure
[06:59] how to pronounce it. It is a pull saw
[07:00] from Japan. So instead of a western saw
[07:03] where you push to cut, this pulls. And
[07:05] for me at least, they're way more
[07:06] accurate.
[07:07] >> I feel like that makes way more sense.
[07:08] And
[07:09] >> it's got two kinds of teeth. I'm going
[07:10] to zoom way in here.
[07:13] So, it's got four rip cut, which is
[07:15] going with the grain, and cross cut,
[07:18] which is going against the grain.
[07:19] >> So, on the upside, the length is right.
[07:21] Downside is, uh, we got some, uh, some
[07:24] massaging to do.
[07:25] >> That's expected.
[07:26] >> Yeah.
[07:27] >> All right.
[07:40] We need the white hardboard first.
[07:43] >> Is that going on the outside?
[07:44] >> This is the outside.
[07:44] >> Okay. So,
[07:46] >> then sauna pan.
[07:47] >> Okay. Putting the hardboard on the
[07:48] outside.
[07:50] What else do we need to dovetail? Cuz
[07:52] we're not going to be able to do that on
[07:53] the inside. We need access to both.
[07:56] >> Uh, just here and there.
[08:00] >> We're not doing any more along the top.
[08:02] >> Oh, balls.
[08:04] So, those kind of have to get done first
[08:06] before we can
[08:06] >> Oh, that sucks. Okay.
[08:08] >> do any of the exterior things.
[08:14] Next, we're going to trim our hardboard
[08:16] and our sauna pan. And we're definitely
[08:19] want mask for that cuz it's not fun
[08:20] stuff to get in your lungs.
[08:31] Next, we're going to build a sandwich
[08:33] out of some hardboard and some sauna
[08:35] pan. Uh, this is a soundproofing
[08:37] material made of like recycled fibers. I
[08:39] don't think you can get it in the
[08:40] states. So, we're going to do this white
[08:42] hardboard on the outside cuz it's
[08:44] already finished and I'm lazy. Then the
[08:45] sauna pan and then the
[08:48] >> more other hardboard.
[08:49] >> More other hardboard, which later on is
[08:51] going to get a coat of some kind of
[08:52] fabric.
[09:02] got a bit of a problem. Turns out our
[09:04] distance here at the bottom is 40 and
[09:09] 3/4 of an inch, whereas up here it's 41.
[09:14] So, we're quarter inch out, meaning our
[09:16] uprightes are going up at angles.
[09:20] This is not good. I think we're going to
[09:21] have to bash this out. Do number three.
[09:34] And then we'll do the same dimension up
[09:36] top so we can just nail it up there to
[09:38] hold it in the right spot.
[09:40] >> Okay.
[09:41] >> Then we can screw in the panels and call
[09:43] it a day.
[09:44] >> Sure.
[09:48] >> Okay.
[09:49] >> All right. I think we're pretty good for
[09:51] day two. We've got our first sandwich
[09:53] done. We had
[09:56] some challenges with our dovetails, but
[09:57] I think we finally figured that out. We
[09:59] have good even dimensions on both sides
[10:02] now.
[10:02] >> Yeah.
[10:03] >> And there's already some soundproofing.
[10:04] Yeah. Give it a test. Justin,
[10:07] >> can you hear me?
[10:08] >> Nope. Not at all.
[10:08] >> Perfect.
[10:11] We'll see you guys tomorrow.
[10:18] Ah, in the middle the dovetails seem to
[10:21] work just fine because we have a lot of
[10:24] material both top and bottom. So, it
[10:26] doesn't really have a way to split. But,
[10:28] as you can see, once we get closer to
[10:30] the top, there's not really a whole lot
[10:32] holding that dovetail in. So, they kind
[10:34] of just pop as you saw there.
[10:37] >> What do we What do we lose if we pivot
[10:40] this
[10:41] >> at this point? The piece that we had cut
[10:43] for the wall with the sauna pan and the
[10:45] hardboard, that'll work for the floor.
[10:47] >> Okay. Okay, so we got nothing lost
[10:49] there. I mean, at this point, it's
[10:51] looking like we're just losing a couple
[10:52] pieces of lumber.
[10:53] >> What if we just go BC box, 2x two walls,
[10:58] sonopan inside it, sandwich it with the
[11:00] hardboard on the outside, so it gives
[11:01] rigidity,
[11:02] >> and then just get some corners,
[11:04] >> pretty it up a bit.
[11:04] >> The post and panel construction with the
[11:06] dovetails is turning out to be just a
[11:08] nightmare to deal with. So, we're going
[11:10] to switch to a more traditional North
[11:11] American stick framing using 2 by twos.
[11:14] That should be more rigid and it'll
[11:16] actually let us cram more sauna pen into
[11:17] the walls. Just means we're in for a lot
[11:19] more cutting.
[11:20] >> All right, time to rip the wall down.
[11:31] >> We're going to pre-drill our holes this
[11:32] time just to avoid any possible
[11:34] splitting. And uh this should go a lot
[11:37] better.
[11:42] Okay, now we do that three more times.
[11:44] We got us a barn.
[11:49] It's day four. Our next step, I think,
[11:51] is to put on our sheathing on the walls
[11:53] to give this a little bit more uh
[11:55] rigidity. And then we'll fill her up
[11:57] with Sona Pan. I should mention it's day
[12:00] four, but we haven't been doing like 8
[12:02] hour days on this by any means, so like
[12:04] don't get too worried about us.
[12:05] >> Yeah, we're doing real construction
[12:07] hours.
[12:07] >> Exactly.
[12:10] So, we're like 46 and 38.
[12:13] Oh, thank God.
[12:15] >> What?
[12:15] >> Exactly 8 ft.
[12:17] >> Nice.
[12:40] We're here on day six or seven somewhere
[12:43] in there and we're ready to start
[12:44] cutting acrylic to make our windows.
[12:46] What we need to do is cut two of each
[12:48] size and then we'll sandwich them
[12:50] together with air in between and that'll
[12:52] hopefully denten the sound a lot more.
[12:54] We've got a plastic specific blade on
[12:57] our saw. Basically just means lots more
[12:59] teeth. But we're going to take it slow
[13:01] and uh see how it goes here.
[13:09] You can tell we weren't exactly square,
[13:11] but the trim will hide it.
[13:12] >> Yep, exactly.
[13:15] That one's good.
[13:16] >> Yeah.
[13:18] >> Beautiful.
[13:18] >> Yeah. I'll do
[13:19] >> It's been a long time since I've done
[13:21] this, but the basic idea is we'll have
[13:24] our trim on both sides.
[13:28] The first layer of acrylic goes here.
[13:31] then some kind of spacer or goo or
[13:34] something. We'll deal with that when we
[13:35] come to it. Then another layer of
[13:37] acrylic and then another layer of trim
[13:40] to make the whole thing a sandwich. And
[13:41] then in theory, that air gap between the
[13:43] two layers gives us some extra
[13:44] soundproofing. It's been a few days
[13:46] since you've seen us. In the meantime,
[13:48] we built a bench. Uh we've got two
[13:50] pieces of acrylic in. And uh our next
[13:53] actual step is to put the second piece
[13:55] of acrylic on this side. Unfortunately,
[13:57] if you want to bring the camera around
[13:59] here, that means we have to build up all
[14:01] the framing around it in order to fit
[14:04] that, which means we're going to have to
[14:06] put in this inside finished panel before
[14:09] we can really go any further, which
[14:10] Justin is going to have to go and put
[14:12] together right about now. Before we put
[14:14] the hardboard up onto the walls, what
[14:16] we're going to do is cover it in some
[14:18] fabric. Just kind of maybe pretty up a
[14:19] bit. First things first, lay in some
[14:22] spray glue. And then I will start laying
[14:24] in the fabric.
[14:28] All right. Now that the spray glue is
[14:29] laid in, time to lay in the fabric. This
[14:31] is a lot easier with two people, but
[14:33] Jordan is busy right now. So,
[14:37] to kind of make this in lay in a little
[14:39] bit easier and kind of get rid of some
[14:41] of the wrinkles, I'm just going to use a
[14:42] normal clothing iron. Works great for
[14:44] getting out all the tiny wrinkles and
[14:45] stuff like that. And hopefully there'll
[14:46] be less air bubbles trapped as well,
[14:48] too.
[14:53] All right, I'm going to finish up the
[14:54] other half here. As you can see, it's
[14:55] going down pretty much as smooth as it's
[14:57] going to get, I think. Um, yeah. We'll
[14:59] see you when we go to put the wall in.
[15:01] Okay, one panel. Let's get her in.
[15:07] Good.
[15:12] Might as well
[15:14] >> get the full peel on camera, you know.
[15:22] We still need to fill out two pieces of
[15:24] SonaPan and then another upholstered
[15:27] panel up here before we can put the
[15:28] glass in.
[15:30] That was better.
[15:35] This pseudo leather stuff, whatever, is
[15:38] left over from the fire truck. We're
[15:40] just going to spray adhesive it onto our
[15:42] panels here and then uh staple that onto
[15:44] the wall.
[15:46] Keep it in there for now. So, this is I
[15:50] forget the name. It is some kind of
[15:51] glazing tape.
[15:52] >> Chromate.
[15:52] >> Basically, we're going to put it on here
[15:54] just to prevent the acrylic from
[15:56] rattling against the uh the trim here.
[15:59] Feels like a clay.
[16:11] Still got to do the top and bottom trim.
[16:14] That's way easier.
[16:16] It's already in place. So, we just got
[16:17] to trim it.
[16:20] >> Can you hear me now?
[16:21] >> Hello.
[16:22] >> Yes.
[16:23] >> We've put together a door with some
[16:25] chopped up 2x4s and using pocket holes
[16:28] the wrong way.
[16:30] We just got to sauna pan that put on the
[16:34] second piece of glass in the sheathing.
[16:36] And then we'll learn how to hang a door.
[16:38] That's future Jordan's problem. And if
[16:41] you come with me, we can see where we're
[16:42] at on the actual pod. We've got the wall
[16:46] panels fully installed. Uh Justin's just
[16:48] starting on the electrical. Next time
[16:50] you see this, it'll probably be be done.
[16:52] We just got to do kind of floor and
[16:54] ceiling after this. So, we'll see you
[16:57] guys in a bit. Time to find out how they
[17:00] did. I have no idea how much money they
[17:02] spent, but I do know how long they've
[17:04] been working on it. So, uh given that we
[17:08] account for our time in our budget,
[17:10] >> it's it's been a long time.
[17:12] >> It looks pretty good, though. Thank you.
[17:15] >> No, no, I don't mean that as like a
[17:17] buttering up compliment thing. I mean,
[17:19] it actually looks pretty good.
[17:21] Obviously, it could use a little bit of
[17:22] putty in a paint job here and there.
[17:24] >> Well, we know you love painting so much,
[17:25] so we figured we'd do that for you.
[17:27] >> The number of times I said eggshells,
[17:30] >> we don't have a swear button. But in
[17:32] terms of like nailing the function,
[17:37] wow,
[17:42] you can fit so much privacy in this bad
[17:44] boy. And I haven't even been inside yet.
[17:46] Jordan, would you like to join me for a
[17:48] quick meeting?
[17:49] >> I suppose so.
[17:50] >> I can already see a few things that are
[17:52] going to help a lot with the privacy of
[17:54] this call pod. We obviously used double
[17:56] paneed glass here.
[17:59] We uh
[18:00] >> it was a real pain, let me tell you. Hi,
[18:01] I get it. Now, you've got a shotgun mic
[18:03] there on the camera. So, what we're
[18:04] going to do is we're going to have the
[18:05] editor switch to that from my lavalier
[18:07] microphone and see what the difference
[18:09] is once I close this door. Okay. I'm
[18:12] going to speak in the same volume as a
[18:18] privacy.
[18:20] >> Oo.
[18:22] Okay. This table is a significant
[18:26] improvement in function over some of the
[18:29] other tables in our call pods. There are
[18:33] probably some things that would serve to
[18:36] stabilize it a little bit more.
[18:38] >> Little bit of bracing would help.
[18:39] >> Little bit of bracing would help, but
[18:41] it's a huge issue for me when I'm
[18:43] sitting in those things that the table's
[18:45] like way out here
[18:46] >> and you only get like one laptop on it
[18:47] if you're lucky. Like,
[18:48] >> and if it's not way out there, it's like
[18:52] you can't get in and out of it. Oh. Oh,
[18:54] dude.
[18:54] >> That's your fan control.
[18:56] >> WHERE IS IT? NO, I see it. Wait. Oh. Oh,
[18:59] it's a combo bathroom light fan unit.
[19:02] Yep.
[19:02] >> That's actually pretty smart.
[19:04] >> And it has multiple levels of light.
[19:07] >> Hey, so depending on what kind of a
[19:10] meeting we're having.
[19:13] >> Oh, no. I like this. Okay. My initial
[19:18] thought was, wow, this table, you know,
[19:20] it could be a little bit more, you know,
[19:22] solid or whatever, but now it's
[19:24] optional.
[19:24] >> The idea was they wanted a space they
[19:27] have as a little kind of mini office.
[19:29] >> So, we can push that against the wall,
[19:31] push the chair up against that, and they
[19:32] can just work as an office.
[19:33] >> I did not expect us to DIY the bench,
[19:37] but it actually turned out pretty okay.
[19:40] >> Justin did a pretty good job.
[19:41] >> I wouldn't want to sit on it all day,
[19:42] but it's definitely fine for a meeting.
[19:44] >> That's a feature. You won't hog the pot.
[19:47] >> This is true. And then what am I looking
[19:49] at here?
[19:50] >> Uh, we've got a USBC powered screen here
[19:52] for sharing your video or whatever you
[19:54] need to.
[19:55] >> Oh, cool.
[19:56] >> So then you're not hunching around
[19:57] trying to share one screen.
[19:59] >> Yeah, for sure.
[20:00] >> We've got power and USB and everything
[20:02] here.
[20:02] >> Now, what did you guys do for noise
[20:04] treatment in here? I already saw the
[20:05] couple of these Elgato sound panels, but
[20:08] what else do you
[20:08] >> That's more to kind of deal with the
[20:10] bounce. So, what we've got inside each
[20:11] of the walls is a dual layer of sonopan,
[20:14] and that cuts out. We tested it at about
[20:16] 30 dB overall.
[20:18] >> That's actually pretty solid. That's
[20:20] about on par with the commercial ones.
[20:22] >> Yep. They're rated to about 28 29
[20:24] somewhere there. So, margin of error,
[20:25] we're probably about the same as them
[20:27] realistically.
[20:28] >> Now, Jordan,
[20:30] >> I do have one major concern.
[20:32] >> Okay.
[20:33] >> Right now, this is in our workshop.
[20:35] >> Yes.
[20:35] >> How does it get not in our workshop?
[20:38] >> Well, we have it on casters. Really?
[20:40] >> So, the idea is you just activate the
[20:42] casters and then you can get the
[20:43] forklift under it. But, uh, if you want
[20:46] to try it yourself, there's a slight
[20:47] problem.
[20:48] >> Okay. You just count 1 2 3 Jordan.
[20:51] >> Okay. 1 2 3.
[20:53] >> Yeah.
[20:56] >> Okay. Now, what?
[20:58] >> That's about as high as it goes.
[20:59] >> Oh, so we got like 2 mm of clearance.
[21:03] >> That feels optimistic.
[21:06] Yeah. So, what I've done is I've
[21:09] declared this an Alex problem.
[21:11] >> I see.
[21:12] >> And it's not a problem for the video
[21:13] anymore.
[21:14] >> What is a problem for the video
[21:16] >> is the price.
[21:18] >> Where did we land? The comparably
[21:20] featured Tuesday Plus from Bureau costs
[21:23] $14,000
[21:25] >> plus install.
[21:27] >> Plus install.
[21:27] >> So, we're under budget.
[21:30] I can tell you that much. For materials,
[21:31] we spent about 4,400 Canadian. So, 3,100
[21:35] US or so. Wow, that's way under.
[21:39] >> But it was a lot of time.
[21:40] >> Yes, it was.
[21:42] >> Uh, we spent about 176 hours in here
[21:47] >> at 30 bucks US an hour.
[21:51] So
[21:53] what that tells us is unless you're a
[21:56] small business owner with functionally
[21:58] unlimited time
[22:00] >> to build something like this
[22:01] >> workshop and tools and
[22:04] >> or you're a large organization that
[22:07] happens to have a team of onstaff
[22:10] skilled construction laborers who could
[22:12] build them for you. Probably doesn't
[22:14] make any sense cuz if you're hiring
[22:16] contractors to do something like this or
[22:19] using
[22:21] more highly paid employees.
[22:23] The economics
[22:25] are tough.
[22:26] >> Technically, we saved about six grand
[22:28] us,
[22:30] >> but realistically, this was way too much
[22:33] work.
[22:33] >> What else could Jordan have been doing
[22:35] in that time and Justin
[22:37] >> like five other videos maybe? So, I
[22:39] think this might be a case where we
[22:41] succeeded, but we also kind of failed.
[22:43] >> Purick victory. Maybe in future buyer
[22:46] DIYs we have a little bit of a time
[22:48] limit or something too. A couple
[22:49] weekends maybe.
[22:50] >> Scope control.
[22:52] >> Yeah, we we preach scope control here.
[22:54] >> You know what else we preach? The gospel
[22:56] of Segway
[22:57] >> to our sponsor
[22:58] >> Squarespace. You'd be surprised how many
[22:59] businesses out there are operating
[23:01] without a website. They rely on third
[23:02] party storefronts and in the end it
[23:04] makes them seem unprofessional and as a
[23:06] result their products may come off as
[23:08] lower in quality. Which is why your
[23:09] business or side hustle could use a
[23:11] website that matches the quality of what
[23:13] you do or make. Squarespace makes it
[23:15] easy to get a website up and running in
[23:16] no time at all. With their long roster
[23:18] of templates or the design intelligence
[23:20] tool that helps you make something that
[23:21] really matches your vibe. With millions
[23:23] of domains to choose from, you can make
[23:24] sure that potential customers can easily
[23:26] find and remember your website. From
[23:28] there, Squarespace can help you track
[23:30] things like sales or other analytics.
[23:31] They'll even help you run your
[23:32] storefront and process payments from all
[23:34] major platforms like direct debit,
[23:36] credit, Apple Pay, and more. We've even
[23:38] used it here for our Linus Media Group
[23:40] site. Start building your website today
[23:42] and receive 10% off your first purchase
[23:43] by visiting squarespace.com/ltt.
[23:46] >> Even if we wouldn't do this again,
[23:47] though, I think the truest measure of
[23:49] the success of buyer DIY is whether we
[23:52] will actually deploy it.
[23:53] >> Yeah.
[23:54] >> And I think we will. I see no reason why
[23:57] we couldn't just use this to well in a
[24:00] few days when we figure out how to move
[24:01] it.
[24:01] >> Yeah.
[24:01] >> If you guys enjoyed this video, why not
[24:04] check out the Ooh, the arcade buyer DIY.
[24:07] That one was a clear success. Yes,
[24:08] Jordan and Justin absolutely killed it.
[24:10] >> Spoiler alert.
⚡ Saved you time reading this? Transcribe any YouTube video for free — no signup needed.