Don't Make This GPU Size Mistake
50sRelatable and preventable mistake of buying a GPU that doesn't fit the case, saving viewers from frustration.
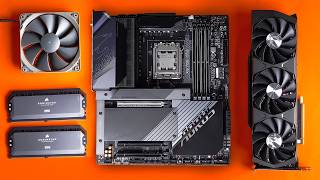
▶ Play ClipThis video provides a comprehensive, step-by-step guide for beginners to build their first gaming PC, from selecting tools and components to installing Windows and playing a game. The creator shares personal tips and tricks to avoid common mistakes and ensure a smooth build process.
Only a Philips screwdriver is essential, but an iFixit kit with various bits and an anti-static strap is recommended for flexibility and safety.
Choose a case that fits your motherboard size (ATX, mATX, ITX) and ensure it can accommodate the length and width of your graphics card.
Install fans and radiators first to plan airflow and avoid damaging the motherboard later.
The front of a fan is intake, the back is exhaust. Plan airflow to bring cool air in and exhaust hot air out.
Use a modular PSU to only plug in necessary cables, reducing clutter. Label cables (CPU, PCIe) to avoid mixing them up.
Build the motherboard outside the case on its box to prevent scratches and static damage. Install CPU, RAM, and NVMe SSD first.
Align the triangle marker on the CPU with the one on the motherboard socket. For AMD Ryzen, pins are on the motherboard, not the CPU.
For two RAM sticks, use slots 2 and 4 (counting from CPU) for optimal dual-channel performance.
Apply a small dot of thermal paste in the center of the CPU to avoid overspill onto surrounding components.
Use a fan hub if you have more fans than motherboard headers. Daisy-chain RGB components to control them from one header.
Install the graphics card in the top PCIe slot, secure it with screws, and connect power cables. Ensure the latch clicks.
Create a bootable USB drive using the Windows Media Creation Tool. Enter BIOS by spamming Delete key during boot.
Enable XMP after Windows installation to run RAM at full speed. For Windows 11, enable CMS and disable Secure Boot in BIOS.
"The title accurately reflects the content: a step-by-step guide from start to finish, including Windows installation."
What is the minimum tool needed to build a PC?
A Philips head screwdriver.
00:37
How do you identify the intake and exhaust sides of a fan?
The front of the fan is the intake side; the back is the exhaust side.
06:01
How do you correctly orient the CPU when installing it?
Align the triangle marker on the CPU with the triangle on the motherboard socket.
21:31
Which RAM slots should you use for optimal dual-channel performance with two sticks?
Slots 2 and 4 (counting from the CPU).
23:15
What is the recommended thermal paste application pattern for a Ryzen CPU to avoid overspill?
A small dot in the center.
36:03
What does XMP do in the BIOS?
XMP (Extreme Memory Profile) allows the RAM to run at its rated speed.
49:49
What two BIOS settings need to be changed for Windows 11 compatibility?
Enable CMS and disable Secure Boot.
51:46
How do you fix the Windows 11 network connection glitch during installation?
Press Shift + F10 to open command prompt, then follow prompts to install the driver.
53:29
Prepare case first
Installing fans and radiators before the motherboard prevents damage and ensures proper layout.
05:00Fan airflow direction
Understanding intake vs exhaust is crucial for effective cooling and component longevity.
06:01Build motherboard outside case
Using the motherboard box as a work surface prevents scratches and static damage.
17:33XMP must be enabled for full RAM speed
RAM runs at a default lower speed; XMP unlocks the advertised performance.
49:49Windows 11 BIOS requirements
Enabling CMS and disabling Secure Boot are necessary steps for Windows 11 installation.
51:46[00:00] this video will show you how to build a
[00:01] gaming PC from the very beginning all
[00:03] the way to installing Windows and
[00:04] playing your first ever game taking you
[00:06] step by step along the way in less than
[00:08] 1 hour where I will share my tips and
[00:10] tricks to make your first time building
[00:11] a gaming PC as simple as possible so you
[00:14] don't make any mistakes or damage your
[00:15] components right so before we actually
[00:17] start on building our PC we need to do a
[00:19] bit of a PC part checklist and also
[00:21] tools checklist just so you can get
[00:23] started and build the PC as quickly as
[00:25] possible cuz I've built loads of systems
[00:26] in my time where I forgot certain bits
[00:28] had to wait for stuff to come into per
[00:30] and it's taken like way longer than it
[00:31] should have so first things first let's
[00:33] actually establish what tools you need
[00:35] for building a gaming PC now most
[00:37] conventionally all you literally will
[00:38] need is a Philips screwdriver like this
[00:40] this is the Linus Tech tips one you
[00:42] don't need to buy this one it's like
[00:43] $100 it' be pretty expensive but any
[00:45] basically like Philips screwdriver will
[00:47] do the job that you can tighten most of
[00:49] the the screws up in with the case but
[00:51] sometimes if you have some really
[00:52] specific high-end stuff or you maybe
[00:54] modifying a few things I do highly
[00:56] recommend picking up like an iFix it
[00:57] tool kit these things are unbelievable
[00:59] and inside the actual case you can see
[01:01] that you have a bunch of different
[01:02] attachments for literally any type of
[01:04] fitting you may have for your PC and
[01:06] also any other Tech things that you're
[01:07] working on that you need tools for like
[01:08] your Xbox and PlayStations when you're
[01:09] modding those so recently we had a
[01:10] really fancy case from Amazon and I
[01:12] couldn't access it and luckily there was
[01:14] a fitting within here that was like some
[01:16] weird triangle shape that allowed us to
[01:17] get the doors off the case so this is
[01:19] really useful and gives you that sort of
[01:20] flexibility so you have every fitting
[01:22] that you need but for M majority of
[01:24] things we're probably going to use this
[01:25] if you go for the pro bundle of the
[01:26] iFixit tool kit you do also get some
[01:28] further tools such as this antistatic
[01:30] strap sort of like grounds and Earth you
[01:32] so you don't cause any static on your
[01:33] components if you're concerned about
[01:35] that occurring you can throw this on
[01:36] your wrist and that will resolve that
[01:38] problem and then there's some other Cool
[01:39] Tools as well that are really useful if
[01:40] you drop any screws in the case and you
[01:42] can't get them out you can use these
[01:43] little pliers to sort of easily pick
[01:45] stuff out if you can't get your fingers
[01:46] down a little sort of crevice next let's
[01:49] go through all of the different
[01:50] components that you would need now
[01:51] depending on the type of case that
[01:52] you're building in this is just like the
[01:53] standard sort of mid tower case there's
[01:55] like full Towers then there's ITX cases
[01:57] that are really small and compact this
[01:58] will dictate what size motherboard that
[02:00] you actually purchase now most
[02:01] conventionally pretty much 99% of people
[02:03] watch this video will probably just go
[02:05] for a standard ATX motherboard that fits
[02:07] in a majority of mid Towers but if
[02:08] you're going for something a little bit
[02:10] more specific I.E maybe something larger
[02:12] you may want an eatx motherboard which
[02:14] is just a little bit bigger and gives
[02:15] you more Pro features a bit more storage
[02:17] for your mvme drives and things like
[02:18] that but if you're going for a much
[02:20] smaller build you'll obviously want
[02:21] something like an matx or an ITX
[02:23] motherboard to fit into a more compact
[02:26] case the board we'll be using in today's
[02:27] video is going to be an eatx which will
[02:30] fit into this case no problem and should
[02:31] look really cool giving me those Pro
[02:33] features that I require for this
[02:34] particular build that I am constructing
[02:36] now I don't want to break down the exact
[02:38] components that I'm using in this system
[02:39] because I want this video to be as
[02:41] Evergreen as possible so like you know
[02:42] if someone's watching this in two years
[02:43] time the whole step-by-step of building
[02:46] a PC wouldn't have changed but the the
[02:48] components obviously would have now to
[02:49] obviously go with your motherboard you
[02:51] also need the correct chipset for your
[02:53] CPU now at the time of filming this
[02:55] video the latest generation of AMD CPUs
[02:57] are using the am5 soft socket which is
[03:00] obviously the motherboard that we've got
[03:02] here with these AMD CPUs there's two
[03:04] versions of them this is the 7900 X but
[03:07] there's also the 7900 which is just a
[03:10] standard sort of non overclockable sort
[03:12] of CPU you have you have different Power
[03:13] deliveries on them and like how you can
[03:15] push them the next thing to consider is
[03:17] the RAM sticks that you need for your
[03:19] system so this is a brand new generation
[03:22] system and we have the latest generation
[03:23] of ram that goes with it so depending
[03:25] again on what CPU you have and what
[03:27] motherboard is accompanying with that
[03:29] CPU will dictate the generation of ram
[03:32] that you'll have so you just want to
[03:33] make sure that you've got the correct
[03:34] generation of ram to go with your
[03:35] motherboard then it's going to be dead
[03:37] simple it'll just click into place no
[03:39] stress now let's move on to actually
[03:41] sort of the final few things to check
[03:43] before we start the build obviously you
[03:44] need a power supply you need some
[03:45] storage you know all that type of stuff
[03:47] you probably know that already but more
[03:49] specifically I want to focus on actually
[03:50] what case you're going to choose and the
[03:52] graphics card so more recently with the
[03:54] latest generation of AMD gpus especially
[03:57] Nvidia gpus because they were getting
[03:59] really large all of those graphics cards
[04:01] have had a significant increase in
[04:03] actual size and and how much space they
[04:05] occupy within the case and this is a
[04:06] problem I had a few years ago I had
[04:08] built a PC in sort of like 5 years I was
[04:10] finally upgrading my system and the case
[04:11] that I purchased was a nice compact mid
[04:13] Tower but then the GPU was too long it
[04:15] just wouldn't fit in once the radiators
[04:17] and things were in there so depending on
[04:18] what spec build you are building you
[04:20] want to make sure that your case can
[04:22] accommodate for the graphic card that
[04:24] you are going to be using now you're
[04:25] probably laughing thinking that's such
[04:26] an obvious thing to consider this is a
[04:28] 3080 TI and you can see in this case
[04:30] that it has plenty of clearance here
[04:32] which is great it also has plenty of
[04:34] clearance for the actual width of it too
[04:36] but with this exact same case if you
[04:39] were to use something like the same
[04:40] generation GPU as this a 3090 TI which
[04:42] we have in the past that GPU is so wide
[04:45] you can't close the panel on the case
[04:46] because once the power connectors are in
[04:48] it's all obtruding and it's sticking out
[04:50] next let's move on to actually preparing
[04:51] the case and getting more of the
[04:53] conventional things in and out of the
[04:54] way so I like to do this first before
[04:56] putting any components in or even like
[04:58] throwing my components together and
[04:59] checking they work i' like to make sure
[05:00] I put all my fans in place my radiators
[05:02] and stuff cuz this sort of will dictate
[05:04] the overall layout of what the final
[05:06] case will be and whether you can
[05:07] actually fit the components where you
[05:09] want to so you get this out the way
[05:10] first while you've got easy access
[05:11] without knocking into your really
[05:12] expensive motherboard now I've already
[05:14] put some fans in to the case just to
[05:16] save us some time you know just to
[05:18] prepare it for the sake of this video
[05:19] and the fans that I'm using are these
[05:21] awesome noctua fans back in the day
[05:22] these things used to be hideous like
[05:24] this prown fan but thankfully they've
[05:26] got these really slick ones in dark gray
[05:27] now that look very minimalistic and now
[05:29] these fans are awesome both from their
[05:31] efficiency perspective of how much air
[05:33] flow they can provide but more
[05:34] importantly they're incredibly quiet
[05:36] like some of the quietest fans you can
[05:38] purchase so they can just plow away
[05:40] cooling all your components and it
[05:41] doesn't get on your nerves while you're
[05:42] actually gaming now we've actually got a
[05:44] little bit of a challenge with this case
[05:45] here for how we're going to lay the fans
[05:47] out because of its cubic design and the
[05:49] amount of tempered glass side panels
[05:51] that there are the place where you would
[05:52] put your fans isn't really that
[05:54] conventional first let's understand how
[05:55] a fan actually works so this is just a
[05:57] standard 120 mm fan all fans are pretty
[05:59] much the same that you throw in your PC
[06:01] just different sizes so on the front of
[06:04] the fan here we have got basically the
[06:06] the intake area of the air so as this
[06:08] spins this will be intaking the air into
[06:11] wherever the destination it's going to
[06:13] and then on the back of the fan you can
[06:14] see here we have all of the ugly stuff
[06:16] like the bracket and also where the
[06:18] cables run and that type of stuff this
[06:19] is the back of the fan where the air is
[06:22] blowing out of so you've got the air
[06:23] coming in and the air coming out now you
[06:25] can mount your fans whichever way you
[06:27] want within the case depending on more
[06:29] air flow orientation as you can see
[06:31] you've got mounting holes on the top and
[06:32] also mounting holes on the back so this
[06:34] allows you to basically control the
[06:35] direction and flow of the air now in a
[06:38] traditional computer case you can
[06:39] usually Mount your fans right on the
[06:41] front here but obviously we have a
[06:43] temperglass side panel so usually you
[06:45] can mount all your fans on the front and
[06:47] intake cool air super easily right from
[06:49] here and then that will exhaust that
[06:51] cool air straight onto your motherboard
[06:53] and your components to keep them cool
[06:54] and the temperatures control you then
[06:56] need to consider how to get that cool
[06:58] air that will eventually become hot
[06:59] because of all the components it becomes
[07:00] cool becomes hot we now need to focus on
[07:02] how we can take that hot air out of the
[07:05] case again traditionally you would then
[07:07] have an exhaust fan mounted at the top
[07:09] here that would then spin away spin away
[07:11] and it would blow and suck all this hot
[07:13] air out of the back of the case now we
[07:16] can't do this in this case because of
[07:18] the different sizes and all type stff
[07:20] the traditional size fans don't fit in
[07:22] here it's more orientated around water
[07:24] cooling mounting rare reses and all that
[07:26] type of stuff so we need to think a
[07:27] little bit different with how going to
[07:29] run these fans in the system now the
[07:32] second location you could put your
[07:33] exhaust fan is on the top of the case
[07:37] right here so you could take this fan
[07:39] this is the front of it and you can have
[07:40] it pointing this way so basically the
[07:42] hot air is sucked up out of the case so
[07:44] it's spinning spinning spinning and
[07:46] blowing up out of the case so you got
[07:48] cool air coming in and then hot air
[07:50] being blown out of the case those are
[07:52] the like standard places where you put a
[07:54] fan but we're going to sort of have to
[07:56] compromise for a best case scenario cuz
[07:58] we also want this to be a very aesthetic
[07:59] PC build that looks great because of all
[08:01] the glass side panels so I've pref
[08:04] fitted some fans here and the way these
[08:06] fans are operating is as follows we've
[08:08] got an intake fan at the bottom you can
[08:11] see the the backs of the fan here so
[08:13] these are going to suck cold air in
[08:15] through the bottom of the case again not
[08:17] the perfect air flow because obviously
[08:18] it's going to be bottom of the case the
[08:20] floor but the plan is this will suck
[08:22] cold air in up onto the GPU which will
[08:26] work pretty nicely and then these fans
[08:28] at the top are going to to act as intake
[08:30] fans rather than exhaust fans you can
[08:32] see we've got them blowing inwards onto
[08:34] the case so this will also bring in cool
[08:36] air onto the motherboard so we've got
[08:38] cold air coming onto the GPU then we've
[08:40] got cold air coming into the top of the
[08:41] motherboard because of how restricted
[08:43] the air flow is going to be down here
[08:45] now the reason why we have to lay the
[08:46] fans out like this is because of where
[08:48] we have to put our all-in-one water
[08:50] cooler so this is the all-in-one water
[08:52] cooler we're going to be using this is
[08:53] our triple rad EK water blocks and you
[08:56] can see we've got the fans mounted on
[08:58] the top of the thing and the these are
[08:59] RGB fans so when these light up they're
[09:01] going to look awesome and look PR cool
[09:03] so we obviously want these to be as
[09:04] clean as possible and we don't want them
[09:05] to be showing the back of the fans like
[09:07] that cuz that would just look rubbish so
[09:09] because we have to compromise like this
[09:10] this means that this whole section of
[09:12] the case is going to act as the exhaust
[09:14] of the hot air so we've got cold air
[09:16] cold air and then exhausting of the hot
[09:18] air whereas really this should be the
[09:20] intake area of the case this should be
[09:22] sucking in the cold air and then boom
[09:24] this should be exhausting all the hot
[09:25] air but because we have to put the fans
[09:26] the wrong way around to accommodate for
[09:28] what we want we got to we just got to
[09:30] work with it you know I hope you're sort
[09:31] of following it but it's going to be
[09:32] okay it's going to be more than enough
[09:34] air flow so let's take a look at
[09:35] actually installing this radiator so
[09:37] we're going to take the back of the case
[09:38] off this case is really cool it just
[09:39] literally slides up like that really
[09:41] easily like no tools needed and we're
[09:43] going to be mounting this radiator from
[09:44] the back because that's how you usually
[09:46] mount a radiator so basically if we just
[09:48] inspect the actual rad itself so I've
[09:50] already installed the fans onto the
[09:52] front of it so when you purchase a
[09:54] radiator they come with two different
[09:55] types of screws you've got some slightly
[09:56] long screws then some slightly shorter
[09:58] ones depending on which side it's being
[10:00] mounted on so we've used the long screws
[10:02] for mounting the fans into the radiator
[10:06] and we've mounted this on the front off
[10:07] of the rad and then on the back we're
[10:09] going to use the small screws to
[10:11] basically install the radiator into the
[10:13] case that would either be at the top of
[10:15] the case here you would just use the
[10:16] little short screws through this thin
[10:18] metal to just hook it onto the back but
[10:20] for us we're actually going to mount it
[10:21] on this back panel here now there are
[10:23] two key types of CPU cooling systems
[10:25] that you can use one's an all-in-one
[10:27] water cooler like I've got here that has
[10:28] a radi and a pump and everything
[10:30] attached to the CPU block but the second
[10:31] option is actually like an air cooler
[10:33] that just goes onto the top of the CPU
[10:34] some of those come included with your
[10:36] actual CPU itself or you buy them
[10:37] additionally for like $50 $100 we're
[10:39] going to go with the all-in-one water
[10:40] cooler but there's one key thing that we
[10:41] have to consider with all water coolers
[10:43] depending on how you sort of orientate
[10:44] it we're a bit restricted with the the
[10:46] length of these hoses to sort of mean
[10:48] this is the only way we can sort them
[10:49] out it but you need to be super careful
[10:51] about any kinks in the actual tubing for
[10:53] all-in-one water cooler just you know so
[10:55] you don't get any air locks and things
[10:56] like that and it actually can flow
[10:58] correctly and it doesn't put over stress
[10:59] and too much strain on the actual pump
[11:01] so using those small screws that I
[11:03] referenced earlier we're going to mount
[11:04] the back of the radiator as follows and
[11:06] then using just a standard screwdriver
[11:08] we can tighten it in now the cool thing
[11:09] about this line is Tech tip screwdriver
[11:10] is is a ratting one so I just can keep
[11:13] it in one position and just sort of
[11:14] rotate my wrist and it'll tighten on up
[11:16] I don't have to like sort of like keep
[11:18] re like going absolutely crazy with the
[11:19] actual motion it's nice and easy just
[11:21] sort of tighten it on into the actual
[11:23] mounting point which makes it super
[11:25] quick and easy to use and once you've
[11:27] got all of the screw roughly in to their
[11:30] actual mounting points H and the the
[11:32] radiat is nice and square we can then go
[11:35] ahead and just sort of make sure it's
[11:36] aligned correctly it's nice and square
[11:38] and not sort of on a on a rough angle
[11:40] then we can just tighten all these up
[11:42] what you'll also notice is once you
[11:43] start getting some of your fans into the
[11:45] case you do start to amas quite a large
[11:47] bundle of cables and especially because
[11:49] these are RGB fans we've got these
[11:51] additional headers on them for obviously
[11:53] operating the various RGB effects and
[11:54] controlling those from our motherboards
[11:56] as well as the standard fan headers that
[11:58] you would find on on traditional fence
[12:00] and that's why I think it's really
[12:01] important to prepare the case first
[12:02] before putting any components in because
[12:03] you can sort of hook things out the way
[12:05] so we can get that CPU Cooler out of the
[12:07] way for now while we kneen these up
[12:10] while we've got space so we can feed
[12:11] these through these little gaps here
[12:14] cool so those are out the way now let's
[12:16] move on to our power supply so the power
[12:19] supply that I've got in this build is a
[12:20] modular power supply so if you got a
[12:22] little bit more budget to spend which
[12:23] basically means You' got these little
[12:25] attachments on the end that means you
[12:26] only plug in the essential cables that
[12:28] you require for the PC build so things
[12:31] like your CPU motherboard power supplies
[12:33] and especially with this build because
[12:34] we're not using any external hard drives
[12:36] it means we don't need any of these sort
[12:37] of SATA connections for powering up the
[12:39] things just using an mvme drive so it
[12:41] means we're going to be able to make it
[12:42] much easier to Cable Management because
[12:43] you don't have all these excess cables
[12:45] that you're not using you just literally
[12:47] plug in the essentials and then that
[12:48] just keeps things much more Compact and
[12:50] way easier to root all the cable l so
[12:53] we're going to be having this power
[12:54] supply down here and it obviously mounts
[12:56] vertically because of the way this case
[12:58] is for me might Mount horizontally for
[13:00] yourself but this is vertical mounting
[13:02] because of the case design now before
[13:04] you actually Mount the power supply into
[13:06] the case with the four screws at the
[13:07] back one thing I do like to do first is
[13:09] to actually just throw it up on on its
[13:11] side like this so you can easily see all
[13:13] of the text and see what connection
[13:15] ports are which and then start matching
[13:17] up the cables that I'm going to actually
[13:19] use like so just by throwing them in
[13:20] here just much easier because when it's
[13:22] mounted into the case you then are like
[13:25] reading on an angle like this and you're
[13:26] trying to like plug it in it's just
[13:28] really annoying so this where you make
[13:29] sure you get everything right and you're
[13:30] not going to accidentally be powering
[13:31] the wrong things with the wrong cables
[13:33] now if you do have a modular power
[13:34] supply inside of the Box basically
[13:36] there'll be a huge bag that will have
[13:37] all of the cables that this power supply
[13:39] is compatible with and basically each of
[13:41] them are labeled up so you can go inside
[13:43] the box and you can see here that on the
[13:45] sides of them this one says CPU so if
[13:48] you join this up like so it'll say CPU
[13:51] so this is telling me that this is the
[13:53] cable that is used for powering the CPU
[13:56] because in some power supplies the CPU
[13:59] header is slightly different to like the
[14:01] graphics card PCI SL slots and things
[14:03] like that and then as well the great
[14:04] thing about this cic power supply as
[14:06] well it also tells you which end is for
[14:08] the power supply so it's super clear
[14:09] this ends for the CPU and this ends for
[14:11] the power supply so you don't actually
[14:12] end up pluging these in the wrong place
[14:13] so this is going to go here so these
[14:15] support pcie and CPU Lanes so we're
[14:17] going to throw that in there and then
[14:19] this will go into our CPU motherboard to
[14:22] power the motherboard in a moment now
[14:23] this one right here we've got for our
[14:25] motherboard section so we're going to
[14:27] throw that in there and then that will
[14:28] go right there super simple now before
[14:30] we move on to the other cables that we
[14:31] need for our power supply such as the
[14:33] graphics card one thing you want to
[14:34] check with your motherboard is how many
[14:36] cables you need for the CPU so if we
[14:38] look on my motherboard here at the top
[14:39] left of it this is where you'll find how
[14:40] many power leads you'll need for
[14:42] powering your CPU block and depending on
[14:43] what type of CPU you have depending on
[14:45] how intense it is Will dictate the
[14:47] amount of power obviously it requires
[14:49] and for this uh 7900x this AMD CPU that
[14:52] I've got I will need two of these CPU
[14:54] cables basically plugged in to my PSU so
[14:56] I just want to make sure that I go ahead
[14:58] and and locate some other cables that
[15:00] have got CPU on them and just make sure
[15:02] that both of those are fed through to
[15:04] the correct destination for powering up
[15:06] the CPU area on the motherboard now
[15:08] let's move on to the cables you need for
[15:10] your graphics card and these will be
[15:11] labeled up with a modular power supply
[15:13] as pcie they look exactly the same as
[15:15] the CPU ones but they are they're
[15:17] different the way they're wired UPS it's
[15:18] very important that you get them
[15:19] correctly and we will need two of these
[15:21] to power my a graphics card cuz it's one
[15:23] of the newer Nvidia graphics cards that
[15:25] needs quite a lot of powering so we'll
[15:27] go ahead and make sure that we've got
[15:28] two of these in place for what we need
[15:30] some other power cables you may need
[15:31] especially if you're going to have any
[15:32] older like hard drives inside of here
[15:34] like a spinning disc hard drive some
[15:35] mass storage are these SATA cables these
[15:37] will power up anything like an SSD those
[15:40] like traditional ssds and any hard dis
[15:42] these will slot straight in but in my
[15:43] build I'm not going to be having any of
[15:45] these as I said we're going to be using
[15:47] MVM ssds which are directly in the
[15:49] motherboard so we don't need to worry
[15:50] about that and we can just proceed and
[15:52] actually Mount the power supply into our
[15:54] case now and then we can root the cables
[15:56] in a moment
[16:01] right so we've got our PCI cables here
[16:04] then we got our CPU cables here I've
[16:06] sort of tried to keep them on the same
[16:08] row as each other when I was plugging
[16:09] those into the power supply I kept the
[16:11] CPU ones together so they're easily
[16:13] located and then the graphics card one
[16:15] separate as well so we will run these uh
[16:17] CPU cables up to the top right corner
[16:19] here every single case will have a
[16:21] little pass through up in this center of
[16:23] the case that will basically allow you
[16:24] to plug it straight into to your
[16:26] motherboard I'm actually going to throw
[16:27] it through here just for EAS easier
[16:28] access because of where those ports are
[16:30] located on my motherboard and we'll get
[16:32] these nice and neat onto the actual
[16:34] cable straps cuz again depending on the
[16:36] quality of case you've purchased they'll
[16:37] have some zip ties and velcro straps
[16:40] like this already inserted for you if
[16:42] not you can just throw some in yourself
[16:44] and you'll have these little tabs for
[16:45] doing so pretty much every single case
[16:47] has some form of cable management with
[16:49] this design this one especially is
[16:51] really good because it all came Velcro
[16:53] so we'll run that in there and then
[16:54] we'll grab our our motherboard one and
[16:56] just sort of get that neat and in there
[16:58] as well in a channel looking good
[17:00] looking good and for now we will just
[17:02] velcro that down so it's all out the way
[17:04] and you can go back later on in your
[17:06] actual build and uh go crazy on your
[17:08] kill management if you want or you can
[17:09] just slap the back panel on and forget
[17:11] that it's even there which I think
[17:13] probably most people do after they've
[17:15] done their build I just get it to a
[17:16] decent state where you can sort of track
[17:18] things don't obsess about it too much
[17:20] I'm more obsessed about the front of it
[17:21] really and just proceed with the build
[17:23] and then again we're going to run these
[17:24] through the side panel here just so we
[17:27] can get these around the front for when
[17:28] we plug in our graphics card later on so
[17:30] we'll just feed those through but before
[17:32] we actually build out the motherboard a
[17:33] pro tip is to actually place it onto its
[17:35] product box the carbo box that is
[17:37] provided this means basically the back
[17:39] of the motherboard won't be like exposed
[17:41] and scratched and marking on the table
[17:43] and you any of the solder joints to get
[17:44] damag but also that the carbo box isn't
[17:46] conductive so it acts as you obviously a
[17:48] neutralizer for when you put your
[17:50] components on for any form of static
[17:51] making it a nice safe working
[17:53] environment if you don't have one of
[17:54] those fancy static pads to work off it
[17:56] now that the case has been prepared we
[17:58] can we can now move on to actually
[17:59] building the main bulk of our PC now
[18:01] what you want to do is you want to
[18:02] actually build the motherboard and
[18:04] everything outside of the case so you
[18:05] can get the CPU in and everything lined
[18:07] up perfectly and then insert it into the
[18:09] case almost as like one whole unit it'll
[18:10] be much easier that way you don't damage
[18:12] anything as well sort of like scragg
[18:13] around inside of the case itself so
[18:16] right here we've got our ATX motherboard
[18:18] the slightly bigger version and you can
[18:20] see in the top Corner those additional
[18:21] power supply areas that I was talking
[18:23] about earlier why we needed two cables
[18:25] to power this motherboard in particular
[18:26] now with these newer generation boards
[18:28] there's a lot of additional things
[18:30] hidden underneath these little covers
[18:32] that you can unlock for further storage
[18:34] and various things like that such as
[18:35] mvme drive so for example if we were to
[18:37] just open this baby up before we put
[18:39] anything else into the motherboard and
[18:40] we just took this little cover off this
[18:42] is quite a big cover to be fair a lot of
[18:44] screws usually it's maybe one or two
[18:45] screws on like slightly tuber
[18:47] motherboards but this is like the top
[18:49] end of what you can sort of get in the
[18:51] price range it's quite expensive one and
[18:53] if you remove this cover this will
[18:54] reveal the area where you can put your
[18:56] nvme ssds so this is a really modern
[18:59] motherboard that has Gen 5 mvme ssds
[19:01] which are insanely quick but they're
[19:02] really expensive at the moment so I've
[19:03] just got a Gen 4 one that will slot
[19:05] straight into here and you can see
[19:07] because as I said earlier this is an at
[19:08] txe motherboard it's got way more space
[19:11] for things like this so you can have a
[19:12] crazy amount of storage usually a
[19:13] motherboard only has like one to two
[19:16] areas for an mvme SSD but this one has
[19:18] like three right here there's another
[19:19] one underneath here absolutely crazy the
[19:21] amount of storage you can have so this
[19:23] right here I've got in my hand is just a
[19:25] 2 tbte mvme SSD traditionally what I
[19:28] like do my build is I usually have like
[19:29] a one TB mvme SSD that I use exclusively
[19:32] for my boot drive like Windows 11 and a
[19:34] few apps installed on there and then I
[19:36] have some separate ones for my game
[19:38] installations but in this build in
[19:40] particular I'm just going to go ahead
[19:41] and throw a 2 TB mvme SSD drive in here
[19:44] that I'll use for my Windows boot and
[19:46] some games just to keep things nice and
[19:47] simple and you know not get too crazy on
[19:49] the price from so the way you insert
[19:51] your MV SSD is you just want to align
[19:53] sort of the pins with this area here
[19:55] then it'll just click into place then
[19:57] it'll sit there and and then you'll then
[19:58] just basically prop it down and then
[20:00] from here you can sort of throw the lock
[20:02] on it now what you also need to bear in
[20:04] mind when you are doing this is you want
[20:06] to take off the actual thermal pads so
[20:08] you can see here there's this like
[20:09] sticky tape on here you want to make
[20:10] sure you take that off so you're not
[20:12] putting the MV M SD on some plastic it's
[20:13] going actually onto a thermal pad that
[20:15] way it's obviously getting heated it
[20:17] cooled down rather when it gets hot and
[20:19] it's it's working properly so you want
[20:20] to make sure you take that off on the
[20:21] actual motherboard and then also take
[20:23] that off on the back of the heat shield
[20:25] so you can see here we need to sort of
[20:26] take it off these ones so that they're
[20:28] not sort of in the way so it keeps this
[20:30] nice and cool and it's thermal pad on
[20:32] the actual ending the SSD then you can
[20:33] go ahead you can put your cover back on
[20:35] next let's move on to actually putting
[20:36] the CPU into the motherboard now so this
[20:38] is going to obviously go in the CPU
[20:39] socket here now if you've got a brand
[20:41] new motherboard it'll have a little
[20:42] cover on and you can even like remove
[20:43] the cover if you want or whatever but
[20:45] usually the cover will just pop off
[20:46] you're just going to basically go down
[20:47] to where the little latch thing is you
[20:49] want to push down and just sort of pull
[20:50] it out it'll just naturally all move you
[20:51] don't need to force anything it'll just
[20:53] naturally move with sort of the tension
[20:54] you remove that then just literally lift
[20:56] up the CPU cover then from here you can
[20:58] go ahead and actually grab your CPU now
[21:00] again depending on the brand of CPU that
[21:02] you're using uh AMD or Intel will
[21:04] dictate where the pins are so for
[21:07] example on these latest ryzen CPUs the
[21:09] pins are on the CPU chipset on the
[21:12] motherboard and there's no pins on the
[21:13] actual CPU itself so when we actually
[21:15] take this out of its packaging you'll
[21:17] see that this is just nothing it's just
[21:19] absolute blank it's like a blank
[21:20] motherboard with just some connection
[21:21] points there's no pins at all whereas
[21:23] back in the day like all the Intel CPUs
[21:25] those have the pins on the CPU body
[21:28] itself and then the motherboard is the
[21:30] place where it sits into you then want
[21:31] to make sure that you check where this
[21:33] triangle is you see this little triangle
[21:35] that we've got on our SS SSD on our zbu
[21:39] H and you want to make sure you align
[21:40] that triangle with where the triangle is
[21:42] on the motherboard so so right here you
[21:45] can see the text for AMD ryzen is the
[21:47] right way around but on some other
[21:48] motherboards the triangle might be
[21:49] somewhere else so it means your CPU
[21:51] looks like it's on its side or upside
[21:53] down so you just want to make sure that
[21:54] you align that triangle in the corner of
[21:56] the CPU with where the triangle is on
[21:59] the actual motherboard so wherever that
[22:00] triangle is you align it with this one
[22:03] on your CPU and then you just want to
[22:04] sort of drop it into place give it a
[22:05] little wiggle make sure it's sating
[22:07] right and then from here you can then
[22:09] lower the door and then you'll go ahead
[22:12] and latch onto it and click it into
[22:14] place and then the thing will just pop
[22:15] off you see how that just pops off
[22:17] sometimes it might ping off really
[22:18] aggressively Don't Panic if it's
[22:19] especially if it's brand new it be like
[22:21] and you're all fine so then that is your
[22:22] CPU now in place now we're not going to
[22:24] put the thermal past on until later on
[22:26] and we'll now move on to putting our Ram
[22:28] in place so before you put your RAM into
[22:30] the motherboard you want to make sure
[22:31] that you unlock all of these latches you
[22:33] just want to click these open and make
[22:35] sure that basically they're ready to
[22:37] accept the ram now what I've got here is
[22:39] a a box of 64 GB of RAM which is very
[22:41] extreme most people are probably
[22:42] building a PC are going to go for 16 GB
[22:45] 32 GB at a push and I also have four
[22:48] channels of ram I've got four sticks
[22:50] which means we're going to occupy all of
[22:52] these regions on the motherboard now
[22:54] traditionally most people will have two
[22:56] sticks of ram that's the standard pretty
[22:59] much every single PC I've built has had
[23:00] that until this one right now we're now
[23:03] drying up for for these latest builds
[23:05] that I've been doing but basically what
[23:06] you'd happen is if you had two dual
[23:07] channels of ram you wouldn't stick them
[23:09] next to each other like that so if
[23:11] you're going down the path of just
[23:13] running two jeel channel sticks you'll
[23:15] want to put them into Channel 2 and also
[23:17] Channel 4 and that's because usually on
[23:20] most modern motherboards those are the
[23:21] two fastest Channel lanes for sort of
[23:23] like the timing that type stuff it's
[23:24] really complicated Stu but basically to
[23:26] get the Optimal Performance out of the
[23:27] ram you put it into channel two and
[23:29] channel four so for example with our RAM
[23:31] sticks we would go ahead and place this
[23:33] into channel
[23:43] four and then we leave a space here and
[23:46] place the other one into channel two we
[23:49] have four RAM sticks so we're going to
[23:50] occupy all four spaces so we'll go ahead
[23:52] and actually put ours in this second
[23:54] region here click it into place see how
[23:56] it clicks that tells you that it's in
[23:58] you don't need to force it beyond that
[23:59] any point you just basically align it
[24:01] make sure the latches are open press
[24:03] down and it'll click it'll click on both
[24:06] sides click click on the top and the
[24:07] bottom then same again we'll grab our
[24:09] final Ram stick for this motherboard and
[24:12] just press down nothing too
[24:14] crazy there we go so they're all in
[24:16] place CPU is in place nvme SSD is in
[24:19] place and everything's looking good we
[24:21] can now take our PC case and actually
[24:23] start putting the components into here
[24:25] so because we've prepared our
[24:26] motherboard it'll literally be super
[24:27] simp Le we just present it up to the
[24:29] case screw it in and most of the
[24:31] stressful stuff's been done but first we
[24:33] need to just take these last covers off
[24:35] our brand new motherboards you see here
[24:36] we've got these two plastic covers
[24:38] they're basically there for the CPU
[24:40] bracket at the back so if we flip this
[24:42] over you'll see there's a there's like a
[24:43] stock CPU bracket here but we don't need
[24:45] this CPU bracket because our all-in-one
[24:47] water cooler has its own for the sockets
[24:50] so we basically just want to unscrew
[24:51] that and basically take take the stock
[24:53] packaging out the way and go ahead and
[24:54] mount our own and then basically this
[24:56] will just fall away
[24:58] at the back be able to just pop it out
[25:01] we can then take these little uh
[25:03] mounting legs for my only one water
[25:05] cooler you see these little things here
[25:06] they've got like a little screw on the
[25:08] bottom and these are just screwed
[25:09] straight into these little fittings that
[25:10] have been revealed from us taking that
[25:12] cover off so we can just throw these in
[25:14] here tighten them up just nice
[25:16] fingertight nothing too crazy don't want
[25:18] to over thread them just tighten them on
[25:20] up like so we can now go ahead and we'll
[25:23] put our case on its side just like so
[25:26] and we can throw the motherboard in and
[25:27] actually start mounting it with the
[25:29] different screws with these newer
[25:31] motherboards back in the day uh you
[25:33] would used to have to put an IO shield
[25:35] into the case so on the side you'd have
[25:37] a little metal bracket that would pop
[25:39] into the side of the case here whereas
[25:41] now these newer motherboards actually
[25:43] have the io Shield built into the back
[25:45] of it so you see here how you've got all
[25:47] the USB ports and then the plastic cover
[25:48] over the top back in the day that used
[25:50] to be like a metal cover you'd have to
[25:51] fit yourself which is a bit finicky so
[25:52] these are now on the motherboard
[25:54] themselves that you just literally
[25:55] present them into the case and the job's
[25:57] done for you make makes it really easy
[25:58] so we can go ahead and just throw it
[26:01] straight into the case if we just make
[26:03] sure we have it all aligned then it
[26:05] should present in really easily we just
[26:07] make sure we get these cables out the
[26:08] way and you just want to it
[26:10] around and make sure it aligns correctly
[26:12] see these little holes these are where
[26:14] we're going to mount the motherboard
[26:15] around here so they're all aligned
[26:17] roughly so then once we start screwing
[26:18] them up they'll sort of tighten in and
[26:20] align perfectly so we can roll with that
[26:22] so the screws that you use for mounting
[26:23] the motherboard will usually come with
[26:25] your case so inside of your case uh when
[26:28] you buy that new inside of the Box
[26:29] there'll be a bunch of different
[26:30] accessories like an accessories pack and
[26:32] that'll have all of the screws for Ming
[26:33] the power supplies and various things
[26:35] but also the screws for mounting the
[26:36] motherboard into its position once
[26:39] you've completely secured the
[26:40] motherboard into the case the next steps
[26:41] that I like to do is actually plug in
[26:44] the cables at this point while we still
[26:46] have a relatively decent amount of
[26:48] access so every single PC case that you
[26:50] purchase will come with like a clump of
[26:51] cables that include things such as like
[26:53] USB headers and various like audio like
[26:56] HD audio and things for the inputs and
[26:58] outputs on the front of your PC case
[27:00] like your USB ports your headphone ports
[27:02] your microphone jacks power buttons
[27:04] reset buttons and so on so all of these
[27:06] will be conveniently labeled up by your
[27:08] case manufacturer so you can see here
[27:10] we've got one that says power switch and
[27:12] then what you want to do is you then
[27:13] want to address either your manual for
[27:15] your motherboard or if you've got a
[27:17] really high quality motherboard these
[27:18] ports are often labeled for you on the
[27:21] board itself so if we take a look right
[27:22] down here in this bottom right corner
[27:25] you can see we've got these little uh
[27:27] switch areas so you can plug in the
[27:29] power switch the LED lights the hard
[27:31] drive lights the reset switch and these
[27:33] obviously correspond with what's labeled
[27:36] on the actual case cables themselves so
[27:38] as you can see right at the bottom it's
[27:40] really difficult to tell but if you zoom
[27:41] right in we'll be able to see that these
[27:43] are labeled up with both a negative and
[27:45] positive which is going to make it way
[27:46] easier to actually plug these in because
[27:49] on some cheaper motherboards these aren
[27:51] labeled up they're just like there so
[27:53] you have to then check the manual and
[27:54] reference things a bit of a nightmare so
[27:56] thankfully that's done for us and we can
[27:58] obviously proceed with doing so so we'll
[28:00] make sure we get all of our cables sort
[28:02] of situated together so we don't miss
[28:04] any so we've got our hard drive LED
[28:06] switch our reset switch this is just an
[28:09] rbgb cable that's different that's a HD
[28:11] audio one for our audio things is there
[28:15] anything else oh and of course this big
[28:17] bag boy here which is our USB stuff
[28:19] right so we'll start with these little
[28:21] finicky ones so we've got our power
[28:23] switch HD LED and also our reset switch
[28:27] so let's first start with the power
[28:28] switch now to understand with which
[28:29] sides actually negative or positive
[28:32] thankfully they're labeled up for you so
[28:34] if you have a look right there there's a
[28:36] little tiny arrow and that Arrow
[28:38] signifies the positive for the cable so
[28:40] sometimes it might be a red cable
[28:42] sometimes you might have like colored
[28:43] cables here that way you don't plug them
[28:44] in the wrong way around if you do plug
[28:46] them in the wrong way around you just
[28:47] obviously switch it and your button
[28:48] won't work so you'll just have to switch
[28:49] it around to get it working correctly so
[28:51] we will obviously align that with
[28:52] whatever the motherboard says so for
[28:53] this the power switch positive is on the
[28:56] left and plug plug in like so that's
[28:58] simple these are probably the hardest
[29:00] cables you'll have to plug in not
[29:01] because it's difficult or anything just
[29:03] more the fact that they're so small and
[29:04] they're really hard to read so we got
[29:06] the reset switch now so we'll have a
[29:08] check on here the reset switch is just
[29:10] underneath the power switch and this
[29:13] time the positive is on the right so
[29:15] we're going to get our swi reset switch
[29:17] you can see we've got our positive Arrow
[29:19] there so we'll plug it in this way this
[29:21] time gorgeous that's plugged in really
[29:23] nicely so our final one's obviously the
[29:26] power LED and and so on and hard drive
[29:28] LED so this will basically just be the
[29:30] LED that flashes on the front of the
[29:31] case depending on what's actually
[29:32] happening with your disc drive and stuff
[29:34] and and the power lights and things so
[29:35] this is a HD Plus okay so we'll throw
[29:39] that in positive on the left this time
[29:42] that I'll just plug into the HD area
[29:44] that's labeled on the motherboard
[29:46] gorgeous so next up we've got our HD
[29:48] audio now these will usually be on the
[29:51] other side of the case around here there
[29:53] it is right there HD audio so this is
[29:56] just located to the other side these are
[29:57] quite easy to plug in you can sometimes
[29:59] get these confused with some USB headers
[30:01] but thankfully obviously they're labeled
[30:02] up dead clearly but also you can see how
[30:04] areas of this are blocked off with a
[30:05] little cap on there so you can't plug it
[30:07] in incorrectly so you don't end up
[30:09] getting it modled up with some of these
[30:10] stuff down here you just basically make
[30:12] sure you're align this super correctly
[30:15] and it just goes in one way you can't
[30:16] really get this one wrong okay so now
[30:18] let's move on to plugging in our power
[30:20] supply cables such as our motherboard
[30:22] and obviously we've got these GPU ones
[30:23] that we don't need right now cuz we
[30:24] don't have a GPU currently so we
[30:26] basically just throw these in you can
[30:27] see here that there's basically a little
[30:29] clip on the actual power cord so this
[30:32] clip basically releases it from when it
[30:34] clicks in so you hold press and hold
[30:36] that to pull it out if you're ever
[30:37] dismantling the PC now as you can
[30:39] obviously see on the back these have a
[30:40] particular shape that aligns with these
[30:42] but also there's a lip on the side of
[30:44] your motherboard power area which is
[30:46] basically where that clip will click
[30:48] into place so we'll just basically align
[30:50] this with that and then just basically
[30:52] push it down and it will do its job and
[30:55] that's it in so pretty simple then as I
[30:56] said if you wanted to remove this you
[30:58] just press that clip in give it a wiggle
[31:00] and it'll come out make sure you press
[31:01] the Clips in otherwise you'll like yank
[31:03] your whole motherboard and snap it into
[31:04] or something it won't come out as easily
[31:06] and then we'll feed the excess cable
[31:08] back through into the back of the case
[31:10] cuz you want as minimal amount of
[31:12] cablage in the front of the case as
[31:14] possible for a few reasons firstly
[31:15] obviously Aesthetics you want it to be
[31:17] as clean and cool as possible but also
[31:19] it helps with air flow and sort of dust
[31:21] so the less cables you have obviously
[31:23] the less things for the the airflow to
[31:25] get caught up on but also there's less
[31:26] things for dust to get climatized onto
[31:29] you and accumulate in one area so that
[31:31] way it just keep your PC a little bit
[31:32] cleaner um as you use it for hours and
[31:35] hours and you know if you have it on
[31:36] your floor and it gets super Dusty next
[31:39] let's take a look at our CPU power cord
[31:41] so again like we established earlier in
[31:43] the video we're using two of these
[31:45] because of how much power is required
[31:47] for this chipset and motherboard that
[31:48] I've got but depending on what chipset
[31:50] you're using and your what brand things
[31:51] you have you may you may have less power
[31:54] cables required it depends obviously
[31:56] what the intensity is of of what you're
[31:57] building so we've got two right here we
[31:59] want to keep them separate and keep them
[32:01] together for both an organization
[32:02] perspective we don't want to like mix
[32:03] and match them we want to keep them as
[32:05] like enties now sometimes when you have
[32:07] these uh Molex connectors that uh split
[32:10] like this they often can sort of Click
[32:11] into place so if you make sure you sort
[32:13] of checked it the right way around
[32:15] you'll basically be able to just like
[32:17] click them into place there sometimes
[32:19] often little clips and it makes them one
[32:20] whole cables especially on the pciu ones
[32:22] that just usually makes it a little bit
[32:24] easier to plug them in unfortunately on
[32:25] these ones it doesn't look like it those
[32:27] but on our GPU ones it will we have a
[32:29] look here on our GPU see how we got that
[32:30] little tiny clip there that little clip
[32:32] just basically clicks into place to
[32:34] basically make one whole cable it like
[32:36] click in like so and then you've got one
[32:38] whole cable that's what they usually do
[32:39] on on on these things but here we just
[32:41] got to struggle on and sort of H get
[32:44] these in correctly so we'll start with
[32:45] the one on the right first I think got
[32:47] the cameras and everything I can't quite
[32:49] see it for myself so I might have to
[32:50] move this round yeah it's a little bit
[32:51] better got better access bit more
[32:53] leverage and just click it on in perfect
[32:56] that's the min then just give them a bit
[32:57] of a push just to make sure then we'll
[32:59] feed the excess into the back of the
[33:01] case so it's out the way then do the
[33:02] same for the second one so we've got our
[33:03] second cable here make sure they're the
[33:05] right way around wound um right right
[33:08] way around and then we'll plug it in so
[33:11] start the first one start with the
[33:13] second one come on there we go perfect
[33:15] that's them in place then we'll feed
[33:17] that into the back of the case it's
[33:18] starting to take shape now as you can
[33:19] see things are getting a little bit
[33:20] cleaner now let's go back to some of
[33:22] these other connection ports that we had
[33:23] here so this is another one from the
[33:25] front of our case and this is for our us
[33:27] B 3.0 connections and and also there
[33:29] there'll be some for some our type-c
[33:31] connections on the front as well so
[33:32] these basically plug into these things
[33:34] here you see how we got USB 3.2 3.2
[33:37] basically just the generation of USB
[33:38] your motherboard supports they'll just
[33:40] plug in straight here dead easy you can
[33:41] see how you've got them all the three
[33:43] dots and then one blocked off so you
[33:45] basically just match that up with
[33:46] whatever is labeled on your motherboard
[33:47] now we might have to actually improvise
[33:49] a little bit here and feed this cable
[33:52] elsewhere into the case because it's not
[33:55] the longest so so we might have to feed
[33:57] this through the bottom of the case
[34:00] there we go that' be better and then we
[34:01] can plug it sort of straight into this
[34:02] port here then there we go perfect it
[34:04] should click in now and that's it seated
[34:07] in not too bad we made it work we've
[34:09] made it work right so everything's now
[34:11] starting to take shape and looking
[34:12] pretty clean at this stage you would
[34:14] also want to take this opportunity to
[34:16] plug in all of your different fans into
[34:18] the different fan headers on your
[34:19] motherboard but I'm actually going to
[34:20] save that for a minute and we're
[34:22] actually going to put the CPU caller on
[34:24] next and we'll come back to the fans
[34:26] main reason because these fans are RGB
[34:29] so we need to do something a little bit
[34:30] more fancy with daisy chaining them all
[34:32] together to actually get them to power
[34:34] up and illuminate with the same patterns
[34:36] as each other we just get the CPU Cooler
[34:37] about the way so it's not dangling about
[34:39] and it doesn't get damaged so if you're
[34:40] using a brand new CPU Cooler it will
[34:43] come pre sort of assembled and prepared
[34:46] rather with the correct amount of
[34:48] thermal paste it'll have like a square
[34:50] of thermal paste on it or a circle of
[34:51] thermal past so you can just use that
[34:53] and throw the CPU Cooler straight on and
[34:55] it should probably work fine if if
[34:56] you've got like some huge like £4,000
[34:59] processor obviously you might want to
[35:00] put some custom thermal pce on for those
[35:02] because of how huge they are for just a
[35:04] regular consumer CPU uh the the CPU
[35:07] block should be prepared and perfectly
[35:09] fine but obviously I'm reusing an old
[35:11] one from the last build that I had in
[35:12] here so we're going to actually have to
[35:13] put our own pattern on so my Preferred
[35:15] Choice for the actual thermal page I
[35:17] think this is some of the best that you
[35:18] can buy is the thermal Grizzly stuff
[35:19] this stuff is amazing it's really good
[35:21] quality not too bad price either it
[35:23] performs really well it's also really
[35:24] good if you you're running quite hot
[35:25] CPUs and you're over in them too this
[35:27] brings up the big debate though of what
[35:30] pattern do you do with your thermal past
[35:32] do you go for a cross do you go for a
[35:33] DOT or you know do you do a smiley face
[35:36] I personally like to do a cross I'm just
[35:39] used to doing that for like my since I
[35:41] was a kid building PCS I've always done
[35:42] a cross so I would just go ahead and put
[35:44] a little cross in but to be honest it
[35:45] doesn't really matter we've done tests
[35:47] here on the channel before where we've
[35:48] done a cross and also a DOT to compare
[35:50] the coverage and it's pretty much
[35:52] marginal it's exactly the same coverage
[35:54] you get on the most important part of
[35:55] the CPU at that sort of Center to point
[35:57] now with this current CPU because of its
[35:59] funny little design with the new ryzen
[36:01] one I would probably I'm going to go for
[36:03] a DOT on this because if you do do a
[36:05] cross and you put a little bit too much
[36:07] on with a cross it can overspill a
[36:09] little bit when the pressure of the CPU
[36:10] Cooler is applied and I don't really
[36:12] want it overspill into any of these
[36:14] regions where the sort of chipset stuff
[36:16] so just to be safe I'm actually going to
[36:17] just do a little dot in the center on
[36:20] this uh CPU that I have right here just
[36:21] sort of thinking ahead of what could
[36:23] arise if I accidentally put a little bit
[36:25] too much on with my traditional method
[36:26] so we'll go ahead I always get panicky
[36:28] even like I've built like a th PCS I
[36:31] always get panicky with the thermal P
[36:32] like whether when I start to press it so
[36:34] we'll just literally like little syringe
[36:36] and it should just start coming out see
[36:37] that like that and we can just pop a
[36:38] little bit on and just leave it like
[36:40] that and then when we apply the the CPU
[36:42] Cooler it will flatten down that's maybe
[36:44] just a little bit little bit too much
[36:46] but it should still be fine that it's
[36:49] probably just about right there be some
[36:51] people coming you put away too much
[36:52] thermal p on this is like one of the
[36:54] biggest debates of like PC thing ever no
[36:56] one's never happy right so now what
[36:58] we'll do is we'll go ahead and place our
[37:01] CPU block make sure it's the right way
[37:02] around and we're going to place it onto
[37:05] our little stanions that we've put into
[37:06] place oh we're getting a bit of clashing
[37:08] there with the RAM sticks that's not
[37:10] good is it okay so we got it in okay
[37:12] we're not clashing with the sticks too
[37:13] much it's just that back pipe I once it
[37:15] in and tighten down I'll go ahead and uh
[37:18] rejig those a little bit so it's not
[37:19] bending our RAM sticks too bad it should
[37:21] be okay though and what we want to do is
[37:23] I've got all the parts in this Xbox mug
[37:25] mug it's kind of ironic this we're
[37:26] building a gaming PC PC Master race but
[37:29] then we have an Xbox console mug without
[37:31] part in I I apologize also as well just
[37:33] to sort of show you the how the thermal
[37:35] paste spreads obviously we put it on and
[37:37] I didn't really need to do this but just
[37:38] to show you how it does spread you can
[37:39] see from that dot this is the coverage
[37:41] that we've gotten so we've got that nice
[37:42] little square and then we've got that
[37:43] nice uh Square as well on the CPU it's
[37:46] done exactly what I predicted that
[37:47] little dotch just spread just enough so
[37:49] it doesn't get on this the CPU stuff you
[37:51] can see that that'll give you confidence
[37:52] that a Dot's fine or whatever right cool
[37:54] so we can now go ahead put the CPU
[37:55] Cooler back on and throw basically the
[37:57] screws in place now you can use a
[37:59] screwdriver for these if you wanted to
[38:01] but sometimes just doing them hand tight
[38:03] is perfectly fine depending on what your
[38:04] access is like within your case h you
[38:06] you can't easily overtighten these uh
[38:08] like unnecessarily so you want to apply
[38:10] the top Corner one and then the bottom
[38:12] left corner one uh like the adjacent
[38:14] Corners so you get that even pressure
[38:16] applied and then you can go ahead and
[38:18] sort of add the other two corners and
[38:20] start tightening it up then just to be
[38:22] safe we'll give it a little squeeze with
[38:24] the screwdriver just it's got a nice
[38:25] little bit of resistance on the go now
[38:27] let's proceed onto plugging in our fans
[38:29] and also our various sort of RGB
[38:31] features that we have in this case and
[38:33] also within our fans so this cable right
[38:35] here is basically one of those RGB
[38:37] cables that I mentioned earlier they
[38:39] sort of got these little uh three dots
[38:41] here these plug directly into your
[38:43] motherboard to obviously control the RGB
[38:45] effects like the lighting effects and
[38:47] the various things you can do in
[38:48] different software you'll find we've got
[38:49] some right down here just a little uh
[38:52] three pins that you can just plug this
[38:53] straight into and you can go ahead and
[38:55] just plug boom it straight into the
[38:57] actual motherboard and then that will be
[38:59] that RGB setup for whatever that is so I
[39:01] believe that is from the front of our
[39:03] case cuz this has an RGB strip on the
[39:05] front of the case now sometimes if
[39:06] you've got tons of RGB stuff your
[39:08] motherboard will only have like maybe
[39:10] two or three of these uh headers for the
[39:12] RGB features so this means that you do
[39:15] need to daisy chain things together in
[39:17] order to get them uh working correctly
[39:19] otherwise you're not going to have
[39:20] enough headers and it's going to be a
[39:22] little bit disappointing I recommend
[39:23] Daisy training all of your fans together
[39:25] so all of the bands run off like a
[39:27] single RGB header and then you have like
[39:29] a second chain of maybe things like your
[39:31] RGB light strips that you might put into
[39:33] the case to illuminate it those are all
[39:34] daty chain together and they use a
[39:36] separate area on the motherboard like
[39:38] this CPU Cooler also supports RGB so
[39:40] that might plug in to its own header as
[39:42] well and at that point we've sort of
[39:43] occupied all of the headers on your
[39:45] motherboard and things are separate so
[39:46] that way you can create different groups
[39:48] that gives you a little bit more
[39:48] flexibility when you're actually uh
[39:50] setting up your custom lighting profiles
[39:52] but also it makes Cable Management a
[39:53] little bit easier so you don't have to
[39:55] daisy chain everything together together
[39:56] into one single header so for example I
[39:59] have these RGB light strips picked these
[40:01] up on Amazon like $20 or something
[40:03] nothing too crazy and these actually
[40:04] have their very own splitter of their
[40:06] own you see how they go into two
[40:07] different plugging in points in fact it
[40:09] goes into three I correct myself it goes
[40:11] into three s split offs and then you've
[40:13] just got your this that would plug into
[40:14] your motherboard like boom so we have
[40:16] two of these light strips they're really
[40:18] cool these they just light up the case
[40:20] do RGB effects or just a simple white
[40:22] effect if that's what you want to just
[40:23] like show off your parts and they are
[40:25] magnetic these ones so you can use the
[40:27] sticky back tape on the back if you have
[40:29] like a cheap plasticky case isn't
[40:31] magnetized but if you've got an awesome
[40:33] case like this one they'll just
[40:34] literally stick on like that no stress
[40:36] at all stick straight in and then you
[40:38] can just go ahead and actually root them
[40:40] wherever you like so we're going to go
[40:41] ahead and probably Place one on either
[40:44] side I would say that sounds wise oh
[40:47] we've even got one here from my old
[40:48] build so actually we got three I forgot
[40:50] about that so we got one up here as well
[40:51] so we can daisy chain all of those
[40:53] together so we' got one two three
[40:55] lighten up the whole case
[40:56] brilliant light show on the works so
[40:58] down here you can see these RGB strips
[41:00] are like a four-way connector slightly
[41:02] different to the three-way connectors
[41:04] that we've connected elsewhere now we
[41:05] have two of these headers on our
[41:06] motherboard we got one up here and also
[41:08] one down there that I have located so
[41:10] what we're going to do is we're going to
[41:11] use this splitter cable that came with
[41:13] the actual RGB light strips themselves
[41:15] we're going to take that four-way
[41:17] splitter cable and we're going to plug
[41:18] it in down at this bottom left on the
[41:21] little four pins you see we got them
[41:22] four pins there they're always a little
[41:24] bit difficult to line up these four ones
[41:26] not too sure why they just never go in
[41:27] easily I think that's in it just never
[41:30] they never feel like they're in it's
[41:31] really weird and then we'll go ahead and
[41:33] we'll take the one on the left and daisy
[41:35] chain that into our strip lights now
[41:38] you'll see here we've got these arrows
[41:40] you see those arrows on the cabling so
[41:41] we want to make sure that that Arrow
[41:43] aligns with that Arrow so then they
[41:45] basically you know synergize together
[41:46] the same flow of current and energy so
[41:50] we're going to do the same on this other
[41:51] side so we'll take the long cable here
[41:54] and we'll take our RGB strip that we've
[41:55] got on this side side and do the same
[41:57] align them arrows up boom nice and easy
[41:59] and then we'll worry about Cable
[42:00] Management in a second it's looking bad
[42:02] but we'll worry about it in a second so
[42:03] that's the RGB strip light set up we've
[42:05] got our CPU Cooler we're going to plug
[42:07] that into this top right corner here
[42:08] this has got three pin connector so
[42:10] we'll plug that into the three Pinner
[42:11] there that's on its own separate little
[42:13] thing nicely plugged in that's all
[42:15] sorted then as well we've also got our
[42:17] fan coolers and things that we'll plug
[42:18] in in just a moment now we need to
[42:20] tackle the issue of plugging in all of
[42:22] our fans into the motherboard so they
[42:24] all power up now we've got quite a lot
[42:26] of fans in this system we got two at the
[42:27] top two at the bottom and three on sort
[42:29] of the front here so we're not going to
[42:31] have enough individual fan headers on
[42:33] the motherboard itself especially if
[42:34] you've got quite a big full tower case
[42:36] so we're going to need a Fan Hub in
[42:39] order to basically power all of our fans
[42:41] off of like a single fan header on the
[42:44] motherboard now you can go ahead and
[42:45] have multiple different fan hubs and
[42:47] different groups of fans on the
[42:48] motherboard and get quite Fancy with it
[42:49] but the Simplicity I've just literally
[42:51] picked up it's was like £10 or something
[42:53] it was hardly anything this little fan
[42:55] header here like a herb and we can throw
[42:56] all of our fans into here and just
[42:57] literally power it off of one Outlet on
[42:59] the motherboard so basically we're just
[43:00] going to go ahead and these are labeled
[43:02] like fan one fan 2 and so on you even
[43:04] have one for the CPU fan so obviously CU
[43:06] you want that might be maybe to be
[43:07] separate for when it kicks up depending
[43:09] on the temperature in the actual system
[43:10] and we're just going to go ahead and
[43:11] just literally throw all of our fans in
[43:13] here so they're now all connected and we
[43:15] just need to basically power it with
[43:16] like a Molex cable so we'll just plug
[43:18] this into our power supply so we got
[43:20] Molex down there can throw that straight
[43:22] in that will power it also this is a
[43:23] cool Molex cable that also has some SATA
[43:25] power connection so if you had some hard
[43:27] drives as well you can power them off of
[43:28] those or ssds uh this system doesn't
[43:30] have any of those we're running MV mvme
[43:33] ssds so we don't need those and then
[43:34] there's our Master header that will run
[43:36] over into the motherboard now this did
[43:38] originally have some sticky tape so you
[43:39] could stick it onto something I used to
[43:41] have it stuck to the power supply but
[43:42] obviously the power supply got a little
[43:43] bit hotter it sort of wasn't the best
[43:45] place to put it so I I will sort that
[43:48] out in a later on after this video but
[43:50] you'll be able to stick it somewhere
[43:51] safe so it doesn't come into contact
[43:52] with the back of the motherboard and
[43:53] short anything out you sort want to be
[43:55] quite careful that it doesn't doesn't
[43:56] touch any of this type of stuff uh when
[43:58] you actually do your final build you
[43:59] know mount it up here or something so
[44:01] it's out the way safe but we can go
[44:02] ahead now and plug our final piece in we
[44:05] can then plug this U um Fan Hub into our
[44:09] motherboard so this is the cable right
[44:11] here and we can go ahead and just locate
[44:12] one of the fan places where we want to
[44:14] plug this in uh and same as well we need
[44:16] to plug in our all-in-one water cooler
[44:18] so that's getting some form of power
[44:20] from the motherboard as well to sort of
[44:21] run the pump and so on so we'll go ahead
[44:23] and find the appropriate place where we
[44:25] should throw that in so we've got fan
[44:28] pump can put that in there and then
[44:31] we'll go ahead and throw this into one
[44:33] of our fan headers then we'll grab the
[44:34] excess cables and we'll just sort of try
[44:36] our best to root them out the way back
[44:38] up into the top here so you can do a a
[44:41] much neater job in this you can sort of
[44:42] I like to sort of grab these cables and
[44:44] run them around the motherboard if that
[44:46] makes sense to sort of use up the excess
[44:48] length and then from there we can feed
[44:50] them up back into the back of the case
[44:52] with that complete we can now put the
[44:54] final piece of the puzzle in which which
[44:56] is our graphics card so we've got our
[44:58] main graphics card here that's going to
[45:00] go into this top pcie slot right here so
[45:02] you want to basically make sure that the
[45:04] clamp is released on the pcie slot so
[45:06] you see how I've got this little clamp
[45:07] you're going to go ahead and press just
[45:09] to open that up and it'll it'll
[45:11] basically open up the latch and then
[45:12] you'll go ahead and you'll align the
[45:14] pcie slot with the area on the
[45:16] motherboard so you want to go ahead and
[45:18] also take out the appropriate areas on
[45:20] the case so you take out these little
[45:22] covers so that's looking good and then
[45:23] basically it should just click as need
[45:26] you push it
[45:27] down there you go that's it in in place
[45:31] that's really solid that's really good
[45:32] motherboard how that holds the GPU I
[45:34] really like that that's is in place
[45:35] absolutely Perfection then we can go
[45:37] ahead and grab these screws that you
[45:38] just removed from the CPU cover and we
[45:40] can throw them back in and tighten the
[45:42] GPU in place so it doesn't sag and stuff
[45:44] like that but before I do that let me
[45:45] just grab our power cables and we're
[45:47] going to root them underneath the back
[45:48] of the GPU and we'll plug them into the
[45:50] front of the graphics card so make sure
[45:52] we got them nice and organized so we've
[45:54] got this one so again like I said
[45:55] they'll clip into place make one whole
[45:57] cable power that side that's nice in and
[46:00] then we'll do the same here perfect and
[46:01] then we can rot these cables back into
[46:03] the rear of the case to keep them out
[46:05] the way and you know keep the air flow
[46:06] nice and clean and obviously the
[46:08] Aesthetics looking good and now we can
[46:10] go ahead and put the screws into our
[46:12] graphics card uh just on the little slot
[46:14] Point here so it basically pegs it in
[46:16] place and it doesn't really go anywhere
[46:19] just just nibbing it in and then as you
[46:21] can see there it just pulls the graphics
[46:22] card up a little bit so it doesn't sag
[46:25] and we'll put both in just so we do a
[46:27] proper
[46:29] job we can now do some final cable
[46:32] management but we're pretty much ready
[46:34] to boot this thing up see if it works
[46:36] and install Windows but before I
[46:38] actually go ahead and install Windows
[46:40] I'm going to put my side panels back on
[46:42] cuz I'm pretty confident that it's going
[46:43] to work cuz you know I know the
[46:44] components I've used them before usually
[46:46] when I would build a gaming PC
[46:47] especially if it's your first time you
[46:49] do have the option to always build all
[46:51] of the components outside of the case so
[46:53] you would throw them on top of the
[46:54] cardboard box and you would throw
[46:55] everything in there and just sort of
[46:56] test boot them to make sure like you
[46:57] haven't got a dead motherboard or
[46:59] anything my first ever PC the
[47:00] motherboard was faulty there's like a
[47:02] bad batch of these motherboards they
[47:04] were like MSI motherboards uh and I had
[47:06] um had the dodgy fault with it it was
[47:08] really cool motherboard as well and and
[47:09] end up having to switch out to like a
[47:10] gigabyte one or something like that so
[47:12] uh and I thought I'd done something
[47:13] wrong it my first ever time building a
[47:14] PC I I spent hours trying to problem
[47:17] solve it thought I had a problem and it
[47:18] was actually a dodgy motherboard from a
[47:21] from a bad batch and then another time
[47:22] when I was building like my second ever
[47:24] PC I had a dead GPU which was really
[47:26] unlucky it was like a dodgy GPU that was
[47:27] dead from like evj or something like
[47:29] that so I didn't have much luck on my
[47:30] first two builds but since then they've
[47:32] been pretty plain sailing okay so now
[47:33] let's move on to the actual installation
[47:35] process of Windows this isn't too
[47:37] difficult and I'll make it as easy as
[47:38] possible for you to follow but you will
[47:40] require a USB stick so right here I've
[47:43] got two different USB sticks one with
[47:44] Windows 11 on and also one with Windows
[47:47] 10 now these are media installation
[47:49] tools basically they're just like
[47:51] bootable drives where we can install
[47:53] Windows off of them onto our mvme SSD
[47:56] now the way that you create a bootle
[47:58] drive is by going over to Google and
[48:00] typing in Windows 10 or Windows 11 media
[48:03] creation tool depending on which
[48:05] operating system you obviously want to
[48:07] use then once you head to the official
[48:08] website you'll be able to find these
[48:11] various options here there'll be a few
[48:12] different types that you can actually
[48:13] download now which option you choose
[48:15] depends on the state of your computer
[48:17] now because we have nothing on this PC
[48:19] I.E all we have is access to the BIOS
[48:21] and nothing else we obviously want to go
[48:23] ahead and create a beaule drive so as
[48:26] you can see on the second option create
[48:28] Windows 11 installation media here we
[48:30] can create a bootable USB stick or DVD
[48:33] drive so if your PC for some reason had
[48:35] has a disc drive you could put it onto a
[48:37] CD disc but no one has CDs in in modern
[48:39] times you can then go ahead and plug
[48:42] this USB stick into your computer and
[48:44] then go into your bios now the way you
[48:46] access your bios will be slightly
[48:48] different depending on your computer it
[48:49] may automatically boot into the BIOS
[48:51] screen like mine has here but if it
[48:53] hasn't the most common button that you
[48:55] need to spam is delete on your keyboard
[48:57] you go ahead and spam that and it'll
[48:59] take you straight into your bios now the
[49:01] BIOS it looks really overwhelming but
[49:03] trust me it's super simple so inside of
[49:05] the BIOS before we actually move on to
[49:06] the windows process you'll be able to
[49:08] see an overview of everything that's
[49:10] actually happening on your system so you
[49:11] can see here we can uh see what
[49:13] temperatures our CPU is running at we
[49:15] can see the current voltage usage on our
[49:17] CPU and if you wanted to do any
[49:19] overclocking you could obviously tweak
[49:21] these voltage parameters to sort get
[49:22] that a little bit of extra gigahertz out
[49:24] of your graphics card out of your your
[49:25] CPU or whatever and then as well we've
[49:28] got the CPU frequency so you can see
[49:30] like I just said the gigahertz it's
[49:31] running out or if it's got turbo mode on
[49:33] whether it's running in those faster
[49:34] regions then also the frequency of your
[49:37] RAM and you can see right now our Ram is
[49:38] running at 3600 MHz now this is actually
[49:42] the incorrect speed of our RAM sticks
[49:44] now every single PC by default will have
[49:47] a feature called XMP disabled you can
[49:49] see it right here XMP now XMP basically
[49:52] almost like I'm probably the wrong word
[49:54] for this but it like overclocks your RAM
[49:56] it essentially just allows you to use
[49:58] the full speed that's capable of those
[50:00] sticks so the sticks that we have are
[50:02] way faster than 3600 MHz so in order to
[50:06] access those higher speeds that's
[50:08] actually portrayed on the box we would
[50:10] have to enable XMP now I'm not going to
[50:13] enable XMP right now because it can
[50:16] actually cause some instability on your
[50:18] system especially when you're going
[50:20] through the process of installing
[50:21] Windows for the very first time so we're
[50:23] actually going to go through that first
[50:25] and then we'll come back to the BIOS
[50:27] where we'll enable and disable a few
[50:28] different things to get the most out of
[50:30] the advanced features on your
[50:31] motherboard what you can also see with
[50:33] in your motherboard are if all of the
[50:34] parts are correctly being detected so
[50:36] you can see our CPU is being detected
[50:38] correctly and also the amount of RAM
[50:39] sticks that we currently have are the
[50:41] entire 64 so inside of here you'd be
[50:43] able to see if you've got all if your 16
[50:44] GB or 32 GB of RAM so if there was any
[50:47] dodgy sticks inside of there this would
[50:48] have the incorrect stats there so that
[50:50] allows you just to check all of this now
[50:51] for whatever reason you can't see all of
[50:54] the correct stuff with in your bios
[50:56] usually if you click F2 you can see here
[50:58] it will unlock Advan mode for this
[50:59] motherboard this will take you into
[51:01] Advan mode now every single person's
[51:03] bios will look slightly different
[51:04] depending on what brand of motherboard
[51:06] they're using and also what generation
[51:08] of like CH CPU and chipset but the
[51:11] premise and all of the settings usually
[51:13] remain the same it just might require
[51:14] you to dive into different menus now
[51:16] inside of here this will unlock those
[51:17] more advanced things I was talking about
[51:18] where you can overclock various aspects
[51:21] of your components and also enable and
[51:23] disable further settings so when it
[51:24] comes to Windows 11 in particular in
[51:26] installing this onto your PC there's a
[51:28] few security parameters that you have to
[51:30] enable on the motherboard to make sure
[51:31] that it's compatible things such as like
[51:33] TSM like secure boot needs to be like
[51:36] enabled and so on and depending on the
[51:37] manufacturers some of these things may
[51:39] be on by default you may have to turn on
[51:41] a couple things on then other ones may
[51:42] require a little bit of tinkering in
[51:44] order to find exactly what you need so
[51:46] first you want to enable CMS so this
[51:50] most likely be disabled now the cool
[51:51] thing about the gigabyte motherboards is
[51:53] you can see there there's a little star
[51:55] that stars showing you this is the
[51:57] really important setting that you need
[51:58] to turn on for Windows 11 so you want to
[52:00] enable CMS now the problem is by default
[52:04] if you enable CMS and C secure boots or
[52:08] also enabled it won't it won't work it
[52:10] will keep disabling the CMS every time
[52:12] you reboot the system it'll it it'll
[52:14] keep disabling it and then that will say
[52:16] windows 11 isn't compatible anyways once
[52:19] you've disabled secure boot you'll then
[52:21] reboot your system and your motherboard
[52:23] will now be in 2.0 mode so if go into
[52:25] miscellaneous you'll see we've got this
[52:26] trusted Computing 2.0 that's now being
[52:28] unlocked but there's Now new settings
[52:30] which is what's going to make it
[52:32] compatible with Windows 11 that's all
[52:34] you need to do enable CMS and disable
[52:36] secure boots so now we can go ahead and
[52:38] install Windows 11 click install it then
[52:40] ask us for a product key that I don't
[52:41] currently have I'm going to install
[52:43] Windows 11 Pro cuz this gives us further
[52:45] more advanced features in around the
[52:46] studio so we can sort of like file share
[52:48] a little bit better and now we can just
[52:49] literally go ahead and install Windows
[52:51] it's that simple select our 2 TB drive
[52:54] you could do some fancy partitioner
[52:55] whatever if you want it but we're just
[52:56] going to install it straight on here cuz
[52:58] that's all we want so now that that
[52:59] process has now completed we can go
[53:01] ahead and actually sign into windows so
[53:02] I'm going to choose my country United
[53:04] Kingdom cuz I'm from Britain uh and then
[53:07] we'll go ahead and click United Kingdom
[53:09] again for the keyboard layout see in
[53:11] America go ahead and choose USA next we
[53:13] have the option to connect to a network
[53:15] now sometimes on a rare occasion there
[53:17] can be a glitch inside of Windows 11
[53:19] that won't let you s select any form of
[53:21] a network connection even if you plug in
[53:23] an ethernet cable into the PC just
[53:25] completely glitched out cuz it didn't
[53:26] install any drivers on the motherboard
[53:28] luckily there's a solution for this if
[53:29] you click shift F10 this will open up
[53:31] the command script where you can go
[53:33] ahead and type in some custom prompts if
[53:35] you if nothing happens but usually what
[53:36] will happen is in the bottom right
[53:38] corner it will then pop up a little like
[53:40] do you want to install driver box yes or
[53:42] no then you can obviously click yes it
[53:43] will install the driver and your problem
[53:44] is fixed you can then go ahead and click
[53:46] next and it will now download the latest
[53:48] version of Windows 11 V the internet and
[53:49] we're good to go now we can go ahead and
[53:51] name our device just going to call it
[53:52] Ben's gaming PC this is going to be on
[53:54] my new gaming set top next then the
[53:56] final stage is adding your Microsoft
[53:58] account now if you already have a
[53:59] Windows key associated with this
[54:01] Microsoft ID you won't need to purchase
[54:03] a new Windows key it's all linked to
[54:04] that so you won't need to activate
[54:05] Windows it'll literally just do that
[54:06] automatically for you which is pretty
[54:08] cool and that is the process of
[54:09] installing Windows now complete from
[54:11] here you can now go ahead and install
[54:13] the appropriate Graphics drivers for
[54:14] your GPU you know AMD or obviously
[54:17] Nvidia and then you can install Steam
[54:19] and play your game so those are the
[54:20] steps that you take when building a
[54:22] gaming PC but if you want to take it to
[54:23] the next level and Custom water cool it
[54:25] and do some crazy stuff you should check
[54:27] out this video next where I build the
[54:29] world's largest PC and I do exactly that
⚡ Saved you 0h 54m reading this? Transcribe any YouTube video for free — no signup needed.