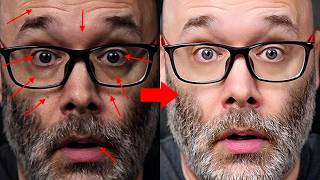

Fix Your Thumbnail Face in 45 Seconds
45sImmediate visual transformation hook promises quick results, appealing to creators seeking thumbnail improvements.
▶ Play Clip"Delivers exactly what the title promises: a practical Photoshop tutorial for fixing your face in thumbnails, though it could be shorter."
This video demonstrates a comprehensive Photoshop workflow for enhancing a portrait photo to be used as a YouTube thumbnail. The creator, Nick, shows how to brighten the image, correct skin tones, remove blemishes, enhance the eyes, and sharpen the final result, all while maintaining a natural look.
The video aims to transform a dark, unflattering image into a brighter, cleaner version for YouTube thumbnails, making the creator look their best.
Emphasizes the importance of composition in thumbnails, using the rule of thirds to place the subject's eyes or main focal points along grid lines for balance.
Uses Image > Adjustments > Levels to brighten the image, adjusting shadows, midtones, and highlights to bring out detail without blowing out edges.
Adds Vibrance and Saturation adjustment layers to restore color and make skin tones pop, being careful not to overdo it.
Selects all layers, duplicates them, and merges (Ctrl+E) to create a single layer for further editing, noting this becomes destructive.
Applies the PortraitPro plugin to smooth skin and remove small imperfections, using a beauty filter effect.
Uses the Healing Brush tool on a new layer to remove freckles, lines, and other blemishes by sampling nearby skin areas.
Uses the Clone Stamp tool with low opacity (around 17%) to lighten specific areas like under-eye circles and nose highlights.
Duplicates the layer, applies Levels to brighten the eyes, then uses a layer mask to paint the effect only on the eyes.
Uses Dodge and Burn tools to add contrast and color back into the eyes, making them stand out.
Resizes the image to 1920x1080 (for a 19:20 thumbnail) and applies Unsharp Mask to add detail back, especially to the beard and eyes.
Adds a final Vibrance adjustment to enhance skin tones, resulting in a professional, polished thumbnail.
The video provides a step-by-step Photoshop workflow for creating a flattering YouTube thumbnail, emphasizing non-destructive editing, careful use of tools, and a balance between enhancement and realism.
What is the rule of thirds in thumbnail composition?
Divide the screen into nine equal parts and place the main subject or eyes along the lines for balance.
01:01
What Photoshop adjustment is used to brighten an image?
Levels (Image > Adjustments > Levels) to adjust shadows, midtones, and highlights.
02:16
What is the purpose of the Vibrance adjustment?
To restore color and make skin tones pop without overdoing saturation.
03:39
What does Ctrl+E do in Photoshop?
Merges selected layers into one.
04:25
What plugin is used for skin smoothing?
PortraitPro.
05:00
What tool is used to remove blemishes by sampling nearby skin?
Healing Brush tool.
06:52
What opacity is recommended for the Clone Stamp tool when lightening?
Around 17%, but can vary from 10% to 20%.
10:30
How do you apply an effect only to the eyes using a layer mask?
Add a layer mask, fill it with black, then paint white over the eyes to reveal the effect.
17:30
What do the Dodge and Burn tools do?
Dodge lightens areas, Burn darkens them, adding contrast and color.
19:22
What is the recommended final image size for a YouTube thumbnail?
1920x1080 pixels.
21:58
Rule of Thirds for Thumbnails
Provides a practical composition principle that improves thumbnail effectiveness.
01:01Vibrance vs Saturation
Explains the difference and how to use both for natural-looking color enhancement.
03:39PortraitPro Plugin
Introduces a powerful tool for skin smoothing that saves time.
05:00Layer Mask for Eye Enhancement
Demonstrates a non-destructive way to selectively apply adjustments.
16:31Resizing and Sharpening
Emphasizes the importance of final sharpening for thumbnail clarity.
21:44[00:00] good I'm going to show you how to take an image that looks like this where it's dark you have a lot of things that you maybe would want to fix up and it's not that flattering to looking like this where it's brighter the skin tones are
[00:14] of a distraction cleaned up some blemishes and more to make my thumbnails represent me in the best possible way this process also helps my thumbnail to learn in this video you going to apply to pretty much any image editing
[00:31] software but for this video I'm going to be using Photoshop because it's what I'm is Nick if you want to learn how to grow your channel make videos and all types of other YouTube related stuff start now by subscribing now let's hop on the
[00:45] kind of the framing in here anyway now keep in mind all this is going to get cut out here of the back so it's just going to be me you know right here like this but um one of the things that's important when you're making thumbnails
[01:01] is to make sure that you do have placement of things in a right way and the reason for this is it makes everything feel balanced so if you look different frames this is based on the rule of thirds um you can find out more
[01:17] it but basically the whole idea is you divide your screen into nine equal parts then you try to put your eyes um or the main subject within these lines
[01:29] here for the second thumbnail that I'm doing so you can see here the hands are just a little bit too far in but it's okay I might leave them as they are um as long as it gets the idea acrossed and I've got some spacing problems over here
[01:44] with the eyes I still have it balanced right here on this particular line so I important part of it but I'm probably going to roll with this one um but but the background so you can just see the difference that is being made once all
[02:00] this is done but uh I'm going to turn these guides off here because they are not crucial to what it is that uh that we're doing right now and I'm going to my wide screen but if you go up to the top menu and you go up to image and then
[02:16] down to adjustments you're going to see an option for levels if I click on that it's going to bring up a little dialogue box or I can move this up down here and here I can click on this little option down here and I can add adjustment
[02:32] layers for different things like uh you know like Hue and saturation Vibrance levels and all of that here as well um me personally just because when I first started learning this I always go up into the top menu for it but for your
[02:44] non-destructive but with this particular box let me make it bigger here for you what this is doing is this is showing me the light and dark areas of the
[02:56] thumbnail so if I grab this over here if if you look at the image you can see how it's making it brighter so what I want to do is I want to take it to where it's bright but not too bright that it's going to blow out this Edge over here so
[03:09] the midtones and I'm going to raise them up and you can see right out of the gate it's kind of taking away some of my color but it's bringing out a lot of the
[03:21] image right so it's giving me a lot more to work with and then on once that is up I can come back over to the bright side and then just maybe that up just a a little bit and then that's that for lightening it up so the next thing I'll
[03:39] do is I will go into that same area and then here I'll put it on Vibrance now with Vibrance this is another one where it's really easy to overdo as you can see right there but it brings color back into the image and it makes everything
[03:53] turn this up and I'm just going to eyeball it you know until I'm like yeah that that looks you know pretty good for what it is that I'm trying to do in this back that off a smidge I'm going to bring up General saturation which does a
[04:10] similar similar thing so now we've got my skin tones back and if we look at the version that I'm working on compared to the original you can see already just the huge difference this is making so now that we have those what I'm going to
[04:25] do is I'm going to select them all and then I'm going to duplicate the layers and I'm just going to smash them by hitting CR e and then that just combines work on there now just the heads up as soon as I do that it becomes destructive
[04:42] I would need to go back in and then you know kind of build everything out again but it's just the way that I work so now I'm going to zoom in and we're going to spots and just like little details and stuff like that on my face um I'm going
[05:00] to remove those using a plugin that I have called portrait 4 and when this pops up the name of it is right up here at the top so what's cool about this is let me just zoom in here to 100% is if you look at these lines on my head and
[05:16] just kind of look around everything here going to take this take it back to default you can see when I press I'm not sure how well this is going to come through with the internet compression you can see when I press on this how it
[05:29] beauty filter of sorts on my skin and it removes all those little tiny details so the next thing I'm going to do is I'm going to sharpen this a little bit so it
[05:43] starts to bring in some of those details not too much there we go and then you can see especially in areas like this where it really you know Blends things nicely now what's cool when it comes to this is I
[06:00] can also ey drop specific areas so if I zoom out on this and I say okay uh let's do this area then you can see here it's selecting my skin tones in this area to
[06:14] work with right so then that way it ensures that I'm putting this filter on doing you know it might end up on another area sometimes maybe you run it
[06:26] through a couple times just to make it you know look a little bit better so right out of the gate what this has done is it's it's taken the image and it's given me a version to where I just don't
[06:39] have as much of that stuff happening um happening in my head right so it just Smooths me out there just a little bit now we're going to work on these um the the lines underneath and just some of the other imperfections on my face so
[06:52] click on the plus icon here to create an additional layer then I'm going to make selected when I select my heel tool now on the heel tool I'm doing the healing
[07:12] brush tool so that I can sample areas and then with this what I'm going to do is I'm making this about the size of this Mark right here that I'm trying to take off it's like a freckle and then I'm just going to quickly go through and
[07:27] or that I just don't like you know when I'm looking at it and keep in mind this now but this is working on a 4K canvas so when it's all said and done then you
[07:43] know the it's actually going to be you know about that size but I'm just working on it big so that I can make sure that I get everything taken care of so that when I make it small again um everything comes out looking nice and
[07:56] good then what I'm doing is I'm just you know kind of rinsing repeating going through straightening up any lines that look weird using this and I just keep
[08:10] okay and then the bonus of this is let's say that I overdo it like I just did can just take that area out and kind of do it all again and then
[08:28] anything that's obviously crazy anything that uh that I want to remove and we're taking away anything that kind of takes away from the image or it's a
[08:43] distraction or like I said before things that I just don't like okay so for this one um one of the things I'm getting ready to do here is this spot right here in my mouth I just don't like how that looks so I'm going to do the same thing
[08:58] here I just go there bam now it's gone and in there that was a bit much so I'm going to sample here put it
[09:11] right there bam things that you don't see when it comes to the actual thumbnail itself it looks like it got a little bit of hair sticking out there I'll lighten this up a little bit later to make the eyebrows a little bit uh
[09:24] more even then so buckle in I'm sure you saw the time stamp Tak it off some of these things
[09:39] make it a little bit easier later and you'll see what I mean by that here in just a second so some of these lines right I'm not trying to look like a like a like I'm completely filtered out right I got to have some type of realism in
[09:51] here um but I am you know just trying to match colors up and that sort of thing here so that uh uh everything just looks a little better okay we're going to
[10:03] lighten that so so far you can see all the things that we've pulled away there now what I'm going to do is I'm going to duplicate this I'm just going to hit e to compress
[10:18] it all then now we're going to go um I created another one of those layers and then I'm now going to go over to the Clone tool and then I also need to make sure that this is current below and and for this I'm actually going to take the
[10:30] opacity down quite a bit like let's say maybe 17 sometimes it'll be 10 sometimes it'll be you know 20 it just kind of depends on exactly what I'm trying to do um but in this particular case I'm going to go
[10:43] and just kind of lighten up some things so for this right I'm just going to I'm sampling up here and then I'm just using that to lighten up that spot in my nose difference when I turn it on and off but when it comes to the thumbnails um these
[11:01] things are things that don't get recognized um I'm going to shrink this down here a little bit going to lighten this air up right
[11:13] here as I'm working on this what I'm going to end up doing is I'm also going to run this filter again the portor filter once we get all this stuff done and it just gives it like another one off for you know just kind of making
[11:29] natural and I'm going to have another layer going to lighten up this stuff just a little bit from my glasses there still there we're not totally removing
[11:43] can kind of reel it back in it's the advantage of you know working in the layers there where it's non non-destructive like that right so
[11:58] out right so here hard Shadow here it looks more diffused right and then I'm
[12:12] going to rinse and repeat that for my eyes as well and I'm creating new layers for all of these things so I can you know make adjustments if I need to per layer here coming in matching some color and I'm going to lighten up under
[12:28] be so I'm doing that with all of this and another thing too is you can go
[12:41] extreme with this and then just back it off a little bit so that's another advantage of working in the layers like that and doing it in the non-destructive way because you know as I build this around when I zoom out it's probably
[12:56] layers I can come in here and I can pull it back you know a little bit if it's too ridiculous let me zoom out and I'm going to do
[13:11] that I'm just making these quick notes on the layer going do the same thing over here we're all we on matching color for
[13:29] skin tone lightening things up a bit trying to hide the circles under my eyes and you know all that stuff just trying to make things
[13:41] blend bit better light coming
[13:54] there do a little bit of this right underneath this eye too you can see the big difference this has made over
[14:15] here and again you know you got to be really careful because some of these things like if you get carried away then it makes it look fake and you
[14:27] want it to look good but not too overly fake do that and I'm going to back it off just a little bit so all that's still there I think left eye is probably okay but we're just going to zoom out
[14:41] here and just take a quick look okay so we're getting there not uh there and if we were to do these together you can just see the difference
[14:57] that that makes and once it's Blended in the other tool it's going to be an even I'm going to build on top of it now that I've kind of backed those off a little bit for this going to zoom out just a little make the brush a little
[15:13] smaller working on some of these areas that I might have overlooked because I was zoomed in another thing too when you're doing
[15:27] this is make sure that brush is um as soft as you can make it because you want together a little bit there's another tool that I used to
[15:44] use for this too called uh rad Labs or totally rad but anymore which kind of sucks um let's see here Okay so we've
[15:59] there so it doesn't look totally unnatural so then so far this is where we're at pretty big difference right pretty crazy so what I'm going to
[16:13] do now going to take all of these do that same exact thing where I duplicate and then I'm just going to crush them together I just kind of know where I'm at pull this out
[16:31] and then next we are going to do the eyes now the eyes are fun because with the eyes we actually paint them in so here what I'm going to do um is I duplicated the layer and then I'm going to mask this layer currently um you can
[16:49] see everything and that's perfectly fine it's what we want um so the next thing I'm going to do is I'm going to go back into the adjustments and then into the levels again and here oops sorry I did it on the
[17:01] actual mask and not the image so adjustments levels and then here bring those eyes up even more and again we can tone these down
[17:15] too if we need to later okay and then now I'm going to click on the layer mask and I'm going to go up to the paint bucket confirm the mask is selected and then I'm going to paint that off click on The Mask again
[17:30] and now I have the paintbrush where I can zoom in and then change this back to white white
[17:43] means show it black means do not show it then I'm going to paint in my eyes another thing you can do before you do this or you can do it in the process
[17:56] is if you have like lines in your eye eyes or you know your eyes are bloodshot adjustments like how this is getting a little pink here I might clone that I'm
[18:09] out now some content creators will leave the extreme version like this sometimes
[18:21] I will too but I try not to make it you know too crazy so I'll tone it back just a little bit which it looks like in this case is right around 65% then if I turn it on and off you can see how it just brings my eyes to life
[18:36] there now the next thing that I'm going to do is I'm going to duplicate this again and then which you can see also added you know a little bit of brightness there um again so what I'm going to do actually you know what I'm
[18:50] not let me delete this and I'll just duplicate this turn this off then I will rasterize this okay now that we've got that next
[19:07] thing I'm going to do is I'm going to do another layer here and I'm going to go to the burn tool I actually have to do this on the the layer I'm go to the go to the Dodge and burn tool the cool thing with this with these particular
[19:22] tools is they help you bring color back you can see right there right added some color back into my eye and then when I take the other option and I go to the
[19:34] Dodge side then here it just creates some like contrast there in my eyes right so then now we bring it back
[19:47] you can see how much the eyes stand out compared to yeah when it's down there compared to what it was before right and I think it's still a bit much so because of that I'm going to
[20:02] bit because I want nice and bright but not you know not too
[20:14] crazy so then now I'm going to duplicate this again make sure that this is yep okay so I'm going to duplicate this again and
[20:26] I'm going to smash those together and then now so far if I turn off all of these other ones down here you can see the huge difference that's being made between these two these two things so the next
[20:44] thing I'm going to do is I'm going to go back up into my filter and I'm going to go back into that portrait plugin again and then going to zoom in I'm going to run it one more time and by doing that I'm going to take the
[21:03] minute bump it up just a smidge there now you know what I'll just do it on Photoshop but you can see here now we've
[21:17] default um is I'm actually going to pull this back just a little bit because it's a little bit
[21:29] much there we go I'm going to hit okay and it just gave me a new layer for that next thing I'm going to
[21:44] do is I'm going to go up to well next thing I'm going to do actually is I'm going to resize this so since this is going to be a 19 by 20 image and in that particular case because it's currently 4 4K and take it down to
[21:58] 1920 and then we're going to see the real size and this is when we sharpen okay so this is the full sizee thumbnail now and then we are going to go up to filter and then sharpen unsharp
[22:16] mask and then here we add detail back to it and how this works in Photoshop is like you can uh just click on this up
[22:30] here and then it just kind of shows you the the difference being made and this one's you have to be really careful here um because with this it's really easy to redo it but this is where you know we bring like the
[22:48] the beard back in and that kind of stuff and pull it back even more okay so that is nice and crisp so now just to avoid any issues I'm going
[23:02] to duplicate it one more time and then now we are going to uh go up into the sharpen tool now with this one um this is also one to where I don't want it to be too crazy but I'm going to just brush over
[23:18] my beard real quick right because that hair kind of stands out I'm G to tap on my eyes real quick that should be good there just a little bit of extra
[23:35] there but um here I'm going to pull up the vibrant scale again and I'm just going to bump it up just a just a little bit more again you know we're not trying
[23:48] to be too crazy but I do want it to you know have good skin tones so if you look at the difference between the two when I toggle them on and off it's a pretty extreme difference between the two and just kind of helps them you know look
[24:03] professional makes me look better you know and all of that it's pretty crazy work if you want to see some of the other skills that you need to work on to
[24:15] help you thrive this year on YouTube click into this video right here right now thank you so much for watching I'll see you in the next video


⚡ Saved you 0h 24m reading this? Transcribe any YouTube video for free — no signup needed.