Play Music Through Your Mic in Games
34sDirectly addresses a common desire among gamers to play music through their mic, with a clear solution.
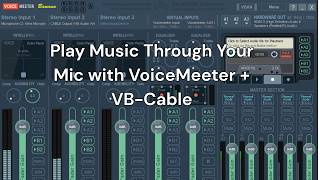
▶ Play ClipThis tutorial demonstrates how to play music through your microphone in video games using VoiceMeeter Banana and VB-Cable. The process involves installing both tools, configuring audio settings to route music into your mic input, and setting default devices in Windows.
The video shows how to play music through your mic in video games using VB-Cable and VoiceMeeter Banana.
Go to vbaudio.com, download the VB-Cable virtual audio device.
Also download VoiceMeeter Banana, the advanced mixer.
Extract and install VB-Cable first, then restart your device.
Run the VoiceMeeter setup and restart after installation.
Set desktop input to VoiceMeeter Input and select your microphone as the input device.
Set microphone to B1 and B2 for virtual mic in game.
Set stereo input 2 to cable output (virtual cable).
Set A1 to headphones, A2 to Elgato if needed, and enable A1/A2 for virtual inputs.
In sound settings, choose B1 or B2 as the input device for the game.
In advanced sound settings, set Spotify to output to virtual cable input.
In Control Panel > Sound, set VoiceMeeter Input as default device and default communication device for playback. For recording, set B1 or B2 as default.
Any app (e.g., YouTube) can be set to output to cable input to play through mic.
By following these steps, you can play music from any source through your microphone in games using VoiceMeeter Banana and VB-Cable.
"Title accurately describes the tutorial; it delivers a working setup guide."
What two pieces of software are needed to play music through your mic?
VB-Cable and VoiceMeeter Banana.
0:10
After installing VB-Cable, what must you do?
Restart your device.
0:58
In VoiceMeeter, which outputs should the microphone be set to for in-game use?
B1 and B2.
2:27
What should stereo input 2 be set to in VoiceMeeter?
Cable output (virtual cable).
2:34
What hardware output should A1 be set to?
Headphones.
2:59
How do you route Spotify music through the virtual cable?
In advanced sound settings, set Spotify to output to virtual cable input.
4:04
In Control Panel > Sound, what should be set as default playback device?
VoiceMeeter Input.
5:25
What should be set as default recording device?
B1 or B2.
6:00
Software Download
Identifies the two essential tools for the setup.
0:10Microphone Output Configuration
Key step to ensure mic audio goes to virtual inputs.
2:27Routing Spotify to Virtual Cable
Demonstrates how to send music from an app to the mic.
4:04Setting Default Devices
Ensures consistent audio routing without manual switching.
5:15[00:00] What's going on, guys? I'm going to be
[00:02] showing you how to um
[00:05] play music through your mic and video
[00:07] games.
[00:09] You're going to want to come over here
[00:10] to vbaudio.com.
[00:14] Go to the audio apps virtual audio
[00:16] cable. Going to want to download the VB
[00:20] cable, virtual audio device
[00:22] right here.
[00:25] And then you're going to also want to
[00:27] grab Voice Meter Banana, the advanced
[00:30] mixer. Download that here. Right here we
[00:34] have the two.
[00:38] Want to extract
[00:42] both of these.
[00:44] We want to first install DB audio cable.
[00:50] Do that. I already have it installed.
[00:52] Going to go through the installation
[00:54] process. install it.
[00:56] I'm not removing the driver. It's
[00:58] probably going to ask you to restart the
[00:59] device or your device. After you restart
[01:02] your device after installing that, I
[01:05] want to come to voice meter
[01:08] and run the setup. Same thing. I already
[01:12] have everything installed.
[01:16] No reason for me to reinstall it again
[01:17] because it's going to ask me to restart.
[01:19] So once you have those two installed,
[01:24] you're going to have something like
[01:25] this.
[01:29] Your banana
[01:32] something like this is going to come up
[01:33] now. All right.
[01:37] So once you open up this,
[01:40] come down to your bottom right hand
[01:42] screen. Click the uh the sound. You're
[01:45] going to want your desktop input set to
[01:47] voice meter input.
[01:50] Then for your selected stereo device,
[01:52] you're going to want to put the
[01:54] microphone that you wish to use in video
[01:56] game. So currently right now I use the
[01:59] uh 5in microphone number two. You put
[02:02] that as your input device. As you can
[02:04] see now it's reading my inputs. These
[02:08] channels right here, your A1, A2, B1,
[02:12] B2, all these channels correlate to over
[02:15] here.
[02:16] So, if I were to put A1, I would now
[02:19] hear my own voice through the desktop or
[02:21] through the um speakers.
[02:25] So, for your microphone, you want to
[02:27] have it set to just B1 and B2 because
[02:30] this is going to be used as the virtual
[02:31] mic in game.
[02:34] Then for stereo input number two, you're
[02:36] going to want to do the uh the cable
[02:38] output, your virtual cable output.
[02:42] Right now, there isn't anything
[02:45] feeding into that virtual audio cable.
[02:48] But if you want to listen to your own
[02:49] audio, you do A1 and A2
[02:53] because over here, this is where you set
[02:56] your hardware outputs up over hardware
[02:59] out. For your A1, you're going to want
[03:01] to set your headphones. A2, if you have
[03:04] an Elgato, you could then use that to
[03:06] output to the Elgato on A2.
[03:11] So, for the virtual inputs, you're going
[03:13] to want to put A1 and A2. So, it goes
[03:15] out through your headphones and your um
[03:21] what is it? Your TV, television, if you
[03:23] want to have dual audio outputs.
[03:26] After that, you're then going to go into
[03:28] your sound settings.
[03:34] Currently right now we have
[03:37] for your output
[03:40] you could choose whatever uh B1 or B2
[03:44] but these right here B1 and B2 are the
[03:48] virtual output devices to use as an
[03:50] input device.
[03:53] So that's what you're going to use. Not
[03:54] Yep. That's what you're going to Yeah.
[03:56] V1. God dang it. V1 going to set that as
[04:01] your input device. And if you go down to
[04:04] advanced sound settings,
[04:07] you're going to click uh you're going to
[04:09] find Spotify,
[04:11] have Spotify play some music,
[04:14] and then you're going to choose your
[04:16] virtual uh cable input. All right. When
[04:20] you do that, is now going to play music
[04:24] through
[04:27] the audio cable. And you can see the
[04:29] music
[04:32] right there playing through all the
[04:34] audio channels. So currently right now
[04:38] the cable output is outputting to both
[04:40] my headphones, my Elgato and then also
[04:44] my two um virtual outputs. So now when I
[04:50] use my mic and play music, it'll play
[04:52] through the virtual audio
[04:56] input technically for the mic. So
[04:58] technically this is being used as my mic
[05:00] and these are being phased through and
[05:04] my headphones speakers are grabbing A1
[05:07] and A2 to listen alongside PE what
[05:10] people are hearing through my mic as
[05:11] well.
[05:15] And then you're going to want to go into
[05:16] control panel
[05:21] sound
[05:25] and set your virtual meter input to both
[05:30] set the set as default device and set as
[05:34] default communication device. You're
[05:36] going to want to set that for your input
[05:37] so it always
[05:40] is on. You don't want to switching sound
[05:42] like you don't want to be switching
[05:43] devices so forth whenever you plug
[05:45] something new in set that at the as a
[05:47] default for both communication
[05:52] and just as default device. Same thing
[05:54] for recording the microphone that you
[05:57] wish to use in game to play music.
[06:00] You're going to want to use,
[06:03] [Music]
[06:04] sorry, you're going to want to use
[06:06] either B1 or B2 as your default
[06:12] device and as your default communication
[06:15] device.
[06:17] Now, when want to play any type of
[06:20] music, now it doesn't even have to be
[06:22] just Spotify. Like, let's just say for
[06:25] example, sound settings. I want
[06:29] uh let's see let's open up a YouTube
[06:30] video. Let's see.
[06:34] YouTube.com
[06:38] and let's just say
[06:40] >> in 1929 in Chicago
[06:43] >> to come out through the the desktop,
[06:45] right?
[06:47] We would then find where is it? Opera
[06:51] and put that also as your cable input
[06:54] and it'll output
[06:57] whatever device that you set as cable
[06:59] input through your mic.
[07:02] That's pretty much that.
[07:05] Pause that.
[07:07] All those two
[07:09] and then you'll learn how each channel
[07:11] works. I mean, you could mess with the
[07:13] gate to make sure that your mic's not
[07:15] peeking in game. So forth. Same thing
[07:18] for the music. Double click to reset.
[07:20] Double click to reset.
[07:23] And hopefully that helps you on
[07:29] getting it all together because right
[07:30] here, these virtual inputs are
[07:34] your desktop audio on where it's going
[07:36] to like pretty much what this is. Sorry.
[07:42] This picks up everything that's on the
[07:44] desktop and sends it through A1 and A2.
[07:49] [Music]
[07:51] If you have any questions, expo in the
[07:54] comments. Message me either or.
[07:57] And have a good one, boys. Peace.
⚡ Saved you time reading this? Transcribe any YouTube video for free — no signup needed.