
Why Voicemeeter is confusing but worth it
45sRelatable frustration hook grabs viewers who've struggled with audio routing.
▶ Play Clip"Delivers a clear step-by-step setup, though the 'best on YouTube' claim is subjective."
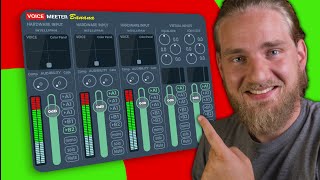
Voicemeeter is a powerful but confusing audio routing app for PC. This guide simplifies setting up Voicemeeter Banana to separate computer audio, communication audio, and microphone inputs, with an optional step to isolate music using EarTrumpet and virtual audio cables.
Voicemeeter installs three versions: base, Banana (most popular), and Potato (largest). This guide uses Banana, but the setup works similarly across versions.
Select your headphones as the A1 output device (use WDM source). Ensure virtual inputs have A1 toggled on.
In Windows Sound Control Panel, set 'Voicemeeter Input' as default playback device and 'Voicemeeter Aux Input' as default communications device.
Computer audio (games, etc.) goes through Voicemeeter Input; communication audio (Discord) goes through Voicemeeter Aux Input. Label them for clarity.
Select your mic on hardware input 1, disable A1 to avoid hearing yourself. Choose B1 or B2 output; B2 is recommended for mic output.
In Sound Control Panel Recording tab, set 'Voicemeeter Aux Output' as default device (or 'Voicemeeter Output' if using B1).
Install EarTrumpet and virtual audio cables. Assign music app to virtual audio cable via EarTrumpet, then select that cable on hardware input 2 in Voicemeeter.
With Voicemeeter Banana configured, you can independently control game audio, chat audio, and microphone levels. The optional music separation step further enhances control using EarTrumpet and virtual cables.
What are the three versions of Voicemeeter?
Voicemeeter (base), Voicemeeter Banana (most popular), and Voicemeeter Potato (largest).
0:12
Which output source should be selected for headphones in Voicemeeter?
A1 output source, preferably with WDM driver.
1:00
What is the purpose of setting 'Voicemeeter Input' as default playback and 'Voicemeeter Aux Input' as default communications device?
To separate computer audio (games, etc.) from communication audio (Discord, etc.).
1:50
Why should you disable the A1 button on the microphone hardware input?
To avoid hearing yourself through the A1 output (headphones).
2:19
What is the difference between B1 and B2 outputs for microphone?
B1 is the Voicemeeter Output, B2 is the Voicemeeter Aux Output.
2:31
Which recording device should be set as default if using B2 for microphone?
Voicemeeter Aux Output.
2:38
What additional tools are needed to separate music audio?
EarTrumpet and virtual audio cables.
3:22
Voicemeeter Versions Explained
Clarifies the differences between the three versions, helping users choose the right one.
Separating Audio Streams
Core technique to isolate game/chat audio for independent volume control.
1:50Microphone Routing
Shows how to avoid echo and route mic to the correct output.
2:13Music Separation with EarTrumpet
Advanced tip to route music apps separately for independent mixing.
3:22[00:00] voicemeeter is widely known as one of
[00:01] the best pc apps to use but it's so
[00:04] confusing that people don't even bother
[00:06] using it today i'm gonna make this app
[00:08] seem so easy you won't even break a
[00:10] sweat after installing voicemeeter you
[00:12] will have three versions of the app
[00:14] installed voicemeeter which is the base
[00:16] version of the app with minimal tools
[00:17] voicemeeter banana which is the most
[00:19] popular version of the app and
[00:21] voicemeeter potato which is the
[00:22] granddaddy of all three and bigger than
[00:24] the rest
[00:26] that's what she said we will be using
[00:27] voice meter banana in this video but
[00:30] don't worry if you want to use a
[00:31] different version of the app it works
[00:33] the same way for all three just with
[00:35] more or less virtual sources we will
[00:38] also use the virtual audio cables which
[00:40] is available for free on voicemeeter's
[00:42] website it's very important that you
[00:44] listen to what i'm about to say the
[00:46] first thing we're going to do is set our
[00:48] default playback device on our computer
[00:50] but before you do it watch me do it
[00:52] because you will lose audio from this
[00:54] video when you change the source so you
[00:56] need to know what you're doing prior to
[00:58] switching the source over first let's
[01:00] set up our output device on the top
[01:02] right of the app is the a1 source this
[01:04] is where we can select our output device
[01:07] i will select my headphones with the wdm
[01:09] source next i want to make sure that
[01:10] virtual inputs here have the a1 source
[01:13] toggled on now let's change our playback
[01:15] devices right click the speaker icon on
[01:18] your desktop select the sound settings
[01:21] and then select the sound control panel
[01:23] in the playback tab we will right click
[01:25] the voicemeeter input source and make
[01:27] this our default device after that we
[01:29] will right-click the voicemeeter aux
[01:31] input source and make this our default
[01:33] communications device once we've done
[01:36] this our computer audio will be playing
[01:38] on the voicemeeter input source and our
[01:40] communication audio will be playing on
[01:42] the voicemeeter aux input source this
[01:44] means you will need to set the audio
[01:46] settings in apps like discord to default
[01:48] at least that's the easiest way to do it
[01:50] the reason for this is we're separating
[01:52] our computer audio from our
[01:54] communication audio so that means apps
[01:55] like discord or communication apps will
[01:57] play through the voicemeeter aux input
[01:59] and that means other apps like video
[02:01] games will play through the voicemeeter
[02:03] input to make things easier let's change
[02:05] the labels of the inputs to desktop and
[02:07] communications by right-clicking the
[02:09] titles to make sure we know what they
[02:11] are next we can set up our microphone
[02:13] left click on the first hardware input
[02:15] and select your microphone source you'll
[02:16] want to disable the a1 button on this
[02:19] input so you aren't listening to
[02:21] yourself on the a1 source that we
[02:23] selected earlier for the microphone
[02:25] output you have two options you can
[02:27] select b1 or b2 b1 is the voicemeter
[02:31] output and b2 is the voicemeter aux
[02:34] output i like to use b2 so that's what i
[02:36] will select in the sound control panel i
[02:38] will go to the recording tab locate the
[02:41] voicemeeter aux output source and set
[02:43] this to the default device if you're
[02:46] using the b1 source instead be sure to
[02:49] select the voicemeeter output instead of
[02:51] the voicemeeter aux output now that
[02:53] we've set the default recording device
[02:55] on our computer we can go into every
[02:57] single one of our apps audio settings
[02:59] and set the input device to default this
[03:02] will default to using the correct
[03:04] voicemeter source that we set up this
[03:06] also means that all the sources on
[03:08] voicemeeter with b2 toggled will also
[03:10] play through your microphone so make
[03:12] sure you only select b2 on inputs you
[03:15] want playing from your mic you can
[03:16] adjust the mix of the output sources
[03:18] from the master section in the bottom
[03:20] right now we can take it even a step
[03:22] further and separate our music audio on
[03:25] voicemeeter as well to do this we'll
[03:26] need to install ear trumpet and the
[03:28] virtual audio cables that i mentioned
[03:30] earlier on the second hardware input of
[03:32] voice meter let's select the virtual
[03:34] audio cable let's then open ear trumpet
[03:36] from our hidden apps find our music app
[03:38] right click click the arrows and then
[03:41] select the virtual audio cable if you
[03:42] don't see your music app on ear trumpet
[03:44] that's because you need to be playing
[03:46] audio from the app in order for ear
[03:48] trumpet to recognize it steelseries made
[03:50] an app like voicemeeter that's way
[03:51] easier to set up check it out here you
[03:54] won't regret it thank you so much for
[03:55] watching and i'll catch you in the next
[03:57] one peace
⚡ Saved you 0h 03m reading this? Transcribe any YouTube video for free — no signup needed.