
Vandalized car interior transformation
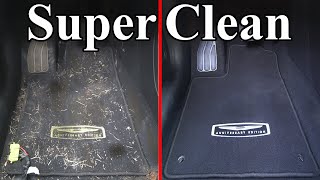
60sThe dramatic before-and-after of a mud-covered interior grabs attention and promises satisfying results.
▶ Play Clip"Delivers exactly what the title promises: a thorough, step-by-step guide to super cleaning carpets and headliner, with minimal fluff."
This video demonstrates a comprehensive, step-by-step method for deep cleaning a car's interior, focusing on carpets, floor mats, and headliners. The host uses two vehicles—a vandalized car and a typical daily driver—to show how to tackle both extreme and normal dirtiness. The process includes removing seats, vacuuming, spot cleaning, shampooing, and protecting carpets, with tips for avoiding damage to delicate headliners.
The video is part of a 'Super Clean' series where the host goes above and beyond a normal clean, using easily available and inexpensive tools and products to make the interior look brand new.
The interior is the most important part of the car because it's where you spend all your time, touch, breathe, and smell. It should look and smell good for you and your passengers.
The cleaning process will cover carpets, floor mats, trunk, and headliner. The host will use two cars: a vandalized car with extreme dirt and a typical daily driver with normal dirt.
To safely remove seats (especially with airbags), disconnect the negative battery cable and wait 20 minutes. Then remove the seats to access hidden dirt and clean underneath.
Clean out all junk from the interior and trunk. This is half the battle because you can't clean around items. The host found a winning lottery ticket in the vandalized car.
Essential tools: microfiber towels, a powerful vacuum (like a Shop Vac with 5 HP), a stiff bristle brush, and a carpet cleaner. Optional: a water injection carpet vacuum for deeper cleaning.
Remove floor mats, then vacuum the carpet surface. Use a brush to agitate the carpet and loosen deep dirt, then vacuum again. This makes a huge difference.
For stains like melted candy or gum, use hot soapy water (120°F) with a toothbrush, or a steam cleaner (212°F) which requires no soap. Steam is effective for gum and sanitizes the area.
Spray carpet cleaner over the entire carpet, agitate with a brush, then absorb with a microfiber towel. Vacuum up any residue. This removes odors and makes the carpet look uniform.
A water injection vacuum (extractor) injects soapy water into the carpet and sucks it out, providing a deeper clean. It's highly recommended for best results.
The transformation is incredible, but avoid oversaturating the carpet because the sound deadening material underneath acts like a sponge and can lead to mold. Use an extractor to avoid this.
Brush off dirt, bang out the mats, vacuum, then use a pressure washer to force out dirt. For deep cleaning, use a drill brush attachment with carpet cleaner, then rinse and dry.
Hang floor mats on a clothes hanger to dry quickly. Apply a carpet protector in light, even coats to prevent future stains and make cleaning easier.
Remove the spare tire and carpet to vacuum the spare tire well. Clean plastic trim with interior cleaner and a brush, then apply protectant. Also clean the trunk lid and rain gutters.
The headliner is delicate; avoid aggressive cleaning to prevent sagging. Start with dry cleaning using a clean microfiber towel and a soft brush. If needed, use a small amount of carpet cleaner and feather out water marks.
The carpets, trunk, and headliner are now clean. The next video will cover the dashboard, center console, door panels, and seats.
A thorough interior cleaning involves preparation, deep carpet cleaning, and careful attention to delicate areas like the headliner. Using the right tools and techniques can make a car's interior look and smell brand new, and protecting surfaces helps maintain the results.
Shop Vac (5 HP vacuum)
tool
Steam cleaner
tool
Water injection carpet vacuum (extractor)
tool
Drill brush attachment
tool
Pressure washer
tool
Microfiber towels
tool
Stiff bristle brush
tool
Carpet cleaner
product
Carpet protector
product
Interior cleaner
product
Protectant
product
Waterless wash
product
Why is it important to disconnect the battery before removing seats?
To disable airbags and prevent electrical issues while the doors are open and seats are removed.
03:11
What is the recommended waiting time after disconnecting the battery before removing seats?
20 minutes.
03:25
What is the temperature of hot soapy water used for spot cleaning?
About 120°F.
08:07
What is the temperature of steam from a steam cleaner?
About 212°F.
08:52
Why should you avoid oversaturating the carpet when cleaning?
Because the sound deadening material underneath acts like a sponge and can hold water, leading to mold.
14:04
What is the purpose of using a carpet protector on floor mats?
To prevent future stains and make cleaning easier.
16:43
What is the best way to dry floor mats quickly?
Hang them on a clothes hanger in the open air.
16:30
What is the biggest tip for cleaning a headliner?
Always try to start with dry cleaning and use as little liquid as possible to prevent sagging.
22:50
How do you remove a watermark from a headliner after wet cleaning?
Feather out the watermark by blending the edge with the dry part of the headliner using a microfiber towel.
25:51
Interior is the most important part
Emphasizes why interior cleaning matters more than exterior, as it's where you spend all your time.
01:09Battery disconnect for airbag safety
Crucial safety tip for anyone removing seats in modern cars with airbags.
03:11Steam cleaner vs. hot soapy water
Highlights the effectiveness of steam (212°F) over hot water (120°F) for tough stains like gum.
08:52Avoid oversaturating carpets
Warns about mold risk from oversaturation, a common mistake in DIY cleaning.
14:04Dry cleaning headliner first
Key tip to prevent headliner sagging by using minimal liquid.
22:50[00:02] going to show you how to super clean the interior of your car and if you're not familiar with the super clean Series this is where we go above and beyond the normal clean we're not just going to vacuum and dust off the dash we're going
[00:17] to go above and beyond and get this interior looking brand spanking new and the best part is we're going to be using tools and products that are easy to find readily available and inexpensive I'll be sure to link everything in the
[00:30] know the products in this video are going to give you the results you want the tools in this video are going to get you to those results they're going to there's Cool Tools and products that I'm using that are really going to help you
[00:43] get that extra clean and I can't wait to show you for example with my exterior super clean video we went from this dirty Mustang to this beautiful deep dark luscious paintwork with my engine bay super clean video we went from this
[00:56] dirty engine bay to this and this dirty engine bay to this so clean you could eat off of it so you know how to super clean the exterior super clean under the hood now let me show you how to super clean probably the most important part
[01:09] of your car the interior and it's the most important part because this is where you spend all of your time this is where you physically go and sit you touch you breathe you smell you take passengers you bring them into your car
[01:21] you want it to look good you want it to smell good and Susan the vandalized car is the perfect example of a car that we need to clean now I wish I knew the like they dirtied up the interior with mud on purpose to vandalize the car but
[01:35] I don't know for sure but it is a mess the carpets are dirty there's gum over there the seats are dirty they have all this loose change that has like sugar and it's gummy and tons of candies that are melted the interior trim has dirt
[01:48] and stuff stuck inside of it we have dust we have the steering wheel it's dirty the back of the car is a mess as well this is why I think it's vandalism because I mean I don't think anybody is that dirty so we are going to clean this
[02:02] your car no problem now I get not everybody's going to have a vandalized car so I asked my sister to leave her daily driver here and I'm going to clean dirtiness you would expect in a car the door panels are a little dirty from your
[02:15] oils on your skin the carpets are a little bit dirty we have some dirt in the stitches of the seats the center console is a little dirty we have dust everywhere and our steering wheel is dirty from either moisturizer or makeup
[02:28] or whatever that gets on here so this is the typical dirtiness what you guys probably would find in your car so between a typical daily driver and a vandalized car we have the perfect examples to show you how to super clean
[02:42] this video the first thing we're going carpets after that we're going to clean the floor mats and then clean the trunk headliner which is very delicate and have some awesome tips for that so let's
[02:56] have some awesome tips for that so let's get started way we don't have to worry about getting any cleaners or oily interior pain to clean off next you want to Pop the trunk open in each of these cars and
[03:11] finally unscrew and disconnect the negative battery cable and we want to reasons one we're going to have the doors open which will kill the battery inside of the car it could take a couple of hours and the dome lights will be on
[03:25] other lights might be on and two we're going to be removing our seats to give us more room so some seats today have airbags in them anytime you disconnect have the battery disconnected for 20 minutes 20 minutes later we are safe to
[03:38] remove the seats so slide it forward and we need to remove the two screws in the we need to remove the two screws in the front so that's one and that's two now more screws back here that we need to remove good next you want to angle your
[03:52] wires you need to disconnect and in this car we have one harness right here we need to disconnect good now we could car carefully remove our seat and you want the metal parts of the seat against the interior or the door panel which could
[04:05] easily scratch it and with the driver seat out now we can do the same thing and carefully remove the passenger seat and finally we can remove the rear seat by pressing in the two levers below each side of the seat and then this seat
[04:17] bottom pops right out like that and with the seats removed I think you get a good idea of why we take the extra time to remove the seats look at all this junk and dirt that's found underneath the seats all all this has to be removed
[04:31] plus we have to clean under here because this is what holds in smells if your car able to clean the carpet up there and the carpet back there but under the seat won't get cleaned and that's very important to do plus we want to be able
[04:45] of it right here where the seat would be we want to clean that you can see there to clean all that out basically we need the interior to be super clean and in seats so that means we also want to remove the seats from our vandalized car
[05:00] as well so with the seats removed the last thing we need to do in the preparation step is to clean out all the junk from inside of the Interior this papers from the floor and I'll do the
[05:14] looks better already and the last place to clean out is the trunk good and it's still want to remove everything so we could properly clean it beautiful now look at all this junk we removed plus I
[05:27] found a winning lottery ticket so today's my luck day now it's important car because you can't clean around this this is half the battle getting all this stuff out then if we look over here my sister's car had some junk in it as well
[05:40] but not as much so with all this junk removed now we can move on to the next removed now we can move on to the next step to clean the basic things some microfiber towels a good vacuum a stiff bristle brush and a
[05:56] carpet cleaner that is it now I do have some other products I'm going to show vacuum that injects water and cleaner into the carpets and sucks it out and don't need them but they do help give
[06:10] you that extra clean so let's go get started first if you have floor mats you want to remove them and I like to fold the edges that way dirt doesn't fall out and if you take a look floor mats do a pretty good job at keeping your
[06:23] carpets clean underneath so with our floor mats removed there are four quick going to vacuum the dirt off the carpet second we're going to spot clean third fourth we're going to protect the carpet so one of the most important pieces of
[06:36] equipment we're going to be using is a vacuum like this this is a shot vac I've been using this forever it has five horsepower so tons of power to suck all vac so it could suck out water if you need to and again it's about the power
[06:49] you're going to be able to lift out all the dirt with this so I suggest you get your car so as you would expect start by vacuuming all the dirt and debris off the surface of the carpet usually this is going to be larger pieces of dirt and
[07:02] now there's still going to be dirt deeper in the carpet so to remove that grab a brush and use the brush to agitate the carpet and loosen up that dirt that's caught deep in the fibers you can see the dirt and the dust that
[07:14] right up and then you have the vacuum right here to suck it right up so using a brush is a huge help in getting that dirt loose and making it easy to vacuum out of the carpet and you can see here the before and after not bad so you're
[07:28] rest of the carpet in your car so it goes from this to this and this to this and check it out what a little bit of brushing and vacuuming does is amazing
[07:41] look at that it looks so good both sides are looking way better than before so now we're on to the next step and that's the spot treatment step so anything you couldn't get out of the carpets any stains any candies like this melted
[07:53] into the carpet and isn't easily coming up and then if we come over here you can see there is gum stuck to the carpet and this is in there good so you won't want so I'm going to show you two different techniques you could use to spot clean
[08:07] first is the hot soapy water technique you get a squirt of dish soap you put it way with hot water and just using the hot water from the tap you can see it gets to around 120° F which is hot enough this is very easy to find at home
[08:21] this soapy water and a toothbrush so let me show you how to clean it up the first remove as many big pieces as possible so get all this out of the way then you're nice warm soapy water and next grab a brush and use that to agitate the
[08:36] that chocolate so it's making it nice and easy to remove from the carpet stain with the towel and blot up the water from the carpet like so and that's not too shabby for some warm soapy water and a toothbrush but there is another
[08:52] method and that is using a steam cleaner like this so instead of using warm soapy water which is like 120° steam is about 2 212° F so you don't need any soap just add plain water to the steam cleaner and screw on the top then all you need to do
[09:06] is plug her in and after about a minute or so she is ready with some very hot steam let me show you how this works on that gum so let the steamer do all the the steam to push the gum out of the fibers and then we want to remove as
[09:21] ripping out the fibers of the carpet now let's go back in here with the Steam and loosen up the rest of the gum and I'm using a brush to clean deep into the fibers and bringing it to the surface it's easy to clean the surface but the
[09:34] tougher to remove but this is working great and then finally you want to hit is going to sanitize the area prevent mold and prevent odors good so here's what it looked like before and here's what it looks like now nice and clean
[09:48] and you can see why I like the steamer so much plus there's other applications we could use this for in different parts of the car besides stains in the carpet now after you're done spot cleaning your carpet and removing all all the stains
[10:00] carpet and this is an important step because it's going to remove the odors out anything that we couldn't get to with just the vacuum any little stains or discoloration that you find in there any little pieces of dirt that you have
[10:14] in there it's going to clean all that and make it nice and even so this looks like one brand new carpet so let's get started to shampoo the carpets all you need is a carpet cleaner a brush and a towel first you want to spray down the
[10:26] entire carpet with your carpet cleaner try to use a a carpet cleaner that not only removes stains but also removes odors especially if the inside of your comes from your carpet as well as your seats and your headliner and this carpet
[10:39] dirt that was in there so finish spraying the entire carpet and next grab your brush and we want to agitate the carpet cleaner deep into the fibers for near the surface and that's just going to clean the top of the fibers but we
[10:52] way we're going to get a better deeper clean also while you're brushing make this will work the cleaner more evenly into your carpet and get you better an absorbent towel like this microfiber towel and you're going to want to rub
[11:07] dirt and cleaner that we just loosened up you're going to want to press down towel back and forth making sure you look at all the dirt we absorbed out of the carpet when doing this next what
[11:20] vacuum and we're going to vacuum up any loose dirt and any cleaner we didn't absorb into the towel this is basically sucking the dirt and cleaner up to the carpet working my way One Direction and then work my way in the other direction
[11:33] missing any spots and then finally you're going to take your towel and do that last amount of dirt and cleaner that we just sucked up good and now that is how you shampoo your carpets check out how clean this looks and while this
[11:48] is very clean if you want we could get this even cleaner and to do that you would use something like this this is a water injection carpet vacuum this works amazing I love these things so how this works is on this side we have a
[12:01] reservoir for soapy water plain water whatever water you want and then we have liquid out that we have in this container and then sucks it up with this special nozzle and puts it in here let me show you so when you press the
[12:15] you need to do is press that trigger and slowly drag the nozzle along the carpet with a medium downward pressure and injected into the carpet it's dissolving and loosening up any of the dirt and
[12:28] can see the dirty water getting pulled out of the carpet and leaving behind a nice clean carpet and I don't know about you guys but for whatever reason this is super satisfying you get such a deep clean and you can see it's actually
[12:41] working and just like with the regular vacuum I like to go in One Direction and that's going to get us complete coverage and then once you're done the last thing to do is get a clean stiff brush and we're going to brush the carpet fibers
[12:53] fibers going in the same direction the carpet's going to look really good it's the same shade the same color and it's just that extra step to make the carpet look amazing and after you let that dry look at this carpet it literally looks
[13:08] brand new but even better take a look at the recovery tank look at all the dirt we extracted from the carpet and that's going to remove the smells and make the carpet look that much cleaner so let's finish the rest of the interior and I
[13:20] down the entire carpet with carpet cleaner work that cleaner in with a brush and then either use a microfiber towel to absorb the dirt or even better use an extractor vacuum which I highly highly suggest to get amazing results
[13:34] the carpet fibers in the same direction to give you a really nice smooth even looking carpet beautiful and the carpet cleaning transformation is incredible here is the before in my sister's car and here is the after before and after
[13:50] this looks amazing so what a huge difference shampooing the carpets makes Not only does it look a million times better but it used to smell really musty in here and now it smells nice and fresh but there is one thing I want to mention
[14:04] it's very important as you're cleaning the carpets that you don't oversaturate them if you take a look at the carpet you can see there's carpet material on sound ding material and the sound ding material acts like a sponge it absorbs
[14:18] water and it's really hard to remove unless you remove the entire carpet and air it out and the problem with that is if you oversaturate it this will hold water and you could get mold so don't drench your carpets with water or soak
[14:30] cleaner and if you have an extractor just like I showed you and it'll come out perfect all right so as we let these carpets air out and dry let's move on to carpets air out and dry let's move on to the next
[14:44] mats cleaning the floor mats is a similar process but use the ability to your advantage for example we could brush off most of this dirt from the surface pretty quickly I also like to bang out the floor mats which works
[14:57] amazing to get that dirt trapped deep into the fibers right out look at all the dirt coming out right now next we could vacuum up any leftover dirt and get it ready for my favorite step and that step is to use a hose or pressure
[15:09] washer and force all the dirt and stains out of the floor mat a pressure washer Works amazing for this and it cleans that dirt and the stains out so easily now we could spray the floor mat down with carpet cleaner and let it sit for a
[15:21] minute now we've already used a brush like this instead of showing you this of these brushes which connects right to a drill so with the brush on the drill I like to keep a light to medium pressure downwards and a medium speed on the
[15:34] just make sure you keep moving that drill from side to side or up and down don't let it stop and sit in one spot and to keep the cleaning relatively even carpet and then do the same thing in the other direction also if you have any
[15:48] logos or stains be careful but give it a little extra attention to make it extra clean so with the floor mats brushed now we can use the pressure washer and wash all the dirt and soap out and again you can see how dirty that water is and
[16:02] you're going to suck out any remaining dirt water and cleaner it's not going to get most of that water out and just make the floor mats damp and check out all the dirt we removed these floor mats are like brand new now so although a brush
[16:18] like this definitely works well I highly suggest you looking into one of these it makes the job quick and easy and you get amazing results so now we need to let these floor mats completely dry and a little trick to get these floor mats to
[16:30] dry pretty quickly is hang them on a clo hanger like this and put them in the air you just want them to be out in the open and hanging them up like this lets it dry real quick so our floor mats are clean they're dry and that's where most
[16:43] people would stop but we have one more step and that is to protect them this is a carpet protector that prevents future stains makes it easier to clean the live in an area where there's snow and
[16:55] it on this is just like spray painting you want light even overlapping coats so you want light even overlapping coats so work your way down the floor mat in One Direction good now we're going to let this dry for 15 minutes and after it's
[17:09] dry do one more light coat in the opposite direction again make sure you do slight overlaps so you don't have any uneven spots and we cover the entire floor mat and finally I like to coat The Edge just to make sure I got the whole
[17:21] Edge so spray one last spray around the edge like so good all right so you know pudding and I want to show you what to expect when you protect your carpet so not protected and then we have this carpet right here which is protected you
[17:35] can pretend this is juice this is coffee or you could just pretend it's water it doesn't matter any liquid that goes into the carpet is going to absorb right in you see how it just goes right in with our protected carpet check this out the
[17:48] water stays right at the surface it repels almost like waxing your car and absorb it up just like that so you can see the benefit of not only cleaning way it's harder to get stains and a lot easier to clean up so now let's get the
[18:03] passenger side floor mats in as well as the driver's side and beautiful these floor mats are looking amazing our carpet is looking incredible this interior is starting to take shape and look great especially compared to before
[18:17] so with these all nice and clean now we can move on to the next this definitely remove it so we could to clean it outside the car now let's get
[18:30] really clean out this spare tire well so now we have access to vacuum the remove this carpet and vacuum this spare tire area as well and then move on to the carpeting on the side of the trunk here and on the other side and remember
[18:45] any dirt definitely do it and it'll help give you a more thorough clean good now trim piece start by using an interior cleaner and spray it into your brush then brush the cleaner into the plastic and and I like using a brush on textured
[19:00] nooks and crannies and then after you're done brushing in the cleaner now we can towel next we want to apply a protectant to another brush and work this brush the cleaner and don't worry about using too much protectant we want the plastic
[19:15] to absorb all that protectant which will make that plastic look brand new and minute or two now we can buff it off with a microfiber towel and check out with a microfiber towel and check out these results before and after this
[19:28] looks amazing and finally we can't forget to vacuum up the main carpet that really isn't that dirty so just a little bit of vacuuming and it looks good as new so with everything in the trunk all nice and clean we could put it all back
[19:40] together all right so our trunk is looking amazing there's no stains it's nice and clean no dirt and our Plastics looking good but we don't want to stop there that's just the inside of the trunk don't forget you also have the top
[19:52] part of the trunk that closes now I did vacuum all this because it wasn't very dirty did it real quickly it looks great but what is very dirty is this up here this paint work this is not looking good and this is something you're going to
[20:04] look at that see all that dirt in there also if we take a look down here you can see there's all dirt in the rain gutter there's debris here sticks and leaves and twigs so we want to remove all of that cuz it doesn't look good and we
[20:18] the little details that you want to remember to clean so it comes out amazing so let's start by vacuuming out all the leaves and the Twigs from the hose out the clean all this out and potentially getting water in the trunk
[20:31] and this has wax in it so saturate the area with the waterless wash and scratching while cleaning light dust and dirt so you don't have to hose this down and this is what I mean by paying attention to details this looks so good
[20:45] it gives you that brand new car Vibe because this is clean now in the tight spaces spray it down and then I suggest using a soft brush to agitate that dirt to do is wipe it away with a microfiber towel then we could go from this to this
[20:59] and this to this and this really gives you a good idea of what a big difference surrounding paintwork on the trunk now would you look at this trunk it is looking super clean not only is it vacuumed it's stain-free but we went the
[21:13] well we made sure it was organized it was clean There's No Junk down there and we paid attention to the little details we cleaned up here all the painted surfaces are cleaned and waxed including the rain channels this is super
[21:27] important it Chang es how the car looks when you open the trunk when this isn't filled with leaves it's not dirty and it looks brand new all of this is waxed and cleaned and it looks just absolutely amazing so that is how you super clean
[21:42] amazing so that is how you super clean your how to clean a headliner now the headliner can be a little bit tricky not want to be aggressive with it cuz you could damage it let me show you so
[21:56] we're in the back of my dad's Jag and this is exactly what we want to avoid do not want to cause the headliner to Sag like this and being too aggressive with it while cleaning could cause this problem the headliner is just this
[22:09] material on the back of this material typically is a foam you can see the foam indenting and on the back of that is an adhesive if we damage the foam or we damage the adhesive over time the headliner could sag so we don't want to
[22:22] carpet so we want to be very delicate with how we clean this and just get to the surface Mater material so we don't cause anything like this in the future so cleaning your headliner is actually pretty simple it's all about the
[22:35] going to use some carpet cleaner we have a soft bristle brush make sure your brush is extra clean and then we have a soft absorbent microfiber towel and that is it so let's go get started and this headliner is looking pretty clean but
[22:50] there is a nice Mark in the back that we need the spot clean now before we do anything my biggest tip for cleaning a headliner is always try to start with dry cleaning don't go in with any liquids we want to try to use as little
[23:02] liquid as possible when cleaning this so if we don't need to use any liquid at all that is awesome I'm going to start out with a clean dry microfiber towel it's dirty you're just going to spread more dirt onto this and you're going to
[23:15] lightly rub back and forth just to try to clean as much of that dirt off the surface look at that we already removed a bunch I can still see a mark there but that's way better than before and we just lightly rubbed it so lightly rub
[23:27] of it out and then I'm going to move to another clean part of the microfiber towel and again lightly rub it and wow that's already coming out so that's really good now unfortunately you could still see there is a very light Mark
[23:40] we're going to move on to using a brush again this is going to be a dry clean hopefully we don't have to but we're going to keep this dry right now and it's very important that the bristles of your brush are clean I cleaned them with
[23:53] this is dirty from something else that you cleaned you're going to just be even just a little bit of dirt is going to make it visible cuz this is a nice white headliner so go in there and lightly brush away any of that dirt
[24:06] don't push too hard oh man this is coming out beautiful I don't even know where that Mark is anymore and we didn't have to use any liquids which is super with cleaning a mark like that without any liquids that is the best case
[24:19] scenario here's a before and here's an after and that was a textbook example of cleaning a mark off the headliner without using any liquids at all but unfortunately sometimes you need to use a liquid cleaner because the stain is
[24:32] right here so again we're going to start out with a clean portion of our microfiber towel and we're going to lightly rub back and forth to try to clean this as much as we can and you can definitely see this stain is in there a
[24:45] to remove so now let's use a dry brush to get deeper into the fabric and now mostly right here but there's still some marks right here and here after the dry clean now we have to move to a wet clean
[24:58] so grab your carpet cleaner and add just a little bit into your microfiber towel fibers that way it doesn't get completely absorbed by that headliner clean the stain off the surface of the headliner and the goal here is to not
[25:12] see any water marks from our cleaner and we're getting closer that's looking better here we can still see a slight stain but this is still there so let's and to do that grab your brush and spray a little bit of carpet cleaner in there
[25:26] remove remove the stain and if the headliner starts to get saturated like you see here don't worry there is a solution for this we didn't use a lot of cleaner so it's really not a big deal just focus on removing that stain and
[25:38] down with the microfiber towel all right so that looks clean except for the giant water mark we just created now if we leave this and let it dry odds are you're going to see the edge of the watermark we definitely don't want that
[25:51] to feather out that Watermark almost like Feathering out a paint job so it Blends there's no hard paint lines we're working the edge of the water mark and the headliner blends with the dry part of the headliner and the goal here is to
[26:04] completely blend it so you can't see a hard water mark then go in there with your dry microfiber towel and lightly wipe up any of that moisture you can and it should blend this nicely into the surrounding dry headliner and look at
[26:16] you feather that Watermark out so it doesn't dry and look horrible so we want doesn't dry and look horrible so we want from this to this to this beautiful and the carpet in the car as well as the trunk and the headliner and what a huge
[26:32] difference clean carpets make the carpets and Susan were a mess but now thing for my sister's car the carpets were a mess but now they are looking that you're going to be putting into cleaning the interior so once you get
[26:46] this done the rest is easy same goes for the trunk it was a mess but now it's nice and tighty and finally those distracting stains on the headliner are clean and they aren't an eyesore anymore now we are aren't done in the next video
[26:59] the dashboard center console and door panels and we're also going to be cleaning the seats which is going to be a huge transformation I can't wait so was remember to give it a thumbs up if you're not a subscriber consider hitting
[27:12] that subscribe button and as always all the tools and products I used in this description so you could easily find them stay tuned
⚡ Saved you 0h 27m reading this? Transcribe any YouTube video for free — no signup needed.