
iPhone 18 Pro Teardown: Secret Upgrades Inside!
45sThe promise of hidden upgrades like variable aperture and vapor chamber creates curiosity and immediate engagement.
▶ Play Clip"The title promises a teardown and delivers exactly that, with detailed insights and a few sponsor plugs that don't detract from the core content."
This video is a detailed teardown of the iPhone 18 Pro, revealing its internal components and repairability. The host demonstrates the process of disassembling the device, highlighting new features like the variable aperture camera, larger vapor chamber, and the A20 Pro chip, while also discussing the repairability and design choices made by Apple.
The iPhone 18 Pro looks similar to last year's model but has significant internal upgrades, including a variable aperture, larger vapor chamber, and cooling plate.
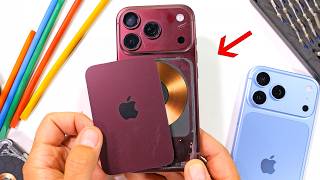
The teardown begins by removing the bottom pentalobe screws, a design Apple has used for 16 years. The back glass is heated and pried off, revealing the wireless charger and MagSafe magnets.
The 25W wireless charging coil is found under a graphite pad. The host promotes a Ridge power bank, a sponsor, and discusses its features.
The front screen is removed using heat and a pry tool, revealing the vapor chamber and the phone remains functional. The process is described as easy after breaking 20-30 screens.
The vapor chamber is three times larger than last year's. The nano-twin copper layer is not visible to the naked eye, but more graphite is present.
An experienced technician can replace the screen in about five minutes. Out-of-warranty screen repair costs $329, and the host recommends a screen protector.
The mid-frame is removed with 13 screws, revealing the battery attached to it. Apple's official procedure is to replace the battery with the mid-frame, making it easy with just a screwdriver.
The eSIM version has a 4,288 mAh battery, while the SIM card version has 4,056 mAh. The battery is held with electrically debonding tape.
There is no thermal paste between the A20 Pro and the mid-frame, only a thermal foil. The host suggests that thermal paste could improve heat dissipation.
The vapor chamber is made of stainless steel, which is less thermally conductive than copper but more economical and 80% recycled. It has divots to prevent collapse and contains copper mesh to spread heat.
The front camera is 18MP, and the rear camera module includes all three cameras, costing $249 to replace. The variable aperture is built into the main camera.
The upper speaker contains balls that cushion air for better sound. The motherboard has soldered ribbon cables, and the A20 Pro has a puffy metallic sticker for thermal contact.
The host discovers that the aperture can be manipulated with a magnetic tool, revealing the internal fins and electromagnets that control them.
Apple's sensor shift stabilization is praised as the best. The aperture blades are paper-thin and controlled by tiny electromagnets.
The iPhone 18 Pro features significant internal improvements, particularly in thermal management and camera technology, but its repairability is mixed. While some repairs are easier, others remain difficult, and the host remains loyal to Android but appreciates Apple's innovations.
iPhone 18 Pro internal upgrades
Reveals that the phone's exterior hides significant internal improvements, setting the stage for the teardown.
Screen replacement is easy
Highlights a positive repairability aspect, contrasting with other difficult repairs.
03:46No thermal paste on A20 Pro
Raises a question about Apple's thermal management choice, potentially affecting performance.
05:26Vapor chamber material choice
Explains the trade-off between thermal conductivity and cost/recyclability.
06:12Apple's sensor shift stabilization
Praises Apple's stabilization technology as the best, highlighting a key camera advantage.
10:06[00:00] Don't let it fool you, the iPhone 18 Pro might look the same as last year on the outside, but the insides are way more cool. Like the new variable aperture, the larger vapor chamber, and cooling plate on the back side of the screen.
[00:14] Plus the rather intense A20 Pro chip. Today we're going to see all of it, starting by removing the back panel. I almost forgot though, the bottom screws do come out first. Apple started using two pentalobe screws to hold their phones shut about 16 years ago.
[00:29] and it's kind of cute that they just kept doing it after all these years. With the screws gone, I can warm up the back glass panel until it's barely too hot to touch. The long screws we took out earlier do double duty of holding in the back glass and the front glass at the same time,
[00:43] so the screws have to be removed regardless of whatever side you're opening up. With my thin pry tool, so that between the glass and the aluminum, I can slice away the adhesive, and voila, the back panel is off, giving us access to basically nothing.
[00:58] The only thing we can repair back here is the back glass panel itself, which includes the 25 watt wireless charger. Apple charges $159 to replace this glass, so take as care as is.
[01:10] The 25 watt copper wireless charging coil is hiding here under the graphite pad, along with all the orienting MagSafe magnets. I personally hardly ever use the wireless charger unless it's on a portable power bank,
[01:26] And the coolest looking power bank I've ever seen is the transparent phantom 5-in-1 charger from my channel sponsor Ridge. Obviously it works way better when the back glass is still glued onto the phone, but it can handle wired USB-C charging and lightning port charging,
[01:41] as well as wireless charging for iPhones, Androids, and Apple Watches. And you can see all the 10,000 mAh of power right here on the inside with your own eyes. Kind of cool seeing all the guts without needing to take it apart.
[01:54] Ridge also has an atomic purple version of the charger, just like the old Game Boy colors back in the day, along with matching 45-watt dual-port portable charging bricks. I've had a Ridge wallet in my own pocket for about seven years now,
[02:07] because it's built for life, and if it can survive me, it can survive anything. I'll be adding this new orange tracker card, though, since losing my wallet would be worse than cracking the screen on my phone. Ridge also has new Glacier and Burgundy wallets, which magnetically fit to the new iPhones rather exquisitely.
[02:24] You can get your own transparent Stanton power bank at ridge.com slash jerryrig, and I'll put the link in the description. Let's swing this phone around and enter in from the front. We'll leave it turned on just as we can.
[02:36] Using the same super hot heat gun and ultra thin pry tool method, once the phone is too hot to touch, we can slice away that adhesive. Might have gone a little too hot this time around since he throttling himself I slip the pry tool between the metal frame and the plastic screen bezel making sure not to touch the edge of the pixels under the glass The goal is to go under the pixel panel and lift up from underneath the whole unit Once you broken about 20 or 30
[03:00] screens perfecting the art, the process becomes rather easy. And take a look at that. Our iPhone 18 Pro is still alive. Already I can see the silhouette of the three times larger vapor chamber under the graphite. That's on the right side of the phone, and on the left, well, Apple
[03:16] did say there was a nano-twin copper layer back here, but so far I'm not seeing it. There is more graphite for sure, this is the same silvery stuff we find in pencils. It's super thermally conductive, but you would expect something named nano-twin copper to be copper in color, and at least for
[03:32] the moment it's not visible to the naked eye, but it's probably this panel. I'll go ahead and turn the phone off at this point. Then I can unplug the battery connector over here on the right and the two screen rivets over here on the left. This releases the screen of the iPhone
[03:46] 18 Pro and an experienced technician could replace this screen in about five minutes, which is super cool. Thumbs up for repairability. Apple hasn't given us the replacement part cost yet, but for them to do the repair out of warranty, it would cost $329. So get that
[04:03] screen protector ASAP. The underscreen camera hole still has a dark patch in the center. Kind of new. To get access to the 3X larger stainless steel vapor chamber, we need to remove the mid-frame. There are 10 screws around the outside and 3 larger screws in the middle.
[04:17] I'll link my repair toolkit down in the description. Then the mid-frame can be removed, revealing the iPhone 18 Pro does not have a battery inside. Amazing.
[04:29] Oh, wait, there it is. Screwed to the back of the mid-frame. Now, Apple does not want people to remove this metal-encased battery from the mid-frame. Their official repair procedure states that the new battery just comes with the new mid-frame already installed,
[04:42] and you screw the whole thing into place, which again is pretty amazing. Being able to replace the battery with just a screwdriver is pretty great. Getting there through the screen is hard, and the screen will probably break, but once you're inside, the repair is easy.
[04:57] Now, if you did want to remove the battery from the mid-frame for whatever reason, it's the same electrically debonding tape as last year. connecting a small battery to the silver tab on the adhesive and grounding on the metal frame makes the tape lose its grip.
[05:11] If you wait long enough. The eSIM version of the iPhone 18 Pro battery is 4,288 mAh. If you have the SIM card model of iPhone, it is slightly less capacity at 4,056.
[05:26] At this point, we can also see that there is no thermal paste connecting the A20 Pro processor with the backside of the mid-frame, which is interesting. There is physical contact for sure but as we all know two metal objects will never achieve perfect contact at a microscopic level They only touch at their highest microscopic peaks which are called asperities There is some
[05:48] kind of thermal foil over the processor, probably to help maintain what contact it can, but a dab of thermal paste in here might help displace the air trapped in those microscopic valleys and improve thermal
[06:00] performance. Because like Apple said, every bit of heat dissipation counts, especially when the processor is a powerful S820 Pro. We'll look at this a little deeper here in a second. The vapor chamber itself is pretty massive.
[06:12] It's strange to see Apple use stainless steel instead of copper, since copper is 20 times more thermally conductive than stainless, but stainless is more economical, and Apple says the vapor chamber is made with 80% recycled material.
[06:25] You can see the little golf ball-sized divots on the surface. This is to make sure the vapor chamber doesn't collapse in on itself under vacuum, and the vapor inside the chamber still has room to move around. It is definitely three times bigger than last year's iPhone 17 Pro.
[06:40] Slicing into the vapor chamber, we see some copper mesh on the inside. This helps whip the moisture around and spread the heat from the A20 processor over a wider area, so it can cool down the phone faster.
[06:54] You can see the deionized water vapor evaporating in real time as I slice through the mesh. Probably not a good idea to drink this. Making our way back to the iPhone, let's find that variable aperture camera and the A20 Pro shift
[07:08] and see what they really look like in real life and not a promotional rendering. There are three screws around the main rear camera unit, while the front camera unit just has a few ribbon cables that I can unplug like little Legos.
[07:20] Here we have the 18 megapixel front-facing selfie camera on the right with the light sensors and the underscreen infrared face ID camera over on the left. The rear camera has a few more ribbon cables of its own holding it in place, and then it comes free from the phone.
[07:35] Apple charges about $249 to replace this module on the iPhone 18 Pro, and considering all the cameras are built into the same housing, all three cameras always need to be replaced at the same time, if one decides to break.
[07:48] The variable aperture hardware is definitely built into the main camera, since I can't see any of the fins at this point in time. The wide-angle camera does not have OIS, but the telephoto has internal sensor shift,
[08:01] and will continue to tear down on the main camera here in a second, once we get out the motherboard. The upper loudspeaker earpiece has a few screws holding it in place, and at first glance, there does not appear to be any balls inside, but if you break it open, all the balls will come tumbling out.
[08:16] These balls help cushion the air inside the speaker so it can sound larger than it actually is. Without the balls, it would sound like a rattly tin can. There's a few more screws holding in the ribbons for the motherboard. Aside from a string replacement and a battery replacement Apple makes any other kind of repair excruciatingly difficult Every screw is a different size and a different type and I wouldn wish these repairs on anyone
[08:39] With the motherboard out, it looks like Apple has soldered some of the ribbon cables onto the back, which is a choice. And interestingly enough, here's a closer look at the puffy metallic copper and stainless sticker that sits on top of the A20 Pro processor.
[08:53] The puffiness is probably to maintain as much physical contact with the vapor chamber as possible, while still accommodating for the thermal expansion and contraction of the materials. Maybe Apple thinks the puffy metallic sticker lasts longer than thermal paste?
[09:06] That could be it. If your phone is going to last 5 or 10 years, maybe the sticker is better than the goo. Only time will tell. Either way, in typical Apple fashion, there's an Apple logo laser-etched onto the top of the A20 Pro chip.
[09:19] Not something everybody gets to see, just a lucky few people who subscribe to my channel. So thanks for being here. Coming back to the variable aperture, this is where I make a discovery. See, my Razer Blade is able to manipulate the aperture just by tickling the outside of the camera,
[09:35] opening and closing the aperture with just a touch, even though there are no moving parts on the outside. Fascinating. Almost like it's alive. Let's see if we can find more of the internal components by going deeper.
[09:47] Ripping off the backside of the 48 megapixel main camera, we can see the sensor itself, as well as the sensor shift mechanism. Credit where credit is due, Apple's sensor shift stabilizing technology really is probably the best stabilization of any smartphone.
[10:06] It's easier and faster to shift a lightweight camera sensor than it is to shift a heavier glass lens array, making Apple stabilization quicker than anyone else's. It's also interesting that my tweezers won't manipulate the aperture, but my $15, link in the description, Jerry Knife, will.
[10:22] It must be magnetic in there somehow, or magic. Magnets and magic are basically the same thing anyway. I'll punch the lens out from the camera housing. This thing is incredibly tiny. My magnetic screwdriver can also manipulate the blades. Kind of nifty.
[10:36] The aperture blades and mechanical movement is still enclosed inside of the black ring. I'll take special care to carefully, cautiously, and circumspectly remove the plastic shroud, and it all explodes.
[10:49] The fins are all super lightweight, paper-thin individual slices that rest on a circular ring around the glass. This can be rotated by super-tiny electromagnets which open and close the fins through that rotation.
[11:01] Fascinating. Apple has done some really cool stuff this year. Not enough for me to switch over just yet, definitely not. But as soon as Apple makes a transparent iPhone as cool as Ridge's Phantom Power Bank,
[11:13] I promise to be first in line at the Apple Store. Links to the Power Bank is down in the description, and thanks a ton for watching. I'll see you around.



⚡ Saved you 0h 11m reading this? Transcribe any YouTube video for free — no signup needed.