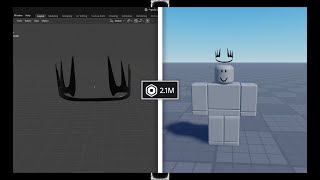
No UGC Program Needed?!
42sReveals a major policy change that simplifies accessory creation, sparking curiosity and debate among Roblox creators.
▶ Play ClipThis video provides a step-by-step guide on how to create and sell UGC accessories in Roblox without needing the UGC program. It covers the entire process from modeling in Blender to publishing on the marketplace, requiring only a Premium subscription and 1,000 Robux per month.
Roblox now allows publishing accessories without the UGC program. You only need Premium, your model, and Robux. Premium requires at least 1,000 Robux per month.
Use Blender to create your 3D model. Export it as FBX format, ensuring to check 'Selected Object' before exporting.
In Roblox Studio, use the 'Import 3D' button in the Home tab to import your FBX model. Adjust its size and position as needed.
Select a block avatar in the Avatar tab. Copy the avatar's position and paste it into the model's position. Use the Asset Creator plugin to attach the accessory to the avatar.
If the accessory scales up 10x, export the scaled-down model again and re-import it. Repeat the plugin steps with the corrected model.
Use a camera plugin to adjust the display angle of your accessory for the marketplace preview.
Right-click the accessory, select 'Save to Roblox', enter name and description, choose avatar item and accessory type, then submit and pay 750 Robux.
Go to the Roblox website, click Create, select Avatar Item Accessories, choose your accessory, set tags, title, description, and price. Pay the required fee to publish.
By following these steps, anyone with a Premium subscription can create and sell UGC accessories on Roblox, turning their 3D models into profitable items.
"Title accurately describes the tutorial; it delivers exactly what it promises."
What are the three requirements to publish UGC accessories in Roblox?
Premium subscription, your 3D model, and Robux (at least 1,000 per month for Premium).
00:03
What file format should you export your model from Blender?
FBX format.
01:09
Which checkbox must be selected when exporting from Blender?
Selected Object.
01:24
How do you import a 3D model into Roblox Studio?
Go to the Home tab and click 'Import 3D'.
01:39
What plugin is used to attach the accessory to the avatar?
Asset Creator plugin.
02:30
What should you do if your accessory scales up 10 times after using the plugin?
Export the scaled-down model again and re-import it, then repeat the plugin steps.
03:17
How much Robux does it cost to submit an accessory to Roblox?
750 Robux.
05:33
Where do you go on the Roblox website to list your accessory on the marketplace?
Click Create, then select Avatar Item Accessories in the left menu.
05:45
UGC Program No Longer Required
Roblox changed its policy, allowing anyone with Premium to publish accessories without the UGC program.
00:03Using Blender for Modeling
Blender is a free tool for creating 3D models, essential for accessory creation.
00:43Asset Creator Plugin
This plugin simplifies attaching accessories to avatars, a key step in the process.
02:30Publishing Cost
Publishing an accessory costs 750 Robux, a significant investment for creators.
05:03[00:03] year now, Roblox has been able to release accessories without a UGC program. A year ago, the UGC program was needed for publishing accessories, but everything has changed. Now you accessories, but everything has changed. Now you only need three things: premium, your
[00:18] model, robx. Note: Roblox Premium requires at least 1,000 robx per month. If you've browsed Marketps, you've seen a
[00:30] variety of accessories, some popular, some not so much, but both bring profit to their owners. Question: How can one become such a creator?
[00:43] You need to start by creating a model. And for this we need a program. I use Blender. The link to the official website will be in the description. When you open Blender, you will see the program interface.
[00:57] program interface. And it seems complicated, but a couple of guides on the Internet, and you'll figure it out. I believe you. I'll just show you how to export your model from Blender itself and
[01:09] model from Blender itself and import it into Roblox Studio. Once you have created your model, select it and then click on file in the upper left corner of the screen. In the window that opens, find the export button and select the
[01:24] FBX format. Select the location where you want to save your model. You also need to click on the Selected Object checkbox, and You also need to click on the Selected Object checkbox, and then click the Export FBX button.
[01:39] Next, we go to Roblox Studio. First, we need to import the 3D model. To do this, in the Home tab, find import 3D. Click on it, find your 3D model, and then click Open.
[01:56] Then click the import button in the lower right corner of the window. After a short download, your model will appear in Roblox Studio. We change and adjust the sizes as you wish. Open the Avatar tab.
[02:14] We need a Charctter button. Here we select a block avatar. Next, we need to copy the position of our avatar in the Properties tab and paste it into the position of the model that we imported earlier.
[02:30] Next, we need to go to the plugin tab at the top of the screen. I'll leave a link to the plugin I use in the description. Click on the plugin called description. Click on the plugin called Asset Creator. Then repeat after me.
[02:45] Asset Creator. Then repeat after me. In the first window, select the Asset button. Click next. In the second window you need to select our accessory. Click next. In the third window, you need to select Riga, which we created earlier. Click
[03:01] next. In the fourth window you need to select the In the fourth window you need to select the accessory type. In my case it's bodybk. Click next. In the fifth window you need to select classic. Click next. In the
[03:17] select classic. Click next. In the sixth window, simply click next. If our accessory has increased in size 10 times, then do not try to reduce it. To fix this, we need to export the already scaled down model.
[03:32] To do this, select it with the right mouse button in the export. Find the Save button. In the window that opens, click Export Selection and save it to a convenient location.
[03:44] After that, import it in the same way as the first model. first model. We repeat all the same operations with the plugin. We repeat all the same operations with the plugin. [music]
[04:36] accessory in Riga to make sure that we did everything correctly. We also need to configure the camera display using the plugin linked in the
[04:48] description. This is necessary so that the item is displayed correctly on the market. Select your accessory and click on the plugin. Then adjust the camera position as you wish.
[05:03] To place this accessory on the market in Export, right-click on it . Find the Save Export button and click Save to Robox. In the Export button and click Save to Robox. In the window that opens, enter the item name and
[05:17] description. Content Type. Select an avatar item. Content Type. Select an avatar item. Also select the accessory type. Next, choose who we will publish this item from: from the group or
[05:33] from yourself. Next, we click the submit button and pay 750 Robux for it. The item appeared in our inventory, but not on the marketplace. To upload it to the
[05:45] Marketplace, we need to go to the Roblox website, click the Create button at Roblox website, click the Create button at the top of the screen, and then the top of the screen, and then select the Create Avatar Item Accessories button in the left menu
[05:59] . Select your accessory type and open it. In the window that opens, specify tags, titles, and description.
[06:11] You can change it to a limited type if you wish. The price can be increased in the same way if desired or left the same.
[06:23] After that, scroll down and find the We will pay a certain amount for this. The amount varies for each type of accessory
[06:35] . That's all. published our subject. And if you liked this video, you can like it and subscribe to the channel. I also have my own group with accessories. You can find it by following the link
[06:52] accessories. You can find it by following the link in the description. Bye-bye everyone. Yes.
⚡ Saved you 0h 06m reading this? Transcribe any YouTube video for free — no signup needed.