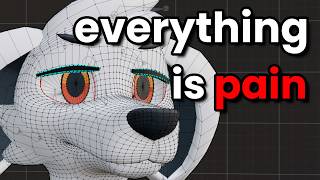

Why 3D VTubers Are So Hard to Make
40sHigh engagement as it demystifies the complex process of creating a 3D avatar, appealing to both curious fans and aspiring creators.
▶ Play Clip"Title accurately reflects the content: a genuine first-time attempt at creating a 3D VTuber."
The video documents the creator's journey to build a 3D VTuber avatar from scratch, starting from 2D design through modeling, rigging, texturing, and final implementation in VR Chat. It highlights the technical challenges and iterative process involved, emphasizing the importance of topology, weight painting, and blend shapes.
The creator previously used pre-made avatar bases in VR Chat but decided to create a custom 3D VTuber from scratch, despite having only basic Blender experience.
A 2D character sheet was created with a neutral pose and multiple views to aid 3D modeling, avoiding overly stylized proportions for VR embodiment.
Box modeling was chosen over sculpting due to lack of traditional art experience. It involves extruding and slicing a simple shape to build the character.
Good topology (quads) is essential for deformation. The tutorial series 'Modeling for Animation' by Dikko helped understand edge loops and subdivision.
Applied a subdivision surface modifier to smooth the model, with a target of 40,000 triangles for performance in VR Chat.
Uploaded the model to Mixamo for quick animation tests, providing early feedback on proportions and movement.
Used a stylized eye method: an empty socket with a floating iris, common in anime models, to be shaded later with a toon shader.
Created an armature (skeleton) for VR Chat, attempted digigrade legs, and used weight painting to assign bone influences to vertices.
Imported the model into Unity with VR Chat SDK. The initial test revealed issues: digigrade legs felt weird, proportions off, hands crumpled.
Simplified legs, remodeled hands, fixed UV mapping, and applied Pyonji shader with toon shading and outlines.
Created 20 blend shapes for vowel sounds and MMD expression guide for face animations, adding emoticon-like expressions.
Added ears, tail, and a shirt. The final model is functional but still needs improvements like better outfit and face tracking.
Creating a 3D VTuber from scratch is a complex, iterative process involving design, modeling, rigging, texturing, and testing. Despite initial failures, persistence and incremental improvements lead to a usable avatar, though further refinements remain.
What are the two common methods for character modeling mentioned?
Sculpting and box modeling.
01:35
What is topology in 3D modeling?
The structure of points, lines, and faces that build a 3D model.
02:54
Why is modeling in quads important?
It makes it easy to slice with loops, subdivide into smaller squares, and deform evenly.
03:08
What triangle limit did the creator set for the base model?
About 40,000 triangles.
03:50
What is the purpose of the subdivision surface modifier?
It smooths the model by dividing all quads.
03:37
What is weight painting?
A process where each vertex has a weight for how much a specific bone affects it, brushed on with colors (red full, blue none).
07:20
What are blend shapes used for?
Smaller animations like facial expressions, deforming the original mesh to a new shape.
10:12
How many blend shapes did the creator make for vowel sounds?
About 20.
10:12
What shader did the creator use for the final model?
Pyonji shader.
09:47
Topology for Animation
Explains the critical concept of topology for deformation, a key technical insight for 3D character modeling.
02:42Overcoming Doubt
Highlights the emotional challenge and iterative nature of creative work, encouraging persistence.
06:00Iterative Problem Solving
Demonstrates the necessity of reworking failed parts (hands, legs) to achieve a functional result.
08:55Blend Shapes for Expression
Shows the importance of blend shapes for facial animation, a key feature for VTubers.
10:12[00:02] journey to create a 3D Vtuber from scratch for the very first time. I started making videos in VR Chat using avatar bases, pre-made models retextured to look like my characters. Yet, after spending so much time in this community
[00:16] and seeing your amazing creations, I decided that it's finally time to dive into 3D art and make something of my own. Thing is, I know it's not going to be easy, but seriously, why is it difficult? What type of work goes into
[00:28] making a VTuber? Let's try it out. Now, I'm not completely new to 3D software. I've used the program Blender before. However, it's always been really simple models like these cool shades are building onto existing bases. A
[00:42] character is still far bigger than anything I've worked on before. I needed a plan. A 2D reference should help keep things on track. Looking at my usual art, we already have a bit of a problem. These drawings are cartoony, stylized.
[00:56] They lack depth. We're making this for virtual reality where you physically embody the avatar. I don't want a giant head or oversized hands. Now, I'm no measure the number of heads to avoid making it look too chibby. So, I decided
[01:10] to explore some new designs. After a bit of sketching and line work, this is what I came up with. The drawing is about as exciting as a Family Guy still, but that's intentional. The character standing in a teose. This will make it
[01:22] easier to model and rig later. Character sheets typically have multiple views, but here it's especially important to make sure it lines up in 3D. So, we can get started. With the reference in place, I looked into some character
[01:35] modeling videos and found there were two common methods: sculpting and box modeling. Sculpting is exactly what you're thinking of, except the clay is material to shape a model. This could be an amazing option if you've got that
[01:48] traditional art experience. I do not. Alternatively, there's box modeling. Here you start with a simple shape, then build onto it by extruding, slicing, and moving different parts. Box modeling felt more
[02:01] decided to go that route. Even though I had some idea of 3D modeling, I wasn't different parts of a character fit together. In fact, I was starting to get big flashbacks to making a 2D Vtuber for the first time. One of the hard things
[02:16] about making a VTuber is that you're expected to foreshadow and draw things a certain way when you already don't know what you're doing. Man, did all my old videos sound like that. Anyway, modeling felt tedious and I had no idea how to
[02:29] fit everything together. Clearly, I was missing something. I found one tutorial series helped immensely. Modeling for animation by Dicko. No, this isn't a Seeing someone block out a character
[02:42] while also explaining their reasoning helped immensely. Our avatar needs to move and deform. So, we need to make patterns that hold their shape even when bent and twisted. Topology is the structure of all the little points,
[02:54] lines, and faces that build your 3D model. It's an entire area of study. But for right now, let's just focus on what matters for characters. In this case, we want to model in quads or four-sided polygons. Modeling in quads makes it
[03:08] easy to slice with loops, subdivide into smaller squares, and deform evenly. With the help of the tutorial and my reference, I managed to block out the character for the first time. I started with the torso and built out the arms
[03:21] and legs from there. Notice that extra geometry on the elbow and knees to help implemented something I learned from YouTube shorts. Holy [ __ ] Everything is mirror and work from one side. Since Tavo is not human, I had to improvise
[03:37] knees. I wanted things to be a bit more smooth, so I started working with a modifier called subdivision subsurface. This sounds complicated, but it basically smooths out your model by dividing all the quads from before. The
[03:50] more detailed our model is, the more processing power it takes to display. that it lights our friends computers on fire. I set a limit of about 40,000 tries for the base model. So, there's
[04:02] some wiggle room for adding clothes and keeping a good performance rating in VR Chat. In retrospect, I think it was a bit high, but it could be a lot worse. Throughout this process, I uploaded my work to a site called Miximo to test it
[04:14] out. This uses an algorithm to quickly set up your model for animation. This is not going to be the final result, but as a quick and dirty movement test, it was really encouraging to visualize how my character might look. When it came time
[04:27] to work on the hands, though, look, all I'm going to say is, ask any artist, hands are hard. Plus, these are not hands. They're big bappers that still somehow have five fingers. Because while most cartoons will chop off a finger to
[04:41] make it easier to animate, I like having all my fingers in VR. Even with all of this work, my character still looked like a blocky gray alien. So, it was time to focus on the head. It was a bit tricky figuring out the muzzle shape,
[04:53] but I had more of a flow going at this point. I extended the muzzle, opened the tongue in. These are separate objects, allowing me to move them around for later lip syncing. Moving up on the face, we have the eyes. One of the most
[05:07] critical parts on a model, but really tricky to get right. After testing the water with spherical eyes, I decided to try a stylized approach. Both of my previous models use this method, and it's pretty common among anime and
[05:19] the magic a little bit here. First, you shape an empty eye socket and then place a floating iris inside. The illusion isn't quite there yet because of the shading, but don't worry, we'll fix that later. This is also where I added the
[05:32] first texture to the model. Previously, I'd just been applying colored materials, which is super basic, but really inefficient. I'll talk more about come together when we get that toune shader on. At this point, I'd come a
[05:45] long way doing research, making a new design, learning new modeling techniques. I finished the entire body. But I won't lie, it still looked pretty rough. Doubt started to creep in and I worried that I wasted so much time on a
[06:00] model that I didn't want to wear. I sent some progress pictures to friends and avatar creators. Some were encouraging and offered some advice, but also something unexpected. Sometimes things don't turn out the way you plan. And I
[06:12] wasn't alone in feeling this way. It's part of the learning process. Little by little, I started making adjustments to push things in the right direction, and it helped a lot. I still didn't have the best hands and wasn't sure how to
[06:25] best hands and wasn't sure how to translate Tabo's funky ears into 3D. But things were back on track and I thought it was about time to do my first real rig test. In order to move our character, we need a rig to control it.
[06:37] This is an armature. It's kind of like a skeleton. It's made up of bones that move different parts of the model. There is a specific style for VR Chat, so we should follow that game's expectations for a human-like character. except I
[06:50] decided to be fancy and try to do something special. I found this tutorial for making digrade legs, kind of like a fox or dog. The trick here is to copy the rotations of the human-like skeleton to different bones in a more animallike
[07:03] skeleton. It felt doable at the time, but I'm sure this won't cause problems place, and we can move on to the next step. We now need to set what section of the model each bone controls. This is done through a process called pain.
[07:20] weight painting. So, every vertex or point on your model has a weight for how much a specific bone affects it. You could set all of these weights manually, but with weight painting, you can brush on large areas. Red is full effect,
[07:33] while fading to blue is less and less of an influence. Anything in between is kind of like a blend between bones. This all makes sense on paper, and for simpler models, it's not too bad. However, as the model increases in
[07:45] complexity, things are uh not so fun. There's a lot of tricky areas that you blending between bones. And if your going to look good. So, you have to go back and fix the topology before trying
[08:00] iteration and adjustment to get it looking somewhat decent. But now, with the rig in place, all the pieces were coming together, and it was finally time for our first in-game tests. To use the avatar in VR Chat, we need to import it
[08:15] to the Unity game engine and set it up with their SDK. I exported the model and did the bare minimum setup for VR Chat. After all this work, we could finally see it working in game, and it still looked awful. The diggrade rig
[08:29] technically worked, but it felt weird to use. The full body proportions are terrible. It pulls up when you look down. Worst of all, my hands were completely crumpled, and I have no idea how to fix them. It felt awful to be so
[08:42] far along and still stuck with something completely unusable. At this point, there was nothing left to do but lock in. Forget the fancy legs. We're keeping them simple. Move them back to a less extreme angle. While we're at it, going
[08:55] to redo those terrible paws. Let's model a normal hand just to see where it's going wrong. Oh, look. Unity is [ __ ] it up. Use that knowledge to completely remodel my own hand paws. Keep fixing things and fixing things and fixing
[09:09] things. It was just one thing going wrong after another, but I was determined to make it work. It still looks really unfinished, so let's fix that. You know how textures are kind of stretched out onto the surface of 3D
[09:21] models? That's all controlled by something called a UV map. Since Tavo is mostly solid colors, I just mapped everything besides the eyes to colored squares. This won't work for everyone, but I can compress this texture down to
[09:34] a very small size. It's lazy and efficient. Now, Unity, the game engine, has a separate material system from Blender. Materials influence how light interacts with our 3D model. And if you've ever heard the term shader
[09:47] before, that's like a small program that's used with the material. Now, for my model, I used a very popular shader called Pyomi and adjusted the material settings for an outline and tune shadows. With all of this done, the
[09:59] model finally started to feel decent for the first time, and we could get to the fun part. So, while the armature controls the big animations like moving your arm, the smaller animations are done through blend shapes. These take
[10:12] the original mesh and deform it to a new shape. I had to make like 20 blend shapes for the vowel sounds. I'm going to do face tracking later because that takes a lot more. For the face animations, I just decided to follow the
[10:24] MMD expressions guide. Not every face is here, but I figured since my character is already anime styled, yes, we do need the face that looks like an emoticon. This is your sign to add MMD blend shapes to your model. Most models have
[10:37] the bare minimum, but a couple more goes a long way. Keep with me. We're in the final stretch. I ended up saving the ears and tail for last because I knew they'd be easy to separate and swap if needed. As for the ears, I tried a few
[10:51] variations before I settled on these. The front ears block both of the sides awkwardly. I think the backwards ears work better at highlighting the face, even if he looks a little bit more like a fox now. And of course, we have to add
[11:03] the fistbones to the ears and tail. Finally, you guys really wanted the hoodie back on my last base. And I agree, Tavo looks plain without any collar. But I see where you're coming from. So, I got this new model a shirt.
[11:16] Yet, I was really running out of time at this point. There's just one more thing this point. There's just one more thing to do.
[11:54] it's to the point where I feel comfortable wearing the avatar. There's still plenty of things I want to do, like a better outfit, face tracking, and other tweaks. I don't know if this video makes it more or less intimidating to
[12:07] get started, but if you're curious about this stuff, now you know the steps involved. And no matter what creative endeavor you try, sometimes you just need to work through the awkward stages to get the results you're looking for.
⚡ Saved you 0h 12m reading this? Transcribe any YouTube video for free — no signup needed.
