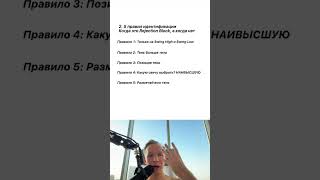

What is a Rejection Block?
31sClearly explains a specific trading concept with visual cues, appealing to traders seeking precise entry strategies.
▶ Play Clip"Delivers on the promise of explaining rejection blocks, but includes a promotional plug and lacks depth."
This video explains the concept of a 'rejection block' in trading, a more precise entry zone compared to a standard order block. It outlines five rules for identifying rejection blocks and explains why they work, emphasizing their formation on pin bars or pin closes with shadows larger than the body.
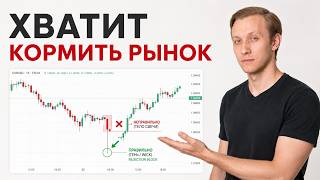
A rejection block is a form of order block that makes risk/reward higher. It is formed only on a pin bar or pin close, where the shadow must be larger than the body of the candle.
Rule 1: Must form on a pin bar or pin close. Rule 2: Shadow larger than body. Rule 3: Shadow position - on top in resistance zone, below in support zone. Rule 4: Choose the highest candle, regardless of bullish or bearish. Rule 5: Mark the entire shadow.
An order block is marked along the body of the candle, while a rejection block is marked by the candle shadow. This makes the rejection block a more precise zone.
The rejection block shows the price's refusal to go further. It collects liquidity, stops, and sharply reverses. It is a more precise entry zone.
Rejection blocks are a more precise trading zone than order blocks, identified by specific candle patterns and shadow rules, and they work by showing price rejection and collecting stops.
What is a rejection block?
A form of order block formed on a pin bar or pin close, where the shadow is larger than the body.
00:02
What are the five rules for identifying a rejection block?
1. Must be on pin bar/pin close. 2. Shadow larger than body. 3. Shadow position: top in resistance, below in support. 4. Choose the highest candle. 5. Mark the entire shadow.
00:33
How does a rejection block differ from an order block?
An order block is marked along the body, while a rejection block is marked by the shadow.
01:00
Why does a rejection block work?
It shows price refusal to go further, collects liquidity and stops, then reverses sharply.
01:12
Key Difference
Clarifies the distinction between order block and rejection block, which is crucial for traders.
01:00Mechanism of Action
Explains the underlying market dynamics that make rejection blocks effective.
01:12[00:02] for entering a trade and makes your risk revo higher. Watch this video to the end and you will find out why. And this is also a rejection block. And now I will explain what it is. A rejection block is a form of order block that
[00:15] is formed only on a pig or pigklu. The shadow must be larger than the body of the candle. We have a schedule. This candle with a shadow larger than the body will This candle with a shadow larger than the body will be the block's notch zone.
[00:33] when it will be a rezhek block and when it won't. The first rule is mandatory only for piglets or only for pigclows. Rule two: the shadow is larger than the body. Rule three: the position of the shadows. If you are in the resistance zone , the shadow should be on top.
[00:46] If you are in the support zone, the shadow should be below. Rule number four. Which candle should I choose? The highest. It doesn't matter whether it's bearish or bullish. The main thing, and the highest. And rule number five: mark the entire
[01:00] shadow. The main difference is that an order block is a zone that is marked along the body of the candle. Rejection block is a zone marked by the candle shadow. Why does this work? The Rejection block shows the price's refusal to go further. The pig refused to go higher.
[01:12] On the swinkle there is a refusal to go lower. The Rejection Block is a more precise zone than entry. This happens to collect low, collects stops and sharply reverses. If you don't understand,
[01:26] look at my deal again. Also, visit my Telegram channel and join the free trading community. There I publish my current setups, conduct Lightroom training, there is training for beginners, and I analyze concepts. All this is absolutely
[01:39] I analyze concepts. All this is absolutely free. Link in the description. M.
⚡ Saved you 0h 01m reading this? Transcribe any YouTube video for free — no signup needed.