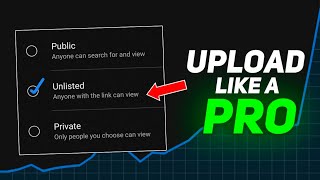

The Biggest Mistake Creators Make Uploading Videos
45sIt challenges a common practice (uploading via the app) and promises a solution, sparking curiosity.
▶ Play Clip"Delivers solid, actionable advice on YouTube upload settings, though some sections feel padded with basic explanations."
This video provides a comprehensive guide on the correct way to upload videos to YouTube, emphasizing the use of YouTube Studio on desktop over mobile apps. It covers essential settings like category selection, visibility options, automatic chapters, and end screens, and explains how to maximize views through strategic upload practices.
Uploading via the YouTube or YouTube Studio app is not recommended because the interface is basic and lacks many settings available on the desktop version.
To access all features, use YouTube Studio in a desktop browser. Navigate to YouTube.com, click your channel icon, and open YouTube Studio in a new tab.
In the license section, ensure 'Publish to subscription feed and notify subscribers' is ON. Turning it off hides your video from subscribers' feeds and notifications, losing potential views.
Set default descriptions and tags in YouTube Studio so they automatically appear in every upload, saving time and ensuring consistency for social handles, affiliate links, and playlists.
Categories were useful when the algorithm was new, but now they have minimal impact on views. Still, choose the most appropriate category, like 'Education' for tutorials.
Automatic chapters help viewers navigate, but they are not always accurate. For better control, manually write chapters, especially for tutorials with multiple topics.
Adding end screens with a reason to click can generate significant views. The creator got over 150K views from end screens, with a 33% click-through rate on one video.
Private videos are only visible to you; unlisted videos are viewable by anyone with the link and allow comments; public videos are visible to everyone and enter the algorithm.
Upload as unlisted first to pin a comment or fix issues, then switch to public or schedule. This is a recommended workflow.
Scheduling allows you to set a specific date and time for public release, with options for a public watch page and countdown timer, ideal for consistent uploads.
The best practice is to upload via YouTube Studio on desktop, enable subscriber notifications, choose an appropriate category, and use unlisted visibility to prepare before going public or scheduling. End screens and manual chapters can significantly boost viewer engagement and extra views.
What is the recommended way to upload YouTube videos for full feature access?
Use YouTube Studio on a desktop browser, not mobile apps.
00:55
What happens if 'Publish to subscription feed and notify subscribers' is turned off?
Subscribers won't see the video in their feed and won't receive notifications, losing potential views.
02:11
Why is category selection considered outdated for YouTube views?
The algorithm is now advanced enough to determine the right audience without relying on categories.
03:51
What is the difference between private and unlisted videos?
Private videos are only visible to you; unlisted videos are viewable by anyone with the link and allow comments.
08:05
What is the recommended workflow before making a video public?
Upload as unlisted first to pin a comment or fix issues, then switch to public or schedule.
09:32
What is the benefit of scheduling a video upload?
It allows automatic publishing at a specific time, with options for a public watch page and countdown timer.
10:02
Subscriber Notification Setting
This setting can significantly impact views, as turning it off hides videos from subscribers.
02:11Category is Outdated
Clarifies a common myth that category selection affects views, saving creators from overthinking.
03:51End Screens Boost Views
Demonstrates with real data (150K+ views, 33% CTR) how end screens can drive significant traffic.
06:30Unlisted Before Public
A practical workflow that allows creators to prepare and fix issues before going live.
09:32[00:00] What is the right way to upload videos on YouTube? वीडियो अपलोड करने का option तो इन तीनों में है ना? तो हम कौन सा choose करें? इतने सारे category इने से कौन सा select करें? इन चारो visibility options के से कौन सा choose करना है और क्यों?
[00:14] And finally, अपलोड सेज़ पे ऐसा कौन सा feature है जिसके वजह से मुझे लाथ हो extra views आ चुके? तब कुछ इस वीडियो में कबर करेंगे and it's going to be really fun. So, let's get started. तो सबसे पहले एक गलती जो बहुत से creators करते हैं
[00:26] इसकी वो अपने वीडियो को YouTube app या फिर YouTube Studio app से upload करते हैं जो कि वीडियो upload करने का best तरीका नहीं है. But why? क्या apps upload करने से views कम आते हैं? तो answer है नहीं, it's not about views, but जब आप app से videos डालते हो, तो बहुत सारे settings हैं, जो आप miss कर देते हो
[00:43] लाइक अगर मैं YouTube आपका upload page दिखाओ, तो you can see कितना basic है इसका interface सिर्फ 5-6 गिनेचुने features ही हैं, तो अगर सारे features access करना है, तो you will have to use YouTube Studio, but in desktop version
[00:55] अब मैं पहले जाना कि मेरे पहले व्यूअर्व अपने फोन का यूज़ करते हैं तो अपलोड वीडियो और वह बहुत अच्छा है। अब फोन पर दी डेट्सटॉप कोशिश कर सकते हैं। इसके लिए अपने वेब ब्राउजर पर YouTube.com शुरू करो।
[01:07] उसके बाद प्लेक ऑन यो चैनल आइकॉन और वहां पर यूट्यूब सूडियो तो अगर डायरेक्टली इस पर क्लिक करते हैं तो बहुत
[01:19] YouTube Studio आप खुल जाता है, which is not what we want. So, SMS पे long press करके open in new tab select कर लूँगा. इसके YouTube Studio एक नए टाइब में open हो चाहेगा. Perfect app. इसके बाद उपर create पे click करो and select upload videos.
[01:34] After that, select files पे click करके जो भी video upload करना है उसे select करो and you can see video upload होना शुरू हो चुका है. अब वीडियो अपलोड हैं पर अब हमारे सामने title, description और tags के अलावा भी प्राई सारे settings आ चुके हैं जो बहुत से creators को confuse कर सकते हैं, especially नए creators. इनमें सिर्फ कुछ settings बहुत जादा important हैं और इने समझना बहुत जरूरी है. So let's talk about them.
[01:57] तो बहुत लोग मुझे से पूछते है कि क्या Chrome से वीडियो अपलोड करने से views ज़्यादा आते हैं तो इसका one word answer है नहीं लेकिन Chrome से वीडियो अपलोड करते वक्त एक छोटी सी setting जरूर मिलेगी जिसे on या off करने से views पर असर पढ़ सकते हैं
[02:11] अगर आप upload page में नीचे scroll करोगे, then license section के under you will get this option, publish to subscription speed and notify subscribers. अगर इस setting को आप off कर दोगे, तो आपके subscribers को subscription speed में आपकी video नहीं देखेगी.
[02:25] Plus, उन्हें उस video का notification भी नहीं जाएगा. ये setting by default तो on रहता है, but in case it is off, तो इसे on कर देना और you will miss out on a lot of views. लाइक अगर मैं अपने किसी भी वीडियो का ट्राफिक दिखाओ, तो आप देख सकते हो कि subscription speed और notifications से हजारों में भी उजार हैं.
[02:41] important Now before we jump on to the next setting notice just file select upload dressing description main automatically
[02:53] नॉट जस टिस, टैक्स सेक्शन में भी चार टैक्स जो मैं हर वीडियो में यूज़ करता हूँ, वो भी ऑटोमाटिकली फैल हो गए. पर कैसे? वेल आप ये बहुत ही असानी से अपने चैनल के लिए भी कर सकते हो using a feature called default description
[03:05] इसे access करने के लिए YouTube Studio ओपन करो then at the bottom left corner click on the settings icon and then click on Upload Default अब जो भी information है जो आप चाहते हो कि हर वीडियो का description में लिखा रहा है
[03:17] like social media handles, affiliate links, important playlists पगेरा वो सब आप यहाँ description box में लिख सकते हो और future में जब आप video upload करोगे तो description में पहले सी यह सब कुछ लिखा होगा और of course the same thing you can do with tags as well
[03:31] इसके लावा अगर आपको title, description and tags लिखने का सही तरीका जानना है तो ये वीडियो बनाया था मैंने अपने चैनल पे आप चाहो तो लेक सकते हो इसके बाद जो next setting जिसमें बहुत लोग confused रहते हैं इस category a lot of people say की सही या गलस category चूज़ करने से
[03:45] आपके views पर बहुत असर पड़ता है और सही category चूज़ करने से आपकी video viral भी हो सकती है
[04:05] इसका option था तो रख हम YouTube को बता पाएं कि हमारी video किस बारे में है In fact, early days में तो YouTube watch page पर category शाब भी होता था तो इस लिए अगर आप अपने video को pets and animals वाले category में डालते हो
[04:17] तो आपकी video pets and animals वाले section में available होगी जहां से लोग उसे देख सकते है लेकिन अगर यह 2024 है तो वह बहुत अधिक अलगोनिज्म है इसलिए वह पता है कि आपकी वीडियो किस प्रदाश के लिए चुकाई रहेगी तो अधिक अलगोनिज्म YouTube का एक बहुत पुराना और अभी अधिक अलगोनिज्म फीचर है
[04:33] जिससे views पर effect ना के बराबर पड़ता है अब question होगा कि क्या category में कुछ भी select कर दे तो answer है नहीं भनी category से उतना फर्क नहीं पड़ता हो अगर उसे select करने का option है तो हमें वही option select करना चाहिए
[04:46] जो हमारे channel के लिए सबसे appropriate है है.. like ajar aap kisi bhi cheez ke baarde men lor ko educate kar rr Yeh Then you can select education yuki मेरे भी वीडियोल का category है..अगर आप कुछ सिखा रहे हो like tutorial kisi bhi चीज़ का या cooking videos तो
[04:59] you can select how to and style..अगर vlogs, challenges इस टाइप के वीडियो सो हैं तन ये बतु से एंडर इंटरेटेइमिंट या people and vlogs और एस टाम पर you can select your और जब तक हमने इतना कुछ जाना उससे देर में हमारा वीडियो अपलोड भी हो गया और अब इसे से पब्लिश करना बाकी है
[05:15] पर वीडियो को पब्लिंच करने से पहले, Visibility Section के अंदर हमें 4 options मिलते हैं, जहां बहुत सारे creators confused हो जाते हैं कि उन्हें क्या select करना है Private, Unlisted, Public या फिर Schedule तो ये सभी क्या है और इन्हें साथ आपको कौन सा select करना है?
[05:29] let talk about two more approach settings one of which is automatic video chapters chapters viewers better and easy viewing experience
[05:41] यह especially tutorials and educational content के लिए बहुत helpful हो सकता है. जैसे आपकी वीडियोस 10 to 15 minutes long हैं और आपने उसमें multiple topics कबर कियें. बट एक viewer है जो की सिर्फ एक particular info के लिए ही आया है
[05:53] तब ऐसे में अगर आपके वीडियो में chapters होंगे तब तो viewer easily वीडियो के उस part में जा सकता है जो उसे देखता है बट अगर chapters नहीं होंगे तब most likely viewer अपना time आपके वीडियो में नहीं waste करेगा
[06:05] जो किसी और ने उस topic को एक separate video में cover किया हुआ है So this means कि setting को on रखता है right? Well, maybe no अगर आपने video में सब कुछ बिल्कुल point wise, systematic तरीके में cover किया है तब तो आप इससे on करके काम चला सकते हो
[06:18] YouTube खुद आपके लिए chapters लेख देगा But most cases में automatic chapters पर depend रहने से अच्छा है कि आप खुद पर chapters लिखो because automatic chapters उतने accurate नहीं होता है अब हम वीडियो को public करने ही वाले है
[06:30] but उससे पहले I want to talk about one more setting जो मेरा favorite है and I never miss that because इसके वज़े से मुझे लाखो extra views आ चुके इसे access करने के लिए video elements section में जाओ and वहाँ पर you will get the option to add an end screen
[06:43] if you click on the element icon अब किसी भी वीडियो, प्लेइलेस या चैनल का एंड स्क्रीन आड कर सकते हो। अगर आपको अपने चैनल के कोई भी राइंडम वीडियो को आड कर देते हैं, जो कि एंड स्क्रीन आड करने का सही तरीका नहीं है।
[06:56] अगर मैं आपके अनलेटिक्स में दिखाओ, तो you can see की मुझे आज तक 150K से भी जादा views फिर एंट्रीन थे आ चुके है बट अगर मैं भी एंट्रीन में वीडियोस रांडम नहीं डालता तो इतने views कभी नहीं आते
[07:09] So, एंट्रीन डालने का सई तरीका क्या है? Well, the secret lies in giving viewers a reason to click यानि कि आपको viewers के मन में अपने channel के किसी और video के लिए एक urgency create करना है For example, अभी मैंने game in channel grow करने का video बनाया था
[07:24] and उस time I was explaining कि starting के initial sub 6 again करते हैं So basically मैं दो method share करने वाला था initial audience gather करने के इसमें से एक तो मैंने video में ही बता दिया और दूसरे वाले method के लिए मैंने end screen में एक video लगा दिया
[07:37] जिस video में मैंने पहले वो चीज explain का रखा है and of course विओस को बोल दिया कि second method के लिए screen पर वीडियो है उसे देखो अब even I wasn't expecting this but इस video के end screen पर बहुत सारे clicks आए
[07:49] like you can see अभी तक 35K से भी जादा clicks है और इसका E-TTR यानि की End Screen Click Through Rate ये भी 33% है, which is just impressive. So इस साइड से आपको भी सोचना है कि आप किस तरह अपने वीडियो में एक reason और एक urgency create कर सकते हो for another video.
[08:05] Alright, तो अब हम finally visibility section में आ चुके हैं जहाँ पे हमें इन चारो options में से कोई एक select खड़ना है. तो सबसे पहले समझते हैं कि इन सब में डिफरेंस क्या है अगर आप वीडियो को प्राइवेट करके सेट करते हो
[08:17] YouTube YouTube Managed Video
[08:31] Because वीडियो को public करने का मतलब है कि आपके सभी subscribers के फीज में ये वीडियो publish हो जाएगी जिन्होंने bell icon प्रेस किया है उन्हें इस वीडियो का notification मिल जाएगा And basically वीडियो algorithm के नज़र में आ जाएगा
[08:43] So like algorithm इस वीडियो को recommend कर सकता है Insert, Suggested and Browse अब लोग अपलोड प्रोसेस खतम होते हैं वीडियो को पब्लिक कर देते हैं और देखा जाये तो इसमें कोई प्रॉब्लम भी नहीं है अगर आपका चानल अभी छोड़ता है
[08:55] पर लेकिन एक और उप्शन है जो वीडियो को सिंपली पब्लिक करने से बेटर है इस क्योंकि वास्तविक फ़ुदेरा माता है। एक वीडियो को लिस्टेड करते सेख करना उसे प्राइवेट करके सेख करना जा साहिल है। लेकिन कुछ दिफरेंस हैं। जिसके वजह से इसके देशकार है। इसलिए एक इस वीडियो में भी प्राइवेट है।
[09:09] लेकिन इसका प्रेशालित है कि आप कहीं भी किसी के साथ भी इसका लिंक शेयर कर सकते हो और वो इसे देख पाएंगे क्योंकि उनके पास भी लिंक है एक और दिफरेंट्स है कि अन्लाइक प्राइवेट वीडियो जहां कोई भी कॉमेंट नहीं कर सकता इन पास आप खुद भी नहीं कर सकते, Unlisted वीडियो पे कोई भी कॉमेंट कर सकता है
[09:24] जिसके पास आपके वीडियो का लिंक है और आप तो कर ही सकते हो तो लेकिन वीडियो को पब्लिक करने से पहले आप उसके अपना कोई कॉमेंट पिन करना चाहते हो वीडियो को अनलिस्टेड करके ऐसा कार सकते हो और बाद में जब आपका मन करे तो वीडियो को पब्लिक कर देना सिंपल्स ऑल्सों वे आपका चैनल मोनेटाइज्ड है तो आपको अनलिस्टेड ऑप्शन के नीचे एक टिप दिखेगा वेर यूट्यूब सेस कि हम अपने व
[10:02] पर्टिकुलर टाइम पर वीडियो प्रोड करता है। लाइक मैं आपके चैनल पर कम्यूरिटी पोस्ट करता हूँ कि न्यू वीडियो शाम 4 बजे आने वाली है। तो वीडियो एक्साक्टली 4 बजे मेरे चैनल पे आ भी जाती है और यह बेस्ट पार्टर्स की ये सब ऑटोमाटिकली होता है यूजन दे स्चेडूल ऑप्शिस
[10:15] तो अगर आप इसे क्लिक करते हैं आप कोई भी डेट और टाइम सेलेक्ट कर सकते हो आपकी वीडियो उस परिकले समय अपने आप public हो जाएगी अगर साथ में screen-age-headbox पर click करते हो तो एक public watch-page create हो जाएगा to let people know कि आपकी वीडियो कब आने वाली है
[10:29] और also जब वीडियो के public होने का समय होगा तो you will see a countdown timer और also वीडियो में live-chat होगा at the time of screen-age तो फाइनली अगर एक conclusion देना हो तो वीडियो upload करने का best तरीका यही है
[10:41] कि पहले आप उसे unlisted करके save करो ताकि अपना comment pin कर पाओ और अगर कोई monetization या visibility issue है तो उसे solve कर पाओ इसके बाद जब आपको लगे जी सब कुछ सही है तो अपने वीडियो को directly public कर दो
[10:53] या फिर अपने favorite upload timing के लिए schedule कर दो जो की मैं भी करता हूँ अच्छा upload timing से यादाया मैंने एक वीडियो बनाया था इस topic पे की what's the best time to upload YouTube videos बस 4 minute की वीडियो है तो नहीं देखा तो देख लो
[11:05] और अगर कुछ more time secrets रहना है तो राइफ वाली वीडियो देखो आप से वही मिलूगा बाइ
⚡ Saved you 0h 11m reading this? Transcribe any YouTube video for free — no signup needed.