Master Image-to-Image in 45 Seconds
45sQuick educational intro that hooks viewers with the promise of mastering a key AI tool.
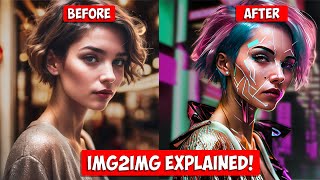
▶ Play ClipThis video provides a comprehensive guide to the image-to-image (img2img) tool in Automatic1111 for Stable Diffusion, covering image-to-image, inpainting, inpainting sketch, inpainting upload, and the sketch tab. It explains how to use an existing image as a starting point to create new images or modify specific parts.
The img2img tab lets you create a new image from an existing picture, pulling elements of composition and color.
Four resize modes: Just Resize (stretch/shrink), Crop and Resize (crop to fit), Resize and Fill (fill blanks with colors), and Just Resize Latent Upscale (also upscales).
Controls how much noise is added; lower values keep image similar, higher values change more. Recommended starting point is 0.7.
Inpaint allows painting over specific parts to change only those areas. Settings include mask blur, mask mode (inpaint masked vs not masked), masked content (fill, original, latent noise, latent nothing), and inpainting area (whole picture vs only masked).
Adds color selection to painting; used to add new elements like a scarf. Requires higher denoising strength (e.g., 0.8).
Inpaint upload allows using an external mask (black for keep, white for change). Sketch tab lets you draw a rough idea and pair with a prompt to generate an image.
The image-to-image tool in Automatic1111 offers powerful ways to modify or create images from existing ones, with inpainting and sketching providing fine control over specific areas.
"The title promises everything about img2img in one place, and the video delivers a thorough walkthrough of all major features."
What is the purpose of the image-to-image tab in Automatic1111?
To create a new image or modify an existing image using an input picture as a starting point.
0:14
What are the four resize modes in image-to-image?
Just Resize, Crop and Resize, Resize and Fill, and Just Resize Latent Upscale.
1:29
What does denoising strength control?
How much extra noise is added to the image, determining how different the new image is from the original.
2:29
What is the recommended starting denoising strength?
0.7
2:50
What is the difference between 'inpaint masked' and 'inpaint not masked'?
Inpaint masked changes only the painted parts; inpaint not masked changes everything except the painted parts.
5:37
What does the 'masked content' setting 'Fill' do?
It blurs the inpainted area and uses that as the base for generation.
5:58
What is the purpose of the inpainting sketch tool?
To paint over an image with a chosen color and add a prompt to generate new elements like a scarf.
7:21
How does inpaint upload differ from regular inpainting?
It allows using an external mask created in another program (black for keep, white for change).
8:05
What is the sketch tab used for?
To draw a rough idea and pair it with a prompt to generate an image.
8:27
Image-to-Image as Essential Tool
Establishes the core functionality of using an existing image as a starting point for new creations.
0:14Denoising Strength Explained
Key parameter that controls the degree of change from the original image.
2:29Inpainting for Targeted Edits
Allows changing only specific parts of an image while preserving the rest.
4:33Inpainting Sketch Adds Color Control
Enables adding new colored elements like a scarf with a prompt.
7:21Inpaint Upload for Advanced Masks
Provides professional-level control by using external masks.
8:05[00:00] in today's video I'm going to show you
[00:02] everything you need to know about the
[00:03] imaged image tool in automatic 1111
[00:06] image to image sketch in painting in
[00:09] paint sketch even in paint upload this
[00:11] video has it all ready let's get started
[00:14] the image to image tab is an essential
[00:16] tool in your air toolbox it lets you
[00:19] create a new image or new elements of an
[00:21] image from an existing picture that you
[00:23] provide there are so many powerful tools
[00:25] here but let's start with the image
[00:27] damage tab itself really you're going to
[00:29] use this tool if you have an image that
[00:31] you want to use as a starting point you
[00:34] can use that image to pull elements of
[00:35] composition and color into a brand new
[00:38] image so I've got an image here that
[00:41] I've generated earlier it's a portrait
[00:43] of a girl on a city street I use the
[00:45] sdxl base model to generate this image
[00:47] but you can use any image you want an
[00:50] existing photo a painting whatever so to
[00:53] start we'll drop that into the image to
[00:54] image box you can also send images here
[00:57] from the text image tab just click on
[01:00] send to image to image under your
[01:02] generation at the top just like we would
[01:04] for text image we can add in positive
[01:07] and negative prompts if you did send
[01:09] your image across from text to image the
[01:11] original prompt will appear just like
[01:13] you see here below the image box you'll
[01:15] see all the settings we can play with
[01:17] now a lot of these settings in this tab
[01:19] are shared with text image so I'll only
[01:21] touch on the image to image specific
[01:23] ones here for a more in-depth
[01:25] explanation of settings check out the
[01:27] video in the description the First new
[01:29] setting is resize mode use this if your
[01:32] new image will have a different size or
[01:34] aspect ratio than your original image
[01:36] for example if your original image is
[01:38] landscape and you want your new image to
[01:40] be portrait the default is just resize
[01:43] this will stretch or shrink your
[01:45] original image to fit the new image you
[01:46] create crop and resize will keep the
[01:49] aspect of your original image and crop
[01:51] it to fit the new canvas size resize and
[01:55] fill takes the original image fits it
[01:57] into the canvas and fills in the blanks
[01:59] with colors from the input image I don't
[02:01] see much use for this one but let me
[02:03] know in the comments if I'm missing
[02:04] something just resize latent upscale is
[02:07] just like just resize but also upscales
[02:10] the image if necessary note that this
[02:12] setting is a bit tricky to get right and
[02:14] there are easier ways to upscale your
[02:16] images below resize modes you'll find
[02:18] settings you're already familiar with
[02:20] including sampling method sampling steps
[02:23] your size and batch settings and the CFG
[02:26] scale the most important setting here is
[02:29] denoising strength stable diffusion
[02:31] makes images by taking random noise and
[02:33] converging it into an image based on
[02:35] your prompt this setting will control
[02:37] how much extra noise is added to the
[02:39] picture and in turn will determine how
[02:41] different the new image is from the
[02:43] original lower settings won't change the
[02:45] image that much and higher settings will
[02:47] make bigger changes I like to use 0.7 as
[02:50] a good starting point okay so now for
[02:52] the fun part once you've sent over an
[02:55] image you can start tweaking some
[02:56] settings to refine your picture we sent
[02:58] this image over from text to image so we
[03:00] have all of our settings and the
[03:02] original prompt now we could just start
[03:04] tweaking our prompt here but bear in
[03:06] mind that the entire prompt plus the
[03:08] image will be used to create a new image
[03:10] so if you aren't using the same model
[03:13] seed and sampler from the original image
[03:15] you may get some weird results so
[03:18] instead we're just going to use some
[03:20] simpler instructions to see how it will
[03:22] affect the image so let's get rid of the
[03:24] prompt and put in pink and and blue hair
[03:30] and let's keep the same sampling method
[03:33] and steps we'll tick restore faces and
[03:37] we'll keep the default on just resize
[03:39] and keep our Dimensions the same and
[03:42] we'll set our denoising strength to 0.7
[03:45] so we should see a bit of a variation in
[03:48] our output foreign
[03:53] seven that's had a pretty big effect so
[03:56] if we want something a little more
[03:57] subtle let's try lowering the denoiser
[04:00] strength to 0.5
[04:03] [Music]
[04:07] and yeah that's a much more subtle
[04:09] impact on the image
[04:11] so you can keep on adding more detail
[04:13] here and reworking things until you get
[04:15] an image that you're looking for
[04:17] when we use this method though we can
[04:19] see that the prompt has had an impact on
[04:22] the entire image the hair and eyes have
[04:24] changed but so has the face and the
[04:26] clothes let's say we just want to change
[04:28] a particular part of the image and keep
[04:31] the rest just as it is that's where in
[04:33] paint comes in in paint is a powerful
[04:35] tool that allows us to paint over the
[04:37] specific parts of images that we want to
[04:39] change this is especially useful when
[04:41] you like the overall composition of your
[04:43] image but you get one of those Cosmic
[04:46] nightmare faces from the hell Dimension
[04:48] just no to start you can click on the in
[04:51] paint tab or just click in paint under
[04:53] the image to copy the image over and all
[04:56] of its settings so now we can just paint
[04:58] over the particular part of the image we
[05:00] want to change in this case the hair we
[05:03] can use the settings in the top right of
[05:05] the box to change the brush size or
[05:07] clear our selection if we go wrong so
[05:10] let's just paint over the hair and then
[05:13] we can check our settings we've seen
[05:14] some of these already so we'll keep
[05:16] resize mode on default mask blur is the
[05:19] amount of blurring that happens around
[05:21] your painted mask lower numbers will
[05:23] give you harder edges while cranking
[05:25] this up will affect how many pixels
[05:27] beyond your mask will be affected by
[05:29] your prompt the default of four is
[05:31] usually fine but feel free to play with
[05:33] this if you're getting hard edges mask
[05:35] mode determines what is actually changed
[05:37] in the image in paint mask will change
[05:39] the parts you've painted while in paint
[05:42] not masked will change everything but
[05:44] the parts you painted this is great if
[05:46] you want to change the background or
[05:48] large amounts of your image in one go
[05:49] next you can choose the masked content
[05:52] setting these settings tell stable
[05:54] diffusion what method it should use as
[05:56] its basis for generating the new image
[05:58] part The Fill option will take the
[06:00] impainted area blur it then generate
[06:03] using that as its base the original
[06:05] setting will use the original image
[06:07] unaltered as its base to generate a new
[06:09] image from latent noise will fill the
[06:12] impainted area with new random noise
[06:14] based on the seed number this can be
[06:16] used if you want to result completely
[06:18] different from the original Late nothing
[06:20] will fill in the painted area with a
[06:22] blend of the colors from the surrounding
[06:24] pixels and base the generation of that
[06:25] these settings will have a dramatic
[06:27] effect on the output but if you're
[06:29] making Minor Adjustments the original
[06:31] setting will usually work great the
[06:33] in-paint area setting is easily confused
[06:35] with mask mode but they are different
[06:37] choosing whole Picture Tells stable
[06:39] diffusion to use the whole picture as
[06:41] inspiration for the in-paint generation
[06:43] while only masked will treat the Mast
[06:46] area in isolation and not draw from the
[06:48] rest of the image typically whole image
[06:50] is the best setting if you want the
[06:52] painted area to blend in but if you do
[06:54] choose only masked you can change the
[06:56] padding size right next to it which will
[06:58] tell stable diffusion how many
[06:59] neighboring pixels it should take into
[07:01] consideration as inspiration for the new
[07:03] generation and of course below that we
[07:05] have the CFG scale and the noising
[07:07] strength let's stick this on 5.5 and 0.6
[07:11] and see what happens
[07:17] now that looks pretty good but we can do
[07:19] even more within painting sketch so
[07:21] let's say we want to give our model a
[07:23] scarf we can send this image to in-paint
[07:25] sketch just like we did before we can
[07:27] paint over the image but we now have the
[07:30] option of choosing colors so let's go
[07:32] with red here and just paint in the area
[07:35] we want to add our scarf to
[07:38] and in the prompt we'll just type in red
[07:40] Woolen scarf
[07:42] for this you usually have to bump up the
[07:45] denoising strength so let's go to 0.8
[07:47] and we can keep all of the other
[07:49] settings the same as before
[07:51] and let's hit generate
[07:56] and yeah that looks pretty good for a
[07:58] first try now you can keep iterating and
[08:01] adding to this to really get the results
[08:02] that you want the last in painting tool
[08:05] is in paint upload now I'm not going to
[08:07] go into too much detail because it's
[08:09] more of an advanced topic but basically
[08:11] you can create a mask in another program
[08:13] like Photoshop using black for the parts
[08:16] that you want to keep and white for the
[08:18] parts that you want to change it's
[08:19] actually a pretty powerful tool and if
[08:21] you have the patience to get really
[08:22] detailed it can be really useful
[08:25] and finally that brings us to the sketch
[08:27] tab if you're struggling to get the
[08:29] image you have in your head onto the
[08:31] screen using image to image or other
[08:33] tools you can always flex your creative
[08:35] muscles and draw it out here
[08:37] simply drop in a white or black mask in
[08:39] the Box provided and use the paintbrush
[08:42] to sketch out your idea
[08:43] use color to highlight the details you
[08:46] want to show up and pair that with your
[08:48] prompt and watch your sketch turn into
[08:49] something incredible
[08:51] there is so much more image to images
[08:53] capable of and in my next video I'll be
[08:55] showing you even more ways to level up
[08:57] your art with the image to image tab if
[08:59] you found this video helpful why not
[09:01] leave a like And subscribe to see more
[09:03] videos like this one thank you for
[09:04] watching to the end I'll catch you later
[09:07] foreign
⚡ Saved you time reading this? Transcribe any YouTube video for free — no signup needed.