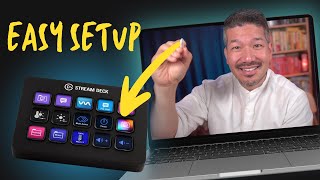

Push a Button, Magic Happens on Stream Deck
45sThe rapid, flashy demonstrations of switching between whiteboard, face, and slides in the first 45 seconds instantly hook viewers with impressive, seemingly magical results.
▶ Play Clip"Title accurately promises an easy setup trick, and the video delivers step-by-step instructions."
This tutorial demonstrates how to set up a Stream Deck with e-cam software to control video production elements like logos, camera switching, and live drawing on an iPad. The video covers basic hardware setup, connecting the Stream Deck to software, and advanced features like green screen overlays for real-time annotation.
The Stream Deck is a hardware device with programmable buttons that can control video software, allowing quick switching between sources like camera and iPad.
It plugs into a computer via USB, each button has a small screen that lights up, and it provides tactile feedback with a bump on the home button.
Recommended software includes e-cam (easier) and OBS (free, popular). Other compatible software: StreamYard, Zoom, Microsoft Teams.
In e-cam, open overlays, add an image with transparency, resize it, set to show in all scenes. Then in Stream Deck software, drag 'Show/Hide Overlay' action to a button.
Create two scenes in e-cam: 'Camera' and 'iPad'. In Stream Deck, drag 'Run Scene' actions and assign each scene to a button.
Add a camera overlay in e-cam, select the main camera source, choose a shape (e.g., squircle), set to show in all scenes. Create a 'Show/Hide Overlay' button for the camera.
Use a green PDF on iPad in a drawing app like Notability. In e-cam, add a camera overlay for the iPad, enable green screen and transparency. Create a 'Show/Hide Overlay' button for the iPad source.
With a Stream Deck and e-cam software, you can easily control video overlays, switch between sources, and add live drawing effects, enhancing your presentations and live streams.
What is a Stream Deck?
A hardware device with programmable buttons that control video software, providing tactile feedback.
01:45
Name two software options compatible with Stream Deck for video production.
e-cam and OBS.
02:47
How do you add a logo overlay in e-cam?
Open overlays, click graphic button, select a transparent image, resize, and set to show in all scenes.
03:29
What action in Stream Deck software is used to toggle an overlay?
Show/Hide Overlay.
04:44
How do you switch between camera and iPad scenes using Stream Deck?
Create two scenes in e-cam, then in Stream Deck assign 'Run Scene' actions to buttons for each scene.
05:43
What shape options are available for camera overlays in e-cam?
Regular, classic, square, and squircle.
09:48
How do you enable green screen effect in e-cam?
In camera effects window, tick 'green screen' and then tick 'transparent'.
13:26
What app is recommended for drawing on iPad in this tutorial?
Notability.
12:11
Stream Deck Magic
Demonstrates the core functionality of Stream Deck for seamless video production.
Software Compatibility
Lists multiple software options, showing versatility of Stream Deck.
02:47Simple Logo Toggle
Provides a beginner-friendly first step in using Stream Deck.
03:29DJ-Style Source Switching
Introduces a powerful technique for live presentations.
05:43Live Drawing Overlay
Shows advanced green screen technique for interactive content.
11:54[00:00] by far the biggest request I'm getting right now for tutorials is about this baby right here the stream deck how am I using it to do these things like I just push a button and it appears there I just push a button like this and then this becomes a whiteboard and if I want I just draw on my iPad and what's here is there
[00:15] and on top of that if I just push this button then my face appears there inside of this camera which is crazy now watches all I have to do is swipe left and I am inside of a slide presentation and what showing up here shows up there inside of
[00:30] the thing this is my slides and if I want I could even just tap and start drawing on here now if you haven't seen the iPad tutorials that you're gonna want to grab that but get this that's kind of in the way I just hit a button it's gone I just hit the button here and then my face is gone I just
[00:43] tap there we go to the next slide go to the next slide this is all stuff that's 100% achievable if you just have some basic hardware and software so here's what I'll be covering the first thing is about the stream deck what is it and why is it able to do all these amazing things the second thing is
[00:57] a software how can you connect the stream deck to the software in order for these things to work together super well the third thing is really simple is how do you get a logo to appear or disappear on your screen at the touch button just like that the next thing is about how to switch between the
[01:12] camera and the iPad and how you're gonna be acting kind of like a DJ with these two different sources now the thing I fly is how do you make your face pop into an iPad especially if it's like a whiteboard or a presentation now I save the best for last I'm gonna show you how you can just take an
[01:27] apple pencil and with a little bit of preparation beforehand you'll be able to just take your finger hit a button and be able to actually draw right onto the video frame like that if you want to see how that works and how you can do yourself make sure you watch all the way to the end
[01:45] so what is a stream deck and how is it gonna help you be a better marketer and create better content so it's just a piece of hardware it plugs into your computer via USB and what all it is is a bunch of buttons and behind each button is a little screen that lights up so you could see
[02:00] what it looks like now each of these buttons of course can be programmed to do what you want it to do and also can be programmed to look how you want it to look so you can remember exactly what's going on when you push a button now the difference between having buttons on a screen like an iPad and a
[02:16] stream deck is that you could actually feel it with your fingers while barely touching it on top of it it has this little button right here this little bump in the middle so you know where home is just like on a regular keyboard there's gonna be a little bump so you know where you are all the time
[02:29] so the stream deck is here to give commands to the software inside your computer so you can quickly switch things and control things without having to click and pull down menus and things like that is that simple so the stream deck is just a piece of hardware and in order for the video stream
[02:47] to come out cool and do some cool tricks like that you're gonna need the right software the software I use most of the time is called e-cam now you can use a lot of different software that works with stream deck and probably the most popular one that people use is called OBS it's free and it does
[03:02] everything I use e-cam because it's a little bit easier to use and I don't want to have to learn all the complicated stuff in something like OBS some other software that's really popular that you can use with your stream deck are going to be things like stream yard zoom and even Microsoft teams
[03:15] they all work with this all this is is buttons that control how the video streaming software works and the software I happen to use that I'm gonna be showing on the rest of these is called e-cam and they'll be a link somewhere in my bio to get that software if you want to check that out
[03:29] when it comes to the stream deck it's best to start super simple so let's start with something as simple as making the logo come on and off in the corner so as you can see right here everything is black
[03:42] because I blanked it all as if it were brand new and you've got nothing set up yet so there's two parts this first of all we have to create an overlay graphic and then the second thing we're gonna do is connect the graphic to this stream deck let's get started first of all open up the overlays window
[03:58] inside of e-cam we're using e-cam by the way and then what you want to do is click this little graphic button right here this one that I'm touching and it's gonna ask for an image now I've already prepared an image with transparency of my company logo called 20x agency and when I hit open then
[04:16] that's gonna show up now this is obviously not very good and what I want to do is just grab the corner of the image not the whole thing and move that to roughly the size I want it and let's say we put
[04:28] it down on the bottom left corner now it's there great but what if we want to turn it off and on well the first thing I want to do here is an overlays right now it says show in current scene I'm gonna drive it up to where it says show in all scenes okay so what that means is that no matter if I'm showing
[04:44] my iPad or myself in the background then you're always gonna see this so we did step one which is we got the logo the graphic on the screen now we want to connect it to the the stream deck so that when we push a button then it could appear or disappear so how do we do that first of all we got to make
[05:00] sure we have the software running and now we've got an empty profile you see how these are all great that's also the reason why these are all great so right now if you go on the left pane you'll see there's something called ecam live we click that and we go to show hide overlay we're gonna click and
[05:16] drag that to let's push it right there and watch what happens when I let go boom you're gonna see that it's changed there right now and it automatically found this image because that's the only overlay
[05:29] that appears there so now that we did that watch what happens I'm gonna just hit this button here boom gone boom it appears just like that and the next one we're gonna show how to use the camera and the
[05:43] iPad just like that and connect it so that this thing controls it all wouldn't it be so cool if you could just hit a button on the stream deck and what's on your iPad will magically show up on your screen well
[05:58] I'm about to set that up with you live and you're gonna watch me do it so I've got ecam going here and you're gonna want to download that and what you want to do first of all is understand that this iPad is behaving like a camera now the way I've got the setup is something I have it in another tutorial
[06:12] go check that out if you haven't seen it yet but we can have the iPad appear like a camera so first of all what we need to do is go into the scenes section of ecam so right now we're inside
[06:24] of here and we're gonna go plus here this little plus button and that is going to set up a new scene so let's call this scene camera okay that means that it's gonna be the main camera the one that's facing me okay this one right here that is that okay now we're gonna set up one more scene plus
[06:42] and we're gonna call this iPad now the thing about ecam is whatever one is selected if you make changes there it automatically saves now remember I said this is behaving like a camera right it's because we've got this hooked up through a video converter now if we click this then that's there
[06:57] we'll click that nothing's changing but what we want to do is go and click camera B now we're switching right that is so cool now we've gotten the software side of this setup so let's connect it to the stream deck so that we can have push button magic in just a second so what we have to do is go
[07:12] into the stream deck software that's on your computer and we're gonna see where it says run scene right here and we're gonna drag that over now this is my favorite part you can watch this hardware update live as that updates that's so cool and we're gonna drag one more of these over now the first
[07:28] one says camera because that corresponds to that scene that says camera now the second one also says camera so what we have to do is go to this drop down menu and select where says iPad that is
[07:40] all we have to do now that we got the hardware communicating with the software I just hit a button and the switches I hit the button again it switches back I hit that button watch it's so cool I just draw on here and what I'm drawing here shows up there and I could push that and it's back so think of
[07:55] this as like being a DJ what's happening is you get to switch between the iPad and you could be kind of like picking your nose or taking a sip if you need to and then switch back to your your camera when you're ready now if you think that is cool in the next video I'm gonna walk you through how we
[08:10] could put a button here so that when I push the button then my face is gonna pop up here inside of the whiteboard or the slide so people can be seeing both me and the slide at the same time and
[08:24] that is gonna be supremely cool I'll walk you through how to do that so far in this stream deck series I've shown you a few cool things like for example how to make the logo come off and on
[08:37] with the push of one how to switch between your iPad and your camera just by hitting different buttons and now we're gonna mix those things up and show you how you can be showing your iPad but with your face inside the frame and I'm gonna build it with you right now now toward the beginning I'll
[08:52] show you how to do this cool trick where we hit this logo button and that logo pops on and off and we're gonna be using a really similar function to make the face come on and off as well so let me show you how that works first of all what we want to do is go here to overlays and then we want to go
[09:08] here to where it says camera so I'm gonna click camera to add a new camera overlay now by default this is kind of weird here we're seeing two cans here and that's never a good thing but what we want
[09:20] to do instead is click that little pencil icon to edit that and then here we're gonna go to cam link 4k now what we're seeing is still two cans but instead of the this webcam here we're seeing it
[09:32] from the really nice camera now it's still not very useful but I want to show you a few things first first of all there's a few shapes we can go to the regular mode like the regular kind of video frame look we can go into classic right that's like you know four by three we can do square I like
[09:48] squircle that's just kind of my style but you can pick the style you like so what use is having two cans on here well first of all if we push this thing look at that it's not working it's because this overlay only shows in current scene because it says current scene so we're gonna drag that up
[10:04] to where it says show in all scenes now when I push this button then the camera stays while the iPad shows underneath now I want to show you how powerful this is now I could be in here in a zoom
[10:16] call just recording drawing kind of you know like some charts right and then I can all of a sudden jump to showing and this is just chrome here on my iPad I'm showing a website and my face is still on there okay and I could jump to a keynote slide right I'm sliding through keynotes and it's not
[10:33] really useful at this point to have two cans on the screen so what we're gonna do is create a new button that's gonna make a can come on and off the screen let's walk through that this is actually very simple we're gonna go back into here and we're gonna look for where says show height overlay
[10:49] and we're gonna drag that over let me put that maybe over here and this is my favorite part watch it's gonna automatically update boom a button just appeared and we're seeing this that's not really useful so we go back to the overlays and we're gonna drop down to where says can link 4k because that's
[11:04] the camera now if your camera uses a different brand then it'll look a little bit different now what's gonna happen check this out check this out baby I'm gonna click this and then boom it disappears boom it appears now you have like ultimate power to be able to show your face when you want to show it
[11:20] and right now it's kind of bothering right it's gone maybe you're on this website and the logo just doesn't work oh yeah it's overlapping right hit that it's gone and you keep going maybe you want to say a little something push a button and it's there this is like so freaking magical and if you're not
[11:35] using a stream deck and you're trying to like run a business and you're trying to do presentations and you're trying to lead zoom meetings or do any kind of VSLs you need to get this set up and I got something else cool to show you in the next one where you can actually draw on the camera screen itself
[11:54] do you know what would be supremely cool is if you could actually draw on the screen as you are presenting live on zoom or in a meeting or anything that will be extremely cool so I'm gonna show you how to do just that and the only thing you need to prepare is a green PDF now I've loaded it up
[12:11] into my iPad and the app I use is called notability you can use any drawing app you want now there's two parts to this there's gonna be the software setup and then there's gonna be the hardware setup we're gonna get to this pretty fast because it's a lot simpler than a lot of you might be making it
[12:27] out to me let's get started and the first thing you gotta do is get this overlays window open at the bottom here you're gonna see this little camera icon when you click it then you're gonna get this now having two cans on the screen at once is never a good idea so click that little that little pencil
[12:42] icon to edit it and then in my case the video source is called USB 3 and that's the source that the iPad is coming in from so I'm gonna click that and now we could see what's on the iPad is there now
[12:55] what we want to do is take this and drag it all the way up to the top right corner and then expand it to cover the whole screen or as much as possible close there just possible there we go now in overlays we we see here that it says show in current scene we're gonna drag that up to the scene
[13:12] above and make sure that it is in the right place now we go into this other window called camera effects okay in this camera effects window what we want to do is tick this little time that says
[13:26] green screen okay still not useful and then we want to tick this tab this little button here that says transparent now it looks like there's nothing going on but believe it or not there was a green screen
[13:38] between us watch watch this I got this here and as I draw on here look what's happening up there look look what is happening up there that is wild and you're gonna be able to like have the most
[13:51] engaging videos ever in your live streams but there's just one thing missing is we need a button to turn it off and on and it's a very similar process to what we did before what we're gonna do here is go
[14:05] into stream deck again and then look for show hide overlay I'm gonna drag it here again this is my favorite park watch as I drag it then that button is gonna light up ready boom we have a new one
[14:17] there okay and this overlay is gonna be called USB 3 capture okay now that it's there check this out on off on off and this is so cool because no matter what else is on the screen it's just gonna overlay it
[14:35] here's what's really cool you see how this is stacked right here you can have the logo over that now if you want if you say hey maybe I want to draw over then you just take the overlay and change the order and then boom one is over the other you can change it to be whatever the heck you want it's
[14:49] that simple so let's wrap this up that's it for today I hope you enjoyed it and I'll be making a lot more like this
⚡ Saved you 0h 14m reading this? Transcribe any YouTube video for free — no signup needed.