
Migrate Legacy APIs to .NET 10
44sHigh educational value with a clear step-by-step migration strategy that solves a common developer pain point.
▶ Play Clip"Delivers exactly what the title promises: a clear, practical explanation of the Strangler Fig pattern with .NET 10, though some parts could be more concise."
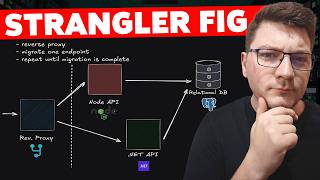
This video demonstrates how to migrate a legacy Node.js API to a modern .NET 10 API using the Strangler Fig pattern. The presenter shows a step-by-step process involving a reverse proxy (YARP) to gradually route traffic from the old system to the new one, minimizing risk and downtime.
The Strangler Fig pattern allows incremental migration of legacy APIs to modern .NET 10, even across different technology stacks like Node.js to .NET.
A complete rewrite is time-consuming and error-prone; the Strangler Fig pattern enables a step-by-step migration.
The process involves: 1) Adding a reverse proxy (YARP) in front of the APIs, 2) Migrating one endpoint at a time to the new .NET API, 3) Repeating until migration is complete.
The example uses a simple Express API with CRUD endpoints for products, connected to a Postgres database via Docker Compose.
YARP is used as a reverse proxy because it's native to .NET and has all necessary capabilities. The proxy hides the Node API from the outside world.
Install the YARP NuGet package, configure services with AddReverseProxy, load config from appsettings.json, and use MapReverseProxy. Routes and clusters define proxying rules and downstream servers.
After configuration, requests through the proxy (port 8080) return the same responses as before, with a 'served-by' header indicating the Node API.
Create a new ASP.NET Core Web API (products API) on port 5000, re-implement the Node endpoints using Npgsql and Dapper for Postgres access.
Define a new cluster for the .NET API and configure routes with an 'order' property (lower number = higher priority) to route specific endpoints to the new API.
By updating the YARP configuration to match all HTTP methods (GET, POST, PUT, DELETE) for the products route, all endpoints are served by the .NET API.
Once all endpoints are migrated, the legacy Node API can be removed, and the system runs entirely on .NET. Real-world migrations may use feature flags for more control.
The Strangler Fig pattern is an effective strategy for migrating legacy systems incrementally, reducing risk and allowing for a smooth transition. By using YARP as a reverse proxy, you can gradually shift traffic to a new .NET API until the old system is fully replaced.
What is the Strangler Fig pattern?
A pattern for incrementally migrating a legacy system by gradually replacing parts of it with new components, often using a reverse proxy to route traffic.
00:01
Why is a complete rewrite not recommended for migrating legacy APIs?
It takes considerable time and is error-prone.
00:29
What are the three main steps in the Strangler Fig migration process shown?
1) Add a reverse proxy, 2) Migrate one endpoint at a time to the new API, 3) Repeat until migration is complete.
00:56
What is YARP?
A reverse proxy library native to .NET, used to route requests to different backend services.
01:11
How do you configure YARP to route requests?
By defining routes and clusters in appsettings.json, and using AddReverseProxy and MapReverseProxy in the application setup.
04:20
What does the 'order' property in YARP routes do?
It sets the priority of a route; a lower number indicates higher priority.
09:43
How can you verify which API served a request through the proxy?
By adding a response header transformation, e.g., 'served-by', with the cluster name.
06:10
What libraries are used in the .NET API to connect to Postgres?
Npgsql for database connection and Dapper for executing SQL queries.
08:18
What is the final step after migrating all endpoints?
Remove the legacy API and update the reverse proxy to route all traffic to the new .NET API.
12:34
Strangler Fig Pattern Introduction
Establishes the core concept of incremental migration, which is the foundation of the entire video.
00:01Step-by-Step Migration Approach
Provides a clear, actionable plan that viewers can apply to their own migration projects.
00:56Using YARP as Reverse Proxy
Shows a practical tool choice that is native to .NET and simplifies the migration process.
03:08Route Priority with Order
Explains a key YARP feature that allows fine-grained control over which API handles specific requests.
09:43Completing the Migration
Demonstrates the final outcome and emphasizes the benefit of the pattern: a smooth, low-risk transition.
12:34[00:01] applications, right? Well, maybe not. So, in this video, I want to show you how we can use the Strangler Fig pattern to migrate our legacy APIs into modern .NET 10, and we can even use this to migrate from a different technology
[00:16] migrate from a different technology stack, like let's say a Node.js API into a .NET API. So, let me show you how. Let's say this is our starting point. We've got a Node API and a relational database, for example, Postgres, and we
[00:29] want to migrate this Node API into a .NET 10 API. Now, we can't do a complete rewrite as this would take a considerable amount of time and it would be error-prone. So, we want to do a step-by-step migration, and this is
[00:43] where the Strangler Fig pattern comes in. Now, everything I'm going to show you here also applies to something like a .NET Framework solution that you no longer want to maintain, and you want to migrate it into .NET 10. So, we're going
[00:56] to break this down into a couple of steps. Let me outline them here. First, we're going to add a reverse proxy in front of our APIs. For this, I'm going to be using YARP as it's native to .NET and it has all of the capabilities that
[01:11] we need to pull this off. Then, we want to migrate one endpoint from the Node API into a new .NET API that we're going to introduce, and then we effectively want to repeat this until the migration is complete. Let me just adjust this so
[01:27] these are the couple of steps that we're going to follow, but first, let me show you the Node API and how it works. As I wanted to keep this example simple, I've only got a simple Express API that connects to my Postgres database, and it
[01:42] exposes a couple of CRUD endpoints. So, we'll be working with some products database, and we've got endpoints for fetching the products, inserting new products, updating them, and deleting them. I've also got a simple Docker
[01:54] Compose file that's going to run my Postgres instance, and it's going to will create the required table and insert some dummy products inside. So, to run this, we need to do a docker compose up from the root directory. So,
[02:08] inside of my terminal, I'm going to say docker compose up. Now, this is going to run my post dress database and also scaffold my initial table structure. If we open up docker desktop, we'll be able to see our database running inside of a
[02:22] container and then in our node app, we can open up the terminal and I can say running this, you're also going to say npm install and this is going to spin up our node API on localhost 3000. Then I can jump into something like postman and
[02:38] calling localhost 3000 and specifying the correct endpoint is going to give us the desired result. So, I can fetch all the products. I can get a single product by specifying the product ID. So, if I send this, we'll get back the details.
[02:53] If I send an ID that doesn't exist, we'll get not found. If I want to create and we'll get the product ID in the response. And now if I send this we also got the put and delete endpoints. So, now we want to migrate
[03:08] this step-by-step using the strangler fig pattern. So, we first have to add a reverse proxy. This is going to slightly change our architecture from having just a node API and our database into this setup here where we've got a reverse
[03:22] proxy inside and our node API can now be hidden from the outside world. So, let's place a boundary here and any request coming into our system first lands on the reverse proxy and then it sends the respective request to our node API that
[03:36] actually serves the response. So, let me show you how we can implement this. I'll start from a blank Visual Studio solution and I'm going to add a new project here. I'm going to choose an ASP.NET Core Web API and I'm going to
[03:49] call this the reverse proxy. Let's click next. I won't be using HTTPS as we don't need it and I want to run this on .NET 10. Let me create this. This is going to scaffold my initial structure where we can basically get rid of everything
[04:04] except the basic setup needed to run this API. I'm also going to delete the scaffolded HTTP file and I want to update my launch settings to run this on port 8080 for example. Then we need to install our YARP proxy library. So let
[04:20] me look for the YARP NuGet package and I will install the latest version of YARP reverse proxy. So let's go ahead and add that. And how do we configure this? Well, we first need to configure some services. We'll say builder services add
[04:35] reverse proxy and we want to load this from a configuration section. We're appsettings.json and the config section name is going to be reverse proxy. Now I need to pass this in by saying builder configuration
[04:50] get section and pass in the respective section name. So that's part one. And then I just need to say map reverse proxy and we've turned our API into a reverse proxy using YARP. Of course we're missing the actual reverse proxy
[05:03] configuration. So I'm going to add this in my appsettings.development.json. Inside of this section we need two more configuration sections. Routes which is going to configure our proxying rules and clusters which configures our
[05:16] downstream servers. So for the first cluster going to define the node API and for this API I need to define the array of available destinations and then let's say this is destination one with the address being HTTP localhost and the
[05:32] address being HTTP localhost and the port is 3000. So let's call this all node to represent that they should target all node endpoints and we first need to give it a cluster ID. So here we're going to use node API which is
[05:45] what we called our cluster in the below configuration section. Then, we need to configure how we want to match these routes. And I'm going to match them by the path, where I'm just going to define a wildcard called catch all, as this
[05:58] will match any incoming request. Also, to allow us to more easily figure out which API served the response, I'm going to add a request transformation, and I
[06:10] want this to apply to the response header. Let's call this served by, and we're going to set the value to the name of our cluster, which is going to be node API. So, this should be all the configuration I need to use YARP as a
[06:23] reverse proxy in front of my node API. Let me run this by saying control F5, and this should start my reverse proxy on localhost 8080. And now we can try to test this out. So, inside of Postman, I'm just going to replace the port and
[06:37] we're getting back the same response as before, and we can also check if the response contains the served by header, and that is indeed the case, and you can see that the value is node API. So, now
[06:49] I'm going to just update all of these requests to use the 8080 port, which means they're going to be routed through our reverse proxy. And if we test out any of them, they should work just fine even when going through the proxy. If we
[07:04] that our requests are indeed being served through YARP. And this means that we can move into our next step, where we are going to introduce our .NET API. And what we do is we implement one endpoint from the node API inside of our .NET
[07:19] API, and then we configure YARP to route the request to the .NET API for this specific endpoint. And we effectively start implementing the Strangler Fig approach, where we move the functionality from our legacy system or
[07:33] system, and we keep repeating this step by step. So, let's go ahead and add our .NET API. Inside of Visual Studio, I'll go ahead and add a new project. I'll pick asp.net core web API. Let's call
[07:47] this the products API. I'll click next. I don't want to use HTTPS and then let's scaffold this. And for now, I'm going to close everything else down and let's clean up the scaffolded setup to get rid of everything we don't need. And I'm
[08:02] going to configure our .net API to run on port 5000 for example. Now, all we need to do is to migrate the existing functionality into our .net code. And in order to save us some time, I'm going to go ahead and just install the required
[08:18] go ahead and just install the required libraries, which are going to be mpgsql because we're using Postgres as our database. And I'll install Dapper for just quickly executing our SQL queries. And then I'm going to drop in all of the
[08:32] code that's needed to make this work. And let me walk you through what's going on here. So, we're going to create an mpgsql data source and basically re-implement the node functionality inside of our .net API. So, we've got
[08:45] minimal APIs for fetching the products, for fetching a single product, for creating a product, for updating the product, and deleting the product. Now, mind you that our API isn't publicly available until we expose it through our
[08:58] reverse proxy. So, let's see how we can do this inside of the YARP setup. The first thing we need to do is to define another cluster here. And I'm going to call this the .net API. And we're going to define the destinations. Let's say
[09:12] we've got a destination one just as in the previous example. And we're going to the previous example. And we're going to set the address to be HTTP localhost 5000. Now, how do we tell YARP or any other reverse proxy to route a specific
[09:26] request to our new API instance? Well, let's say I define a set of routes here that I'm going to call products read and I want them to use the cluster ID for the dot net API and also want them to take precedence over the matching node
[09:43] routes. So with YARP, we can do this by defining an order on the individual route level and a lower number indicates a higher priority. So for the dot net API, I'm going to specify an order of zero and for the node API, I'm going to
[09:57] specify an order of one. So now I need to just match the respective requests. So let's add match here. We'll use path to make them match. So to start, let's say I match just on the products route and nothing else and let's also add our
[10:12] response transform by configuring the transforms array and we're going to set transforms array and we're going to set the response header to be served by and we'll set the value as dot net API. Now mind you that the whole time my
[10:27] YARP proxy was still running behind the scenes and as I was making the updates trying to load them into my running instance. As soon as I have a valid configuration, it's going to be able to load it and I should be able to route my
[10:40] requests to my dot net API. So let's set it as the startup project. I'm going to run it and you can see it starts up on local host 5000 and now if I try to send a request to fetch all of the products, we get a response back but if you take a
[10:55] look at your response headers, you can see that this was served by our dot net API. However, if I try to fetch a single product, this is still served by our node API. So if I update the transformation to make a match by using
[11:10] a specific HTTP method, let's say we're targeting get and we want to expand this targeting get and we want to expand this to also have a catch all wild card so product ID in them, we should successfully match both product routes
[11:24] for fetching the products. We can confirm this by sending a request to fetch all the products. You can see we get a response back and it's also served by the .NET API. And if we fetch a single product through the proxy, we get
[11:36] a response back, and it's served by the .NET API. The create request is still being served by our Node API, so we can also migrate this. And I'm going to update the route to be products because it's not only for reading the products.
[11:51] And I'm just going to add the post HTTP method into my YARP configuration. And now I should be able to send this request again, and this time it's served .NET API. We get the same response. The product ID is now six. I can send a
[12:05] request for that here. That also returns 200 OK, and it's served by the .NET API. So, let's update this to also target the put and delete HTTP methods, and we're going to save this. And now I should be able to send an update request for a
[12:20] specific product, and you can see that this is also served by the .NET API. And let's try deleting a product with an ID of six, for example, and this is also served by the .NET API. At this point, we've completed our migration, and we
[12:34] can decide what we want to do with the legacy system. For example, I can just delete the routing code from my YARP configuration, and move everything into our new system, which is our .NET API. So, at this point, we've completed our
[12:47] third and final step. At this point, we can, for example, remove our Node API from the system and have everything flowing to our new API, which is running .NET. And hopefully, you now understand how you can apply the strangler effect
[13:00] pattern to a larger system. Obviously, a real-world migration is going to be more complicated. You will probably be using feature flags to manage which APIs are currently exposed, and I'm going to also leave some documentation for you in the
[13:12] description of this video if you want to learn more about the strangler effect further and learn how you can use feature flags, I recommend taking a look at this video next, where I show you some interesting and usages for feature
[13:27] flags in .NET. If you like this video, consider gently tapping the like button. Thanks a lot for watching, and until next time, stay awesome.


⚡ Saved you 0h 13m reading this? Transcribe any YouTube video for free — no signup needed.