
The Magic of Smart Objects
47sViewers are immediately hooked by the idea of editing once and seeing updates everywhere, a powerful Photoshop trick.
▶ Play Clip"The title promises a tutorial on book cover templates and delivers exactly that, with a clear demonstration of smart objects and practical tips."
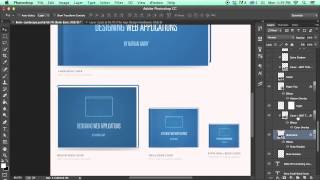
This video demonstrates how to create reusable book cover templates in Adobe Photoshop using smart objects. The creator explains how smart objects allow for centralized editing, where changes to a single source file automatically update across multiple instances in the document, and shows how to add realistic details like gloss, highlights, and shadows.
The video starts by showing how to use smart objects in Photoshop for book cover templates. Command-clicking on a layer reveals the smart object, which can be edited by double-clicking and opening it in a separate PSB document.
The smart object content is saved in a PSB file but treated separately. Changes made to the smart object, like hiding or showing layers, are saved with Command-S and automatically update in the main document.
The creator shows how to add gloss, spine highlights, and shadows to the flat design. These layers are clipped to the cover outline, and toggling them on/off changes the appearance. The advantage is that non-experts only need to edit the smart object to update the cover.
The back cover uses the same smart object to match the book color. A 10% black overlay is applied to the back cover to make it slightly darker than the front, ensuring color consistency regardless of the chosen color.
The creator demonstrates creating a new document (1000 pixels square), adding a shape, converting it to a smart object, and editing it. Changes to the smart object update all instances, allowing for multiple scaled or transformed copies.
The recommended workflow is to create one template, starting with the largest size, then add highlights, shadows, and details around the outside, but not on the cover itself, since those are handled by the smart object.
The video provides a clear, practical guide to using smart objects for efficient book cover template creation in Photoshop, emphasizing the benefits of centralized editing and the ability to create multiple variations from a single source.
What is a smart object in Photoshop?
A smart object is a layer that contains image data from a separate file (PSB), allowing non-destructive editing and automatic updates across multiple instances.
How do you edit a smart object?
Double-click the smart object layer, click OK, and it opens in a new PSB document where you can edit the content. Save with Command-S to update the main document.
00:17
What is the advantage of using smart objects for book cover templates?
Non-experts can edit only the smart object (text, icon, color) and save, and the cover updates automatically with realistic details like gloss and shadows already applied.
01:34
How is the back cover color matched to the front?
The same smart object is used on the back cover, and a 10% black overlay is applied to make it slightly darker than the front.
03:08
What is the recommended workflow for creating a book cover template?
Create one template, starting with the largest size, then add highlights, shadows, and details around the outside, but not on the cover itself.
06:28
Smart Objects for Templates
Explains the core concept of using smart objects to create reusable templates, which is a fundamental technique for efficient design.
Ease of Use for Non-Experts
Highlights the practical benefit of smart objects: allowing non-designers to update covers without breaking the design.
01:34Color Matching with Overlay
Shows a clever use of a color overlay to ensure the back cover matches the front while being slightly darker.
03:08Centralized Updates
Demonstrates that changing one smart object updates all instances, saving time and ensuring consistency.
06:15[00:00] Alright, I'll show you how to make different book cover templates or things like that. Basically it's using smart objects. And so if you command click on any of these, you can find what I labeled as a cover and it says edit this.
[00:17] So that's actually the smart object, that little icon indicates the smart object. When you double click, and click OK. And so all of this, you see it opens in another document called rare2.psb.
[00:33] And so it saves all of this within this PSB, but it's still kind of treated separately. So because it's a slide object, I can tweak any of this. So I hide this, and now I'm showing my other book cover.
[00:47] Command-S to save. Unlock extension saving. Tab over to my other document. and then you can see that those have all updated live. So all of this is actually the exact same
[01:00] smart object I just duplicated it and then scaled it down. So what you can do well I'll show you how to do that in a second but right now I want to show you what else goes into making one of these
[01:16] book covers. So take a look at this medium size you know we've got gloss, we've got all this around here and so taking this flat design in the slide object and adding lights to it and the advantages to this
[01:34] is that someone who doesn know what they doing they only have to edit the smart object you know throw in a click icon some text and save it And it comes out looking pretty good So if you command click on the smart object here you can just start turning off layers
[01:51] So you toggle this cover gloss layer and you can see that this little bit of gloss shows and hides. And the spine highlight, you know that, is adding a highlight right across there.
[02:04] and the spine shadow is doing the other thing. So if you turn off the highlight and the shadow, then it's just flat and we don't have a spine at all anymore. Now you can see that all of these layers are clipped to the cover outline.
[02:22] And that, so you know, if I were to unclip them, you can see that they now stick out. You know, and the spine is too tall and everything, so I'm going to undo that. Okay, so that's part of it. I'm going to hide all those layers. Now you can see there's another cover behind here as well.
[02:40] And the reason for that is that's actually the back of the book, which you can show and hide there. And you can see it has another of that same smart object clip through it. So if I show and hide that, you can see the color changes.
[02:52] The reason why I have the smart object twice is I want the book color, I want to get that same color of the book on that back image. image. Now you can also see I have a color overlay on this on the back one
[03:08] with a 10% black overlay and so what that's doing is that's making it so that let me turn this back on so that my back you know my back cover of the book matches the color of the front but then is 10 dark So that way you know no matter what color they put in here into the
[03:32] small dog, even if we do something, um, let's do a new layer and go with pure white, save that. My computer's being a little slow right now. Well, that didn't come out quite as well as I'd like
[03:47] just pure white but the idea is you know whether the blue or the red it comes out looking looking good and it updates in every place that's why it updates
[04:00] twice there. Other things you know looking through this medium book folder which is this one you'll notice that well first there's a shadow on the book
[04:13] that's down at the bottom and that's pretty much it. I've got two different full pages I've got two layers for that and they've got a little pattern overlay
[04:25] on them and I'll show you that so it's just a pattern to create that right there but what you'll notice is that there's no layers in here related to you
[04:38] the text in the book, the icon, the name, because those are all inside the smart object. Alright, hopefully that overview makes sense. I'm going to create a new document, 1000 pixels
[04:52] square and what I can do is create a new shape and then set that up there and I can there and I can just right click where did it go Oh convert to smart object right there
[05:09] And now when I double click on it, it opens in that new layer. I can fill it with, I'll make it obvious, I'll fill it with red.
[05:21] There we go. And when I save it, that's going to update. Well, and I'll add some other things.
[05:33] This is going to be really ugly, but that's okay. So we'll save that, you can see that that's updated. And then, I'm going to call this edit this, because it's part of the template, and I'm going to duplicate it.
[05:45] And I can drag it to a new position and then scale it down. I could also do some other things, like I could change the perspective. There we go. So now I've got these two here.
[05:57] And again, when I come over to here, change this color to blue, save, both of those changed. So I can make any template that I wanted and, you know, have more of these really at any size.
[06:15] And when I change one, it's going to change them all. All right. So then what you would do is you create one template like this.
[06:28] I always do the big one first and then right here. So then I would go through and add a highlight and shadow and I would add all the details around the outside but none for the cover itself.
[06:42] Hopefully that makes sense. Let me know if you have any questions.



⚡ Saved you 0h 06m reading this? Transcribe any YouTube video for free — no signup needed.